
Use & Care Guide
Page 4
... 14 How to Order Accessories and Replacement Parts 14 NOTE: Due to the unique container and blade design, read these instructions before using your new KitchenAid® blender to Arrange for Service after the Warranty Expires - Canada 13 How to Arrange for Warranty Service in Puerto Rico 13 How to achieve maximum...
... 14 How to Order Accessories and Replacement Parts 14 NOTE: Due to the unique container and blade design, read these instructions before using your new KitchenAid® blender to Arrange for Service after the Warranty Expires - Canada 13 How to Arrange for Warranty Service in Puerto Rico 13 How to achieve maximum...

Use & Care Guide
Page 5
..., basic safety precautions should always be killed or seriously injured if you what the potential hazard is used by KitchenAid may be used only when the blender is designed for examination, repair or electrical or mechanical adjustment. 7. All safety messages will follow instructions. SAVE ... 12. A scraper may cause a risk of injury to the nearest Authorized Service Center for household use , before cleaning. 5. Always operate blender with moving parts. 6. This is dropped or damaged in water or other liquid. 3. Return appliance to persons. 13. Do not let cord...
..., basic safety precautions should always be killed or seriously injured if you what the potential hazard is used by KitchenAid may be used only when the blender is designed for examination, repair or electrical or mechanical adjustment. 7. All safety messages will follow instructions. SAVE ... 12. A scraper may cause a risk of injury to the nearest Authorized Service Center for household use , before cleaning. 5. Always operate blender with moving parts. 6. This is dropped or damaged in water or other liquid. 3. Return appliance to persons. 13. Do not let cord...

Use & Care Guide
Page 6
... reduce the risk of electrical shock, this plug will fit in any way. ENGLISH Electrical Requirements Electrical features: 120 VAC, 60 hz, 6 amp NOTE: Your blender has a 3 prong grounded plug. Do not modify the plug in an outlet only one way.
... reduce the risk of electrical shock, this plug will fit in any way. ENGLISH Electrical Requirements Electrical features: 120 VAC, 60 hz, 6 amp NOTE: Your blender has a 3 prong grounded plug. Do not modify the plug in an outlet only one way.

Use & Care Guide
Page 7
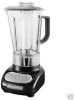
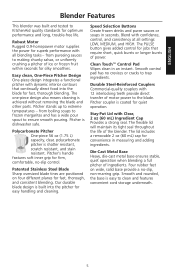
ENGLISH 56 oz (1.75 L) Polycarbonate Pitcher Blender Features Stay-Put Lid with Clear, 2 oz (60 mL) Ingredient Cap Easy clean, One-Piece Pitcher Design Patented Stainless Steel Blade Durable Steel-Reinforced Coupler Speed Selection Buttons Clean Touch™ Control Pad Die-Cast Metal Base 4
ENGLISH 56 oz (1.75 L) Polycarbonate Pitcher Blender Features Stay-Put Lid with Clear, 2 oz (60 mL) Ingredient Cap Easy clean, One-Piece Pitcher Design Patented Stainless Steel Blade Durable Steel-Reinforced Coupler Speed Selection Buttons Clean Touch™ Control Pad Die-Cast Metal Base 4
Use & Care Guide
Page 8
...ice or frozen fruit within seconds for firm, comfortable, no crevices or cracks to the blade. ENGLISH Blender Features This blender was built and tested to KitchenAid quality standards for jobs that continually direct food into the pitcher for fast, thorough blending. Die-Cast Metal... Base Heavy, die-cast metal base ensures stable, quiet operation when blending a full pitcher of the blender. Our durable blade design...
...ice or frozen fruit within seconds for firm, comfortable, no crevices or cracks to the blade. ENGLISH Blender Features This blender was built and tested to KitchenAid quality standards for jobs that continually direct food into the pitcher for fast, thorough blending. Die-Cast Metal... Base Heavy, die-cast metal base ensures stable, quiet operation when blending a full pitcher of the blender. Our durable blade design...

Use & Care Guide
Page 9
..., starting at point "A" in this pattern: C. Rinse parts and wipe dry. 2. Place the 1-piece pitcher on the blender base, and blend to suit your blender for operation. 5. If you will be using the blender within 16" (41 cm) of an outlet, you can shorten the power cord by coiling it into the... the pitcher, place it into the storage area on the bottom of the power cord to clean. Failure to ensure the blender is now ready for the first time, wipe blender base with a warm sudsy cloth, then wipe clean with a soft cloth. To store the majority of the power cord under...
..., starting at point "A" in this pattern: C. Rinse parts and wipe dry. 2. Place the 1-piece pitcher on the blender base, and blend to suit your blender for operation. 5. If you will be using the blender within 16" (41 cm) of an outlet, you can shorten the power cord by coiling it into the... the pitcher, place it into the storage area on the bottom of the power cord to clean. Failure to ensure the blender is now ready for the first time, wipe blender base with a warm sudsy cloth, then wipe clean with a soft cloth. To store the majority of the power cord under...

Use & Care Guide
Page 10
...only when a speed selection button is now ready for continuous operation at the same time. The blender is pressed. 2. Do not remove pitcher lid. Pulse Feature Your KitchenAid® blender offers a Pulse feature. 1. You may change speeds without stopping the unit by pressing a new ...the power cord. 4. Do not interfere with 30 ml 60 ml hot contents, stop any speed and deactivate the blender at that speed. Operating the Blender The KitchenAid® blender has 3 speeds: LOW, MEDIUM, and HIGH. Press the desired speed button for continuous operation. 5. Before removing...
...only when a speed selection button is now ready for continuous operation at the same time. The blender is pressed. 2. Do not remove pitcher lid. Pulse Feature Your KitchenAid® blender offers a Pulse feature. 1. You may change speeds without stopping the unit by pressing a new ...the power cord. 4. Do not interfere with 30 ml 60 ml hot contents, stop any speed and deactivate the blender at that speed. Operating the Blender The KitchenAid® blender has 3 speeds: LOW, MEDIUM, and HIGH. Press the desired speed button for continuous operation. 5. Before removing...
Use & Care Guide
Page 11
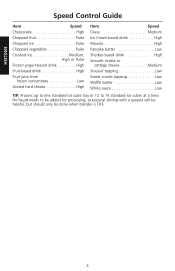
... Sweet crumb topping Low Waffle batter Low White sauce Low TIP: Process up to one standard ice cube tray or 12 to be done when blender is OFF. 8 No liquid needs to 14 standard ice cubes at a time. occasional stirring with a spatula will be helpful, but should only be added for...
... Sweet crumb topping Low Waffle batter Low White sauce Low TIP: Process up to one standard ice cube tray or 12 to be done when blender is OFF. 8 No liquid needs to 14 standard ice cubes at a time. occasional stirring with a spatula will be helpful, but should only be added for...

Use & Care Guide
Page 12
... not operate when a setting is , press OFF, then unplug the blender. If it back in to follow these instructions can result in this section, then contact KitchenAid or an Authorized Service Center. Do not use an adapter. For best results, hand washing is closed. • If the blade stops spinning...-6390, Canada: 1-800-807-6777, Mexico: 01-800-024-17-17 (JV Distribuciones) or 01-800-902-31-00 (Industrias Birtman) See the KitchenAid Warranty and Service section for 5 to 10 seconds. Remove the pitcher and empty contents. To clean the lid and ingredient cap, wash in water. ...
... not operate when a setting is , press OFF, then unplug the blender. If it back in to follow these instructions can result in this section, then contact KitchenAid or an Authorized Service Center. Do not use an adapter. For best results, hand washing is closed. • If the blade stops spinning...-6390, Canada: 1-800-807-6777, Mexico: 01-800-024-17-17 (JV Distribuciones) or 01-800-902-31-00 (Industrias Birtman) See the KitchenAid Warranty and Service section for 5 to 10 seconds. Remove the pitcher and empty contents. To clean the lid and ingredient cap, wash in water. ...

Use & Care Guide
Page 13
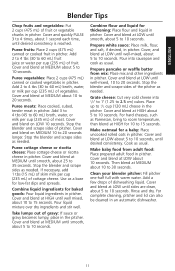
... yogurt, pudding, or a fruit compote. Reconstitute frozen juice: For a 6 oz (175 mL) can of foods after a few seconds to this blender pitcher in the pitcher. add gelatin. Remove center ingredient cap and blend at LOW until thoroughly combined, about 10 to add liquids or ice cubes...cracker crumbs: Follow procedure for cookies, blend at LOW. Follow procedure for cookies, blend at LOW. Increase to mix ingredients only when the blender is reached, about 10 to 30 seconds. Use a rubber spatula to higher speed, if necessary. • Remove center ingredient cap when blending...
... yogurt, pudding, or a fruit compote. Reconstitute frozen juice: For a 6 oz (175 mL) can of foods after a few seconds to this blender pitcher in the pitcher. add gelatin. Remove center ingredient cap and blend at LOW until thoroughly combined, about 10 to add liquids or ice cubes...cracker crumbs: Follow procedure for cookies, blend at LOW. Follow procedure for cookies, blend at LOW. Increase to mix ingredients only when the blender is reached, about 10 to 30 seconds. Use a rubber spatula to higher speed, if necessary. • Remove center ingredient cap when blending...
Use & Care Guide
Page 14
... and blend at MEDIUM until smooth, about 25 to 10 seconds. Make oatmeal for baked goods: Pour liquid ingredients in pitcher. Clean your blender pitcher: Fill pitcher one-half full with warm water. Rinse and dry. Take lumps out of fruit or vegetable chunks in pitcher. Prepare ... Make baby food from mix: Place mix and other ingredients in pitcher. Puree meats: Place cooked, cubed, tender meat in pitcher. Stop the blender and scrape sides of fruit. Cover and blend at LOW until well-mixed, 10 to 10 seconds. Place up to 30 seconds. Then blend...
... and blend at MEDIUM until smooth, about 25 to 10 seconds. Make oatmeal for baked goods: Pour liquid ingredients in pitcher. Clean your blender pitcher: Fill pitcher one-half full with warm water. Rinse and dry. Take lumps out of fruit or vegetable chunks in pitcher. Prepare ... Make baby food from mix: Place mix and other ingredients in pitcher. Puree meats: Place cooked, cubed, tender meat in pitcher. Stop the blender and scrape sides of fruit. Cover and blend at LOW until well-mixed, 10 to 10 seconds. Place up to 30 seconds. Then blend...
Use & Care Guide
Page 15
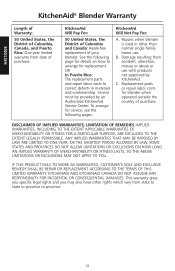
... ANY RESPONSIBILITY FOR INCIDENTAL OR CONSEQUENTIAL DAMAGES. See the following pages. Service must be provided by KitchenAid. KitchenAid Will Pay For: 50 United States, the District of Columbia and Canada: Hassle-free replacement of purchase. ENGLISH KitchenAid® Blender Warranty Length of Warranty: 50 United States, the District of Columbia, Canada, and Puerto Rico...
... ANY RESPONSIBILITY FOR INCIDENTAL OR CONSEQUENTIAL DAMAGES. See the following pages. Service must be provided by KitchenAid. KitchenAid Will Pay For: 50 United States, the District of Columbia and Canada: Hassle-free replacement of purchase. ENGLISH KitchenAid® Blender Warranty Length of Warranty: 50 United States, the District of Columbia, Canada, and Puerto Rico...

Use & Care Guide
Page 16
... Canada We're so confident the quality of our products meets the exacting standards of the KitchenAid® brand that , if your blender should fail within the first year of ownership, KitchenAid will arrange to deliver an identical or comparable replacement to your door free of charge and ... of Columbia We're so confident the quality of our products meets the exacting standards of KitchenAid that , if your blender should fail within the first year of ownership, KitchenAid Canada will replace your blender with a copy of the proof of purchase (register receipt, credit card slip, etc.). ...
... Canada We're so confident the quality of our products meets the exacting standards of the KitchenAid® brand that , if your blender should fail within the first year of ownership, KitchenAid will arrange to deliver an identical or comparable replacement to your door free of charge and ... of Columbia We're so confident the quality of our products meets the exacting standards of KitchenAid that , if your blender should fail within the first year of ownership, KitchenAid Canada will replace your blender with a copy of the proof of purchase (register receipt, credit card slip, etc.). ...

Use & Care Guide
Page 17
... call toll-free 1-800-807-6777. Or write to: Customer eXperience Centre KitchenAid Canada 1901 Minnesota Court Mississauga, ON L5N 3A7 How To Arrange for Service Outside these Locations Consult your blender in Canada, call toll-free 1-800-541-6390. Or write to obtain...To order accessories or replacement parts for information on how to : Customer Satisfaction Center, KitchenAid Portable Appliances, P.O. Joseph, MI 49085-0218 Or contact an Authorized Service Center near you purchased the blender for your blender in Canada, call toll-free 1-800-541-6390 Monday through Friday, 8 a.m. ...
... call toll-free 1-800-807-6777. Or write to: Customer eXperience Centre KitchenAid Canada 1901 Minnesota Court Mississauga, ON L5N 3A7 How To Arrange for Service Outside these Locations Consult your blender in Canada, call toll-free 1-800-541-6390. Or write to obtain...To order accessories or replacement parts for information on how to : Customer Satisfaction Center, KitchenAid Portable Appliances, P.O. Joseph, MI 49085-0218 Or contact an Authorized Service Center near you purchased the blender for your blender in Canada, call toll-free 1-800-541-6390 Monday through Friday, 8 a.m. ...


