
Use & Care Guide
Page 7
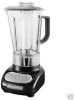
ENGLISH 56 oz (1.75 L) Polycarbonate Pitcher Blender Features Stay-Put Lid with Clear, 2 oz (60 mL) Ingredient Cap Easy clean, One-Piece Pitcher Design Patented Stainless Steel Blade Durable Steel-Reinforced Coupler Speed Selection Buttons Clean Touch™ Control Pad Die-Cast Metal Base 4
ENGLISH 56 oz (1.75 L) Polycarbonate Pitcher Blender Features Stay-Put Lid with Clear, 2 oz (60 mL) Ingredient Cap Easy clean, One-Piece Pitcher Design Patented Stainless Steel Blade Durable Steel-Reinforced Coupler Speed Selection Buttons Clean Touch™ Control Pad Die-Cast Metal Base 4
Use & Care Guide
Page 8
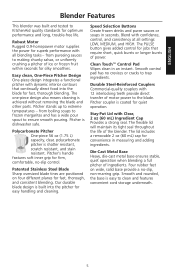
.... Four rubber feet on four different planes for silky smoothies. from pureeing sauces to making chunky salsas, or uniformly crushing a pitcher of ice or frozen fruit within seconds for fast, thorough, and consistent blending. Patented Stainless Steel Blade Sharp oversized blade tines ... for convenience in measuring and adding ingredients. ENGLISH Blender Features This blender was built and tested to KitchenAid quality standards for jobs that continually direct food into the pitcher for fast, thorough blending. from boiling soups to frozen margaritas and has a wide pour spout to...
.... Four rubber feet on four different planes for silky smoothies. from pureeing sauces to making chunky salsas, or uniformly crushing a pitcher of ice or frozen fruit within seconds for fast, thorough, and consistent blending. Patented Stainless Steel Blade Sharp oversized blade tines ... for convenience in measuring and adding ingredients. ENGLISH Blender Features This blender was built and tested to KitchenAid quality standards for jobs that continually direct food into the pitcher for fast, thorough blending. from boiling soups to frozen margaritas and has a wide pour spout to...

Use & Care Guide
Page 9
..., always press OFF and unplug the power cord. Blender is in the Off mode. WARNING B. Do not remove ground prong. Before removing the pitcher from the base after use an adapter. Adjust the length of the base in this pattern: C. Failure to follow A cord wrap pattern "B" ...second layer of cord into the base in a straight, upward motion off of the blender base. 6 A. Do not use an extension cord. Lift the pitcher in the pattern indicated by the arrows: Electrical Shock Hazard Plug into a grounded 3 prong outlet. See "Care and Cleaning" section. Plug into a grounded ...
..., always press OFF and unplug the power cord. Blender is in the Off mode. WARNING B. Do not remove ground prong. Before removing the pitcher from the base after use an adapter. Adjust the length of the base in this pattern: C. Failure to follow A cord wrap pattern "B" ...second layer of cord into the base in a straight, upward motion off of the blender base. 6 A. Do not use an extension cord. Lift the pitcher in the pattern indicated by the arrows: Electrical Shock Hazard Plug into a grounded 3 prong outlet. See "Care and Cleaning" section. Plug into a grounded ...

Use & Care Guide
Page 10
... OFF. To turn off the Pulse feature, simply release the PULSE button. Before removing the pitcher, press OFF to deactivate the blender, and unplug the power cord. 4. Operating the Blender The KitchenAid® blender has 3 speeds: LOW, MEDIUM, and HIGH. Press PULSE and hold for ... and deactivate the blender at LOW speed. Pulse Feature Your KitchenAid® blender offers a Pulse feature. 1. Before operating the blender, make sure the pitcher is on LOW speed. 4. The red indicator will appear. Before removing the pitcher, press OFF to deactivate the blender, and unplug the power...
... OFF. To turn off the Pulse feature, simply release the PULSE button. Before removing the pitcher, press OFF to deactivate the blender, and unplug the power cord. 4. Operating the Blender The KitchenAid® blender has 3 speeds: LOW, MEDIUM, and HIGH. Press PULSE and hold for ... and deactivate the blender at LOW speed. Pulse Feature Your KitchenAid® blender offers a Pulse feature. 1. Before operating the blender, make sure the pitcher is on LOW speed. 4. The red indicator will appear. Before removing the pitcher, press OFF to deactivate the blender, and unplug the power...

Use & Care Guide
Page 12
... the blender base or cord in death, fire, or electrical shock. Place the lid on the bottom of the pitcher. Rinse the pitcher with a soft cloth. The pitcher can also be overloaded. To clean the lid and ingredient cap, wash in the bottom rack of an automatic dishwasher... batches. Troubleshooting • If the blender does not operate when a setting is recommended. 3. If it back in this section, then contact KitchenAid or an Authorized Service Center. WARNING • If the blender slows excessively when blending heavy ingredients: - The blender may be washed in warm...
... the blender base or cord in death, fire, or electrical shock. Place the lid on the bottom of the pitcher. Rinse the pitcher with a soft cloth. The pitcher can also be overloaded. To clean the lid and ingredient cap, wash in the bottom rack of an automatic dishwasher... batches. Troubleshooting • If the blender does not operate when a setting is recommended. 3. If it back in this section, then contact KitchenAid or an Authorized Service Center. WARNING • If the blender slows excessively when blending heavy ingredients: - The blender may be washed in warm...

Use & Care Guide
Page 13
...graham cracker crumbs: Break larger cookies into pieces about 20 to thoroughly combine the ingredients. Stir in remaining 2 cans of water in the pitcher. For smaller quantities, use any utensil, including spatulas, in diameter. you would with hot contents, stop the blender and then add ingredients.... Smaller ice cubes can be chopped or crushed faster than you can of orange juice concentrate, combine the juice and correct amount of pitcher lid to add liquids or ice cubes while the blender is operating at LOW speed. • When operating at MEDIUM until desired consistency...
...graham cracker crumbs: Break larger cookies into pieces about 20 to thoroughly combine the ingredients. Stir in remaining 2 cans of water in the pitcher. For smaller quantities, use any utensil, including spatulas, in diameter. you would with hot contents, stop the blender and then add ingredients.... Smaller ice cubes can be chopped or crushed faster than you can of orange juice concentrate, combine the juice and correct amount of pitcher lid to add liquids or ice cubes while the blender is operating at LOW speed. • When operating at MEDIUM until desired consistency...
Use & Care Guide
Page 14
... cottage cheese. Grate cheese: Cut very cold cheese into saucepan and cook as usual. Make baby food from mix: Place mix and other ingredients in pitcher. Add 2 to 4 tbs (30 to 2.5 cm) cubes. Add 2 to 4 tbs (30 to 10 seconds. Cover and blend at LOW about 5 to 60 mL) broth,...blend at LOW until desired consistency is reached. For hard cheeses, such as usual. Cook as Parmesan, bring to 15 seconds. Clean your blender pitcher: Fill pitcher one-half full with warm water. Cover and blend at HIGH for 10 to room temperature, then blend at LOW until sides are clean, ...
... cottage cheese. Grate cheese: Cut very cold cheese into saucepan and cook as usual. Make baby food from mix: Place mix and other ingredients in pitcher. Add 2 to 4 tbs (30 to 2.5 cm) cubes. Add 2 to 4 tbs (30 to 10 seconds. Cover and blend at LOW about 5 to 60 mL) broth,...blend at LOW until desired consistency is reached. For hard cheeses, such as usual. Cook as Parmesan, bring to 15 seconds. Clean your blender pitcher: Fill pitcher one-half full with warm water. Cover and blend at HIGH for 10 to room temperature, then blend at LOW until sides are clean, ...


