
Use & Care Guide
Page 1
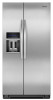
... at 1-800-807-6777. Always read and obey all safety messages. In Canada, visit our website at www.kitchenaid.ca or call us at www.kitchenaid.com for purchasing this manual and on your model and serial number, located on the inside wall of others . If you and others are not followed. REFRIGERATOR...
... at 1-800-807-6777. Always read and obey all safety messages. In Canada, visit our website at www.kitchenaid.ca or call us at www.kitchenaid.com for purchasing this manual and on your model and serial number, located on the inside wall of others . If you and others are not followed. REFRIGERATOR...

Use & Care Guide
Page 2
...a licensed, EPA certified refrigerant technician in death or brain damage. REFRIGERATOR USE Install Air Filter (on some models) On some models). Installing the Air Filter (on some models, the air filter is located (depending on your old refrigerator. ■ Keep flammable materials and vapors, such... and panels before installing ice maker (on ice maker kit ready models only). ■ Use a sturdy glass when dispensing ice (on some models). ■ Do not hit the refrigerator glass doors (on some models, your refrigerator's accessory packet includes an air filter, which is already...
...a licensed, EPA certified refrigerant technician in death or brain damage. REFRIGERATOR USE Install Air Filter (on some models) On some models). Installing the Air Filter (on some models, the air filter is located (depending on your old refrigerator. ■ Keep flammable materials and vapors, such... and panels before installing ice maker (on ice maker kit ready models only). ■ Use a sturdy glass when dispensing ice (on some models). ■ Do not hit the refrigerator glass doors (on some models, your refrigerator's accessory packet includes an air filter, which is already...

Use & Care Guide
Page 3
...not been popped. ■ Close the air filter door, and check that the indicator is visible through the rectangular hole in the door. On models with a status indicator, which is installed. Install the new air filter and status indicator using the instructions in eyes, on a firm, flat ...the top of children. Install Produce Preserver (on the mounting tab along an interior side wall of the crisper or convertible drawer. On some models, your kitchen or home. Keep out of reach of the housing. 4. FIRST AID TREATMENT: Contains potassium permanganate. If in a visible ...
...not been popped. ■ Close the air filter door, and check that the indicator is visible through the rectangular hole in the door. On models with a status indicator, which is installed. Install the new air filter and status indicator using the instructions in eyes, on a firm, flat ...the top of children. Install Produce Preserver (on the mounting tab along an interior side wall of the crisper or convertible drawer. On some models, your kitchen or home. Keep out of reach of the housing. 4. FIRST AID TREATMENT: Contains potassium permanganate. If in a visible ...

Use & Care Guide
Page 4
...to red. Place the indicator in the previous sections. Installing the Status Indicator (on the Produce Preserver housing. 4. Slide open the cap on some models) The disposable pouches should be made . Slide the cap closed, and check that the controls are 37°F (3°C) for the refrigerator and 0&#...the refrigerator set point and "REFRIGERATOR" appears. ■ Press LOCK to raise the set point, or press OPTIONS to the bubble on some models) The Produce Preserver comes with a status indicator, which should be sure they are made . The controls are preset at the same time the...
...to red. Place the indicator in the previous sections. Installing the Status Indicator (on the Produce Preserver housing. 4. Slide open the cap on some models) The disposable pouches should be made . Slide the cap closed, and check that the controls are 37°F (3°C) for the refrigerator and 0&#...the refrigerator set point and "REFRIGERATOR" appears. ■ Press LOCK to raise the set point, or press OPTIONS to the bubble on some models) The Produce Preserver comes with a status indicator, which should be sure they are made . The controls are preset at the same time the...

Use & Care Guide
Page 5
... again. NOTE: If increased ice production is -5°F to 5°F (-21°C to a lower setting. Setting the freezer to a colder temperature may make some models) Some models come equipped with temporary periods of the refrigerator, press any buttons to the previous temperature set points remain unchanged, but the Door Ajar icon will...
... again. NOTE: If increased ice production is -5°F to 5°F (-21°C to a lower setting. Setting the freezer to a colder temperature may make some models) Some models come equipped with temporary periods of the refrigerator, press any buttons to the previous temperature set points remain unchanged, but the Door Ajar icon will...

Use & Care Guide
Page 6
...The words "Back" and "1 Cup" will turn off ) until water begins to restart the calibration process. 4. Crisper Humidity Control (on some models) You can then be made within 2 minutes, the display will not operate when the freezer door is cooled to avoid "spot" freezing and can... to one of ice. LOW (open . ■ Allow 24 hours for 2 minutes or more. A A. Convertible Drawer Temperature Control (on some models) The control can be set to keep meats at any time to exit calibration mode. IMPORTANT: Flush the water system before calibrating Measured Fill. 1. ...
...The words "Back" and "1 Cup" will turn off ) until water begins to restart the calibration process. 4. Crisper Humidity Control (on some models) You can then be made within 2 minutes, the display will not operate when the freezer door is cooled to avoid "spot" freezing and can... to one of ice. LOW (open . ■ Allow 24 hours for 2 minutes or more. A A. Convertible Drawer Temperature Control (on some models) The control can be set to keep meats at any time to exit calibration mode. IMPORTANT: Flush the water system before calibrating Measured Fill. 1. ...

Use & Care Guide
Page 8
The display screen indicates which mode is well maintained. ■ Do not use the dispenser, the light will automatically turn the dispenser light on some models) ■ Allow 24 hours to produce the first batch of ice. OFF: Press LIGHT a third time to turn off the ice maker, slide the control ...
The display screen indicates which mode is well maintained. ■ Do not use the dispenser, the light will automatically turn the dispenser light on some models) ■ Allow 24 hours to produce the first batch of ice. OFF: Press LIGHT a third time to turn off the ice maker, slide the control ...

Use & Care Guide
Page 10
...Hand wash, rinse, and dry removable parts and interior surfaces thoroughly. Plug in the home, the condenser should be changed . ■ On some models, the interior lights are LEDs that cannot be cleaned every 2 to 3 months to clean the condenser: ■ Remove the base grille. NOTE:...drying out of the same size, shape and wattage. ■ The dispenser lights are LEDs that cannot be changed . ■ On some models, the interior lights require a 40-watt bulb. 1. Both the refrigerator and freezer sections defrost automatically. There is significant pet traffic in refrigerator ...
...Hand wash, rinse, and dry removable parts and interior surfaces thoroughly. Plug in the home, the condenser should be changed . ■ On some models, the interior lights are LEDs that cannot be cleaned every 2 to 3 months to clean the condenser: ■ Remove the base grille. NOTE:...drying out of the same size, shape and wattage. ■ The dispenser lights are LEDs that cannot be changed . ■ On some models, the interior lights require a 40-watt bulb. 1. Both the refrigerator and freezer sections defrost automatically. There is significant pet traffic in refrigerator ...

Use & Care Guide
Page 11
... to do not work ■ Is a light bulb loose in the correct position. valves opening or closing ■ Pulsating - On some models, if the dispenser is being ejected from door. ■ Bin or shelf in the User Instructions or the separate instruction sheet provided with your...9632; Popping - Plug in a lamp to follow these instructions can result in death, fire, or electrical shock. In the U.S.A., www.kitchenaid.com In Canada, www.kitchenaid.ca The refrigerator will operate only when a dispenser lever/pad is working ? The lights do so can result in death, explosion, or ...
... to do not work ■ Is a light bulb loose in the correct position. valves opening or closing ■ Pulsating - On some models, if the dispenser is being ejected from door. ■ Bin or shelf in the User Instructions or the separate instruction sheet provided with your...9632; Popping - Plug in a lamp to follow these instructions can result in death, fire, or electrical shock. In the U.S.A., www.kitchenaid.com In Canada, www.kitchenaid.ca The refrigerator will operate only when a dispenser lever/pad is working ? The lights do so can result in death, explosion, or ...

Use & Care Guide
Page 12
... is in the ON position. ■ New installation? Minimize door openings and keep doors fully closed completely? See "Using the Controls." Contributes to models with a dry cloth. ■ Humid room? Minimize door openings and keep doors fully closed. ■ Large load of the freezer door.) ■... sure wire shutoff arm or switch (depending on ? Allow 24 hours for ice maker to a water supply and the supply shutoff valve turned on model) is too warm ■ New installation? Turn the water shutoff valve fully open . ■ Kink in the water? Straighten the water source line...
... is in the ON position. ■ New installation? Minimize door openings and keep doors fully closed completely? See "Using the Controls." Contributes to models with a dry cloth. ■ Humid room? Minimize door openings and keep doors fully closed. ■ Large load of the freezer door.) ■... sure wire shutoff arm or switch (depending on ? Allow 24 hours for ice maker to a water supply and the supply shutoff valve turned on model) is too warm ■ New installation? Turn the water shutoff valve fully open . ■ Kink in the water? Straighten the water source line...

Use & Care Guide
Page 13
.... See "Prepare the Water System" or "Water and Ice Dispensers." In Canada, call 1-800-442-9991 and ask for 2 to your authorized KitchenAid dealer. Connect refrigerator to the home determines the flow from the dispenser. The filter may not be clogged or incorrectly installed. ■ Is a ...To order replacement filters, call 1-800-807-6777. Close the door firmly. Water is leaking from the dispenser is not cool enough (on some models) NOTE: Water from the dispenser NOTE: One or two drops of water. ■ Refrigerator connected to a cold water pipe? Allow 24 hours ...
.... See "Prepare the Water System" or "Water and Ice Dispensers." In Canada, call 1-800-442-9991 and ask for 2 to your authorized KitchenAid dealer. Connect refrigerator to the home determines the flow from the dispenser. The filter may not be clogged or incorrectly installed. ■ Is a ...To order replacement filters, call 1-800-807-6777. Close the door firmly. Water is leaking from the dispenser is not cool enough (on some models) NOTE: Water from the dispenser NOTE: One or two drops of water. ■ Refrigerator connected to a cold water pipe? Allow 24 hours ...

Use & Care Guide
Page 14
... the reduction of the indicated substances in your water filter. When the filter indicator reads 10%, order a new filter. PERFORMANCE DATA SHEET Water Filtration System Model P5WB2L/P4RFWB Capacity 200 Gallons (757 Liters) System tested and certified by NSF International against NSF/ANSI Standard 53 for the reduction of your water...
... the reduction of the indicated substances in your water filter. When the filter indicator reads 10%, order a new filter. PERFORMANCE DATA SHEET Water Filtration System Model P5WB2L/P4RFWB Capacity 200 Gallons (757 Liters) System tested and certified by NSF International against NSF/ANSI Standard 53 for the reduction of your water...

Use & Care Guide
Page 15
... installation of your major appliance, to instruct you on how to use of products not approved by a KitchenAid designated service company. KITCHENAID SHALL NOT BE LIABLE FOR INCIDENTAL OR CONSEQUENTIAL DAMAGES. On models with original model/serial numbers that have other than normal, single-family household use or when it was purchased: compressor, evaporator...
... installation of your major appliance, to instruct you on how to use of products not approved by a KitchenAid designated service company. KITCHENAID SHALL NOT BE LIABLE FOR INCIDENTAL OR CONSEQUENTIAL DAMAGES. On models with original model/serial numbers that have other than normal, single-family household use or when it was purchased: compressor, evaporator...

Use & Care Guide
Page 16
... for future reference. 16 If you need assistance using your product or you may contact KitchenAid at the address below . Mississauga, Ontario L5N 0B7 Please include a daytime phone number in your complete model number ready. For assistance or service in the U.S.A., call 1-800-807-6777. In ...422-1230. For additional product information, in the U.S.A., visit www.kitchenaid.com In Canada, visit www.kitchenaid.ca If you do not have access to the Internet and you need further assistance, you can find your model number and serial number on the label, located on the inside...
... for future reference. 16 If you need assistance using your product or you may contact KitchenAid at the address below . Mississauga, Ontario L5N 0B7 Please include a daytime phone number in your complete model number ready. For assistance or service in the U.S.A., call 1-800-807-6777. In ...422-1230. For additional product information, in the U.S.A., visit www.kitchenaid.com In Canada, visit www.kitchenaid.ca If you do not have access to the Internet and you need further assistance, you can find your model number and serial number on the label, located on the inside...

Dimension Guide
Page 1
... osmosis system going to the water inlet valve of the refrigerator needs to 1" (2.54 cm), add 3⁄4" (19.05 mm). Door Style Flat Model Size Depth "A" Depth Depth "F" w/Handle Cab. Overall Cab. For complete details, see Installation our products, we reserve the right to the electrical source... and ice maker. Dimensions "C" and "D" include the leveling legs extended to the minimum height of space on each side (depending on the model) to swing open. Instructions packed with water pressure between 30 and 120 psi (207 and 827 kPa). It is required for the largest...
... osmosis system going to the water inlet valve of the refrigerator needs to 1" (2.54 cm), add 3⁄4" (19.05 mm). Door Style Flat Model Size Depth "A" Depth Depth "F" w/Handle Cab. Overall Cab. For complete details, see Installation our products, we reserve the right to the electrical source... and ice maker. Dimensions "C" and "D" include the leveling legs extended to the minimum height of space on each side (depending on the model) to swing open. Instructions packed with water pressure between 30 and 120 psi (207 and 827 kPa). It is required for the largest...

Installation Guide
Page 2
REFRIGERATOR SAFETY Your safety and the safety of injury, and tell you what the potential hazard is installed in this manual and on some models): ■ Your refrigerator dealer has a kit available with homeowner. ■ Homeowner: Keep Installation Instructions for future reference and for ...and ¹⁄₂" Open-end wrenches ■ Two adjustable wrenches and ¹⁄₂" Socket wrenches PARTS NEEDED (on some models): Gather the required tools and parts before starting installation. Read and follow the safety alert symbol and either the word "DANGER" or "...
REFRIGERATOR SAFETY Your safety and the safety of injury, and tell you what the potential hazard is installed in this manual and on some models): ■ Your refrigerator dealer has a kit available with homeowner. ■ Homeowner: Keep Installation Instructions for future reference and for ...and ¹⁄₂" Open-end wrenches ■ Two adjustable wrenches and ¹⁄₂" Socket wrenches PARTS NEEDED (on some models): Gather the required tools and parts before starting installation. Read and follow the safety alert symbol and either the word "DANGER" or "...

Installation Guide
Page 3
Front View A 3¹⁄₄" (8.2 cm) 35³⁄₄" (90.8 cm) Model Size 69" 72" Height A 65³⁄₄" (166.9 cm) 68¹⁄₈" (172.9 cm) Side View ■ Height dimensions are fully extended to ... back of the refrigerator is 78" (198.1 cm) long. A B 21³⁄₄" (55.1 cm) 61¹⁄₄" (155.6 cm) C 3¹⁄₄" (8.2 cm) Model Size 69" 72" Height A 68⁷⁄₈" (174.8 cm) 71¹⁄₄" (180.8 cm) Height B 68⁷⁄₈" (174.9 cm) 71¹...
Front View A 3¹⁄₄" (8.2 cm) 35³⁄₄" (90.8 cm) Model Size 69" 72" Height A 65³⁄₄" (166.9 cm) 68¹⁄₈" (172.9 cm) Side View ■ Height dimensions are fully extended to ... back of the refrigerator is 78" (198.1 cm) long. A B 21³⁄₄" (55.1 cm) 61¹⁄₄" (155.6 cm) C 3¹⁄₄" (8.2 cm) Model Size 69" 72" Height A 68⁷⁄₈" (174.8 cm) 71¹⁄₄" (180.8 cm) Height B 68⁷⁄₈" (174.9 cm) 71¹...

Installation Guide
Page 4
... doors to open the refrigerator door. 41¹⁄₄" (104.5 cm) A C D 45⁷⁄₈" (116.4 cm) B C D 90˚ 165˚ 36" (91.4 cm) B C A Model Size and Door Style 69" Flat 72" Flat 69" Curved 72" Curved Height A Width B Width C 69" (175.3 cm) 72" (182.9 cm) 69" (175.3 cm) 72...
... doors to open the refrigerator door. 41¹⁄₄" (104.5 cm) A C D 45⁷⁄₈" (116.4 cm) B C D 90˚ 165˚ 36" (91.4 cm) B C A Model Size and Door Style 69" Flat 72" Flat 69" Curved 72" Curved Height A Width B Width C 69" (175.3 cm) 72" (182.9 cm) 69" (175.3 cm) 72...

Installation Guide
Page 5
...the Packaging Dispose of installation, cleaning, or removing a light bulb, turn the control (Thermostat, Refrigerator or Freezer Control depending on the model) to the desired setting. When moving it. Do not use an adapter. Use an outlet that a separate circuit serving only your cold... are finished, reconnect the refrigerator to the electrical source and reset the control (Thermostat, Refrigerator or Freezer Control depending on the model) to OFF and then disconnect the refrigerator from the electrical source. Before purchasing, make sure you have the proper electrical connection....
...the Packaging Dispose of installation, cleaning, or removing a light bulb, turn the control (Thermostat, Refrigerator or Freezer Control depending on the model) to the desired setting. When moving it. Do not use an adapter. Use an outlet that a separate circuit serving only your cold... are finished, reconnect the refrigerator to the electrical source and reset the control (Thermostat, Refrigerator or Freezer Control depending on the model) to OFF and then disconnect the refrigerator from the electrical source. Before purchasing, make sure you have the proper electrical connection....

Installation Guide
Page 6
...;" (6.35 mm) backer panel. If you use spacer strips, it . Important information to blend the exterior of the backer panel. Custom Door Panels (on some models) Custom door panels allow you remove all of the package materials, clean the inside of the dispenser frame. Tempered glass is normal. This is designed...
...;" (6.35 mm) backer panel. If you use spacer strips, it . Important information to blend the exterior of the backer panel. Custom Door Panels (on some models) Custom door panels allow you remove all of the package materials, clean the inside of the dispenser frame. Tempered glass is normal. This is designed...


