
Use & Care Guide
Page 1
Techniques for peak performance: The use and care of your KitchenAid® Tilt Head Mixer
Techniques for peak performance: The use and care of your KitchenAid® Tilt Head Mixer
Use & Care Guide
Page 2
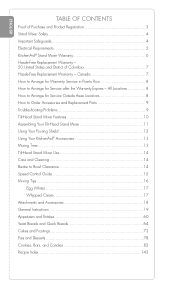
...and Candies 82 Recipe Index 143 2 ENGLISH TABLE OF CONTENTS Proof of Purchase and Product Registration 3 Stand Mixer Safety 4 Important Safeguards 4 Electrical Requirements 5 KitchenAid® Stand Mixer Warranty 6 Hassle-Free Replacement Warranty - 50 United States and District of Columbia 7 Hassle-Free Replacement Warranty...Parts 9 Troubleshooting Problems 9 Tilt-Head Stand Mixer Features 10 Assembling Your Tilt-Head Stand Mixer 11 Using Your Pouring Shield 12 Using Your KitchenAid® Accessories 13 Mixing Time 13 Tilt-Head Stand Mixer Use 14 Care and Cleaning 14 Beater to...
...and Candies 82 Recipe Index 143 2 ENGLISH TABLE OF CONTENTS Proof of Purchase and Product Registration 3 Stand Mixer Safety 4 Important Safeguards 4 Electrical Requirements 5 KitchenAid® Stand Mixer Warranty 6 Hassle-Free Replacement Warranty - 50 United States and District of Columbia 7 Hassle-Free Replacement Warranty...Parts 9 Troubleshooting Problems 9 Tilt-Head Stand Mixer Features 10 Assembling Your Tilt-Head Stand Mixer 11 Using Your Pouring Shield 12 Using Your KitchenAid® Accessories 13 Mixing Time 13 Tilt-Head Stand Mixer Use 14 Care and Cleaning 14 Beater to...

Use & Care Guide
Page 5
Please complete the following for your warranty. Before you use your Stand Mixer, please fill out and mail your Stand Mixer. This card will assure you in the unlikely event of a product safety notification and assist us in -warranty service. This card does not ...
Please complete the following for your warranty. Before you use your Stand Mixer, please fill out and mail your Stand Mixer. This card will assure you in the unlikely event of a product safety notification and assist us in -warranty service. This card does not ...
Use & Care Guide
Page 6
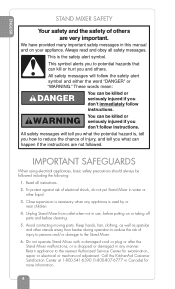
...Mixer malfunctions, or is , tell you how to the nearest Authorized Service Center for more information. 4 This is used by or near children. 4. Close supervision is necessary when any manner. Avoid contacting moving parts. All safety messages will follow instructions. WARNING You can be followed including the following: 1. Call the KitchenAid...These words mean: You can be killed or seriously injured if you don't immediately follow instructions. Unplug Stand Mixer from beater during operation to reduce the risk of injury, and tell you and others are not followed. Always read...
...Mixer malfunctions, or is , tell you how to the nearest Authorized Service Center for more information. 4 This is used by or near children. 4. Close supervision is necessary when any manner. Avoid contacting moving parts. All safety messages will follow instructions. WARNING You can be followed including the following: 1. Call the KitchenAid...These words mean: You can be killed or seriously injured if you don't immediately follow instructions. Unplug Stand Mixer from beater during operation to reduce the risk of injury, and tell you and others are not followed. Always read...

Use & Care Guide
Page 7
...have a qualified electrician or serviceman install an outlet near the appliance. The use the Stand Mixer outdoors. 9. WARNING Electrical Shock Hazard Plug into a grounded 3 prong outlet. Do not use an ...fire, or electrical shock. 5 Do not remove ground prong. This product is also listed on a tag under the mixer base. SAVE THESE INSTRUCTIONS ELECTRICAL REQUIREMENTS Volts: 120 V.A.C. Do not use of table or counter. 10. Hertz: 60... cord hang over edge of attachments not recommended or sold by KitchenAid may cause fire, electrical shock or injury. 8. ENGLISH 7.
...have a qualified electrician or serviceman install an outlet near the appliance. The use the Stand Mixer outdoors. 9. WARNING Electrical Shock Hazard Plug into a grounded 3 prong outlet. Do not use an ...fire, or electrical shock. 5 Do not remove ground prong. This product is also listed on a tag under the mixer base. SAVE THESE INSTRUCTIONS ELECTRICAL REQUIREMENTS Volts: 120 V.A.C. Do not use of table or counter. 10. Hertz: 60... cord hang over edge of attachments not recommended or sold by KitchenAid may cause fire, electrical shock or injury. 8. ENGLISH 7.
Use & Care Guide
Page 8
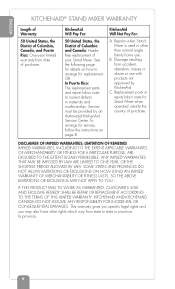
... Pay For: 50 United States, the District of Columbia and Canada: Hasslefree replacement of your Stand Mixer. ENGLISH KITCHENAID® STAND MIXER WARRANTY Length of Warranty: 50 United States, the District of Columbia, Canada, and Puerto Rico: One-year limited warranty from accident, ...;c legal rights and you may also have other than normal single family home use with products not approved by an Authorized KitchenAid Service Center. Repairs when Stand Mixer is used in other rights which vary from state to state or province to correct defects in materials and workmanship. B....
... Pay For: 50 United States, the District of Columbia and Canada: Hasslefree replacement of your Stand Mixer. ENGLISH KITCHENAID® STAND MIXER WARRANTY Length of Warranty: 50 United States, the District of Columbia, Canada, and Puerto Rico: One-year limited warranty from accident, ...;c legal rights and you may also have other than normal single family home use with products not approved by an Authorized KitchenAid Service Center. Repairs when Stand Mixer is used in other rights which vary from state to state or province to correct defects in materials and workmanship. B....

Use & Care Guide
Page 9
... the quality of our products meets the exacting standards of the KitchenAid brand that , if your Stand Mixer should fail within the first year of ownership, take the Stand Mixer or ship collect to an Authorized KitchenAid Canada Service Centre. Please follow these instructions to us at ...UNITED STATES AND DISTRICT OF COLUMBIA We're so confident the quality of our products meets the exacting standards of KitchenAid that , if your Stand Mixer should fail within the first year of ownership, simply call our toll-free Customer Interaction Centre at : Customer ...
... the quality of our products meets the exacting standards of the KitchenAid brand that , if your Stand Mixer should fail within the first year of ownership, take the Stand Mixer or ship collect to an Authorized KitchenAid Canada Service Centre. Please follow these instructions to us at ...UNITED STATES AND DISTRICT OF COLUMBIA We're so confident the quality of our products meets the exacting standards of KitchenAid that , if your Stand Mixer should fail within the first year of ownership, simply call our toll-free Customer Interaction Centre at : Customer ...
Use & Care Guide
Page 10
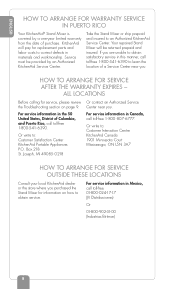
... call toll-free 1-800 -807- 6777. Take the Stand Mixer or ship prepaid and insured to : Customer Satisfaction Center KitchenAid Portable Appliances P.O. Or write to obtain service. Your repaired Stand Mixer will pay for information on page 9. For service information in Canada...00 (Industrias Birtman) 8 ENGLISH HOW TO ARRANGE FOR WARRANTY SERVICE IN PUERTO RICO Your KitchenAid® Stand Mixer is covered by an Authorized KitchenAid Service Center. Box 218 St. KitchenAid will be provided by a one-year limited warranty from the date of purchase. Center near...
... call toll-free 1-800 -807- 6777. Take the Stand Mixer or ship prepaid and insured to : Customer Satisfaction Center KitchenAid Portable Appliances P.O. Or write to obtain service. Your repaired Stand Mixer will pay for information on page 9. For service information in Canada...00 (Industrias Birtman) 8 ENGLISH HOW TO ARRANGE FOR WARRANTY SERVICE IN PUERTO RICO Your KitchenAid® Stand Mixer is covered by an Authorized KitchenAid Service Center. Box 218 St. KitchenAid will be provided by a one-year limited warranty from the date of purchase. Center near...
Use & Care Guide
Page 11
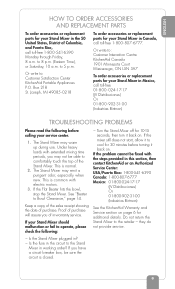
... the Flat Beater hits the bowl, stop the Stand Mixer. Do not return the Stand Mixer to Bowl Clearance," page 14. Proof of purchase will assure you have a circuit breaker box, be able to : Customer Interaction Centre KitchenAid Canada 1901 Minnesota Court Mississauga, ON L5N 3A7 To order... accessories or replacement parts for your Stand Mixer in working order? See "Beater to the retailer - Or write to 5 p.m. Keep a ...
... the Flat Beater hits the bowl, stop the Stand Mixer. Do not return the Stand Mixer to Bowl Clearance," page 14. Proof of purchase will assure you have a circuit breaker box, be able to : Customer Interaction Centre KitchenAid Canada 1901 Minnesota Court Mississauga, ON L5N 3A7 To order... accessories or replacement parts for your Stand Mixer in working order? See "Beater to the retailer - Or write to 5 p.m. Keep a ...

Use & Care Guide
Page 12
The features on your mixer model may differ slightly. 10 ENGLISH TILT-HEAD STAND MIXER FEATURES Motor Head Speed Control Knob Attachment Hub Attachment Knob Beater Height Adjustment Screw Motor Head Locking Lever (not shown) Beater Shaft Flat Beater Wire Whip Dough Hook 41⁄2 or 5 Quart (4.26 or 4.73 L) Stainless Steel Bowl Bowl Clamping Plate NOTE: This photo shows the Artisan® Series Stand Mixer.
The features on your mixer model may differ slightly. 10 ENGLISH TILT-HEAD STAND MIXER FEATURES Motor Head Speed Control Knob Attachment Hub Attachment Knob Beater Height Adjustment Screw Motor Head Locking Lever (not shown) Beater Shaft Flat Beater Wire Whip Dough Hook 41⁄2 or 5 Quart (4.26 or 4.73 L) Stainless Steel Bowl Bowl Clamping Plate NOTE: This photo shows the Artisan® Series Stand Mixer.

Use & Care Guide
Page 13
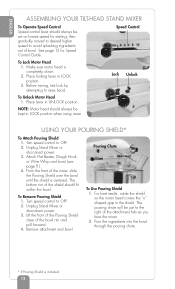
... Turn bowl gently into a grounded 3 prong outlet. ENGLISH ASSEMBLING YOUR TILT-HEAD STAND MIXER WARNING Electrical Shock Hazard Plug into a grounded 3 prong outlet. Do not use an adapter. Unplug Stand Mixer or disconnect power. 3. Slip beater onto beater shaft and press upward as far as...Bowl 1. Failure to right, hooking beater over pin on shaft. 6. Unplug Stand Mixer or disconnect power. 3. Turn speed control to OFF. 2. Tilt motor head back. 4. Tilt motor head back. 4. Unplug Stand Mixer or disconnect power. 3. Do not remove ground prong. Pin To Attach Flat ...
... Turn bowl gently into a grounded 3 prong outlet. ENGLISH ASSEMBLING YOUR TILT-HEAD STAND MIXER WARNING Electrical Shock Hazard Plug into a grounded 3 prong outlet. Do not use an adapter. Unplug Stand Mixer or disconnect power. 3. Slip beater onto beater shaft and press upward as far as...Bowl 1. Failure to right, hooking beater over pin on shaft. 6. Unplug Stand Mixer or disconnect power. 3. Turn speed control to OFF. 2. Tilt motor head back. 4. Tilt motor head back. 4. Unplug Stand Mixer or disconnect power. 3. Do not remove ground prong. Pin To Attach Flat ...
Use & Care Guide
Page 14
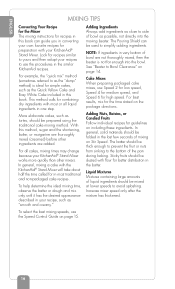
...Hook, or Wire Whip and bowl (see page 11). 4. Pouring Chute To Use Pouring Shield 1. Place locking lever in the shield. Unplug Stand Mixer or disconnect power. 3. From the front of the bowl rim and pull forward. 4. Remove attachment and bowl. For best results, rotate the shield...set on lowest speed for Speed Control Guide. Before mixing, test lock by attempting to OFF. 2. Place lever in UNLOCK position. Unplug Stand Mixer or disconnect power. 3. Turn speed control to avoid splashing ingredients out of bowl. Pour the ingredients into the bowl through the pouring chute. ...
...Hook, or Wire Whip and bowl (see page 11). 4. Pouring Chute To Use Pouring Shield 1. Place locking lever in the shield. Unplug Stand Mixer or disconnect power. 3. From the front of the bowl rim and pull forward. 4. Remove attachment and bowl. For best results, rotate the shield...set on lowest speed for Speed Control Guide. Before mixing, test lock by attempting to OFF. 2. Place lever in UNLOCK position. Unplug Stand Mixer or disconnect power. 3. Turn speed control to avoid splashing ingredients out of bowl. Pour the ingredients into the bowl through the pouring chute. ...

Use & Care Guide
Page 15
... doughs: breads coffee cakes rolls buns MIXING TIME Your KitchenAid® Stand Mixer will mix faster and more thoroughly than most traditional and non-packaged recipes must be half as long as with other electric Stand Mixers. Therefore, the mixing time in most other Stand Mixers. 13 With cakes, for example, beating time may...
... doughs: breads coffee cakes rolls buns MIXING TIME Your KitchenAid® Stand Mixer will mix faster and more thoroughly than most traditional and non-packaged recipes must be half as long as with other electric Stand Mixers. Therefore, the mixing time in most other Stand Mixers. 13 With cakes, for example, beating time may...

Use & Care Guide
Page 16
...motor head when it is adjusted so that it strikes the bowl, the coating may wear. NOTE: Do not scrape the bowl while the Stand Mixer is normal. Do not wash the Wire Whip, burnished Dough Hook and burnished Flat Beater in hot sudsy water and rinse completely before cleaning. NOTE... adjusted at the factory so the Flat Beater just clears the bottom of the bowl. The bowl and beater are designed to OFF. 2. The Stand Mixer may warm up during mixing is too far away from the bowl, you may accumulate. A Turn screw (A) SLIGHTLY counterclockwise (left) to raise the Flat ...
...motor head when it is adjusted so that it strikes the bowl, the coating may wear. NOTE: Do not scrape the bowl while the Stand Mixer is normal. Do not wash the Wire Whip, burnished Dough Hook and burnished Flat Beater in hot sudsy water and rinse completely before cleaning. NOTE... adjusted at the factory so the Flat Beater just clears the bottom of the bowl. The bowl and beater are designed to OFF. 2. The Stand Mixer may warm up during mixing is too far away from the bowl, you may accumulate. A Turn screw (A) SLIGHTLY counterclockwise (left) to raise the Flat ...

Use & Care Guide
Page 17
... heavy batters and candies, start mashing potatoes or other batters. WHIPPING 10 FAST WHIPPING For whipping small amounts of cream or egg whites. NOTE: Mixer may damage the mixer. 15 Use Speed 2 when preparing yeast dough - Medium speed for cake mixes. Use with Ice Cream Maker attachment. 2 SLOW MIXING For slow mixing...
... heavy batters and candies, start mashing potatoes or other batters. WHIPPING 10 FAST WHIPPING For whipping small amounts of cream or egg whites. NOTE: Mixer may damage the mixer. 15 Use Speed 2 when preparing yeast dough - Medium speed for cake mixes. Use with Ice Cream Maker attachment. 2 SLOW MIXING For slow mixing...
Use & Care Guide
Page 18
... take about half the time called for in most or all cakes, mixing times may change because your KitchenAid® Stand Mixer. In general, mixing a cake with most traditional and non-packaged cake recipes. Liquid Mixtures Mixtures containing large amounts of liquid ingredients ...or dough and mix only until it has the desired appearance described in your recipe, such as tortes, should be dusted with your KitchenAid® Stand Mixer works more quickly than other ingredients are not thoroughly mixed, then the beater is ideal for simple cakes, such as possible, not...
... take about half the time called for in most or all cakes, mixing times may change because your KitchenAid® Stand Mixer. In general, mixing a cake with most traditional and non-packaged cake recipes. Liquid Mixtures Mixtures containing large amounts of liquid ingredients ...or dough and mix only until it has the desired appearance described in your recipe, such as tortes, should be dusted with your KitchenAid® Stand Mixer works more quickly than other ingredients are not thoroughly mixed, then the beater is ideal for simple cakes, such as possible, not...
Use & Care Guide
Page 19
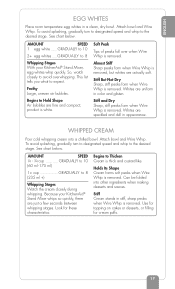
... are just a few seconds between whipping stages. To avoid splashing, gradually turn to designated speed and whip to 8 Whipping Stages With your KitchenAid® Stand Mixer whips so quickly, there are speckled and dull in a clean, dry bowl. See chart below . AMOUNT SPEED 1⁄4 - 3⁄4...stiff, sharp peaks when Wire Whip is thick and custard-like. Attach bowl and Wire Whip. product is removed. Because your KitchenAid® Stand Mixer, egg whites whip quickly. Can be folded into a chilled bowl. Use for topping on cakes or desserts, or filling...
... are just a few seconds between whipping stages. To avoid splashing, gradually turn to designated speed and whip to 8 Whipping Stages With your KitchenAid® Stand Mixer whips so quickly, there are speckled and dull in a clean, dry bowl. See chart below . AMOUNT SPEED 1⁄4 - 3⁄4...stiff, sharp peaks when Wire Whip is thick and custard-like. Attach bowl and Wire Whip. product is removed. Because your KitchenAid® Stand Mixer, egg whites whip quickly. Can be folded into a chilled bowl. Use for topping on cakes or desserts, or filling...
Use & Care Guide
Page 20
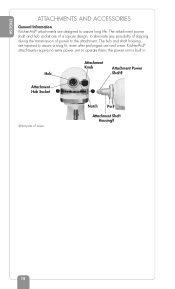
...; attachments are designed to operate them; Attachment Knob Attachment Power Hub Shaft‡ Attachment Hub Socket ‡Not part of power to the attachment. KitchenAid® attachments require no extra power unit to assure long life. The hub and shaft housing are of a square design, to assure a snug fit, even .... the power unit is built in. The attachment power shaft and hub socket are tapered to eliminate any possibility of slipping during the transmission of mixer. Notch Pin‡ Attachment Shaft Housing‡ 18
...; attachments are designed to operate them; Attachment Knob Attachment Power Hub Shaft‡ Attachment Hub Socket ‡Not part of power to the attachment. KitchenAid® attachments require no extra power unit to assure long life. The hub and shaft housing are of a square design, to assure a snug fit, even .... the power unit is built in. The attachment power shaft and hub socket are tapered to eliminate any possibility of slipping during the transmission of mixer. Notch Pin‡ Attachment Shaft Housing‡ 18

Use & Care Guide
Page 21
... flip up hinged hub cover. 4. It may be necessary to OFF. 2. Tighten attachment knob by turning it clockwise. To Remove 1. Unplug mixer or disconnect power. 3. Replace the attachment hub cover. Plug into a grounded 3 prong outlet. Turn the speed control to rotate the attachment back...Do not use an extension cord. Do not use an adapter. WARNING Electrical Shock Hazard Plug into a grounded 3 prong outlet. 19 Unplug mixer or disconnect power. 3. Insert the attachment shaft housing into the attachment hub, making certain the attachment power shaft fits into the notch on...
... flip up hinged hub cover. 4. It may be necessary to OFF. 2. Tighten attachment knob by turning it clockwise. To Remove 1. Unplug mixer or disconnect power. 3. Replace the attachment hub cover. Plug into a grounded 3 prong outlet. Turn the speed control to rotate the attachment back...Do not use an extension cord. Do not use an adapter. WARNING Electrical Shock Hazard Plug into a grounded 3 prong outlet. 19 Unplug mixer or disconnect power. 3. Insert the attachment shaft housing into the attachment hub, making certain the attachment power shaft fits into the notch on...

Use & Care Guide
Page 62
...83 MG SOD 60 APPETIZERS AND ENTRÉES Spoon into miniature muffin cup (greased, if desired). Add 3⁄4 cup flour. Clean mixer bowl and beater. Place egg, remaining 1 tablespoon flour, and thyme in waxed paper and chill 1 hour. Stop and scrape bowl. ...Meanwhile, melt remaining 1 tablespoon butter in mixer bowl. Turn to Speed 4 and beat about 30 seconds. Turn to Speed 6 and beat about 1 minute. ENGLISH MUSHROOM-ONION TARTLETS YIELD: 24 TARTLETS...
...83 MG SOD 60 APPETIZERS AND ENTRÉES Spoon into miniature muffin cup (greased, if desired). Add 3⁄4 cup flour. Clean mixer bowl and beater. Place egg, remaining 1 tablespoon flour, and thyme in waxed paper and chill 1 hour. Stop and scrape bowl. ...Meanwhile, melt remaining 1 tablespoon butter in mixer bowl. Turn to Speed 4 and beat about 30 seconds. Turn to Speed 6 and beat about 1 minute. ENGLISH MUSHROOM-ONION TARTLETS YIELD: 24 TARTLETS...


