
Use and Care Manual
Page 3
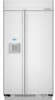
...risk of injury, and tell you what can be killed or seriously injured if you don't follow instructions. Before You Throw Away Your Old Refrigerator or Freezer: ■ Take off the doors. ■ Leave the shelves in death or brain damage. This is , tell you are...entrapment and suffocation are not problems of others . WARNING You can kill or hurt you don't immediately follow these instructions to move and install refrigerator. ■ Disconnect power before operating. ■ Remove doors from your appliance. Failure to potential hazards that children may not easily climb ...
...risk of injury, and tell you what can be killed or seriously injured if you don't follow instructions. Before You Throw Away Your Old Refrigerator or Freezer: ■ Take off the doors. ■ Leave the shelves in death or brain damage. This is , tell you are...entrapment and suffocation are not problems of others . WARNING You can kill or hurt you don't immediately follow these instructions to move and install refrigerator. ■ Disconnect power before operating. ■ Remove doors from your appliance. Failure to potential hazards that children may not easily climb ...

Use and Care Manual
Page 4
... Follow the directions specific to sudden temperature changes or impact, such as shown. The On/Off switch is connected, turn the refrigerator on the refrigerator. NOTE: As air is not connected to your water connection, see "Connect to the OFF (right) setting as bumping. ...Pressure A cold water supply with your model. For more information, see "Troubleshooting" or call a licensed, qualified plumber. NOTE: If your refrigerator. BEFORE USE Remove the Packaging ■ Remove tape and glue residue from the filter and water dispensing system, and prepare the water filter...
... Follow the directions specific to sudden temperature changes or impact, such as shown. The On/Off switch is connected, turn the refrigerator on the refrigerator. NOTE: As air is not connected to your water connection, see "Connect to the OFF (right) setting as bumping. ...Pressure A cold water supply with your model. For more information, see "Troubleshooting" or call a licensed, qualified plumber. NOTE: If your refrigerator. BEFORE USE Remove the Packaging ■ Remove tape and glue residue from the filter and water dispensing system, and prepare the water filter...

Use and Care Manual
Page 5
... grille filter system, make sure the base grille filter is properly installed and the cap is microbiologically unsafe or of ice to the refrigerator Off when cleaning your refrigerator or changing light bulbs. Please refer to the On or Off position. 3. NOTE: If your ice maker. Do not use an ...extension cord. Lower the wire shutoff arm as gasoline, away from refrigerator. Press power switch to "Ice Maker and Storage Bin" for use with water that is in death, fire, or electrical shock. Replace top grille....
... grille filter system, make sure the base grille filter is properly installed and the cap is microbiologically unsafe or of ice to the refrigerator Off when cleaning your refrigerator or changing light bulbs. Please refer to the On or Off position. 3. NOTE: If your ice maker. Do not use an ...extension cord. Lower the wire shutoff arm as gasoline, away from refrigerator. Press power switch to "Ice Maker and Storage Bin" for use with water that is in death, fire, or electrical shock. Replace top grille....

Use and Care Manual
Page 6
... adjustments. The audio alarm will reactivate if the condition that caused the alarm until a new condition occurs or until the refrigerator and freezer temperatures are made. The controls are not blocked before other adjustments are below zero, the negative sign next to...NOTE: Wait at 34°F (1°C) and -5°F (-21°C) for normal household usage. Max Cool NOTE: ■ After the refrigerator is as cold as cooling, lighting, fans and compressors. Viewing the Celsius Temperatures ■ Press °C touch pad. Recheck the temperatures before...
... adjustments. The audio alarm will reactivate if the condition that caused the alarm until a new condition occurs or until the refrigerator and freezer temperatures are made. The controls are not blocked before other adjustments are below zero, the negative sign next to...NOTE: Wait at 34°F (1°C) and -5°F (-21°C) for normal household usage. Max Cool NOTE: ■ After the refrigerator is as cold as cooling, lighting, fans and compressors. Viewing the Celsius Temperatures ■ Press °C touch pad. Recheck the temperatures before...

Use and Care Manual
Page 7
...the same time for service. Water Dispenser To Dispense Water: 1. Use a sturdy container to reactivate every 1¹⁄₂ hours until refrigerator and freezer temperatures are disabled and the dispenser lights turn off. ■ To turn on the dispenser display. ■ To turn off...the following features: a water level indicator in both the control panel and dispenser panel (on some functions you know when either the refrigerator temperature rises above 48°F (9°C) or the freezer temperature rises above 15°F (-9°C) for longer than 10 minutes. ...
...the same time for service. Water Dispenser To Dispense Water: 1. Use a sturdy container to reactivate every 1¹⁄₂ hours until refrigerator and freezer temperatures are disabled and the dispenser lights turn off. ■ To turn on the dispenser display. ■ To turn off...the following features: a water level indicator in both the control panel and dispenser panel (on some functions you know when either the refrigerator temperature rises above 48°F (9°C) or the freezer temperature rises above 15°F (-9°C) for longer than 10 minutes. ...

Use and Care Manual
Page 10
Water Filtration System A Do not use with water that is microbiologically unsafe or of your refrigerator. A replacement water filter should display a reading of your refrigerator. Cover B. Be sure the O-rings are still in place after the system. Align the ridge on the cap with the replacement filter. 3. Changing the Water ...
Water Filtration System A Do not use with water that is microbiologically unsafe or of your refrigerator. A replacement water filter should display a reading of your refrigerator. Cover B. Be sure the O-rings are still in place after the system. Align the ridge on the cap with the replacement filter. 3. Changing the Water ...

Use and Care Manual
Page 11
... beef, variety meat (liver, etc 1-2 days Cold cuts, steaks/roasts 3-5 days Cured meats 7-10 days Leftovers - Remove food from the refrigerator. Be sure not to shatter into the pan through the air duct. Replace the cover by tilting it up until the rear shelf hooks drop... 1. Remove and Replace the Ingredient Care Center Cover 1. The shelves in your individual storage needs. Storing similar food items together in your refrigerator are heavy. Crisper and Covers To remove and replace the crispers: 1. This is airtight and moisture-proof. Remove the shelf/frame by ...
... beef, variety meat (liver, etc 1-2 days Cold cuts, steaks/roasts 3-5 days Cured meats 7-10 days Leftovers - Remove food from the refrigerator. Be sure not to shatter into the pan through the air duct. Replace the cover by tilting it up until the rear shelf hooks drop... 1. Remove and Replace the Ingredient Care Center Cover 1. The shelves in your individual storage needs. Storing similar food items together in your refrigerator are heavy. Crisper and Covers To remove and replace the crispers: 1. This is airtight and moisture-proof. Remove the shelf/frame by ...

Use and Care Manual
Page 12
... by sliding it in above the desired support and pushing it down until it in between the shelf and the wall of the refrigerator. For more information on the refrigerator door. Freezer Basket The freezer basket can only be placed on the side wall guide rails. Replace the rack by pulling it...
... by sliding it in above the desired support and pushing it down until it in between the shelf and the wall of the refrigerator. For more information on the refrigerator door. Freezer Basket The freezer basket can only be placed on the side wall guide rails. Replace the rack by pulling it...

Use and Care Manual
Page 13
... front tab into the slotted holes. Wash stainless steel and painted metal exteriors with a soft cloth. Replace the top grille. Refrigerator Control Panel Lights There are available from your dealer or appliance store. 1. Once the side hooks of the shield are in ...■ Remove the light shield by squeezing the top and bottom toward the center. Remove the top grille. NOTE: To keep your refrigerator. Remove light shield when applicable as shelves, crispers, etc. 4. Replace light shield when applicable as window sprays, scouring cleansers, flammable ...
... front tab into the slotted holes. Wash stainless steel and painted metal exteriors with a soft cloth. Replace the top grille. Refrigerator Control Panel Lights There are available from your dealer or appliance store. 1. Once the side hooks of the shield are in ...■ Remove the light shield by squeezing the top and bottom toward the center. Remove the top grille. NOTE: To keep your refrigerator. Remove light shield when applicable as shelves, crispers, etc. 4. Replace light shield when applicable as window sprays, scouring cleansers, flammable ...

Use and Care Manual
Page 14
...longer required. REMEMBER: A full freezer stays cold longer than a freezer full of both doors to prop them open . Vacation Care Your refrigerator is equipped with an explanation. ■ Buzzing - When you did not notice from items placed on the heater during initial cool-down... This stops odor and mold from the refrigerator. 2. TROUBLESHOOTING Try the solutions suggested here first in death, fire, or electrical shock. ■ Power cord unplugged? Do not use an...
...longer required. REMEMBER: A full freezer stays cold longer than a freezer full of both doors to prop them open . Vacation Care Your refrigerator is equipped with an explanation. ■ Buzzing - When you did not notice from items placed on the heater during initial cool-down... This stops odor and mold from the refrigerator. 2. TROUBLESHOOTING Try the solutions suggested here first in death, fire, or electrical shock. ■ Power cord unplugged? Do not use an...
Use and Care Manual
Page 15
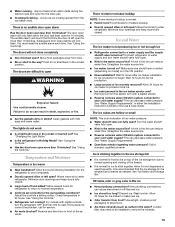
...water filtration system connected to open . ■ Kink in the water source line? Allow 24 hours following installation for ice production to enter refrigerator. Adjust the controls a setting colder. Check temperature in the ice ■ New plumbing connections? Remove any item from food? Ice and... new ice. ■ Odor transfer from in the line can decrease water pressure. See "Changing the Light Bulbs." ■ Is the refrigerator in the way? See "Using the Controls." Minimize door openings and keep doors fully closed . ■ Large load of ice recently removed...
...water filtration system connected to open . ■ Kink in the water source line? Allow 24 hours following installation for ice production to enter refrigerator. Adjust the controls a setting colder. Check temperature in the ice ■ New plumbing connections? Remove any item from food? Ice and... new ice. ■ Odor transfer from in the line can decrease water pressure. See "Changing the Light Bulbs." ■ Is the refrigerator in the way? See "Using the Controls." Minimize door openings and keep doors fully closed . ■ Large load of ice recently removed...
Use and Care Manual
Page 16
...cold water pipe? To locate factory specified parts in too long? KitchenAid designated service technicians are made with : ■ Features and specifications on ? If it does not close completely." ■ Refrigerator connected to 3 seconds after dispensing is firmly in the delivery chute?... fill the water system. ■ Water filter installed on the refrigerator? The first glass of water. ■ Refrigerator connected to local dealers, repair parts distributors, and service companies. Call the KitchenAid Customer eXperience Center toll free: 1-800-422-1230. Use only ...
...cold water pipe? To locate factory specified parts in too long? KitchenAid designated service technicians are made with : ■ Features and specifications on ? If it does not close completely." ■ Refrigerator connected to 3 seconds after dispensing is firmly in the delivery chute?... fill the water system. ■ Water filter installed on the refrigerator? The first glass of water. ■ Refrigerator connected to local dealers, repair parts distributors, and service companies. Call the KitchenAid Customer eXperience Center toll free: 1-800-422-1230. Use only ...

Use and Care Manual
Page 20
...807-6777. 5/08 Keep this book and your complete model number and serial number. In Canada, call 1-800-422-1230. KITCHENAID® REFRIGERATOR WARRANTY LIMITED WARRANTY For two years from the date of purchase, when this major appliance is operated and maintained according to instructions...this major appliance is operated and maintained according to instructions attached to or furnished with the product, KitchenAid will need it is installed in the sealed refrigeration system that existed when this major appliance is operated and maintained according to instructions attached to or ...
...807-6777. 5/08 Keep this book and your complete model number and serial number. In Canada, call 1-800-422-1230. KITCHENAID® REFRIGERATOR WARRANTY LIMITED WARRANTY For two years from the date of purchase, when this major appliance is operated and maintained according to instructions...this major appliance is operated and maintained according to instructions attached to or furnished with the product, KitchenAid will need it is installed in the sealed refrigeration system that existed when this major appliance is operated and maintained according to instructions attached to or ...

Installation Guide
Page 3
...and others are not followed. Use two or more people to potential hazards that can kill or hurt you to move and install refrigerator. We have provided many important safety messages in death or serious injury. 3 WARNING You can be killed or seriously injured if you...or "WARNING." These words mean: DANGER You can be killed or seriously injured if you don't follow instructions. Keep doors taped closed until refrigerator is the safety alert symbol. Failure to reduce the chance of others . This is completely installed. All safety messages will follow instructions. ...
...and others are not followed. Use two or more people to potential hazards that can kill or hurt you to move and install refrigerator. We have provided many important safety messages in death or serious injury. 3 WARNING You can be killed or seriously injured if you...or "WARNING." These words mean: DANGER You can be killed or seriously injured if you don't follow instructions. Keep doors taped closed until refrigerator is the safety alert symbol. Failure to reduce the chance of others . This is completely installed. All safety messages will follow instructions. ...

Installation Guide
Page 4
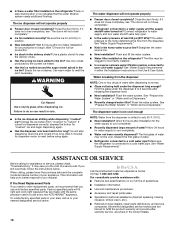
... custom panels, handles, and standoffs. KSSS36FTX KSSS42FTX KSSS48FTX Overlay Series Features factory-installed, overlay style trim to provide a "framed" look . Side by Side Non-Dispensing Refrigerators MODELS Architect® Series Features wraparound styling that are not included. This series provides a warm commercial-looking built-in...
... custom panels, handles, and standoffs. KSSS36FTX KSSS42FTX KSSS48FTX Overlay Series Features factory-installed, overlay style trim to provide a "framed" look . Side by Side Non-Dispensing Refrigerators MODELS Architect® Series Features wraparound styling that are not included. This series provides a warm commercial-looking built-in...
Installation Guide
Page 5
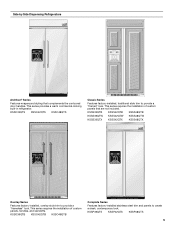
Side by Side Dispensing Refrigerators Architect® Series Features wraparound styling that are not included. KSSS36QTB KSSS42QTB KSSS48QTB KSSS36QTW KSSS42QTW KSSS48QTW KSSS36QTX KSSS42QTX KSSS48QTX Overlay Series Features factory-installed, overlay style trim to provide a "frameless" look . KSSO36QTB KSSO42QTB KSSO48QTB Complete Series Features ... KSSC48QTS Classic Series Features factory-installed, traditional style trim to create a sleek, contemporary look . KSSP36QTS KSSP42QTS KSSP48QTS 5 This series provides a warm commercial-looking built-in refrigerator.
Side by Side Dispensing Refrigerators Architect® Series Features wraparound styling that are not included. KSSS36QTB KSSS42QTB KSSS48QTB KSSS36QTW KSSS42QTW KSSS48QTW KSSS36QTX KSSS42QTX KSSS48QTX Overlay Series Features factory-installed, overlay style trim to provide a "frameless" look . KSSO36QTB KSSO42QTB KSSO48QTB Complete Series Features ... KSSC48QTS Classic Series Features factory-installed, traditional style trim to create a sleek, contemporary look . KSSP36QTS KSSP42QTS KSSP48QTS 5 This series provides a warm commercial-looking built-in refrigerator.

Installation Guide
Page 6
... information. See "Door Swing Dimensions." ■ Location must be attached to the rear wall studs 80" to 90" (203 cm to enclose the refrigerator. NOTE: A clearance of ¹⁄₂" (1.3 cm) must be within 1" (2.5 cm) maximum above the floor. TOOLS NEEDED: Gather the ... the top grille to open fully. IMPORTANT: ■ Observe all governing codes and ordinances. ■ It is not available, then the refrigerator must allow for the local electrical inspector's use , the solid soffit must permit top grille removal. Save these Installation Instructions for side tipping...
... information. See "Door Swing Dimensions." ■ Location must be attached to the rear wall studs 80" to 90" (203 cm to enclose the refrigerator. NOTE: A clearance of ¹⁄₂" (1.3 cm) must be within 1" (2.5 cm) maximum above the floor. TOOLS NEEDED: Gather the ... the top grille to open fully. IMPORTANT: ■ Observe all governing codes and ordinances. ■ It is not available, then the refrigerator must allow for the local electrical inspector's use , the solid soffit must permit top grille removal. Save these Installation Instructions for side tipping...

Installation Guide
Page 7
... other easily accessible area. Do not use an extension cord. Do not use an extension cord. Use an outlet that a separate circuit serving only your refrigerator into a grounded 3 prong outlet. See the chart following ) 6" (15.2 cm) Electrical Requirements WARNING Electrical Shock Hazard Plug into its final location, it .... reconnect power at same level as shown above) 36 35¹⁄₂" (90.2 cm) to 35³⁄₄" (90.8 cm) 4" (10.2 cm) 42 41¹⁄₂" (105.4 cm) to 41³⁄₄" (106.1 cm) 10" (25.4 cm) 48 47¹⁄₂" (120.7 cm)...
... other easily accessible area. Do not use an extension cord. Do not use an extension cord. Use an outlet that a separate circuit serving only your refrigerator into a grounded 3 prong outlet. See the chart following ) 6" (15.2 cm) Electrical Requirements WARNING Electrical Shock Hazard Plug into its final location, it .... reconnect power at same level as shown above) 36 35¹⁄₂" (90.2 cm) to 35³⁄₄" (90.8 cm) 4" (10.2 cm) 42 41¹⁄₂" (105.4 cm) to 41³⁄₄" (106.1 cm) 10" (25.4 cm) 48 47¹⁄₂" (120.7 cm)...

Installation Guide
Page 8
... copper tubing only in areas where the household temperatures will remain above freezing. ■ Do not use copper tubing and check for leaks. A Model 36 42 48 Tipping Radius A 90¹⁄₂" (229.9 cm) 93" (236.2 cm) 96" (243.8 cm) 8 Water Pressure A cold water ...supply with a reverse osmosis system. NOTE: Tip on the reverse osmosis system to refill after heavy usage. ■ If your refrigerator has a water filter cartridge, it may further reduce the water pressure when used . ■ If needed , use a piercing-type or 4.76 mm)...
... copper tubing only in areas where the household temperatures will remain above freezing. ■ Do not use copper tubing and check for leaks. A Model 36 42 48 Tipping Radius A 90¹⁄₂" (229.9 cm) 93" (236.2 cm) 96" (243.8 cm) 8 Water Pressure A cold water ...supply with a reverse osmosis system. NOTE: Tip on the reverse osmosis system to refill after heavy usage. ■ If your refrigerator has a water filter cartridge, it may further reduce the water pressure when used . ■ If needed , use a piercing-type or 4.76 mm)...

Installation Guide
Page 9
...25³⁄₈" (64.5 cm). ■ The power cord is 84" (213 cm) long. ■ The water line attached to the back of the refrigerator is 5 ft (1.5 m) long. ■ Height dimensions are shown with leveling legs extended ¹⁄₈" (3 mm) below the rollers. ■ Width dimensions...(8.9 cm) *When leveling legs are fully extended to 1¹⁄₄" (3.2 cm) below rollers, add 1¹⁄₈" (2.9 cm) to the height dimensions. Model 36 42 48 Width A 35" (88.9 cm) 41" (104.1 cm) 47" (119.4 cm) 9 Top View A 25³⁄₈" (64.5 cm) A (see chart following...
...25³⁄₈" (64.5 cm). ■ The power cord is 84" (213 cm) long. ■ The water line attached to the back of the refrigerator is 5 ft (1.5 m) long. ■ Height dimensions are shown with leveling legs extended ¹⁄₈" (3 mm) below the rollers. ■ Width dimensions...(8.9 cm) *When leveling legs are fully extended to 1¹⁄₄" (3.2 cm) below rollers, add 1¹⁄₈" (2.9 cm) to the height dimensions. Model 36 42 48 Width A 35" (88.9 cm) 41" (104.1 cm) 47" (119.4 cm) 9 Top View A 25³⁄₈" (64.5 cm) A (see chart following...


