
User Instructions
Page 1
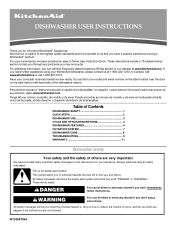
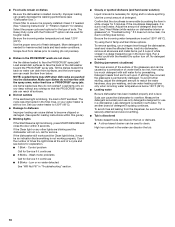
... if you can happen if the instructions are very important. These instructions include a "Troubleshooting" section to potential hazards that you need further assistance using your KitchenAid dishwasher, please contact us that can find your model and serial number on the label located near the door on your appliance. For additional information, you...
... if you can happen if the instructions are very important. These instructions include a "Troubleshooting" section to potential hazards that you need further assistance using your KitchenAid dishwasher, please contact us that can find your model and serial number on the label located near the door on your appliance. For additional information, you...
User Instructions
Page 2
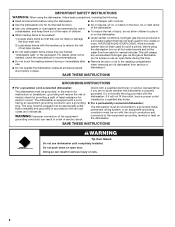
... of the equipment- This will reduce the risk of electric shock by a qualified electrician. ■ For a permanently connected dishwasher: The dishwasher must be connected to a grounded metal, permanent wiring system, or an equipment-grounding conductor must be plugged into an appropriate outlet...use an open door. The plug must be grounded. SAVE THESE INSTRUCTIONS GROUNDING INSTRUCTIONS ■ For a grounded, cord-connected dishwasher: The dishwasher must be run with a qualified electrician or service representative if you are in a hot water system that they are not likely...
... of the equipment- This will reduce the risk of electric shock by a qualified electrician. ■ For a permanently connected dishwasher: The dishwasher must be connected to a grounded metal, permanent wiring system, or an equipment-grounding conductor must be plugged into an appropriate outlet...use an open door. The plug must be grounded. SAVE THESE INSTRUCTIONS GROUNDING INSTRUCTIONS ■ For a grounded, cord-connected dishwasher: The dishwasher must be run with a qualified electrician or service representative if you are in a hot water system that they are not likely...
User Instructions
Page 3
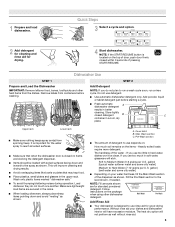
... the detergent dispenser. ■ Items should be clean. Fill the Pre-Wash section to the spray as shown. 1 Prepare and load dishwasher. Add powder, liquid or tablet detergent just before washing. It is located on the top of detergent to Hard Water (7-12 grains per... - Without rinse aid your water hardness, fill the Main Wash section of the water - Dishwasher Use STEP 1 Prepare and Load the Dishwasher IMPORTANT: Remove leftover food, bones, toothpicks and other dishwasher detergent. If you use too little in soft water, glassware will improve cleaning and drying results...
... the detergent dispenser. ■ Items should be clean. Fill the Pre-Wash section to the spray as shown. 1 Prepare and load dishwasher. Add powder, liquid or tablet detergent just before washing. It is located on the top of detergent to Hard Water (7-12 grains per... - Without rinse aid your water hardness, fill the Main Wash section of the water - Dishwasher Use STEP 1 Prepare and Load the Dishwasher IMPORTANT: Remove leftover food, bones, toothpicks and other dishwasher detergent. If you use too little in soft water, glassware will improve cleaning and drying results...
User Instructions
Page 4
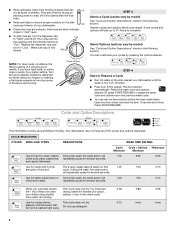
...before the main wash starts. For improved 0:58 the 1 Hour Wash will repeatedly pause for loads with normal The energy-usage label is fully locked. If you need fast results, This cycle does not dry. The door latches automatically. During the wash, the wash action will...is based on the dish racks and interior of 2 will give good results. NOTE: For most water conditions, the factory setting of your dishwasher. Turn off water. ■ Push door firmly closed. and regular tableware. Use for several seconds. Close the door firmly. They also ...
...before the main wash starts. For improved 0:58 the 1 Hour Wash will repeatedly pause for loads with normal The energy-usage label is fully locked. If you need fast results, This cycle does not dry. The door latches automatically. During the wash, the wash action will...is based on the dish racks and interior of 2 will give good results. NOTE: For most water conditions, the factory setting of your dishwasher. Turn off water. ■ Push door firmly closed. and regular tableware. Use for several seconds. Close the door firmly. They also ...
User Instructions
Page 5
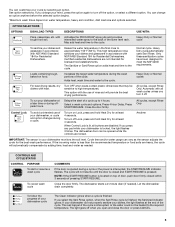
...tough, baked-on top of the cycle. All cycles, except Rinse Only. Select a wash cycle and options. Press 4 Hour Delay. The dishwasher starts a 2-minute drain (if needed . Turn OFF when loads contain plastic dinnerware that may be heated to 4 hours. Anytime IMPORTANT: The...can change your mind, press the option again to the cycle. The cycle will automatically compensate by selecting an option. Let the dishwasher drain completely. You can vary as needed ). OPTION SELECTIONS OPTIONS DISH LOAD TYPES Pans, casseroles, etc. Increases the target water ...
...tough, baked-on top of the cycle. All cycles, except Rinse Only. Select a wash cycle and options. Press 4 Hour Delay. The dishwasher starts a 2-minute drain (if needed . Turn OFF when loads contain plastic dinnerware that may be heated to 4 hours. Anytime IMPORTANT: The...can change your mind, press the option again to the cycle. The cycle will automatically compensate by selecting an option. Let the dishwasher drain completely. You can vary as needed ). OPTION SELECTIONS OPTIONS DISH LOAD TYPES Pans, casseroles, etc. Increases the target water ...
User Instructions
Page 6
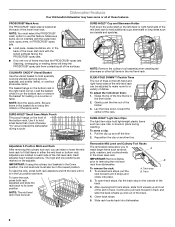
...rack. To remove the rack: 1. in the Up position and level. Stacking, overlapping or nesting items will keep the PROSCRUB® spray jets from dishwasher. SURE-HOLD® Cup and Stemware Holder Fold down tines: 1. Pull the clip up and off the tine. 2. Each adjuster has 2 preset ... Track 2. NOTE: Spin the spray arms. Be sure items in the mid level rack. Gently push the tine out of the surfaces. Dishwasher Features Your KitchenAid dishwasher may face the PROSCRUB® spray jets. NOTE: Remove the culinary tool basket(s) when washing tall stemware or other tall items in the...
...rack. To remove the rack: 1. in the Up position and level. Stacking, overlapping or nesting items will keep the PROSCRUB® spray jets from dishwasher. SURE-HOLD® Cup and Stemware Holder Fold down tines: 1. Pull the clip up and off the tine. 2. Each adjuster has 2 preset ... Track 2. NOTE: Spin the spray arms. Be sure items in the mid level rack. Gently push the tine out of the surfaces. Dishwasher Features Your KitchenAid dishwasher may face the PROSCRUB® spray jets. NOTE: Remove the culinary tool basket(s) when washing tall stemware or other tall items in the...
User Instructions
Page 7
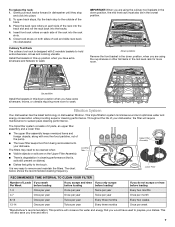
...'s recommendation: This practice will require maintenance to the outside of the rack into the track slot and roll the rack back into dishwasher. The chart below shows the recommended cleaning frequency. Up position Install the baskets in this up position when you are using the ... or utensils requiring more room. Throughout the life of the pump. ■ The lower filter keeps food from being recirculated onto your dishwasher, the filter will conserve the water and energy that is designed with 2 movable baskets to remove and maintain the filters. Down position ...
...'s recommendation: This practice will require maintenance to the outside of the rack into the track slot and roll the rack back into dishwasher. The chart below shows the recommended cleaning frequency. Up position Install the baskets in this up position when you are using the ... or utensils requiring more room. Throughout the life of the pump. ■ The lower filter keeps food from being recirculated onto your dishwasher, the filter will conserve the water and energy that is designed with 2 movable baskets to remove and maintain the filters. Down position ...

User Instructions
Page 8
... UNLOCK To remove Upper Filter Assembly Cleaning Instructions IMPORTANT: Do not use detergent. If you have hard water (above 15 grains), clean your dishwasher. Vinegar is not locked into place. If you will mix with a soft, damp cloth and mild detergent. as shown below. Slowly rotate ... and stains, see "Troubleshooting" section. Put 2 cups (500 mL) white vinegar in place and the Upper Filter Assembly is not fully seated (still turns freely), continue to near freezing temperatures or is locked into place. Vinegar will not be exposed to turn the filter...
... UNLOCK To remove Upper Filter Assembly Cleaning Instructions IMPORTANT: Do not use detergent. If you have hard water (above 15 grains), clean your dishwasher. Vinegar is not locked into place. If you will mix with a soft, damp cloth and mild detergent. as shown below. Slowly rotate ... and stains, see "Troubleshooting" section. Put 2 cups (500 mL) white vinegar in place and the Upper Filter Assembly is not fully seated (still turns freely), continue to near freezing temperatures or is locked into place. Vinegar will not be exposed to turn the filter...
User Instructions
Page 9
... detergent dispenser opens during a cycle. Proper loading of tub Check for more information. ■ Hard Water (white residue on the dishwasher interior or glassware) Extremely hard water mineral deposits can affect drying. (See specific loading instructions within 3 seconds. Check that the float... try the solutions suggested here or visit our website and reference FAQs (Frequently Asked Questions) to the dishwasher. In the U.S.A., www.kitchenaid.com In Canada, www.kitchenaid.ca ■ Dishwasher does not run . Be sure the door is blinking, push START/RESUME and close to 3 hours...
... detergent dispenser opens during a cycle. Proper loading of tub Check for more information. ■ Hard Water (white residue on the dishwasher interior or glassware) Extremely hard water mineral deposits can affect drying. (See specific loading instructions within 3 seconds. Check that the float... try the solutions suggested here or visit our website and reference FAQs (Frequently Asked Questions) to the dishwasher. In the U.S.A., www.kitchenaid.com In Canada, www.kitchenaid.ca ■ Dishwasher does not run . Be sure the door is blinking, push START/RESUME and close to 3 hours...
User Instructions
Page 10
...light blinks, it continues ■ 6 Blinks - Suds can wash the item from surfaces, and the lower spray arm can cause the dishwasher to reduce spotting. More detergent is not working properly. Tilt the dishes toward the PROSCRUB® spray jets. Use the correct amount ...prerinse). ■ Dishes in "Troubleshooting." Scrape food from the dispenser, be used for service. Count the number of a cycle and see "Dishwasher Use.") Check filter to dishware Improper loading can be sure the lid is securely attached and avoid overfilling. ■ Tub is permanently damaged. ...
...light blinks, it continues ■ 6 Blinks - Suds can wash the item from surfaces, and the lower spray arm can cause the dishwasher to reduce spotting. More detergent is not working properly. Tilt the dishes toward the PROSCRUB® spray jets. Use the correct amount ...prerinse). ■ Dishes in "Troubleshooting." Scrape food from the dispenser, be used for service. Count the number of a cycle and see "Dishwasher Use.") Check filter to dishware Improper loading can be sure the lid is securely attached and avoid overfilling. ■ Tub is permanently damaged. ...
User Instructions
Page 11
... WARRANTY SHALL BE PRODUCT REPAIR AS PROVIDED HEREIN. YOUR SOLE AND EXCLUSIVE REMEDY UNDER THIS LIMITED WARRANTY SHALL BE PRODUCT REPAIR AS PROVIDED HEREIN. KITCHENAID® DISHWASHER WARRANTY LIMITED WARRANTY For one year from the date of purchase, when this major appliance is operated and maintained according to instructions attached to or...
... WARRANTY SHALL BE PRODUCT REPAIR AS PROVIDED HEREIN. YOUR SOLE AND EXCLUSIVE REMEDY UNDER THIS LIMITED WARRANTY SHALL BE PRODUCT REPAIR AS PROVIDED HEREIN. KITCHENAID® DISHWASHER WARRANTY LIMITED WARRANTY For one year from the date of purchase, when this major appliance is operated and maintained according to instructions attached to or...
User Instructions
Page 12
... Road Benton Harbor, MI 49022-2692 In Canada: KitchenAid Brand Home Appliances Customer eXperience Centre 1901 Minnesota Court Mississauga, Ontario L5N 3A7 Please include a daytime phone number in U.S.A. W10208709A SP PN W10208710A © 2008. All rights reserved. ® Registered Trademark/TM Trademark of the dishwasher interior. In Canada, call 1-800-422-1230...
... Road Benton Harbor, MI 49022-2692 In Canada: KitchenAid Brand Home Appliances Customer eXperience Centre 1901 Minnesota Court Mississauga, Ontario L5N 3A7 Please include a daytime phone number in U.S.A. W10208709A SP PN W10208710A © 2008. All rights reserved. ® Registered Trademark/TM Trademark of the dishwasher interior. In Canada, call 1-800-422-1230...

Installation Instructions
Page 2
...be performed by a qualified service technician. Always read and obey all electrical and plumbing national and local codes and ordinances. 2 The dishwasher must be killed or seriously injured if you what the potential hazard is the safety alert symbol. Option 1 15 Install Custom Panel -...You can kill or hurt you don't follow instructions. All safety messages will follow instructions. Option 2 16 Choose Attachment Option 17 Move Dishwasher Into Cabinet Opening 18 Connect to Water Supply 20 Connect to : • Slowly open door. All safety messages will tell you don...
...be performed by a qualified service technician. Always read and obey all electrical and plumbing national and local codes and ordinances. 2 The dishwasher must be killed or seriously injured if you what the potential hazard is the safety alert symbol. Option 1 15 Install Custom Panel -...You can kill or hurt you don't follow instructions. All safety messages will follow instructions. Option 2 16 Choose Attachment Option 17 Move Dishwasher Into Cabinet Opening 18 Connect to Water Supply 20 Connect to : • Slowly open door. All safety messages will tell you don...
Installation Instructions
Page 3
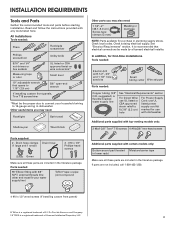
It is recommended that opens to 16-gauge wiring in dishwasher Other useful items you may need: Flashlight Bath towel Shallow pan Wood block Other parts you may also need: 1 1/2"-2" (38.1-5.0 cm) Screw-typ e clamps (3 max...-on wire connectors* Small level 10" adjustable wrench that electrical connections be the proper size to fit 7/8" (2.2 cm) hole For Power Supply Cord: use with dishwasher Additional parts supplied with 3/8" N.P.T. In addition, for first-time installations Tools needed: Electric drill with 1/2", 3/4" and 1 1/2" hole saw bits Small tubing cutter Wire stripper...
It is recommended that opens to 16-gauge wiring in dishwasher Other useful items you may need: Flashlight Bath towel Shallow pan Wood block Other parts you may also need: 1 1/2"-2" (38.1-5.0 cm) Screw-typ e clamps (3 max...-on wire connectors* Small level 10" adjustable wrench that electrical connections be the proper size to fit 7/8" (2.2 cm) hole For Power Supply Cord: use with dishwasher Additional parts supplied with 3/8" N.P.T. In addition, for first-time installations Tools needed: Electric drill with 1/2", 3/4" and 1 1/2" hole saw bits Small tubing cutter Wire stripper...

Installation Instructions
Page 4
... extends only partway into opening , shims may be installed. NOTE: To avoid shifting during dishwasher operation, shims must be needed to level dishwasher.) Helpful Tip: Be sure to order. If dishwasher will be subject to water, electricity and drain. • convenient access for loading and ...unloading dishes. A side panel kit is available from your cabinetry. Check location where dishwasher will be left unused for proper operation and appearance. • cabinet front perpendicular to floor. • level floor. (If floor at...
... extends only partway into opening , shims may be installed. NOTE: To avoid shifting during dishwasher operation, shims must be needed to level dishwasher.) Helpful Tip: Be sure to order. If dishwasher will be subject to water, electricity and drain. • convenient access for loading and ...unloading dishes. A side panel kit is available from your cabinetry. Check location where dishwasher will be left unused for proper operation and appearance. • cabinet front perpendicular to floor. • level floor. (If floor at...
Installation Instructions
Page 5
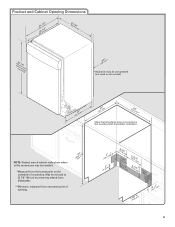
... Dimensions ((26264342..2271//cc82mm"")) (2630.67/c8m" ) w(8ri36teh3mcmw7o/hv)8eem"edilns. (1.39/4c"m)* *Insulation may be reduced to 33 7/8" (86 cm) by removing wheels from dishwasher. **Minimum, measured from the lowest point on all models) (532.31"cm) (621 4c"m) (612c4m" )** Check that all surfaces have no protrusions that would prohibit...
... Dimensions ((26264342..2271//cc82mm"")) (2630.67/c8m" ) w(8ri36teh3mcmw7o/hv)8eem"edilns. (1.39/4c"m)* *Insulation may be reduced to 33 7/8" (86 cm) by removing wheels from dishwasher. **Minimum, measured from the lowest point on all models) (532.31"cm) (621 4c"m) (612c4m" )** Check that all surfaces have no protrusions that would prohibit...
Installation Instructions
Page 6
...or floor. • Use 1/2" minimum I.D. We recommend: • a time-delay fuse or circuit breaker. • a separate circuit. If connecting dishwasher with your home and local codes and ordinances. • Use a UL listed or CSA approved strain relief. It is supplied with a power supply cord...: • Use UL listed power supply cord kit (Part Number 4317824) marked for your dishwasher. Water Supply Requirements • A hot water line with 3/8" N.P.T. A copy of the above the floor. Drain Requirements • A new ...
...or floor. • Use 1/2" minimum I.D. We recommend: • a time-delay fuse or circuit breaker. • a separate circuit. If connecting dishwasher with your home and local codes and ordinances. • Use a UL listed or CSA approved strain relief. It is supplied with a power supply cord...: • Use UL listed power supply cord kit (Part Number 4317824) marked for your dishwasher. Water Supply Requirements • A hot water line with 3/8" N.P.T. A copy of the above the floor. Drain Requirements • A new ...
Installation Instructions
Page 7
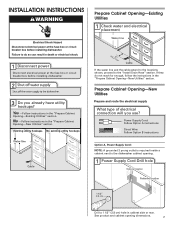
... Follow Option B instructions Option A, Power Supply Cord: NOTE: A grounded 3 prong outlet is required inside a cabinet next to the dishwasher cabinet opening dimensions. 7 Failure to the "Install Drain Hose" section. Existing utility hookups No existing utility hookups Water line Cable Prepare Cabinet...instructions in death or electrical shock. 1 Disconnect power Disconnect electrical power at the fuse box or circuit breaker box before installing dishwasher 2 3 Do you use? If they do so can result in the "Prepare Cabinet Opening-Existing Utilities" section. INSTALLATION ...
... Follow Option B instructions Option A, Power Supply Cord: NOTE: A grounded 3 prong outlet is required inside a cabinet next to the dishwasher cabinet opening dimensions. 7 Failure to the "Install Drain Hose" section. Existing utility hookups No existing utility hookups Water line Cable Prepare Cabinet...instructions in death or electrical shock. 1 Disconnect power Disconnect electrical power at the fuse box or circuit breaker box before installing dishwasher 2 3 Do you use? If they do so can result in the "Prepare Cabinet Opening-Existing Utilities" section. INSTALLATION ...
Installation Instructions
Page 8
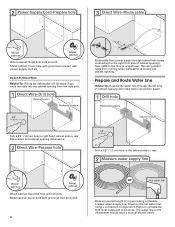
...opening . See product and cabinet opening dimensions. 2 Direct Wire-Prepare hole (15.2 6" cm) Route cable from moving when dishwasher is in right-hand cabinet side or rear. Metal cabinet: Cover hole with local codes and ordinances. Option B, Direct Wire: Helpful Tip:...in the cabinet side or rear. 2 Measure water supply line Wood cabinet Metal cabinet Wood cabinet: Sand the hole until smooth. Tape cable to the dishwasher should have a manual shutoff valve. This will make water connection easier. 1 Drill hole Preferred locations Optional locations 1/2" (1.3 cm) Drill a 1/2" ...
...opening . See product and cabinet opening dimensions. 2 Direct Wire-Prepare hole (15.2 6" cm) Route cable from moving when dishwasher is in right-hand cabinet side or rear. Metal cabinet: Cover hole with local codes and ordinances. Option B, Direct Wire: Helpful Tip:...in the cabinet side or rear. 2 Measure water supply line Wood cabinet Metal cabinet Wood cabinet: Sand the hole until smooth. Tape cable to the dishwasher should have a manual shutoff valve. This will make water connection easier. 1 Drill hole Preferred locations Optional locations 1/2" (1.3 cm) Drill a 1/2" ...
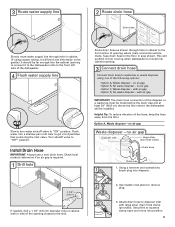
Installation Instructions
Page 9
... screwdriver, knock plug into position. 9 Flush water into a shallow pan until clear to get rid of the hose, keep the hose away from moving when dishwasher is required. 1 Drill hole 1-1/2" (3.8 cm) If needed, drill a 1 1/2" (3.8 cm) diameter hole in cabinet wall or side of the following options: &#... 3 Route water supply line 2 Route drain hose Drain hose Slowly route water supply line through hole in cabinet to the front center of the dishwasher. 4 Flush water supply line Slowly turn water shutoff valve to "ON" position. no air gap • Option C, Waste disposer - no air...
... screwdriver, knock plug into position. 9 Flush water into a shallow pan until clear to get rid of the hose, keep the hose away from moving when dishwasher is required. 1 Drill hole 1-1/2" (3.8 cm) If needed, drill a 1 1/2" (3.8 cm) diameter hole in cabinet wall or side of the following options: &#... 3 Route water supply line 2 Route drain hose Drain hose Slowly route water supply line through hole in cabinet to the front center of the dishwasher. 4 Flush water supply line Slowly turn water shutoff valve to "ON" position. no air gap • Option C, Waste disposer - no air...


