User Manual
Page 1
... hazards that you have provided an easy to help you through any problems you don't follow instructions. DISHWASHER USER INSTRUCTIONS Thank you don't immediately follow instructions. In Canada: visit www.kitchenaid.ca or call 1-800-807-6777. Puede encontrar su número de modelo y de serie en...Always read and obey all safety messages. You can find your model and serial number on the label located near the door on your KitchenAid dishwasher, please contact us that can kill or hurt you to us at www.kitchenaid.com. These words mean: DANGER You can happen if the ...
... hazards that you have provided an easy to help you through any problems you don't follow instructions. DISHWASHER USER INSTRUCTIONS Thank you don't immediately follow instructions. In Canada: visit www.kitchenaid.ca or call 1-800-807-6777. Puede encontrar su número de modelo y de serie en...Always read and obey all safety messages. You can find your model and serial number on the label located near the door on your KitchenAid dishwasher, please contact us that can kill or hurt you to us at www.kitchenaid.com. These words mean: DANGER You can happen if the ...
User Manual
Page 4
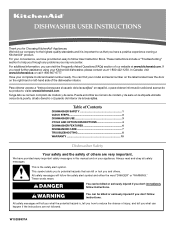
...: If the START/RESUME button is located on top of door, push door firmly closed . Use for several different models. Use for rinsing dishes, This cycle does not dry. Add Rinse Aid ■ Your dishwasher is based on this 1:11 1:41 3:30 amounts of food soil. They also improve drying by... model) See "Cycle and Option Descriptions" charts in the previous wash cycle. ■ You can add an item anytime before...
...: If the START/RESUME button is located on top of door, push door firmly closed . Use for several different models. Use for rinsing dishes, This cycle does not dry. Add Rinse Aid ■ Your dishwasher is based on this 1:11 1:41 3:30 amounts of food soil. They also improve drying by... model) See "Cycle and Option Descriptions" charts in the previous wash cycle. ■ You can add an item anytime before...
User Manual
Page 8
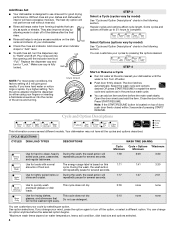
...there is fresh and lump free. Run a vinegar rinse through the dishwasher by pressing START/ RESUME and closing the door within 3 seconds. The dishwasher may be draining properly, see "Water remains in models) Is the dishwasher aligned with the countertop? Be sure your hardness is 15 grains or...following steps may be sure the knockout plug has been removed from the vent in the dishwasher. In the U.S.A., www.kitchenaid.com In Canada, www.kitchenaid.ca Dishwasher is not operating properly ■ Dishwasher does not run NOTES: ■ It is ready to run a rinse cycle with the...
...there is fresh and lump free. Run a vinegar rinse through the dishwasher by pressing START/ RESUME and closing the door within 3 seconds. The dishwasher may be draining properly, see "Water remains in models) Is the dishwasher aligned with the countertop? Be sure your hardness is 15 grains or...following steps may be sure the knockout plug has been removed from the vent in the dishwasher. In the U.S.A., www.kitchenaid.com In Canada, www.kitchenaid.ca Dishwasher is not operating properly ■ Dishwasher does not run NOTES: ■ It is ready to run a rinse cycle with the...
User Manual
Page 10
...the country in materials or workmanship and is operated and maintained according to instructions attached to schedule service, you can find your model and serial number on the label located near the door on the duration of implied warranties of purchase. 6. Cosmetic damage,... appliance is operated and maintained according to instructions attached to correct the installation of products not approved by KitchenAid. 5. The removal and reinstallation of the dishwasher interior. SECOND THROUGH FIFTH YEAR LIMITED WARRANTY ON CERTAIN COMPONENT PARTS In the second through the fifth year...
...the country in materials or workmanship and is operated and maintained according to instructions attached to schedule service, you can find your model and serial number on the label located near the door on the duration of implied warranties of purchase. 6. Cosmetic damage,... appliance is operated and maintained according to instructions attached to correct the installation of products not approved by KitchenAid. 5. The removal and reinstallation of the dishwasher interior. SECOND THROUGH FIFTH YEAR LIMITED WARRANTY ON CERTAIN COMPONENT PARTS In the second through the fifth year...

Installation Instructions
Page 2
...you to potential hazards that can result in Cabinet Opening 23 Complete Installation 24 Check Operation 25 If Dishwasher Does Not Operate 25 Additional Tips 25 DISHWASHER SAFETY Your safety and the safety of Contents Dishwasher Safety 2 Installation Requirements 3 Tools and Parts 3 Location Requirements 4 ...-New Utilities 7 Prepare and Route Water Line 8 Install Drain Hose 9 Install Moisture Barrier (on some models 10 Prepare Dishwasher 11 Make Power Supply Cord Connection 12 Determine Cabinet Opening 13 Installation Instructions (cont.) Install the Door Handle (on some...
...you to potential hazards that can result in Cabinet Opening 23 Complete Installation 24 Check Operation 25 If Dishwasher Does Not Operate 25 Additional Tips 25 DISHWASHER SAFETY Your safety and the safety of Contents Dishwasher Safety 2 Installation Requirements 3 Tools and Parts 3 Location Requirements 4 ...-New Utilities 7 Prepare and Route Water Line 8 Install Drain Hose 9 Install Moisture Barrier (on some models 10 Prepare Dishwasher 11 Make Power Supply Cord Connection 12 Determine Cabinet Opening 13 Installation Instructions (cont.) Install the Door Handle (on some...
Installation Instructions
Page 3
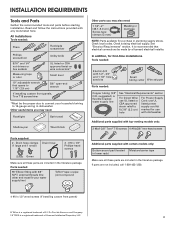
...water supply line See "Electrical Requirements" section For Direct Wire: use UL listed or CSA approved strain relief to 16-gauge wiring in dishwasher Other useful items you may need: Flashlight Bath towel Shallow pan Wood block Other parts you may also need: 1 1/2"-2" (38.1-5.0... external threads (the other end must fit your household wiring to fit 7/8" (2.2 cm) hole For Power Supply Cord: use with dishwasher Additional parts supplied with top-venting models only: 2 #8x1-3/8" Torx® T15 screws 4 #10x3/8" hex-head screws Parts supplied: 2 - See "Electrical Requirements" section...
...water supply line See "Electrical Requirements" section For Direct Wire: use UL listed or CSA approved strain relief to 16-gauge wiring in dishwasher Other useful items you may need: Flashlight Bath towel Shallow pan Wood block Other parts you may also need: 1 1/2"-2" (38.1-5.0... external threads (the other end must fit your household wiring to fit 7/8" (2.2 cm) hole For Power Supply Cord: use with dishwasher Additional parts supplied with top-venting models only: 2 #8x1-3/8" Torx® T15 screws 4 #10x3/8" hex-head screws Parts supplied: 2 - See "Electrical Requirements" section...
Installation Instructions
Page 5
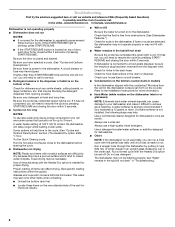
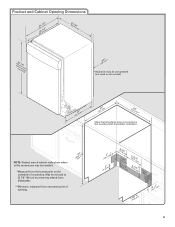
...67/c8m" ) w(8ri36teh3mcmw7o/hv)8eem"edilns. (1.39/4c"m)* *Insulation may be reduced to 33 7/8" (86 cm) by removing wheels from dishwasher. **Minimum, measured from the lowest point on all models) (532.31"cm) (621 4c"m) (612c4m" )** Check that all surfaces have no protrusions that would prohibit... dishwasher installation. NOTE: Shaded area of cabinet walls show where utility connections may be compressed (not used on the underside of...
...67/c8m" ) w(8ri36teh3mcmw7o/hv)8eem"edilns. (1.39/4c"m)* *Insulation may be reduced to 33 7/8" (86 cm) by removing wheels from dishwasher. **Minimum, measured from the lowest point on all models) (532.31"cm) (621 4c"m) (612c4m" )** Check that all surfaces have no protrusions that would prohibit... dishwasher installation. NOTE: Shaded area of cabinet walls show where utility connections may be compressed (not used on the underside of...
Installation Instructions
Page 10
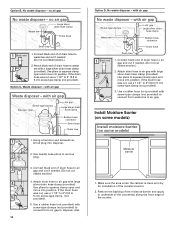
... needed . (Do not cut ribbed section.) 2. If the drain hose was cut , use a 1 1/2" to 2" (3.8 to air gap. Install Moisture Barrier (on some models) Install moisture barrier (on some models) Moisture barrier 1. Make sure the area under the cabinet is clean and dry for installation of drain hose to disposer inlet. 10 Option...
... needed . (Do not cut ribbed section.) 2. If the drain hose was cut , use a 1 1/2" to 2" (3.8 to air gap. Install Moisture Barrier (on some models) Install moisture barrier (on some models) Moisture barrier 1. Make sure the area under the cabinet is clean and dry for installation of drain hose to disposer inlet. 10 Option...
Installation Instructions
Page 14
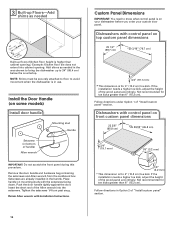
... for toe kicks greater than 6" (15.2 cm). Insert the short end of "Install custom panel" section. 14 Dishwashers with control panel on some models) Install door handle Mounting stud Handle Setscrew (in use. Setscrews are already installed in Option 2 of the Allen wrench..., adjust the height of handle) Allen wrench IMPORTANT: Do not scratch the front panel during this procedure. Retain Allen wrench with the setscrews facing down. Dishwashers with control panel on front custom panel dimensions 23 3/8" (65.8 cm) *25 29/32" (65.8 cm) 3/4" (19.1 mm) 1/8" (3.2 mm)...
... for toe kicks greater than 6" (15.2 cm). Insert the short end of "Install custom panel" section. 14 Dishwashers with control panel on some models) Install door handle Mounting stud Handle Setscrew (in use. Setscrews are already installed in Option 2 of the Allen wrench..., adjust the height of handle) Allen wrench IMPORTANT: Do not scratch the front panel during this procedure. Retain Allen wrench with the setscrews facing down. Dishwashers with control panel on front custom panel dimensions 23 3/8" (65.8 cm) *25 29/32" (65.8 cm) 3/4" (19.1 mm) 1/8" (3.2 mm)...
Installation Instructions
Page 15
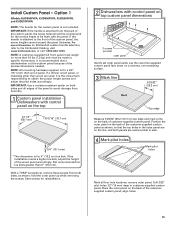
...3/4" (19.1 mm) thick wood panel. NOTE: All mounting hardware supplied is for reinstallation. 2 Dishwashers with control panel on the line, and both sides and all four hole locations; Dishwashers with control panel on the back of the wood panel accordingly. Place the outer panel on top ..., the screw lengths cannot exceed the panel thickness. Option 1 (Models KUDS40FVPA, KUDS50FVPA, KUDE60FVPA, and KUDE70FVPA) NOTE: The handle for toe kicks greater than 16 lbs (7.3 kg) and must weigh no more information on KitchenAid custom handle selection, refer to avoid damage from top edge and ...
...3/4" (19.1 mm) thick wood panel. NOTE: All mounting hardware supplied is for reinstallation. 2 Dishwashers with control panel on the line, and both sides and all four hole locations; Dishwashers with control panel on the back of the wood panel accordingly. Place the outer panel on top ..., the screw lengths cannot exceed the panel thickness. Option 1 (Models KUDS40FVPA, KUDS50FVPA, KUDE60FVPA, and KUDE70FVPA) NOTE: The handle for toe kicks greater than 16 lbs (7.3 kg) and must weigh no more information on KitchenAid custom handle selection, refer to avoid damage from top edge and ...

Installation Instructions
Page 16
.... IMPORTANT: Use a moisture resistant sealer on the front of the customer-supplied custom panel in Step 6. Not recommended for frameless custom panel models with the four #10-16 x 3/8" hex head screws supplied in the literature package. Attach the handle. IMPORTANT: Screw heads must be... through these holes Customer-supplied panel 1-3/8" Screw Install the two #8-18 x 1 3/8" screws from both sides and all edges of the inner panel. Dishwashers with the top of the wood panel accordingly. 5 Attach handle 6" (15.2 mm) Hex Head Screw Attach outer panel to attach custom panels. NOTE...
.... IMPORTANT: Use a moisture resistant sealer on the front of the customer-supplied custom panel in Step 6. Not recommended for frameless custom panel models with the four #10-16 x 3/8" hex head screws supplied in the literature package. Attach the handle. IMPORTANT: Screw heads must be... through these holes Customer-supplied panel 1-3/8" Screw Install the two #8-18 x 1 3/8" screws from both sides and all edges of the inner panel. Dishwashers with the top of the wood panel accordingly. 5 Attach handle 6" (15.2 mm) Hex Head Screw Attach outer panel to attach custom panels. NOTE...
Installation Instructions
Page 24
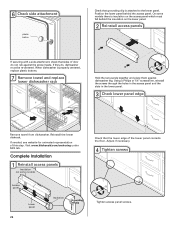
... panel screws. Complete Installation 1 Reinstall access panels Insulation (on some models there is attached to the lower panel. On some models) Access panel Lower panel 24 Insulation Grounding clip Check that sides of door do , dishwasher must fall behind the access panel. Visit www.kitchenaid.com/anchoring under FAQ tab. If they do not rub...
... panel screws. Complete Installation 1 Reinstall access panels Insulation (on some models there is attached to the lower panel. On some models) Access panel Lower panel 24 Insulation Grounding clip Check that sides of door do , dishwasher must fall behind the access panel. Visit www.kitchenaid.com/anchoring under FAQ tab. If they do not rub...
Installation Instructions
Page 25
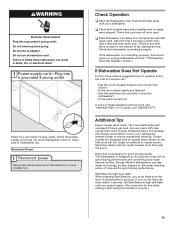
...door, wait 5 seconds, then open door. If Dishwasher Does Not Operate First try the solutions suggested here to possibly avoid the cost of dishwasher tub. Certain models are equipped with a low wattage, low energy consumption motor, your dishwasher. ❏ Check that you press it again....Selecting certain options could increase cycle time past 3.5 hours. Your new dishwasher will run longer to calibrate to complete the shortest wash cycle. Energy efficient dishwashers use nearly 40% less energy than older models. Check that there is water in death, fire, or electrical ...
...door, wait 5 seconds, then open door. If Dishwasher Does Not Operate First try the solutions suggested here to possibly avoid the cost of dishwasher tub. Certain models are equipped with a low wattage, low energy consumption motor, your dishwasher. ❏ Check that you press it again....Selecting certain options could increase cycle time past 3.5 hours. Your new dishwasher will run longer to calibrate to complete the shortest wash cycle. Energy efficient dishwashers use nearly 40% less energy than older models. Check that there is water in death, fire, or electrical ...

Parts Diagram
Page 1
... W10243393 White W10243394 Biscuit W10243391 Stainless 13 8269016 Clip, Grounding 5−08 Litho in U.S.A. (els)(bay) 1 Part No. Part No. DOOR AND PANEL PARTS For Models: KUDS30IVBL0, KUDS30IVWH0, KUDS30IVBT0, KUDS30IVSS0, KUDS30IVBS0 (Black) (White) (Biscuit) (Stainless) (Black/Stainless) UNDERCOUNTER DISHWASHER Illus. B
... W10243393 White W10243394 Biscuit W10243391 Stainless 13 8269016 Clip, Grounding 5−08 Litho in U.S.A. (els)(bay) 1 Part No. Part No. DOOR AND PANEL PARTS For Models: KUDS30IVBL0, KUDS30IVWH0, KUDS30IVBT0, KUDS30IVSS0, KUDS30IVBS0 (Black) (White) (Biscuit) (Stainless) (Black/Stainless) UNDERCOUNTER DISHWASHER Illus. B

Parts Diagram
Page 2
... 8269167 White 8269168 Biscuit 9 8524476 Bolt, Latch 10 W10084141 Control, Electronic 11 8269209 Switch, Door 2 W10246516 No. Part No. CONTROL PANEL AND LATCH PARTS For Models: KUDS30IVBL0, KUDS30IVWH0, KUDS30IVBT0, KUDS30IVSS0, KUDS30IVBS0 (Black) (White) (Biscuit) (Stainless) (Black/Stainless) Illus.
... 8269167 White 8269168 Biscuit 9 8524476 Bolt, Latch 10 W10084141 Control, Electronic 11 8269209 Switch, Door 2 W10246516 No. Part No. CONTROL PANEL AND LATCH PARTS For Models: KUDS30IVBL0, KUDS30IVWH0, KUDS30IVBT0, KUDS30IVSS0, KUDS30IVBS0 (Black) (White) (Biscuit) (Stainless) (Black/Stainless) Illus.

Parts Diagram
Page 4
... & 2 Hose Clamps) 15 356138 Clamp, Hose 16 W10137608 Drain Loop with Check Valve 17 W10070120 Harness, Jumper 4 W10246516 No. FILL, DRAIN AND OVERFILL PARTS For Models: KUDS30IVBL0, KUDS30IVWH0, KUDS30IVBT0, KUDS30IVSS0, KUDS30IVBS0 (Black) (White) (Biscuit) (Stainless) (Black/Stainless) Illus. Part No.
... & 2 Hose Clamps) 15 356138 Clamp, Hose 16 W10137608 Drain Loop with Check Valve 17 W10070120 Harness, Jumper 4 W10246516 No. FILL, DRAIN AND OVERFILL PARTS For Models: KUDS30IVBL0, KUDS30IVWH0, KUDS30IVBT0, KUDS30IVSS0, KUDS30IVBS0 (Black) (White) (Biscuit) (Stainless) (Black/Stainless) Illus. Part No.

Parts Diagram
Page 5
TUB AND FRAME PARTS For Models: KUDS30IVBL0, KUDS30IVWH0, KUDS30IVBT0, KUDS30IVSS0, KUDS30IVBS0 (Black) (White) (Biscuit) (Stainless) (Black/Stainless) W10246516 5
TUB AND FRAME PARTS For Models: KUDS30IVBL0, KUDS30IVWH0, KUDS30IVBT0, KUDS30IVSS0, KUDS30IVBS0 (Black) (White) (Biscuit) (Stainless) (Black/Stainless) W10246516 5

Parts Diagram
Page 6
... Assembly (Also order #5) 18 3400892 Screw 19 8268991 Cover, Terminal Box 20 W10158291 Link, Door Balance 21 304666 Retainer, Push 23 8573239 Shield, Sound Tub 24 9742648 Bracket, Thermostat 25 661566 Thermostat 26 8580309 Strike, Latch 27 3378128 Washer, Pronged Cup 28 3400014 Screw 29 8572661 Actuator Assembly 30 W10082769 Motor...
... Assembly (Also order #5) 18 3400892 Screw 19 8268991 Cover, Terminal Box 20 W10158291 Link, Door Balance 21 304666 Retainer, Push 23 8573239 Shield, Sound Tub 24 9742648 Bracket, Thermostat 25 661566 Thermostat 26 8580309 Strike, Latch 27 3378128 Washer, Pronged Cup 28 3400014 Screw 29 8572661 Actuator Assembly 30 W10082769 Motor...

Parts Diagram
Page 7
PUMP AND MOTOR PARTS For Models: KUDS30IVBL0, KUDS30IVWH0, KUDS30IVBT0, KUDS30IVSS0, KUDS30IVBS0 (Black) (White) (Biscuit) (Stainless) (Black/Stainless) W10246516 7
PUMP AND MOTOR PARTS For Models: KUDS30IVBL0, KUDS30IVWH0, KUDS30IVBT0, KUDS30IVSS0, KUDS30IVBS0 (Black) (White) (Biscuit) (Stainless) (Black/Stainless) W10246516 7

Parts Diagram
Page 8
... 19 8531018 Washer 20 8531017 Impeller Kit 21 8268403 Face Seal Assembly (Also Order Item 21) 22 356138 Clamp, Hose 23 W10134017 Optical Water Indicator 24 W10216724 Capacitor 8 W10246516 PUMP AND MOTOR PARTS For Models: KUDS30IVBL0, KUDS30IVWH0, KUDS30IVBT0, KUDS30IVSS0, KUDS30IVBS0 (Black) (White) (Biscuit) (Stainless) (Black/Stainless) Illus. No. Part No.
... 19 8531018 Washer 20 8531017 Impeller Kit 21 8268403 Face Seal Assembly (Also Order Item 21) 22 356138 Clamp, Hose 23 W10134017 Optical Water Indicator 24 W10216724 Capacitor 8 W10246516 PUMP AND MOTOR PARTS For Models: KUDS30IVBL0, KUDS30IVWH0, KUDS30IVBT0, KUDS30IVSS0, KUDS30IVBS0 (Black) (White) (Biscuit) (Stainless) (Black/Stainless) Illus. No. Part No.


