

Installation Guide
Page 2
... instructions. Doing so can result in this dishwasher as specified in Cabinet Opening 24 Bottom Sound Pad Installation (on some models 15 Custom Panel Dimensions 15 Install Custom Panel 16 Choose Attachment Option 18 Move Dishwasher Close to Cabinet Opening 19 Connect to...Prepare Dishwasher 12 Make Power Supply Cord Connection 13 Determine Cabinet Opening 14 INSTALLATION INSTRUCTIONS (CONT.) Install Door Handle (on some models 25 Complete Installation 25 Check Operation 26 If Dishwasher Does Not Operate 26 Additional Tips 26 DISHWASHER SAFETY Your safety and the safety...
... instructions. Doing so can result in this dishwasher as specified in Cabinet Opening 24 Bottom Sound Pad Installation (on some models 15 Custom Panel Dimensions 15 Install Custom Panel 16 Choose Attachment Option 18 Move Dishwasher Close to Cabinet Opening 19 Connect to...Prepare Dishwasher 12 Make Power Supply Cord Connection 13 Determine Cabinet Opening 14 INSTALLATION INSTRUCTIONS (CONT.) Install Door Handle (on some models 25 Complete Installation 25 Check Operation 26 If Dishwasher Does Not Operate 26 Additional Tips 26 DISHWASHER SAFETY Your safety and the safety...

Installation Guide
Page 3
Read and follow the instructions provided with certain models only Make sure all these parts are included in Kit: 4 Plastic studs (attached to 16-gauge wiring in plumbing supply stores. Parts available for purchase ... panel is recommended when installing a dishwasher under a wood countertop. Other parts you may also need : Parts needed: Parts supplied: Additional parts supplied with top-venting models only: Parts needed : * Must be the proper size to connect your household wiring to each other by runners) 4 Short screws (10-16 hex head screw...
Read and follow the instructions provided with certain models only Make sure all these parts are included in Kit: 4 Plastic studs (attached to 16-gauge wiring in plumbing supply stores. Parts available for purchase ... panel is recommended when installing a dishwasher under a wood countertop. Other parts you may also need : Parts needed: Parts supplied: Additional parts supplied with top-venting models only: Parts needed : * Must be the proper size to connect your household wiring to each other by runners) 4 Short screws (10-16 hex head screw...

Installation Guide
Page 15
... cabinet opening height is higher than 34" (86.4 cm), the rear wheels can be more difficult to move. (Measurements are approximate. Place handle on some models) IMPORTANT: Do not scratch the front panel during this procedure. Tighten the setscrews ¹⁄₄ turn past snug.
... cabinet opening height is higher than 34" (86.4 cm), the rear wheels can be more difficult to move. (Measurements are approximate. Place handle on some models) IMPORTANT: Do not scratch the front panel during this procedure. Tighten the setscrews ¹⁄₄ turn past snug.

Installation Guide
Page 20
... the tensioner. Using a nut driver or hex socket, remove the screw from the rear leg of dishwasher should be put into cabinet opening . ■ For models with water softener, make sure that the drain hose stays on the hanger that is on the side of the unit. 20 Reattach door spring...
... the tensioner. Using a nut driver or hex socket, remove the screw from the rear leg of dishwasher should be put into cabinet opening . ■ For models with water softener, make sure that the drain hose stays on the hanger that is on the side of the unit. 20 Reattach door spring...

Installation Guide
Page 25
Place pad on some models) 1. Fold up and vinyl pad faces down. 3. NOTE: If there are pipes or other obstructions coming up and down . Make sure the vinyl pad is ... lettering is tucked up into place. Bottom Sound Pad Installation (on the floor in the pad to lock into position. Adjust if necessary. 4. Visit www.kitchenaid.com/anchoring under FAQ tab. Remove the bottom sound pad from dishwasher. Fold the front end of the dishwasher, making sure not to push or...
Place pad on some models) 1. Fold up and vinyl pad faces down. 3. NOTE: If there are pipes or other obstructions coming up and down . Make sure the vinyl pad is ... lettering is tucked up into place. Bottom Sound Pad Installation (on the floor in the pad to lock into position. Adjust if necessary. 4. Visit www.kitchenaid.com/anchoring under FAQ tab. Remove the bottom sound pad from dishwasher. Fold the front end of the dishwasher, making sure not to push or...

Installation Guide
Page 26
... outlet. Do not use an extension cord. Failure to optical sensor. Check that there is not working properly. Additional Tips Expect longer wash times. Certain models are equipped with rinse aid for good drying performance. Energy efficient dishwashers use nearly 40% less energy than older... models. Do not remove ground prong. Check that you press it to be used , replace inlet hose after 5 years to reduce the risk of a service call 1-...
... outlet. Do not use an extension cord. Failure to optical sensor. Check that there is not working properly. Additional Tips Expect longer wash times. Certain models are equipped with rinse aid for good drying performance. Energy efficient dishwashers use nearly 40% less energy than older... models. Do not remove ground prong. Check that you press it to be used , replace inlet hose after 5 years to reduce the risk of a service call 1-...

User Instructions
Page 1
...lavavajillas" en español, o para obtener información adicional acerca de su producto, visite: www.kitchenaid.com Tenga listo su número completo de modelo y de serie. Always read and obey all safety messages. For additional information, you can kill or hurt you don't ... CARE 7 TROUBLESHOOTING 8 WARRANTY 10 Dishwasher Safety Your safety and the safety of others . Have your complete model and serial number ready. Puede encontrar su número de modelo y de serie en la etiqueta ubicada cerca de la puerta, al lado derecho o izquierdo del interior de la lavavajillas....
...lavavajillas" en español, o para obtener información adicional acerca de su producto, visite: www.kitchenaid.com Tenga listo su número completo de modelo y de serie. Always read and obey all safety messages. For additional information, you can kill or hurt you don't ... CARE 7 TROUBLESHOOTING 8 WARRANTY 10 Dishwasher Safety Your safety and the safety of others . Have your complete model and serial number ready. Puede encontrar su número de modelo y de serie en la etiqueta ubicada cerca de la puerta, al lado derecho o izquierdo del interior de la lavavajillas....

User Instructions
Page 4
... -- Start or Resume a Cycle ■ Run hot water at "Full." Open the door slowly and add the item. Use for several different models. glasses, and silverware that can Full dry as in the previous wash cycle. ■ You can add an item anytime before the selected option.... Refill Lock fill - -- 6 5 4 STEP 3 Select a Cycle (cycles vary by model) See "Cycle and Option Descriptions" charts in the following section. Select Options (options vary by model) See "Cycle and Option Descriptions" charts in the following section. repeatedly pause for hard-to ...
... -- Start or Resume a Cycle ■ Run hot water at "Full." Open the door slowly and add the item. Use for several different models. glasses, and silverware that can Full dry as in the previous wash cycle. ■ You can add an item anytime before the selected option.... Refill Lock fill - -- 6 5 4 STEP 3 Select a Cycle (cycles vary by model) See "Cycle and Option Descriptions" charts in the following section. Select Options (options vary by model) See "Cycle and Option Descriptions" charts in the following section. repeatedly pause for hard-to ...

User Instructions
Page 8
...nonstick surfaces are detected, the dishwasher may not operate properly or may be sure the knockout plug has been removed from the vent in models) Is the dishwasher aligned with the Heated Dry option turned off. Check for dishwashers. ■ Odors NOTE: If the dishwasher is ...the solutions suggested here or visit our website and reference FAQs (Frequently Asked Questions) to collect water droplets. In the U.S.A., www.kitchenaid.com In Canada, www.kitchenaid.ca Dishwasher is on ). Be sure the cycle has completed (green light is needed for proper drying. Some options will not ...
...nonstick surfaces are detected, the dishwasher may not operate properly or may be sure the knockout plug has been removed from the vent in models) Is the dishwasher aligned with the Heated Dry option turned off. Check for dishwashers. ■ Odors NOTE: If the dishwasher is ...the solutions suggested here or visit our website and reference FAQs (Frequently Asked Questions) to collect water droplets. In the U.S.A., www.kitchenaid.com In Canada, www.kitchenaid.ca Dishwasher is on ). Be sure the cycle has completed (green light is needed for proper drying. Some options will not ...

User Instructions
Page 10
...dents, chips or other damage to the finish of your model and serial number on the label located near the door on major appliances with any questions or concerns at the number below : In the U.S.A.: In Canada: KitchenAid Brand Home Appliances Customer eXperience Center 553 Benson Road Benton ... limitations on how to use or when it was purchased: nylon dish racks and electronic controls. You can write to KitchenAid with original model/serial numbers that have other than normal, single-family household use your correspondence. If you need assistance using your complete...
...dents, chips or other damage to the finish of your model and serial number on the label located near the door on major appliances with any questions or concerns at the number below : In the U.S.A.: In Canada: KitchenAid Brand Home Appliances Customer eXperience Center 553 Benson Road Benton ... limitations on how to use or when it was purchased: nylon dish racks and electronic controls. You can write to KitchenAid with original model/serial numbers that have other than normal, single-family household use your correspondence. If you need assistance using your complete...
Parts Diagram
Page 1
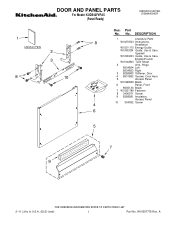
... 7 W10331789 Fastener 8 3400071 Screw 9 8268581 Insulation, Access Panel 10 304392 Screw 2−11 Litho In U.S.A. (ELS) (eeb) 1 Part No. No. DOOR AND PANEL PARTS For Model: KUDS40FVPA5 (Panel Ready) UNDERCOUNTER DISHWASHER Illus.
... 7 W10331789 Fastener 8 3400071 Screw 9 8268581 Insulation, Access Panel 10 304392 Screw 2−11 Litho In U.S.A. (ELS) (eeb) 1 Part No. No. DOOR AND PANEL PARTS For Model: KUDS40FVPA5 (Panel Ready) UNDERCOUNTER DISHWASHER Illus.
Parts Diagram
Page 2
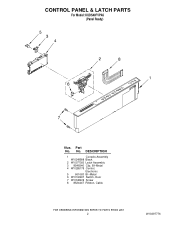
DESCRIPTION 1 Console Assembly W10249998 Black 2 W10077360 Latch Assembly 3 8546546 Clip, BI−Metal 4 W10285179 Control, Electronic 5 661663 BI−Metal 6 W10102497 Switch, Door 7 W10348409 Screw 8 8524447 Ribbon, Cable 2 W10397776 CONTROL PANEL & LATCH PARTS For Model: KUDS40FVPA5 (Panel Ready) Illus. No. Part No.
DESCRIPTION 1 Console Assembly W10249998 Black 2 W10077360 Latch Assembly 3 8546546 Clip, BI−Metal 4 W10285179 Control, Electronic 5 661663 BI−Metal 6 W10102497 Switch, Door 7 W10348409 Screw 8 8524447 Ribbon, Cable 2 W10397776 CONTROL PANEL & LATCH PARTS For Model: KUDS40FVPA5 (Panel Ready) Illus. No. Part No.
Parts Diagram
Page 3
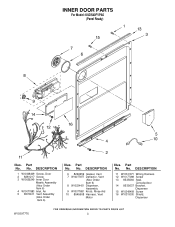
... 12 W10177098 Screw 13 8535660 Seal, Console/door 14 8535637 Bracket, Dispenser 15 W10348408 Screw 16 W10319030 Shield, Dispenser W10397776 3 No. INNER DOOR PARTS For Model: KUDS40FVPA5 (Panel Ready) Illus. No. Part No.
... 12 W10177098 Screw 13 8535660 Seal, Console/door 14 8535637 Bracket, Dispenser 15 W10348408 Screw 16 W10319030 Shield, Dispenser W10397776 3 No. INNER DOOR PARTS For Model: KUDS40FVPA5 (Panel Ready) Illus. No. Part No.
Parts Diagram
Page 4
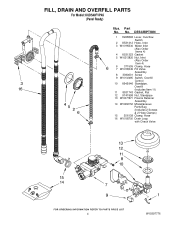
No. FILL, DRAIN AND OVERFILL PARTS For Model: KUDS40FVPA5 (Panel Ready) Illus. Part No. DESCRIPTION 1 8268892 Lever, Overflow Switch 2 8531412 Hose, Inlet 3 W10195536 Water Inlet (Also Order Items 4) 4 8531323 Gasket 5 W10213826 Nut, Inlet (...
No. FILL, DRAIN AND OVERFILL PARTS For Model: KUDS40FVPA5 (Panel Ready) Illus. Part No. DESCRIPTION 1 8268892 Lever, Overflow Switch 2 8531412 Hose, Inlet 3 W10195536 Water Inlet (Also Order Items 4) 4 8531323 Gasket 5 W10213826 Nut, Inlet (...
Parts Diagram
Page 5
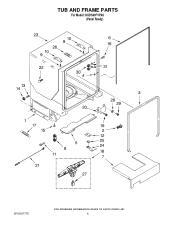
TUB AND FRAME PARTS For Model: KUDS40FVPA5 (Panel Ready) W10397776 5
TUB AND FRAME PARTS For Model: KUDS40FVPA5 (Panel Ready) W10397776 5
Parts Diagram
Page 6
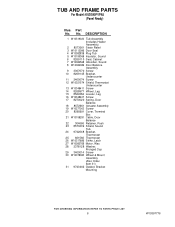
... 3400014 Screw 30 W10078083 Wheel & Mount Assembly (Also Order Item 31) 31 9743002 Gasket, Bracket Mounting 6 W10397776 Part No. No. TUB AND FRAME PARTS For Model: KUDS40FVPA5 (Panel Ready) Illus.
... 3400014 Screw 30 W10078083 Wheel & Mount Assembly (Also Order Item 31) 31 9743002 Gasket, Bracket Mounting 6 W10397776 Part No. No. TUB AND FRAME PARTS For Model: KUDS40FVPA5 (Panel Ready) Illus.
Parts Diagram
Page 7
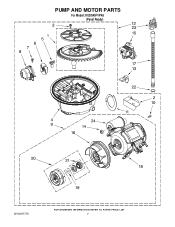
PUMP AND MOTOR PARTS For Model: KUDS40FVPA5 (Panel Ready) W10397776 7
PUMP AND MOTOR PARTS For Model: KUDS40FVPA5 (Panel Ready) W10397776 7
Parts Diagram
Page 8
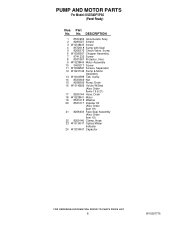
No. PUMP AND MOTOR PARTS For Model: KUDS40FVPA5 (Panel Ready) Illus. DESCRIPTION 1 8534952 Accumulator Assy 2 8283527 Shield 3 W10348405 Screw 4 8572618 Sump with Seal 5 8268375 Check Valve, Sump 6 W10083957 Chopper Assembly 7 9741232 Screw 8 ...
No. PUMP AND MOTOR PARTS For Model: KUDS40FVPA5 (Panel Ready) Illus. DESCRIPTION 1 8534952 Accumulator Assy 2 8283527 Shield 3 W10348405 Screw 4 8572618 Sump with Seal 5 8268375 Check Valve, Sump 6 W10083957 Chopper Assembly 7 9741232 Screw 8 ...

Parts Diagram
Page 9
DESCRIPTION 1 W10077859 Feed Tube Assembly (Also Includes Item 3) 2 8533889 Screw 3 8557720 Sprayarm, 3rd Level 4 W10118464 Cover, Screw 5 W10082867 Mount 6 W10323424 Manifold 7 W10082832 Hanger 8 8268433 Seal, Sprayarm 9 W10082831 Probe, Manifold 10 W10082841 Sprayarm 11 W10077600 Manifold, Spray Zone 12 W10077903 Valve Assembly, Manifold 9 No. Part No. UPPER WASH AND RINSE PARTS For Model: KUDS40FVPA5 (Panel Ready) W10397776 Illus.
DESCRIPTION 1 W10077859 Feed Tube Assembly (Also Includes Item 3) 2 8533889 Screw 3 8557720 Sprayarm, 3rd Level 4 W10118464 Cover, Screw 5 W10082867 Mount 6 W10323424 Manifold 7 W10082832 Hanger 8 8268433 Seal, Sprayarm 9 W10082831 Probe, Manifold 10 W10082841 Sprayarm 11 W10077600 Manifold, Spray Zone 12 W10077903 Valve Assembly, Manifold 9 No. Part No. UPPER WASH AND RINSE PARTS For Model: KUDS40FVPA5 (Panel Ready) W10397776 Illus.
Parts Diagram
Page 10
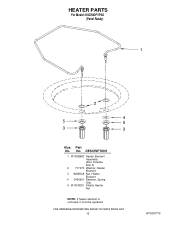
DESCRIPTION 1 W10082892 Heater Element Assembly (Also Includes Item 2) 2 717273 Washer, Heater Element 3 8268548 Nut, Heater Element 4 3400931 Retainer, Spring Grip 5 W10343251 Shield, Heeter Nut NOTE: If heater element is removed, it must be replaced. 10 W10397776 HEATER PARTS For Model: KUDS40FVPA5 (Panel Ready) Illus. Part No. No.
DESCRIPTION 1 W10082892 Heater Element Assembly (Also Includes Item 2) 2 717273 Washer, Heater Element 3 8268548 Nut, Heater Element 4 3400931 Retainer, Spring Grip 5 W10343251 Shield, Heeter Nut NOTE: If heater element is removed, it must be replaced. 10 W10397776 HEATER PARTS For Model: KUDS40FVPA5 (Panel Ready) Illus. Part No. No.


