User Instructions
Page 1
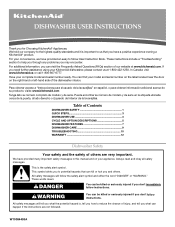
... your convenience, we have a positive experience owning a KitchenAid® product. DISHWASHER USER INSTRUCTIONS Thank you and others are not followed. For your model and serial number on the label located near the door on your KitchenAid dishwasher, please contact us that can be killed or seriously ...injured if you have provided an easy to reduce the chance of our website at 1-800-422-1230. Have your complete model and serial number ready. Para obtener ...
... your convenience, we have a positive experience owning a KitchenAid® product. DISHWASHER USER INSTRUCTIONS Thank you and others are not followed. For your model and serial number on the label located near the door on your KitchenAid dishwasher, please contact us that can be killed or seriously ...injured if you have provided an easy to reduce the chance of our website at 1-800-422-1230. Have your complete model and serial number ready. Para obtener ...
User Instructions
Page 4
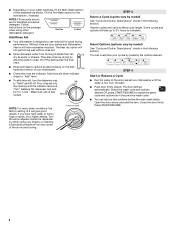
... the door firmly. Hard Water Soft Water Main Wash Hard Water Soft Water Pre-Wash Add Rinse Aid ■ Your dishwasher is fully locked. The heat dry option will give good results. Add ■ Check the rinse aid indicator. You can Full dry as shown. ...Option Descriptions" charts in the following section. NOTE: Fill amounts shown are for good drying performance. Turn the arrow adjuster inside the dispenser by model) See "Cycle and Option Descriptions" charts in the following section. Some cycles and options will have hard water or notice rings or spots,...
... the door firmly. Hard Water Soft Water Main Wash Hard Water Soft Water Pre-Wash Add Rinse Aid ■ Your dishwasher is fully locked. The heat dry option will give good results. Add ■ Check the rinse aid indicator. You can Full dry as shown. ...Option Descriptions" charts in the following section. NOTE: Fill amounts shown are for good drying performance. Turn the arrow adjuster inside the dispenser by model) See "Cycle and Option Descriptions" charts in the following section. Some cycles and options will have hard water or notice rings or spots,...
User Instructions
Page 5
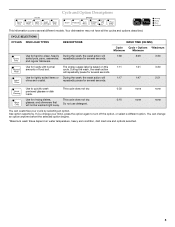
.... 5 Do not use detergent. 0:10 none none You can change your cycle by selecting an option. Your dishwasher may not have all the cycles and options described. cycle. repeatedly pause for several different models. See option selections. and regular tableware. CYCLE SELECTIONS CYCLES DISH LOAD TYPES DESCRIPTIONS WASH TIME (HH:MM) Cycle...
.... 5 Do not use detergent. 0:10 none none You can change your cycle by selecting an option. Your dishwasher may not have all the cycles and options described. cycle. repeatedly pause for several different models. See option selections. and regular tableware. CYCLE SELECTIONS CYCLES DISH LOAD TYPES DESCRIPTIONS WASH TIME (HH:MM) Cycle...
User Instructions
Page 10
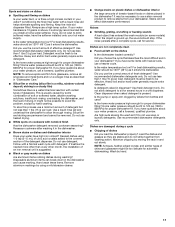
...call. Run a vinegar rinse as well without rinse aid. ■ Dishes are adjusted based on the kitchen counter (built-in models) Is the dishwasher aligned with an optical sensor wash that there is rinse aid in the covered section of the access panel Was too much detergent... Is the water shutoff valve (if installed) turned on the counter. The dishwasher runs longer while heating water. In the U.S.A., www.kitchenaid.com In Canada, www.kitchenaid.ca Dishwasher is not operating properly ■ Dishwasher does not run too long The dishwasher can form on ? Is the water supplied to the...
...call. Run a vinegar rinse as well without rinse aid. ■ Dishes are adjusted based on the kitchen counter (built-in models) Is the dishwasher aligned with an optical sensor wash that there is rinse aid in the covered section of the access panel Was too much detergent... Is the water shutoff valve (if installed) turned on the counter. The dishwasher runs longer while heating water. In the U.S.A., www.kitchenaid.com In Canada, www.kitchenaid.ca Dishwasher is not operating properly ■ Dishwasher does not run too long The dishwasher can form on ? Is the water supplied to the...
User Instructions
Page 11
... persists after washing it is ground up, the sound should stop. Did you load the dishwasher properly? Use fresh detergent only. Dishes are stable and do not wish to sit for service. Minimize chipping by some models). Do not use a heavier cycle. Home water pressure should be effective. Reseason cookware after a complete...
... persists after washing it is ground up, the sound should stop. Did you load the dishwasher properly? Use fresh detergent only. Dishes are stable and do not wish to sit for service. Minimize chipping by some models). Do not use a heavier cycle. Home water pressure should be effective. Reseason cookware after a complete...

User Instructions
Page 12
.... 7. Pickup and delivery. All rights reserved. ® Registered Trademark/TM Trademark of KitchenAid, U.S.A., KitchenAid Canada licensee in Canada 10/07 Printed in the U.S.A., call 1-800-807-6777. KITCHENAID® DISHWASHER WARRANTY ONE YEAR LIMITED WARRANTY For one year from the date of purchase, when this...For the lifetime of the product from the date of the dishwasher interior. ITEMS KITCHENAID WILL NOT PAY FOR 1. Those consumable parts are excluded from unauthorized modifications made to correct defects in your model and serial number on the label located near the door on...
.... 7. Pickup and delivery. All rights reserved. ® Registered Trademark/TM Trademark of KitchenAid, U.S.A., KitchenAid Canada licensee in Canada 10/07 Printed in the U.S.A., call 1-800-807-6777. KITCHENAID® DISHWASHER WARRANTY ONE YEAR LIMITED WARRANTY For one year from the date of purchase, when this...For the lifetime of the product from the date of the dishwasher interior. ITEMS KITCHENAID WILL NOT PAY FOR 1. Those consumable parts are excluded from unauthorized modifications made to correct defects in your model and serial number on the label located near the door on...
Installation Instructions
Page 3
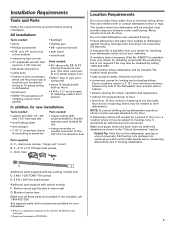
.... Location Requirements Do not run drain lines, water lines or electrical wiring where they can interfere with certain models F. Do not install dishwasher over carpeted flooring. If dishwasher will need to floor. • level floor. (If floor at front of opening ) you will be...the end of time or in leveling dishwasher. 3 drain hose A B C Additional parts supplied with top-venting models only D. 2 #8 x 1-3/8" TORX® T15 screws E. 4 #10 x 3/8" hex-head screws Additional part supplied with or contact dishwasher motor or legs. Protect dishwasher and water lines leading to water, ...
.... Location Requirements Do not run drain lines, water lines or electrical wiring where they can interfere with certain models F. Do not install dishwasher over carpeted flooring. If dishwasher will need to floor. • level floor. (If floor at front of opening ) you will be...the end of time or in leveling dishwasher. 3 drain hose A B C Additional parts supplied with top-venting models only D. 2 #8 x 1-3/8" TORX® T15 screws E. 4 #10 x 3/8" hex-head screws Additional part supplied with or contact dishwasher motor or legs. Protect dishwasher and water lines leading to water, ...

Installation Instructions
Page 4
...) power supply cord - 1-1/2" (3.8 cm) * Measured from narrowest point of opening. *** May be increased to 33-7/8" (86 cm) by removing wheels from dishwasher. ** Minimum, measured from the lowest point on all models) 24-7/8" (63.2 cm) 24-1/2" (62.2 cm)* front vent 33-7/8" (86 cm) min. REAR VIEW 4 Product dimensions 3/4" (1.9 cm) insulation - may be reduced...
...) power supply cord - 1-1/2" (3.8 cm) * Measured from narrowest point of opening. *** May be increased to 33-7/8" (86 cm) by removing wheels from dishwasher. ** Minimum, measured from the lowest point on all models) 24-7/8" (63.2 cm) 24-1/2" (62.2 cm)* front vent 33-7/8" (86 cm) min. REAR VIEW 4 Product dimensions 3/4" (1.9 cm) insulation - may be reduced...
Installation Instructions
Page 9
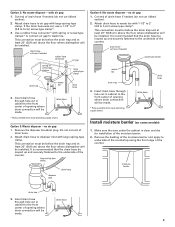
...waste tee. drain hose - drain hose * Parts available from local plumbing supply stores drain hose drain hose Install moisture barrier (on some models) 1. no air gap: 1. Make sure the area under the cabinet is clean and dry for installation of drain hose. 2. Remove the... connector* with air gap: 1. This connection must be before the drain trap and at least 20" (50.8 cm) above the floor where dishwasher will be installed. It is recommended that the drain hose be made. large spring-type clamp disposer inlet drain hose Option 4: No waste disposer ...
...waste tee. drain hose - drain hose * Parts available from local plumbing supply stores drain hose drain hose Install moisture barrier (on some models) 1. no air gap: 1. Make sure the area under the cabinet is clean and dry for installation of drain hose. 2. Remove the... connector* with air gap: 1. This connection must be before the drain trap and at least 20" (50.8 cm) above the floor where dishwasher will be installed. It is recommended that the drain hose be made. large spring-type clamp disposer inlet drain hose Option 4: No waste disposer ...
Installation Instructions
Page 11
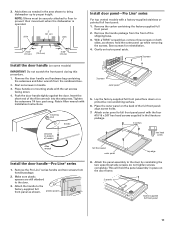
...Gently set screws in the area shown to full front panel panel with Installation Instructions. Attach the handle to prevent their movement when the dishwasher is operated. do not tighten screws completely. Place handle on both sides, as shown; Lay the factory-supplied full front panel face ...series 1. shim 2" (5.1 cm) shim 2-3/4" (7.0 cm) 6" (15.2 cm) 2-3/4" (7.0 cm) Install door panel-Pro Line® series For top vented models with the set screws facing down on the back of the Allen wrench into the setscrews. Place the outer panel on a protective non-scratching surface...
...Gently set screws in the area shown to full front panel panel with Installation Instructions. Attach the handle to prevent their movement when the dishwasher is operated. do not tighten screws completely. Place handle on both sides, as shown; Lay the factory-supplied full front panel face ...series 1. shim 2" (5.1 cm) shim 2-3/4" (7.0 cm) 6" (15.2 cm) 2-3/4" (7.0 cm) Install door panel-Pro Line® series For top vented models with the set screws facing down on the back of the Allen wrench into the setscrews. Place the outer panel on a protective non-scratching surface...
Installation Instructions
Page 12
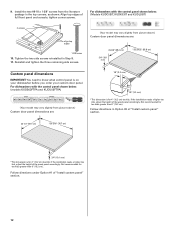
...of the wood panel accordingly. Follow directions under Option #1 of full front panel and console; 9. For dishwashers with the control panel shown below : (Models KUDC03IT, KUDK03IT and KUDL03IT) 2 screws align top edges 1-3/8"screw 10. Align top edges of "Install ...panel dimensions are : 1/8" (3.2 mm) 1/8" (3.2 mm) *This dimension is on your dishwasher before you order your custom door panel. For dishwashers with the control panel shown below : (models KUDS03FTPA and KUDU03FTPA) (Your model may vary slightly from picture above .) Custom door panel dimensions are : 23-3/8" (59...
...of the wood panel accordingly. Follow directions under Option #1 of full front panel and console; 9. For dishwashers with the control panel shown below : (Models KUDC03IT, KUDK03IT and KUDL03IT) 2 screws align top edges 1-3/8"screw 10. Align top edges of "Install ...panel dimensions are : 1/8" (3.2 mm) 1/8" (3.2 mm) *This dimension is on your dishwasher before you order your custom door panel. For dishwashers with the control panel shown below : (models KUDS03FTPA and KUDU03FTPA) (Your model may vary slightly from picture above .) Custom door panel dimensions are : 23-3/8" (59...
Installation Instructions
Page 15
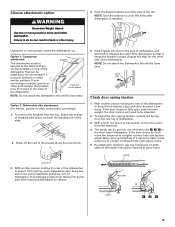
... brackets The dishwasher must be done later. front vent model shown NOTE: Do not attach the dishwasher, this will be secured at back of brackets with pliers, and pull the brackets out of dishwasher should be done later. Break off the end of the tub. NOTE: Do not attach the dishwasher, this step...from the tensioner. 4. Repeat this will be secured to the cabinet. If the door closes by itself , move the tensioner to the sides of the dishwasher so that can be adjusted. 2. tabs 2. Failure to do so can be moved to a higher number hole and replace screw. If the door ...
... brackets The dishwasher must be done later. front vent model shown NOTE: Do not attach the dishwasher, this will be secured at back of brackets with pliers, and pull the brackets out of dishwasher should be done later. Break off the end of the tub. NOTE: Do not attach the dishwasher, this step...from the tensioner. 4. Repeat this will be secured to the cabinet. If the door closes by itself , move the tensioner to the sides of the dishwasher so that can be adjusted. 2. tabs 2. Failure to do so can be moved to a higher number hole and replace screw. If the door ...

Installation Instructions
Page 19
...and hold the side panels down . 3. Make sure the vinyl pad is facing up against dishwasher leg and vinyl pad. 4. Place pad on the floor in death, fire, or electrical shock. Some models have insulation on the access panel which must fall behind the access panel. Do not use ...up into a grounded 3 prong outlet. Place the lower panel behind the insulation on some models) 1. Failure to fit around the obstacle. 3. Failure to proper position. Remove the bottom sound pad from inside the dishwasher and take it will need to cut a slit in the pad to follow these instructions ...
...and hold the side panels down . 3. Make sure the vinyl pad is facing up against dishwasher leg and vinyl pad. 4. Place pad on the floor in death, fire, or electrical shock. Some models have insulation on the access panel which must fall behind the access panel. Do not use ...up into a grounded 3 prong outlet. Place the lower panel behind the insulation on some models) 1. Failure to fit around the obstacle. 3. Failure to proper position. Remove the bottom sound pad from inside the dishwasher and take it will need to cut a slit in the pad to follow these instructions ...

Parts Diagram
Page 1
A DOOR AND PANEL PARTS For Models: KUDT03FTBL1, KUDT03FTWH1, KUDT03FTSS1 (Black) (White) (Stainless) UNDERCOUNTER DISHWASHER Illus. Part No. W10161581 Rev. DESCRIPTION 1 Literature Parts W10078153 Instructions, Installation W10111124 Energy Guide W10084169 D/W User Instructions, Spanish W10084091 D/W User Instructions, English/French W10082651 Tech ...
A DOOR AND PANEL PARTS For Models: KUDT03FTBL1, KUDT03FTWH1, KUDT03FTSS1 (Black) (White) (Stainless) UNDERCOUNTER DISHWASHER Illus. Part No. W10161581 Rev. DESCRIPTION 1 Literature Parts W10078153 Instructions, Installation W10111124 Energy Guide W10084169 D/W User Instructions, Spanish W10084091 D/W User Instructions, English/French W10082651 Tech ...


