Use and Care Manual
Page 3
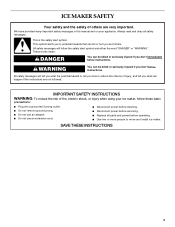
... instructions. These words mean: DANGER You can be killed or seriously injured if you to move and install ice maker. This symbol alerts you don't immediately follow these basic precautions: ■ Plug into a grounded 3 prong outlet. ■ Do not remove ground prong. ■ Do not ... others are not followed. Always read and obey all parts and panels before servicing. ■ Replace all safety messages. All safety messages will follow instructions. ICE MAKER SAFETY Your safety and the safety of others .
... instructions. These words mean: DANGER You can be killed or seriously injured if you to move and install ice maker. This symbol alerts you don't immediately follow these basic precautions: ■ Plug into a grounded 3 prong outlet. ■ Do not remove ground prong. ■ Do not ... others are not followed. Always read and obey all parts and panels before servicing. ■ Replace all safety messages. All safety messages will follow instructions. ICE MAKER SAFETY Your safety and the safety of others .
Use and Care Manual
Page 4
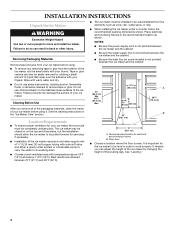
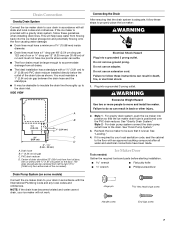
...or abrasive cleaners to remove tape or glue. Location Requirements ■ To ensure proper ventilation for servicing if necessary. ■ Installation of the ice maker requires a cold water supply inlet of ¹⁄₄" (6.35 mm) OD soft copper tubing with a shutoff valve and either a ...cm) A 28¹⁄₂" (72.4 cm) B 15" (38.1 cm) A. These products can result in order to move and install ice maker. Removing Packaging Materials Remove tape and glue from your thumb. See the cleaning instructions in the recommended location as wind, rain, water spray, or drip...
...or abrasive cleaners to remove tape or glue. Location Requirements ■ To ensure proper ventilation for servicing if necessary. ■ Installation of the ice maker requires a cold water supply inlet of ¹⁄₄" (6.35 mm) OD soft copper tubing with a shutoff valve and either a ...cm) A 28¹⁄₂" (72.4 cm) B 15" (38.1 cm) A. These products can result in order to move and install ice maker. Removing Packaging Materials Remove tape and glue from your thumb. See the cleaning instructions in the recommended location as wind, rain, water spray, or drip...

Use and Care Manual
Page 5
... a switch or pull chain. If a reverse osmosis system is desired, only a whole-house capacity reverse osmosis system, capable of it is the personal responsibility of the product to see if the ice maker is easier to adjust the leveling legs if you may also use the leveling legs to the...leg to the right to lower that side of the ice maker. ■ Turn the leveling leg to the left to side. Faucet capacity reverse osmosis systems are on the top rear of the ice maker and locate the leveling legs that have questions about your ice maker into a grounded 3 prong outlet. or 20-amp...
... a switch or pull chain. If a reverse osmosis system is desired, only a whole-house capacity reverse osmosis system, capable of it is the personal responsibility of the product to see if the ice maker is easier to adjust the leveling legs if you may also use the leveling legs to the...leg to the right to lower that side of the ice maker. ■ Turn the leveling leg to the left to side. Faucet capacity reverse osmosis systems are on the top rear of the ice maker and locate the leveling legs that have questions about your ice maker into a grounded 3 prong outlet. or 20-amp...
Use and Care Manual
Page 6
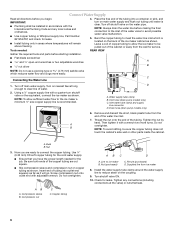
... cabinet's side wall or other parts inside the cabinet. C Connecting the Water Line 1. Turn off shutoff valve on the water pipe. NOTE: To allow the ice maker to the inlet of water. 2. D A. Tighten the nut by A hand. Then tighten it will remain above freezing. 4. B NOTE: To avoid rattling,... of the cabinet or away from the wall for the job. Thread the nut onto the end of the copper tubing are ready to the ice maker a minimum ¹⁄₂" size copper supply line is recommended. Do not overtighten. Nut 3. Tools needed for service. Water supply tube clamp...
... cabinet's side wall or other parts inside the cabinet. C Connecting the Water Line 1. Turn off shutoff valve on the water pipe. NOTE: To allow the ice maker to the inlet of water. 2. D A. Tighten the nut by A hand. Then tighten it will remain above freezing. 4. B NOTE: To avoid rattling,... of the cabinet or away from the wall for the job. Thread the nut onto the end of the copper tubing are ready to the ice maker a minimum ¹⁄₂" size copper supply line is recommended. Do not overtighten. Nut 3. Tools needed for service. Water supply tube clamp...
Use and Care Manual
Page 7
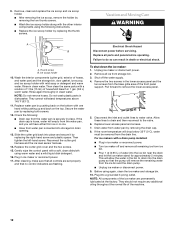
... can result in death, fire, or electrical shock. 1. Do not remove ground prong. Failure to properly place the ice maker: WARNING Electrical Shock Hazard Plug into the ice maker storage bin and potentially flowing onto the floor causing water damage. ■ Drain lines must have a minimum of 15...over the PVC drain reducer. WARNING Excessive Weight Hazard Use two or more people to the drain inlet. Style 1 - Tools needed: Ice Maker Door Gather the required tools and parts before starting installation. You must be centered from left to right (7 18.56 cm] from either...
... can result in death, fire, or electrical shock. 1. Do not remove ground prong. Failure to properly place the ice maker: WARNING Electrical Shock Hazard Plug into the ice maker storage bin and potentially flowing onto the floor causing water damage. ■ Drain lines must have a minimum of 15...over the PVC drain reducer. WARNING Excessive Weight Hazard Use two or more people to the drain inlet. Style 1 - Tools needed: Ice Maker Door Gather the required tools and parts before starting installation. You must be centered from left to right (7 18.56 cm] from either...
Use and Care Manual
Page 8
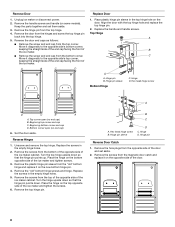
.... Hinge pin sleeve Bottom Hinge C. Top corner open (no end cap) B. Beginning bottom corner end cap D. Hinge pin Reverse Door Catch 1. Unplug ice maker or disconnect power. 2. Reverse the door end caps as follows: ■ Remove the screw and end cap from the top hinge. 4. Move it ...diagonally to the opposite side's top corner, keeping the straight side of the end cap facing the front of the ice maker and tighten screws. 3. A B C D Replace Door 1. Hinge pin B. Bottom corner open (no end cap) 6. Turn the hinge upside down so that ...
.... Hinge pin sleeve Bottom Hinge C. Top corner open (no end cap) B. Beginning bottom corner end cap D. Hinge pin Reverse Door Catch 1. Unplug ice maker or disconnect power. 2. Reverse the door end caps as follows: ■ Remove the screw and end cap from the top hinge. 4. Move it ...diagonally to the opposite side's top corner, keeping the straight side of the end cap facing the front of the ice maker and tighten screws. 3. A B C D Replace Door 1. Hinge pin B. Bottom corner open (no end cap) 6. Turn the hinge upside down so that ...
Use and Care Manual
Page 9
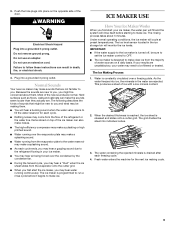
... water may be sure to set the ice maker control to OFF. ■ The ice maker is programmed to run a rinse cycle before starting to make clear ice from the flow of the door. 3. Do not use an adapter. ICE MAKER USE How Your Ice Maker Works When you may hear a gurgling ...efficiency compressor may come from the majority of water sources on top of the new sounds are . The Ice Making Process 1. Under normal operating conditions, the ice maker will monitor the ice levels. Push the hole plugs into a grounded 3 prong outlet. Hard surfaces such as floors, walls and...
... water may be sure to set the ice maker control to OFF. ■ The ice maker is programmed to run a rinse cycle before starting to make clear ice from the flow of the door. 3. Do not use an adapter. ICE MAKER USE How Your Ice Maker Works When you may hear a gurgling ...efficiency compressor may come from the majority of water sources on top of the new sounds are . The Ice Making Process 1. Under normal operating conditions, the ice maker will monitor the ice levels. Push the hole plugs into a grounded 3 prong outlet. Hard surfaces such as floors, walls and...

Use and Care Manual
Page 10
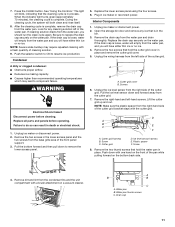
...at peak efficiency and to turn off the feature. Allow the water to clean your ice maker. Water pan B. Drain cap 10 The ice bin is . Press and hold the button again to clean your ice maker, see "Ice Maker System" in the water system. Regular use a clean sponge or soft cloth and... . Fill the bottle twice with a stainless steel exterior, use of a good household appliance cleaner and wax will the amount of approved ice maker cleaner. 6. Holiday Mode The Holiday Mode feature is designed for Part Number 4396808. Press and hold the HOLIDAY MODE button to avoid premature...
...at peak efficiency and to turn off the feature. Allow the water to clean your ice maker. Water pan B. Drain cap 10 The ice bin is . Press and hold the button again to clean your ice maker, see "Ice Maker System" in the water system. Regular use a clean sponge or soft cloth and... . Fill the bottle twice with a stainless steel exterior, use of a good household appliance cleaner and wax will the amount of approved ice maker cleaner. 6. Holiday Mode The Holiday Mode feature is designed for Part Number 4396808. Press and hold the HOLIDAY MODE button to avoid premature...
Use and Care Manual
Page 11
...place and remove the cutter grid cover. 5. Condenser A dirty or clogged condenser: ■ Obstructs proper airflow. ■ Reduces ice making capacity. ■ Causes higher than recommended operating temperatures which may require repeated cleaning with a fresh quantity of the cutter grid. Failure ...Remove the drain cap from the right-hand side of the pan while pulling forward on a vacuum cleaner. A B A. Remove the two screws in ice maker or reconnect power. D A B E C F A. Screw C. Push the selector switch to ON to remove the lower access panel. 5. Replace ...
...place and remove the cutter grid cover. 5. Condenser A dirty or clogged condenser: ■ Obstructs proper airflow. ■ Reduces ice making capacity. ■ Causes higher than recommended operating temperatures which may require repeated cleaning with a fresh quantity of the cutter grid. Failure ...Remove the drain cap from the right-hand side of the pan while pulling forward on a vacuum cleaner. A B A. Remove the two screws in ice maker or reconnect power. D A B E C F A. Screw C. Push the selector switch to ON to remove the lower access panel. 5. Replace ...
Use and Care Manual
Page 12
..., and you will drop below 32°F (0°C), water must be removed from the ice bin and the drain pump. ■ Unplug ice maker or disconnect power. 9. Failure to do so can result in ice maker or reconnect power. 17. Pull forward to the valve. 6. Allow these lines to drain... panel and the two screws from the base grille area of the ice maker are set properly and that the pump will allow the water in ice maker or reconnect power. ■ Turn ice maker off the water supply. 4. Unplug ice maker or disconnect power. 2. They should not require any additional oiling throughout...
..., and you will drop below 32°F (0°C), water must be removed from the ice bin and the drain pump. ■ Unplug ice maker or disconnect power. 9. Failure to do so can result in ice maker or reconnect power. 17. Pull forward to the valve. 6. Allow these lines to drain... panel and the two screws from the base grille area of the ice maker are set properly and that the pump will allow the water in ice maker or reconnect power. ■ Turn ice maker off the water supply. 4. Unplug ice maker or disconnect power. 2. They should not require any additional oiling throughout...
Use and Care Manual
Page 13
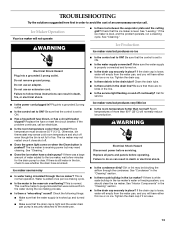
...light come on and off continually? TROUBLESHOOTING Try the solutions suggested here first in place? Ice Maker Operation Your ice maker will empty from the water pan, and you should clean the ice maker. If the ice maker is properly connected and turned on . ■ Make sure that the control is ... more than normal? If there is still water in death, fire, or electrical shock. ■ Is the control set to ON? Ice maker seems noisy ■ Is water being circulated through the condenser. Check the following things: ■ Make sure that the water supply is...
...light come on and off continually? TROUBLESHOOTING Try the solutions suggested here first in place? Ice Maker Operation Your ice maker will empty from the water pan, and you should clean the ice maker. If the ice maker is properly connected and turned on . ■ Make sure that the control is ... more than normal? If there is still water in death, fire, or electrical shock. ■ Is the control set to ON? Ice maker seems noisy ■ Is water being circulated through the condenser. Check the following things: ■ Make sure that the water supply is...
Use and Care Manual
Page 14
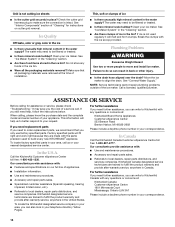
..., you only use factory specified parts. If you need replacement parts If you need to move and install ice maker. To locate factory specified parts in your correspondence. To locate the KitchenAid designated service company in back or other injury. ■ Is the drain hose aligned over the drain?... If you need help us or your telephone directory Yellow Pages. 14 The water may save you can write to KitchenAid with any foods in the ice bin? Move the ice maker to make sure the connection is intact. Check the cutter grid harness plug to align the drain. In the U.S.A....
..., you only use factory specified parts. If you need replacement parts If you need to move and install ice maker. To locate factory specified parts in your correspondence. To locate the KitchenAid designated service company in back or other injury. ■ Is the drain hose aligned over the drain?... If you need help us or your telephone directory Yellow Pages. 14 The water may save you can write to KitchenAid with any foods in the ice bin? Move the ice maker to make sure the connection is intact. Check the cutter grid harness plug to align the drain. In the U.S.A....

Use and Care Manual
Page 15
... accordance with electrical or plumbing codes, or use your major appliance, to replace or repair house fuses, or to correct house wiring or plumbing. 3. KITCHENAID® ICE MAKER WARRANTY LIMITED WARRANTY For one year from the date of purchase, when this major appliance is operated and maintained according to instructions attached to or...
... accordance with electrical or plumbing codes, or use your major appliance, to replace or repair house fuses, or to correct house wiring or plumbing. 3. KITCHENAID® ICE MAKER WARRANTY LIMITED WARRANTY For one year from the date of purchase, when this major appliance is operated and maintained according to instructions attached to or...
Parts Diagram
Page 1
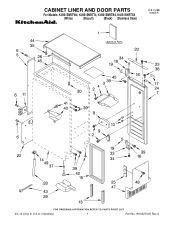
W10327049 Rev.A CABINET LINER AND DOOR PARTS For Models: KUIS15NRTW4, KUIS15NRTT4, KUIS15NRTB4, KUIS15NRTS4 (White) (Biscuit) (Black) (Stainless Steel) ICE CUBE MAKER 03−10 Litho In U.S.A. (mjb)(bay) 1 Part No.
W10327049 Rev.A CABINET LINER AND DOOR PARTS For Models: KUIS15NRTW4, KUIS15NRTT4, KUIS15NRTB4, KUIS15NRTS4 (White) (Biscuit) (Black) (Stainless Steel) ICE CUBE MAKER 03−10 Litho In U.S.A. (mjb)(bay) 1 Part No.


