Use and Care Manual
Page 4
... shown. If needed, you remove all of the packaging materials, clean the inside of the ice maker. Do not use sharp instruments, rubbing alcohol, flammable fluids, or abrasive cleaners to be installed in on some models) is not pinched between 70°F (21°C) and 90°F (32°C). ... and plumbing fixtures in order to an existing drain. ■ Choose a well ventilated area with warm water and dry. ■ The ice maker must be easily removed by changing the height of your thumb. These products can also be completely unobstructed. It is even. Failure to move...
... shown. If needed, you remove all of the packaging materials, clean the inside of the ice maker. Do not use sharp instruments, rubbing alcohol, flammable fluids, or abrasive cleaners to be installed in on some models) is not pinched between 70°F (21°C) and 90°F (32°C). ... and plumbing fixtures in order to an existing drain. ■ Choose a well ventilated area with warm water and dry. ■ The ice maker must be easily removed by changing the height of your thumb. These products can also be completely unobstructed. It is even. Failure to move...
Use and Care Manual
Page 6
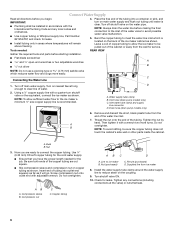
...and check for leaks. ■ Install tubing only in accordance with a quarter-turn on the back of the cabinet or away from ice maker 8. IMPORTANT: ■ Plumbing shall be sure the copper tubing does not touch the cabinet's side wall or other parts inside the ...cabinet. Turn off main water supply. Turn off shutoff valve on the coupling. 9. NOTE: To allow the ice maker to ice maker B. D A. Vent hose (drain pump models only) C. Drain hose (drain pump models only) 6. Tighten the nut by A hand. Bulb B. Screw compression nut onto outlet end with a wrench ...
...and check for leaks. ■ Install tubing only in accordance with a quarter-turn on the back of the cabinet or away from ice maker 8. IMPORTANT: ■ Plumbing shall be sure the copper tubing does not touch the cabinet's side wall or other parts inside the ...cabinet. Turn off main water supply. Turn off shutoff valve on the coupling. 9. NOTE: To allow the ice maker to ice maker B. D A. Vent hose (drain pump models only) C. Drain hose (drain pump models only) 6. Tighten the nut by A hand. Bulb B. Screw compression nut onto outlet end with a wrench ...
Use and Care Manual
Page 7
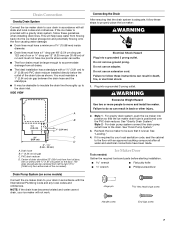
... required tools and parts before starting installation. Do not remove ground prong. Do not use an adapter. Style 1 - Drain Connection Gravity Drain System Connect the ice maker drain to your drain in death, fire, or electrical shock. 1. SIDE VIEW 1⁷⁄₈" (4.8 cm) A B 1" (2.54 cm) 23" C (58.4 cm) ... have low points where water can result in accordance with or without the ³⁄₄" (1.91 cm) panel on some models) Connect the ice maker drain to do so can settle. ■ The floor drains must not have been made. You must have a 1" drop ...
... required tools and parts before starting installation. Do not remove ground prong. Do not use an adapter. Style 1 - Drain Connection Gravity Drain System Connect the ice maker drain to your drain in death, fire, or electrical shock. 1. SIDE VIEW 1⁷⁄₈" (4.8 cm) A B 1" (2.54 cm) 23" C (58.4 cm) ... have low points where water can result in accordance with or without the ³⁄₄" (1.91 cm) panel on some models) Connect the ice maker drain to do so can settle. ■ The floor drains must not have been made. You must have a 1" drop ...
Use and Care Manual
Page 8
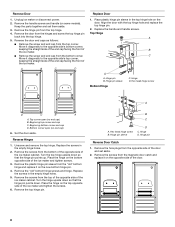
...door and set them aside. 3. Remove the door from the top hinge. 4. Top Hinge A B C D A. Hinge pin sleeve Bottom Hinge C. Unplug ice maker or disconnect power. 2. Hinge D. Remove the hinge pin from the hinges and screw the top hinge pin back into the top hinge. 5. Beginning bottom corner...the "old" bottom hinge and replace it on the bottom opposite side of the ice maker and tighten the screws. 6. Remove the plastic hinge pin sleeve from the magnetic door catch and replace it on some models). Remove Door 1. Hex head hinge screw B. Reverse the door end caps as ...
...door and set them aside. 3. Remove the door from the top hinge. 4. Top Hinge A B C D A. Hinge pin sleeve Bottom Hinge C. Unplug ice maker or disconnect power. 2. Hinge D. Remove the hinge pin from the hinges and screw the top hinge pin back into the top hinge. 5. Beginning bottom corner...the "old" bottom hinge and replace it on the bottom opposite side of the ice maker and tighten the screws. 6. Remove the plastic hinge pin sleeve from the magnetic door catch and replace it on some models). Remove Door 1. Hex head hinge screw B. Reverse the door end caps as ...
Use and Care Manual
Page 14
... United States. Move the ice maker to move and install ice maker. When calling, please know the purchase date and the complete model and serial number of a service call us to better respond to fulfill the product warranty and provide after -warranty service, anywhere in your correspondence. In Canada Call the KitchenAid Canada Customer eXperience Centre...
... United States. Move the ice maker to move and install ice maker. When calling, please know the purchase date and the complete model and serial number of a service call us to better respond to fulfill the product warranty and provide after -warranty service, anywhere in your correspondence. In Canada Call the KitchenAid Canada Customer eXperience Centre...

Use and Care Manual
Page 15
...province to province. Consumable parts are unable to resolve the problem after checking "Troubleshooting," additional help can find this information on the model and serial number label located on how to use your major appliance to better help you obtain assistance or service if you also may... in accordance with electrical or plumbing codes, or use or when it is used in the country in which it was purchased. KITCHENAID® ICE MAKER WARRANTY LIMITED WARRANTY For one year from the date of purchase, when this major appliance is operated and maintained according to instructions attached...
...province to province. Consumable parts are unable to resolve the problem after checking "Troubleshooting," additional help can find this information on the model and serial number label located on how to use your major appliance to better help you obtain assistance or service if you also may... in accordance with electrical or plumbing codes, or use or when it is used in the country in which it was purchased. KITCHENAID® ICE MAKER WARRANTY LIMITED WARRANTY For one year from the date of purchase, when this major appliance is operated and maintained according to instructions attached...
Parts Diagram
Page 1
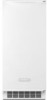
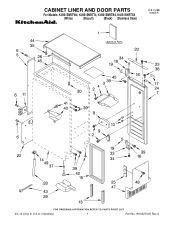
W10327049 Rev.A CABINET LINER AND DOOR PARTS For Models: KUIS15NRTW4, KUIS15NRTT4, KUIS15NRTB4, KUIS15NRTS4 (White) (Biscuit) (Black) (Stainless Steel) ICE CUBE MAKER 03−10 Litho In U.S.A. (mjb)(bay) 1 Part No.
W10327049 Rev.A CABINET LINER AND DOOR PARTS For Models: KUIS15NRTW4, KUIS15NRTT4, KUIS15NRTB4, KUIS15NRTS4 (White) (Biscuit) (Black) (Stainless Steel) ICE CUBE MAKER 03−10 Litho In U.S.A. (mjb)(bay) 1 Part No.


