
Use & Care Guide
Page 1
...performance, parts, accessories or service, call: 1-800-422-1230 or visit our website at www.kitchenaid.com In Canada, for assistance, installation and service, call: 1-800-807-6777 or visit our website at www.kitchenaid.ca HOTTE DE CUISINIÈRE POUR MONTAGE MURAL 30" ET 36" (76,2 CM ET 91...,4 CM) Instructions d'installation et Guide d'utilisation et d'entretien Au Canada, pour assistance, installation ou service composez le 1-800-807-6777 ou visitez notre site web à www.kitchenaid.ca Table of Contents/Table des matières 2 IMPORTANT: READ AND ...
...performance, parts, accessories or service, call: 1-800-422-1230 or visit our website at www.kitchenaid.com In Canada, for assistance, installation and service, call: 1-800-807-6777 or visit our website at www.kitchenaid.ca HOTTE DE CUISINIÈRE POUR MONTAGE MURAL 30" ET 36" (76,2 CM ET 91...,4 CM) Instructions d'installation et Guide d'utilisation et d'entretien Au Canada, pour assistance, installation ou service composez le 1-800-807-6777 ou visitez notre site web à www.kitchenaid.ca Table of Contents/Table des matières 2 IMPORTANT: READ AND ...

Use & Care Guide
Page 2
... 16 TABLE DES MATIÈRES SÉCURITÉ DE LA HOTTE DE CUISINIÈRE 17 EXIGENCES D'INSTALLATION 19 Outils et pièces 19 Exigences d'emplacement 19 Exigences concernant l'évacuation 20 Spécifications électriques 21 ...INSTRUCTIONS D'INSTALLATION 22 Préparation de l'emplacement 22 Installation de la hotte 23 Raccordement du circuit d'évacuation 23 Raccordement électrique 24 Installation des cache-conduits 25 Achever l'installation 25 UTILISATION DE LA HOTTE 25 Affichage 25 Lampes...
... 16 TABLE DES MATIÈRES SÉCURITÉ DE LA HOTTE DE CUISINIÈRE 17 EXIGENCES D'INSTALLATION 19 Outils et pièces 19 Exigences d'emplacement 19 Exigences concernant l'évacuation 20 Spécifications électriques 21 ...INSTRUCTIONS D'INSTALLATION 22 Préparation de l'emplacement 22 Installation de la hotte 23 Raccordement du circuit d'évacuation 23 Raccordement électrique 24 Installation des cache-conduits 25 Achever l'installation 25 UTILISATION DE LA HOTTE 25 Affichage 25 Lampes...
Use & Care Guide
Page 3
... small and contained in the area where it . - Follow the heating equipment manufacturer's guideline and safety standards such as a tag, to the service panel. ■ Installation work and electrical wiring must always be sure to exhaust hazardous or explosive materials and vapors. aBased on low or medium settings. ■ Always turn...
... small and contained in the area where it . - Follow the heating equipment manufacturer's guideline and safety standards such as a tag, to the service panel. ■ Installation work and electrical wiring must always be sure to exhaust hazardous or explosive materials and vapors. aBased on low or medium settings. ■ Always turn...

Use & Care Guide
Page 4
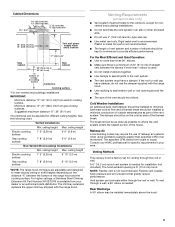
... for Mobile Home Construction and Safety, Title 24, HUD, Part 280) or when such standard is not applicable, the standard for Manufactured Home Installation 1982 (Manufactured Home Sites, Communities and Setups) ANSI A225.1/NFPA 501A, or latest edition, or with 1¼" (3.0 cm 9.5 mm), and... must be away from packages. Tools Needed ■ Level ■ Drill with local codes. Given dimensions provide minimum clearance. For Mobile Home Installations The installation of the vent hood. Product Dimensions 10⁵⁄₈" (26.9 cm) 13 33.2 cm) 4⁷⁄₈" (12.3 cm...
... for Mobile Home Construction and Safety, Title 24, HUD, Part 280) or when such standard is not applicable, the standard for Manufactured Home Installation 1982 (Manufactured Home Sites, Communities and Setups) ANSI A225.1/NFPA 501A, or latest edition, or with 1¼" (3.0 cm 9.5 mm), and... must be away from packages. Tools Needed ■ Level ■ Drill with local codes. Given dimensions provide minimum clearance. For Mobile Home Installations The installation of the vent hood. Product Dimensions 10⁵⁄₈" (26.9 cm) 13 33.2 cm) 4⁷⁄₈" (12.3 cm...
Use & Care Guide
Page 5
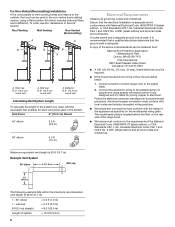
... of vent system and number of elbows should be kept to a minimum to cooking surface Centerline Cooking surface *For non-vented (recirculating) installations IMPORTANT: Minimum distance "X": 24" (61.0 cm) from gas cooking surfaces. Flexible vent creates back pressure and air turbulence that greatly reduce... performance. ceiling height Max. Plastic or metal foil vent is factory set for installation (not included). The damper should be on the distance "X" between the elbows if more than three 90° elbows. ■...
... of vent system and number of elbows should be kept to a minimum to cooking surface Centerline Cooking surface *For non-vented (recirculating) installations IMPORTANT: Minimum distance "X": 24" (61.0 cm) from gas cooking surfaces. Flexible vent creates back pressure and air turbulence that greatly reduce... performance. ceiling height Max. Plastic or metal foil vent is factory set for installation (not included). The damper should be on the distance "X" between the elbows if more than three 90° elbows. ■...
Use & Care Guide
Page 6
... it is recommended that a qualified electrician determine that the electrical installation is adequate and in conformance with the rating of copper wire using a Recirculation Kit (which includes charcoal filters and a deflector). Roof cap B. 6" (15.2 cm) round ...
... it is recommended that a qualified electrician determine that the electrical installation is adequate and in conformance with the rating of copper wire using a Recirculation Kit (which includes charcoal filters and a deflector). Roof cap B. 6" (15.2 cm) round ...
Use & Care Guide
Page 7
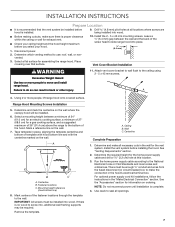
...seal all necessary cuts in place, aligning the template centerline and bottom of the screw head to move and install range hood. Vent Cover Bracket Installation WARNING Excessive Weight Hazard Use two or more people, lift range hood onto covered surface. Failure to screw into...the back of template with hood bottom line and with the centerline marked on ordering. See the "Accessories" section for the vent system. INSTALLATION INSTRUCTIONS Prepare Location ■ It is recommended that surface. Remove the template. Ceiling B. Determine the required height for exhaust vent. &#...
...seal all necessary cuts in place, aligning the template centerline and bottom of the screw head to move and install range hood. Vent Cover Bracket Installation WARNING Excessive Weight Hazard Use two or more people, lift range hood onto covered surface. Failure to screw into...the back of template with hood bottom line and with the centerline marked on ordering. See the "Accessories" section for the vent system. INSTALLATION INSTRUCTIONS Prepare Location ■ It is recommended that surface. Remove the template. Ceiling B. Determine the required height for exhaust vent. &#...

Use & Care Guide
Page 8
...Remove the air deflector. 5. Place the assembled air deflector and duct over transition piece. 2. Install Range Hood 1. Vent transition B. 3.5 x 9.5 mm screw For vented installations only: 1. For non-vented (recirculating) installation only: 1. Vent clamp C. Reassemble the air deflector to the bottom of hood. A ...bracket 2. Mounting screws B. Lower mounting screws 2. Level the range hood and tighten upper mounting screws. 4. Air deflector B. Install transition on back of the hood outlet. Check that back draft dampers work properly. Cut the duct to cut vent duct...
...Remove the air deflector. 5. Place the assembled air deflector and duct over transition piece. 2. Install Range Hood 1. Vent transition B. 3.5 x 9.5 mm screw For vented installations only: 1. For non-vented (recirculating) installation only: 1. Vent clamp C. Reassemble the air deflector to the bottom of hood. A ...bracket 2. Mounting screws B. Lower mounting screws 2. Level the range hood and tighten upper mounting screws. 4. Air deflector B. Install transition on back of the hood outlet. Check that back draft dampers work properly. Cut the duct to cut vent duct...
Use & Care Guide
Page 9
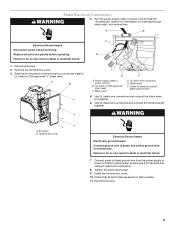
...Terminal box cover Electrical Shock Hazard Electrically ground blower. Connect ground wire to do so can result in their sockets. 11. Install the terminal box cover. 10. White wires F. Check that all parts and panels before servicing. Replace all light bulbs are ...wires 5. Knockout B. A B Electrical Shock Hazard Disconnect power before operating. Failure to green and yellow ground wire in the terminal box cover and install a UL listed or CSA approved ¹⁄₂" strain relief. Black wires D. Use UL listed wire connectors and connect the black wires ...
...Terminal box cover Electrical Shock Hazard Electrically ground blower. Connect ground wire to do so can result in their sockets. 11. Install the terminal box cover. 10. White wires F. Check that all parts and panels before servicing. Replace all light bulbs are ...wires 5. Knockout B. A B Electrical Shock Hazard Disconnect power before operating. Failure to green and yellow ground wire in the terminal box cover and install a UL listed or CSA approved ¹⁄₂" strain relief. Black wires D. Use UL listed wire connectors and connect the black wires ...
Use & Care Guide
Page 10
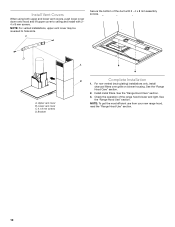
...the most efficient use from your new range hood, read the "Range Hood Use" section. 10 Install metal filters. Check the operation of the duct with 2 4 x 8 mm screws. For non-vented (recirculating) installations only, install charcoal filters over grille on blower housing. Lower vent cover C. 4 x 8 mm screws D. ...See the "Range Hood Use" section. C Secure the bottom of the range hood blower and light. Install Vent Covers When using both upper and lower vent covers, push lower cover down onto hood and lift upper cover to hide slots. See the...
...the most efficient use from your new range hood, read the "Range Hood Use" section. 10 Install metal filters. Check the operation of the duct with 2 4 x 8 mm screws. For non-vented (recirculating) installations only, install charcoal filters over grille on blower housing. Lower vent cover C. 4 x 8 mm screws D. ...See the "Range Hood Use" section. C Secure the bottom of the range hood blower and light. Install Vent Covers When using both upper and lower vent covers, push lower cover down onto hood and lift upper cover to hide slots. See the...

Use & Care Guide
Page 11
... deactivated by the heat sensor, the blower speed cannot be displayed. 11 A B C D E FG H I . Louver holes (non-vented [recirculating] installations only) B. Canopy E. Top light housings I A. The "Clean Grease Filter" icon will no longer be decreased. ■ When the temperature level on the...Duct covers C. Bottom light housings D. Display D. "Able" will automatically set to low. 3. "None" will appear in the display, the installed grease filters should be selected while the lights and the fan motor are located on the display for 3 seconds. ■ If the audible...
... deactivated by the heat sensor, the blower speed cannot be displayed. 11 A B C D E FG H I . Louver holes (non-vented [recirculating] installations only) B. Canopy E. Top light housings I A. The "Clean Grease Filter" icon will no longer be decreased. ■ When the temperature level on the...Duct covers C. Bottom light housings D. Display D. "Able" will automatically set to low. 3. "None" will appear in the display, the installed grease filters should be selected while the lights and the fan motor are located on the display for 3 seconds. ■ If the audible...
Use & Care Guide
Page 13
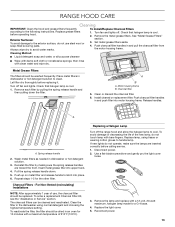
... range hood and allow the halogen lamp to the exterior surface, do not use , the charcoal filter should be replaced. A B A. Install cleaned or replacement filter. Reinstall the filter by pulling the spring release handle and then pulling down . 5. Clean the filter in and pull... CARE Cleaning IMPORTANT: Clean the hood and grease filters frequently according to avoid water marks. Replace grease filters before replacing it. To Install/Replace Charcoal Filters 1. Turn fan and lights off. Check that halogen lamp is cool. 2. Metal Grease Filters The filters should be...
... range hood and allow the halogen lamp to the exterior surface, do not use , the charcoal filter should be replaced. A B A. Install cleaned or replacement filter. Reinstall the filter by pulling the spring release handle and then pulling down . 5. Clean the filter in and pull... CARE Cleaning IMPORTANT: Clean the hood and grease filters frequently according to avoid water marks. Replace grease filters before replacing it. To Install/Replace Charcoal Filters 1. Turn fan and lights off. Check that halogen lamp is cool. 2. Metal Grease Filters The filters should be...

Use & Care Guide
Page 15
... distributors and service companies. For further assistance If you need further assistance, you can write to KitchenAid with : ■ Features and specifications on our full line of appliances. ■ Installation information. ■ Use and maintenance procedures. ■ Accessory and repair parts sales. ■... 1-800-422-1230 or visit our website at www.kitchenaid.com. To locate the KitchenAid designated service company in your area, you use only factory specified parts. Accessories Charcoal Filter (for non-vented installations only) Order Part Number W10285062 Power Cord Kit Order ...
... distributors and service companies. For further assistance If you need further assistance, you can write to KitchenAid with : ■ Features and specifications on our full line of appliances. ■ Installation information. ■ Use and maintenance procedures. ■ Accessory and repair parts sales. ■... 1-800-422-1230 or visit our website at www.kitchenaid.com. To locate the KitchenAid designated service company in your area, you use only factory specified parts. Accessories Charcoal Filter (for non-vented installations only) Order Part Number W10285062 Power Cord Kit Order ...

Use & Care Guide
Page 16
...the customer. Proof of Whirlpool Corporation or Whirlpool Canada LP (hereafter "KitchenAid") will need to correct the installation of consumables or cleaning products not approved by an authorized KitchenAid servicer is reported to KitchenAid within 30 days from accident, alteration, misuse, abuse, fire, flood... calls to better help by checking the "Assistance or Service" section or by a KitchenAid designated service company. DISCLAIMER OF IMPLIED WARRANTIES; If you need it is installed in an inaccessible location or is void if the factory applied serial number has been altered...
...the customer. Proof of Whirlpool Corporation or Whirlpool Canada LP (hereafter "KitchenAid") will need to correct the installation of consumables or cleaning products not approved by an authorized KitchenAid servicer is reported to KitchenAid within 30 days from accident, alteration, misuse, abuse, fire, flood... calls to better help by checking the "Assistance or Service" section or by a KitchenAid designated service company. DISCLAIMER OF IMPLIED WARRANTIES; If you need it is installed in an inaccessible location or is void if the factory applied serial number has been altered...
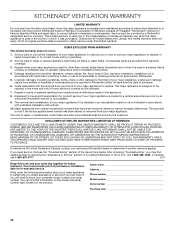
Warranty Information
Page 1
...or cleaning products not approved by a KitchenAid designated service company. In Canada, call 1-800-422-1230. Service calls to correct the installation of your major appliance, unless such damage results from defects in which it . KITCHENAID® VENTILATION WARRANTY LIMITED WARRANTY For one... OR LIMITATIONS MAY NOT APPLY TO YOU. The cost of purchase or installation date for product service if your authorized KitchenAid dealer to published user or operator instructions and/or installation instructions. 4. You can find additional help you obtain assistance or service if...
...or cleaning products not approved by a KitchenAid designated service company. In Canada, call 1-800-422-1230. Service calls to correct the installation of your major appliance, unless such damage results from defects in which it . KITCHENAID® VENTILATION WARRANTY LIMITED WARRANTY For one... OR LIMITATIONS MAY NOT APPLY TO YOU. The cost of purchase or installation date for product service if your authorized KitchenAid dealer to published user or operator instructions and/or installation instructions. 4. You can find additional help you obtain assistance or service if...

Dimension Guide
Page 1
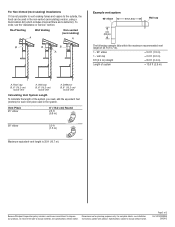
... min. (38.7 cm) 42¾" (108.6 cm) max. 2³⁄₈" (6.0 cm) 19 50.0 cm) *For non-vented (recirculating) installations **For vented installations VENTING REQUIREMENTS 10" (25.4 cm) min. 13" (33.0 cm) max. Vent and power supply cable entry location 17" (43.2 cm)* Side cabinet ... PRODUCT DIMENSIONS KXW4430Y KXW4436Y Electrical Requirements: q A 120 volt, 60 Hz., AC only, 15-amp, fused electrical circuit is needed for installation (not included). Suggested maximum distance "X": 36" (91.4 cm) The chimneys can terminate either through the roof or wall. ceiling height ...
... min. (38.7 cm) 42¾" (108.6 cm) max. 2³⁄₈" (6.0 cm) 19 50.0 cm) *For non-vented (recirculating) installations **For vented installations VENTING REQUIREMENTS 10" (25.4 cm) min. 13" (33.0 cm) max. Vent and power supply cable entry location 17" (43.2 cm)* Side cabinet ... PRODUCT DIMENSIONS KXW4430Y KXW4436Y Electrical Requirements: q A 120 volt, 60 Hz., AC only, 15-amp, fused electrical circuit is needed for installation (not included). Suggested maximum distance "X": 36" (91.4 cm) The chimneys can terminate either through the roof or wall. ceiling height ...
Dimension Guide
Page 2
... without notice. For complete details, see the "Assistance or Service" section. Page 2 of system = 13.0 ft (3.9 m) A. For Non-Vented (recirculating) Installations If it is 35 ft (10.7 m). To order, see Installation our products, we reserve the right to improve Dimensions are for each vent piece used in the system. wall cap = 0.0 ft...
... without notice. For complete details, see the "Assistance or Service" section. Page 2 of system = 13.0 ft (3.9 m) A. For Non-Vented (recirculating) Installations If it is 35 ft (10.7 m). To order, see Installation our products, we reserve the right to improve Dimensions are for each vent piece used in the system. wall cap = 0.0 ft...
Installation Guide
Page 1
...performance, parts, accessories or service, call: 1-800-422-1230 or visit our website at www.kitchenaid.com In Canada, for assistance, installation and service, call: 1-800-807-6777 or visit our website at www.kitchenaid.ca HOTTE DE CUISINIÈRE POUR MONTAGE MURAL 30" ET 36" (76,2 CM ET 91...,4 CM) Instructions d'installation et Guide d'utilisation et d'entretien Au Canada, pour assistance, installation ou service composez le 1-800-807-6777 ou visitez notre site web à www.kitchenaid.ca Table of Contents/Table des matières 2 IMPORTANT: READ AND ...
...performance, parts, accessories or service, call: 1-800-422-1230 or visit our website at www.kitchenaid.com In Canada, for assistance, installation and service, call: 1-800-807-6777 or visit our website at www.kitchenaid.ca HOTTE DE CUISINIÈRE POUR MONTAGE MURAL 30" ET 36" (76,2 CM ET 91...,4 CM) Instructions d'installation et Guide d'utilisation et d'entretien Au Canada, pour assistance, installation ou service composez le 1-800-807-6777 ou visitez notre site web à www.kitchenaid.ca Table of Contents/Table des matières 2 IMPORTANT: READ AND ...
Installation Guide
Page 2
... U.S.A 15 Accessories 15 In Canada 15 WARRANTY 16 TABLE DES MATIÈRES SÉCURITÉ DE LA HOTTE DE CUISINIÈRE 17 EXIGENCES D'INSTALLATION 19 Outils et pièces 19 Exigences d'emplacement 19 Exigences concernant l'évacuation 20 Spécifications électriques 21 INSTRUCTIONS...
... U.S.A 15 Accessories 15 In Canada 15 WARRANTY 16 TABLE DES MATIÈRES SÉCURITÉ DE LA HOTTE DE CUISINIÈRE 17 EXIGENCES D'INSTALLATION 19 Outils et pièces 19 Exigences d'emplacement 19 Exigences concernant l'évacuation 20 Spécifications électriques 21 INSTRUCTIONS...

Installation Guide
Page 3
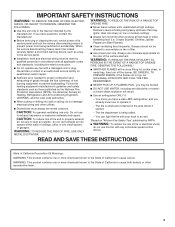
... locked, securely fasten a prominent warning device, such as those published by NFPA. ■ WARNING: To reduce the risk of California to the service panel. ■ Installation work and electrical wiring must always be burned. ■ DO NOT USE WATER, including wet dishcloths or towels a violent steam explosion will result. ■ Use...
... locked, securely fasten a prominent warning device, such as those published by NFPA. ■ WARNING: To reduce the risk of California to the service panel. ■ Installation work and electrical wiring must always be burned. ■ DO NOT USE WATER, including wet dishcloths or towels a violent steam explosion will result. ■ Use...
