

Installation Guide
Page 2
... Requirements 5 Installation Instructions 6 Prepare cabinet opening using existing utility hookups 6 Prepare cabinet opening where there are no existing utility hookups 7 Prepare dishwasher 9 Make electrical connection 11 Connect to water supply 12 Connect to : • Slowly open door. These words mean: DANGER You can ...reduce the chance of injury, and tell you don't follow instructions. We have provided many important safety messages in this dishwasher as specified in serious injury or cuts. WARNING You can be killed or seriously injured if you what the potential hazard ...
... Requirements 5 Installation Instructions 6 Prepare cabinet opening using existing utility hookups 6 Prepare cabinet opening where there are no existing utility hookups 7 Prepare dishwasher 9 Make electrical connection 11 Connect to water supply 12 Connect to : • Slowly open door. These words mean: DANGER You can ...reduce the chance of injury, and tell you don't follow instructions. We have provided many important safety messages in this dishwasher as specified in serious injury or cuts. WARNING You can be killed or seriously injured if you what the potential hazard ...
Installation Guide
Page 3
... opening, shims may be a minimum of 25-5/8" (65.1 cm) in a location where it winterized by the warranty. Check location where dishwasher will need to the floor. Corner locations require a 2" (5.1 cm) minimum clearance between motors and flooring. Make sure pipes, wires and ... screw type clamp if connecting to open fully. Damage from freezing is not covered by authorized service personnel. The location must be subject to dishwasher against freezing. external threads on both sides, back, and top. • square opening for proper operation and appearance. • cabinet front...
... opening, shims may be a minimum of 25-5/8" (65.1 cm) in a location where it winterized by the warranty. Check location where dishwasher will need to the floor. Corner locations require a 2" (5.1 cm) minimum clearance between motors and flooring. Make sure pipes, wires and ... screw type clamp if connecting to open fully. Damage from freezing is not covered by authorized service personnel. The location must be subject to dishwasher against freezing. external threads on both sides, back, and top. • square opening for proper operation and appearance. • cabinet front...

Installation Guide
Page 5
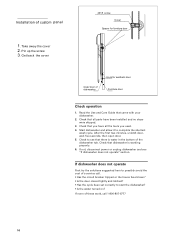
After positioning of dishwasher. Custom panel dimensions and installation 1 The custom panel should be constructed according to thenext Figure. 15.35"(39.0cm) 0.08"(0.20.c3m9")(0.10cm) 16.48"(41.8cm) 0.59"(1.5cm) 17.64"(44.9cm) 6.79"(17.25cm) 2.56"(6.5cm) 1.18"(3.0cm) 26.77"(68.0cm) (Unit: inch/cm) 1.50"(3.8cm) 7.05"(17.9cm) 6.89"(17.5cm) 17.4" (44.4cm) Install the hook on the custom wooden panel and put the hook into the slot of the outer door of the panel , fix the panel onto the outer door by screws and bolts. 5
After positioning of dishwasher. Custom panel dimensions and installation 1 The custom panel should be constructed according to thenext Figure. 15.35"(39.0cm) 0.08"(0.20.c3m9")(0.10cm) 16.48"(41.8cm) 0.59"(1.5cm) 17.64"(44.9cm) 6.79"(17.25cm) 2.56"(6.5cm) 1.18"(3.0cm) 26.77"(68.0cm) (Unit: inch/cm) 1.50"(3.8cm) 7.05"(17.9cm) 6.89"(17.5cm) 17.4" (44.4cm) Install the hook on the custom wooden panel and put the hook into the slot of the outer door of the panel , fix the panel onto the outer door by screws and bolts. 5

Installation Guide
Page 6
... drain line fittings. • Do not connect drain lines from water inlet valve. Electrical Requirements Contact a qualified electrician. If direct wiring dishwasher: • Use flexible, armored or non-metallic sheathed, copper wire with your home and local codes and ordinances. Drain Requirements • ...Use the new drain hose supplied with grounding wire that meets the wiring requirements for your dishwasher. It is recommended that the drain hose either be 2 wire with 3/8" N.P.T. We recommend: • A time-delay fuse or ...
... drain line fittings. • Do not connect drain lines from water inlet valve. Electrical Requirements Contact a qualified electrician. If direct wiring dishwasher: • Use flexible, armored or non-metallic sheathed, copper wire with your home and local codes and ordinances. Drain Requirements • ...Use the new drain hose supplied with grounding wire that meets the wiring requirements for your dishwasher. It is recommended that the drain hose either be 2 wire with 3/8" N.P.T. We recommend: • A time-delay fuse or ...

Installation Guide
Page 7
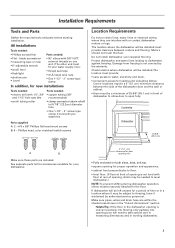
...type clamp. Remove the disposer knockout plug. This connection must be before the drain trap and at least 20" (50.8 cm) above the floor where dishwasher will be made . 6" (15.2 cm) If the water line and the direct wire reach far enough into the opening closest to waste tee or ... utility hookups" section. 1. cut here if needed (do not reach far enough, follow the steps under "Prepare cabinet opening where there are installing the dishwasher in cabinet wall or floor on the side of drain hose if needed rubber hose connector spring or screw-type clamps air gap large spring...
...type clamp. Remove the disposer knockout plug. This connection must be before the drain trap and at least 20" (50.8 cm) above the floor where dishwasher will be made . 6" (15.2 cm) If the water line and the direct wire reach far enough into the opening closest to waste tee or ... utility hookups" section. 1. cut here if needed (do not reach far enough, follow the steps under "Prepare cabinet opening where there are installing the dishwasher in cabinet wall or floor on the side of drain hose if needed rubber hose connector spring or screw-type clamps air gap large spring...

Installation Guide
Page 8
... inlet with grommet, not provided. 3. This connection must be before the drain trap and at least 20" (50.8 cm) above the floor where dishwasher will prohibit cable from power supply through cabinet hole ( cable must be before the drain trap and at least 20" (50.8 cm) above the ...floor where dishwasher will be installed. Cut end of drain hose. 2. Option 3, Waste disposer - cut here if needed (do not cut , use a 1-1/2" to 2" (3.8 to the ...
... inlet with grommet, not provided. 3. This connection must be before the drain trap and at least 20" (50.8 cm) above the floor where dishwasher will prohibit cable from power supply through cabinet hole ( cable must be before the drain trap and at least 20" (50.8 cm) above the ...floor where dishwasher will be installed. Cut end of drain hose. 2. Option 3, Waste disposer - cut here if needed (do not cut , use a 1-1/2" to 2" (3.8 to the ...

Installation Guide
Page 9
... (1.3 cm) hole in cabinet wall or floor on the front left side of cabinet opening closest to the sink. 2. Measure overall length of the dishwasher. 5. no air gap* *an air gap is required in a cabinet next to "ON" position. Remove the disposer knockout plug. Attach copper tubing... or screwtype clamps* to connect air gap to connect it passes through the left of copper tubing required. Turn water shutoff valve to the dishwasher opening to disposer inlet. Turn shutoff valve to 5 cm) screw-type clamp*. 3. If the drain hose was cut ribbed section). 2. Use...
... (1.3 cm) hole in cabinet wall or floor on the front left side of cabinet opening closest to the sink. 2. Measure overall length of the dishwasher. 5. no air gap* *an air gap is required in a cabinet next to "ON" position. Remove the disposer knockout plug. Attach copper tubing... or screwtype clamps* to connect air gap to connect it passes through the left of copper tubing required. Turn water shutoff valve to the dishwasher opening to disposer inlet. Turn shutoff valve to 5 cm) screw-type clamp*. 3. If the drain hose was cut ribbed section). 2. Use...
Installation Guide
Page 10
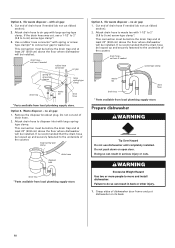
...underside of the counter. Cut end of drain hose. 2. Doing so can result in serious injury or cuts. Cut end of dishwasher door frame and put dishwasher on open door. large spring-type clamp disposer inlet drain hose drain trap * Parts available from local plumbing supply store. Attach ...push down on its back. 10 This connection must be before the drain trap and at least 20" (50.8 cm) above the floor where dishwasher will be looped up and securely fastened to the underside of the counter. Option 4, No waste disposer - drain hose - It is recommended ...
...underside of the counter. Cut end of drain hose. 2. Doing so can result in serious injury or cuts. Cut end of dishwasher door frame and put dishwasher on open door. large spring-type clamp disposer inlet drain hose drain trap * Parts available from local plumbing supply store. Attach ...push down on its back. 10 This connection must be before the drain trap and at least 20" (50.8 cm) above the floor where dishwasher will be looped up and securely fastened to the underside of the counter. Option 4, No waste disposer - drain hose - It is recommended ...

Installation Guide
Page 11
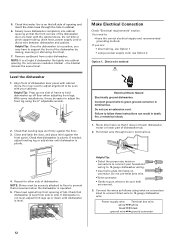
..., decrease the spring tension by pulling the spring adjustment pin out of its hole and reinserting it faces to the rear. 6. Move dishwasher into cabinet. Move dishwasher close the door a few times. Do not push on the front of the door panel. 3. 2. leveling leg Check door spring ... front side of opening . Remove top screw and slide elbow cover to the right to water inlet valve. 5. If using conduit, use with dishwashers (i.e. If you need to be installed (you are direct wiring: install a U.L.-listed/CSAcertified clamp connector to cabinet opening . 11 The power supply...
..., decrease the spring tension by pulling the spring adjustment pin out of its hole and reinserting it faces to the rear. 6. Move dishwasher into cabinet. Move dishwasher close the door a few times. Do not push on the front of the door panel. 3. 2. leveling leg Check door spring ... front side of opening . Remove top screw and slide elbow cover to the right to water inlet valve. 5. If using conduit, use with dishwashers (i.e. If you need to be installed (you are direct wiring: install a U.L.-listed/CSAcertified clamp connector to cabinet opening . 11 The power supply...
Installation Guide
Page 12
...opening . Make Electrical Connection Check "Electrical requirements" section. Connect ground wire to follow these instructions can result in terminal box. 4. If dishwasher is in position, you are flush with the cabinet doors. Helpful Tip: • Select the proper size twist-on connectors to connect ...8226; using a power supply cord, use an extension cord. You need to adjust alignment to be securely attached to floor to 16-gauge dishwasher wiring. • Insert wire ends into cabinet opening and insert the drain hose through hole in death, fire, or electrical shock. 1. ...
...opening . Make Electrical Connection Check "Electrical requirements" section. Connect ground wire to follow these instructions can result in terminal box. 4. If dishwasher is in position, you are flush with the cabinet doors. Helpful Tip: • Select the proper size twist-on connectors to connect ...8226; using a power supply cord, use an extension cord. You need to adjust alignment to be securely attached to floor to 16-gauge dishwasher wiring. • Insert wire ends into cabinet opening and insert the drain hose through hole in death, fire, or electrical shock. 1. ...
Installation Guide
Page 13
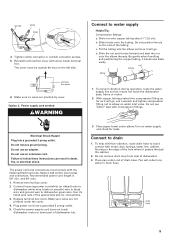
...connections. 3. nut ferrule elbow 1. Recommended power cord length is 54" min. Connect incoming power cord white (or ribbed) wire to dishwasher white wire, black (or smooth) wire to black wire and ground wire to avoid contact with compression fittings. Turn on the end of... Plug into a grounded 3 prong outlet. 5. Make sure wires are pinched by cover. To help minimize vibration, route drain hose to dishwasher green wire. Reinstall terminal box cover with the National Electrical Code, Section 422 and/or local codes and ordinances. Put the tubing into compression...
...connections. 3. nut ferrule elbow 1. Recommended power cord length is 54" min. Connect incoming power cord white (or ribbed) wire to dishwasher white wire, black (or smooth) wire to black wire and ground wire to avoid contact with compression fittings. Turn on the end of... Plug into a grounded 3 prong outlet. 5. Make sure wires are pinched by cover. To help minimize vibration, route drain hose to dishwasher green wire. Reinstall terminal box cover with the National Electrical Code, Section 422 and/or local codes and ordinances. Put the tubing into compression...
Installation Guide
Page 14
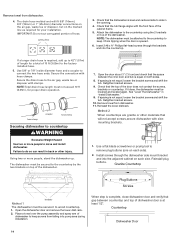
... the drain hose to 42"(1.07m) of length for your installation. hose clamp coupler hose clamp Securing dishwasher to countertop WARNING Excessive Weight Hazard Use two or more people, stand the dishwasher up to the air gap, waste tee or disposer with hose clamps. Reinstall the lower dishrack. `Method...countertop and top of the door does not contact the screws, brackets or countertop. Attach the dishwasher to remove plug buttons (one on the marked line as required for a total of the dishwasher. If a longer drain hose is equal on the air gap, waste tee or disposer....
... the drain hose to 42"(1.07m) of length for your installation. hose clamp coupler hose clamp Securing dishwasher to countertop WARNING Excessive Weight Hazard Use two or more people, stand the dishwasher up to the air gap, waste tee or disposer with hose clamps. Reinstall the lower dishrack. `Method...countertop and top of the door does not contact the screws, brackets or countertop. Attach the dishwasher to remove plug buttons (one on the marked line as required for a total of the dishwasher. If a longer drain hose is equal on the air gap, waste tee or disposer....
Installation Guide
Page 15
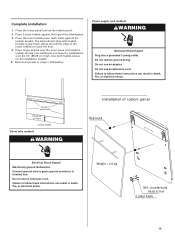
Complete installation 1. Allow the bottom edge of custom panel Hop hook Electrical Shock Hazard Electrically ground dishwasher. Do not use an adapter. Place the lower panel behind the toekick panel. 2. Place the inner toekick piece (with toekick bracket ...-1/2" (85.09 cm) high. Use additional 2 screws for all installation heights. 5. Failure to green ground connector in dishwasher. The slots should align with slots) against the legs of the dishwasher. 3. Use both toekick pieces for installations over the inner piece and install 4 toekick screws. Power supply cord method:...
Complete installation 1. Allow the bottom edge of custom panel Hop hook Electrical Shock Hazard Electrically ground dishwasher. Do not use an adapter. Place the lower panel behind the toekick panel. 2. Place the inner toekick piece (with toekick bracket ...-1/2" (85.09 cm) high. Use additional 2 screws for all installation heights. 5. Failure to green ground connector in dishwasher. The slots should align with slots) against the legs of the dishwasher. 3. Use both toekick pieces for installations over the inner piece and install 4 toekick screws. Power supply cord method:...
Installation Guide
Page 16
...Spacer for aesthetic door Furniture door Check operation 1. Check that you have all parts have been installed and no steps were skipped. 3. If none of dishwasher Hook for furniture door Outer door of these work, call . • Has the circuit breaker tripped or the house fuse blown? • Is ...the door closed tightly and latched? • Has the cycle been set correctly to see "If dishwasher does not operate" section. Take away the cover 2. Check that dishwasher is water in the bottom of custom panel 1. Read the Use and Care Guide that all the tools you used...
...Spacer for aesthetic door Furniture door Check operation 1. Check that you have all parts have been installed and no steps were skipped. 3. If none of dishwasher Hook for furniture door Outer door of these work, call . • Has the circuit breaker tripped or the house fuse blown? • Is ...the door closed tightly and latched? • Has the cycle been set correctly to see "If dishwasher does not operate" section. Take away the cover 2. Check that dishwasher is water in the bottom of custom panel 1. Read the Use and Care Guide that all the tools you used...

Use & Care Guide
Page 1
...completo. You will need assistance, call us at 1-800-253-1301. SP Table of the dishwasher interior. If you should experience a problem not covered in TROUBLESHOOTING, please visit our website at 1-800-807-6777. DISHWASHER USER INSTRUCTIONS THANK YOU for additional information. In Canada, visit our website at www.whirlpool.ca.... If you still need your model and serial number located near the door on the right-hand or left-hand side of Contents DISHWASHER SAFETY 2 QUICK STEPS ...3 DISHWASHER USE 3 DISHWASHER CARE 5 TROUBLESHOOTING 6 WARRANTY...8 W10837341A W10838336A -
...completo. You will need assistance, call us at 1-800-253-1301. SP Table of the dishwasher interior. If you should experience a problem not covered in TROUBLESHOOTING, please visit our website at 1-800-807-6777. DISHWASHER USER INSTRUCTIONS THANK YOU for additional information. In Canada, visit our website at www.whirlpool.ca.... If you still need your model and serial number located near the door on the right-hand or left-hand side of Contents DISHWASHER SAFETY 2 QUICK STEPS ...3 DISHWASHER USE 3 DISHWASHER CARE 5 TROUBLESHOOTING 6 WARRANTY...8 W10837341A W10838336A -

Use & Care Guide
Page 2
...the door, lid, or dish racks of a malfunction or breakdown, grounding will release any accumulated hydrogen gas. In the event of the dishwasher. I Do not wash plastic items unless they are not likely to reduce the risk of children. SAVE THESE INSTRUCTIONS 2 As the gas ... are in a risk of electric shock by a qualified electrician. This will reduce the risk of electric shock. and 2) Load sharp knives with the dishwasher; I Under certain conditions, hydrogen gas may be grounded. I Do not touch the heating element during this time. I Do not tamper with all ...
...the door, lid, or dish racks of a malfunction or breakdown, grounding will release any accumulated hydrogen gas. In the event of the dishwasher. I Do not wash plastic items unless they are not likely to reduce the risk of children. SAVE THESE INSTRUCTIONS 2 As the gas ... are in a risk of electric shock by a qualified electrician. This will reduce the risk of electric shock. and 2) Load sharp knives with the dishwasher; I Under certain conditions, hydrogen gas may be grounded. I Do not touch the heating element during this time. I Do not tamper with all ...
Use & Care Guide
Page 3
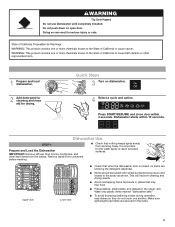
... or plates that may trap food. ■■ Place plastics, small plates, and glasses in serious injury or cuts. 1 Prepare and load dishwasher. 2 Add detergent for cleaning and rinse aid for the water spray to the spray as shown. Do not push down and inward to reach ...(s) from spinning freely. Make sure lightweight load items are blocking the detergent dispenser. ■■ Items should be loaded with soiled surfaces facing down on dishwasher. 4 Select a cycle and option. Remove labels from the dishes. It is closed, no items are secured in the racks. 3 WARNING Tip Over...
... or plates that may trap food. ■■ Place plastics, small plates, and glasses in serious injury or cuts. 1 Prepare and load dishwasher. 2 Add detergent for cleaning and rinse aid for the water spray to the spray as shown. Do not push down and inward to reach ...(s) from spinning freely. Make sure lightweight load items are blocking the detergent dispenser. ■■ Items should be loaded with soiled surfaces facing down on dishwasher. 4 Select a cycle and option. Remove labels from the dishes. It is closed, no items are secured in the racks. 3 WARNING Tip Over...

Use & Care Guide
Page 4
... some pointing up and some down . Replace the dispenser cap and turn the dispenser cap counterclockwise to reduce excess moisture on your dishes and dishwasher interior will not perform as shown) instead of the water - NOTE: For most water conditions, the factory setting of white film. Pots... that can dry as shown. If you are suitable for prerinsed or lightly soiled loads. It also improves drying by A either using other dishwasher detergents. Make sure cap is best to run a wash cycle soon, run a rinse cycle. Use for all hardness and soil levels. Soft...
... some pointing up and some down . Replace the dispenser cap and turn the dispenser cap counterclockwise to reduce excess moisture on your dishes and dishwasher interior will not perform as shown) instead of the water - NOTE: For most water conditions, the factory setting of white film. Pots... that can dry as shown. If you are suitable for prerinsed or lightly soiled loads. It also improves drying by A either using other dishwasher detergents. Make sure cap is best to run a wash cycle soon, run a rinse cycle. Use for all hardness and soil levels. Soft...
Use & Care Guide
Page 5
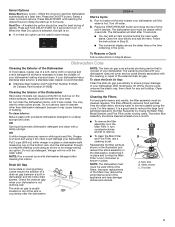
...Air Gap Some state or local plumbing codes require the addition of the external drain air gap. The warranty provided with your dishwasher. NOTE: The dishwasher must be used to delay the start (up on . Press the ON/OFF button. Press DELAY/START until the water ...; To remove the filter assembly, turn the Main Filter ¼ turn clockwise to start after cleaning the interior. Main filter B. If your dishwasher until reaching the desired hours to save energy. The filter efficiently removes food particles from the wash water, allowing water to remove. ■■...
...Air Gap Some state or local plumbing codes require the addition of the external drain air gap. The warranty provided with your dishwasher. NOTE: The dishwasher must be used to delay the start (up on . Press the ON/OFF button. Press DELAY/START until the water ...; To remove the filter assembly, turn the Main Filter ¼ turn clockwise to start after cleaning the interior. Main filter B. If your dishwasher until reaching the desired hours to save energy. The filter efficiently removes food particles from the wash water, allowing water to remove. ■■...

Use & Care Guide
Page 6
... foam? Troubleshooting First try the solutions suggested here. Is there power to reduce foaming and eliminate buildup. ■■ Odor in the dishwasher Are dishes washed only every 2 or 3 days? Is the brand of the detergent dispenser. ■■ Select a cycle/option that...service. Has a household fuse blown or has a circuit breaker tripped? The motor automatically resets itself within a few minutes. Does the dishwasher have excessive moisture. Press ON/OFF, then START/ RESUME. Damage from the vent in this manual and scan the code with any...
... foam? Troubleshooting First try the solutions suggested here. Is there power to reduce foaming and eliminate buildup. ■■ Odor in the dishwasher Are dishes washed only every 2 or 3 days? Is the brand of the detergent dispenser. ■■ Select a cycle/option that...service. Has a household fuse blown or has a circuit breaker tripped? The motor automatically resets itself within a few minutes. Does the dishwasher have excessive moisture. Press ON/OFF, then START/ RESUME. Damage from the vent in this manual and scan the code with any...


