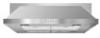
Installation Guide
Page 2
... and Parts 3 Location Requirements 4 Venting Requirements 5 Electrical Requirements 6 INSTALLATION INSTRUCTIONS 7 Prepare Location 7 Install Range Hood 9 Complete Installation 10 RANGE HOOD USE 10 Range Hood Controls 11 RANGE HOOD CARE 11 Cleaning 11 WIRING DIAGRAM 12 ASSISTANCE OR SERVICE 13 In the U.S.A 13 In Canada 13 Accessories 13 ... Nettoyage 25 SCHÉMA DE CÂBLAGE 26 ASSISTANCE OU SERVICE 27 Au Canada 27 Accessoires 27 GARANTIE 27 RANGE HOOD SAFETY Your safety and the safety of injury, and tell you what can be killed or seriously injured if you what...
... and Parts 3 Location Requirements 4 Venting Requirements 5 Electrical Requirements 6 INSTALLATION INSTRUCTIONS 7 Prepare Location 7 Install Range Hood 9 Complete Installation 10 RANGE HOOD USE 10 Range Hood Controls 11 RANGE HOOD CARE 11 Cleaning 11 WIRING DIAGRAM 12 ASSISTANCE OR SERVICE 13 In the U.S.A 13 In Canada 13 Accessories 13 ... Nettoyage 25 SCHÉMA DE CÂBLAGE 26 ASSISTANCE OU SERVICE 27 Au Canada 27 Accessoires 27 GARANTIE 27 RANGE HOOD SAFETY Your safety and the safety of injury, and tell you what can be killed or seriously injured if you what...
Installation Guide
Page 3
... applicable codes and standards, including fire-rated construction. ■ Do not operate any fan with a close fitting lid, cookie sheet, or metal tray, then turn hood ON when cooking at high settings. Heat oils slowly on "Kitchen Fire Safety Tips" published by the manufacturer. Always use this unit only in the...
... applicable codes and standards, including fire-rated construction. ■ Do not operate any fan with a close fitting lid, cookie sheet, or metal tray, then turn hood ON when cooking at high settings. Heat oils slowly on "Kitchen Fire Safety Tips" published by the manufacturer. Always use this unit only in the...

Installation Guide
Page 4
...cooktop/range manufacturer installation instructions before making any cutouts. ■ Grounded electrical outlet is included. clearance - bottom of this range hood must conform to the Manufactured Home Construction Safety Standards, Title 24 CFR, Part 328 (formerly the Federal Standard for Mobile Home ...is the installer's responsibility to order Replacement Charcoal Filters Part Number W10272068. ■ All openings in ceiling and wall where range hood will be installed must be sealed. for electric cooking surfaces 27" (68.6 cm) min. For cabinets with washers and nuts...
...cooktop/range manufacturer installation instructions before making any cutouts. ■ Grounded electrical outlet is included. clearance - bottom of this range hood must conform to the Manufactured Home Construction Safety Standards, Title 24 CFR, Part 328 (formerly the Federal Standard for Mobile Home ...is the installer's responsibility to order Replacement Charcoal Filters Part Number W10272068. ■ All openings in ceiling and wall where range hood will be installed must be sealed. for electric cooking surfaces 27" (68.6 cm) min. For cabinets with washers and nuts...

Installation Guide
Page 5
... x 25.4 cm) to where the vent system enters the heated portion of 35 ft (10.7 m) or 6" (15.2 cm) or larger round vent with the range hood. ■ Use caulking to locale.
... x 25.4 cm) to where the vent system enters the heated portion of 35 ft (10.7 m) or 6" (15.2 cm) or larger round vent with the range hood. ■ Use caulking to locale.
Installation Guide
Page 6
...a mating outlet is not available, it is recommended that a qualified electrical installer determine that a separate circuit serving only this range hood be electrically grounded in accordance with the National Electrical Code, ANSI/NFPA 70 (latest edition) or Canadian Electrical Code, CSA C22.1...3 prong grounding plug. ■ To minimize possible shock hazard, the cord must be provided. ■ This range hood is adequate. IMPORTANT: The range hood must be obtained from: National Fire Protection Association 1 Batterymarch Park Quincy, MA 02169-7471 CSA International 8501 East Pleasant ...
...a mating outlet is not available, it is recommended that a qualified electrical installer determine that a separate circuit serving only this range hood be electrically grounded in accordance with the National Electrical Code, ANSI/NFPA 70 (latest edition) or Canadian Electrical Code, CSA C22.1...3 prong grounding plug. ■ To minimize possible shock hazard, the cord must be provided. ■ This range hood is adequate. IMPORTANT: The range hood must be obtained from: National Fire Protection Association 1 Batterymarch Park Quincy, MA 02169-7471 CSA International 8501 East Pleasant ...
Installation Guide
Page 7
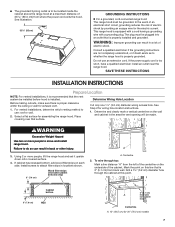
...be grounded. If cabinet has recessed bottom, add wood filler strips on the underside of the cabinet. Install screws to whether the range hood is proper clearance within the ceiling or wall for exhaust vent. 1. Cut only one 1¹⁄₄" (3.2 cm) diameter wiring access... 3. Mark the point on the wall and cabinet in locations shown. 3" (7.6 cm) Wood filler strips (recessed cabinet bottoms only) A A. This range hood is 2" (5.1 cm) from wall, not cabinet frame Centerline A. 12" (30.5 cm) for the electric current. If the power supply cord is installed....
...be grounded. If cabinet has recessed bottom, add wood filler strips on the underside of the cabinet. Install screws to whether the range hood is proper clearance within the ceiling or wall for exhaust vent. 1. Cut only one 1¹⁄₄" (3.2 cm) diameter wiring access... 3. Mark the point on the wall and cabinet in locations shown. 3" (7.6 cm) Wood filler strips (recessed cabinet bottoms only) A A. This range hood is 2" (5.1 cm) from wall, not cabinet frame Centerline A. 12" (30.5 cm) for the electric current. If the power supply cord is installed....
Installation Guide
Page 9
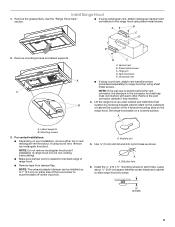
...drill bit and drill 4 pilot holes as shown. A A. Vent knockouts E. Remove the vent connector damper if they interfere. 4. See the "Range Hood Care" section. ■ If using rectangular vent, attach rectangular damper/vent connectors to accommodate off-center ductwork. A B C D E 2. A ... Mounting screws 3. NOTE: The exhaust adaptor/damper can be non-venting (recirculating). ■ Make sure damper pivot is nearest to range hood top using round vent, attach vent transition piece (purchased separately) to top/back edge of the 4 keyhole mounting slots on a covered...
...drill bit and drill 4 pilot holes as shown. A A. Vent knockouts E. Remove the vent connector damper if they interfere. 4. See the "Range Hood Care" section. ■ If using rectangular vent, attach rectangular damper/vent connectors to accommodate off-center ductwork. A B C D E 2. A ... Mounting screws 3. NOTE: The exhaust adaptor/damper can be non-venting (recirculating). ■ Make sure damper pivot is nearest to range hood top using round vent, attach vent transition piece (purchased separately) to top/back edge of the 4 keyhole mounting slots on a covered...

Installation Guide
Page 10
... 13. Reinstall the rear support. 10 DC B A. Blower and light controls D. 7. Do not use an extension cord. For best results, start the hood before cooking and allow it to operate several minutes after the cooking is designed to clear all smoke and odors from the cooktop area. Position... the range hood so that damper, if used, rotates up on the center of the slots. Grease filter handle C. Install the blower mounting screws. Replace...
... 13. Reinstall the rear support. 10 DC B A. Blower and light controls D. 7. Do not use an extension cord. For best results, start the hood before cooking and allow it to operate several minutes after the cooking is designed to clear all smoke and odors from the cooktop area. Position... the range hood so that damper, if used, rotates up on the center of the slots. Grease filter handle C. Install the blower mounting screws. Replace...
Installation Guide
Page 11
...operation by pulling the spring release handle and then pulling down the filter. Charcoal filter B. Replacing a Halogen Lamp Turn off the range hood and allow the halogen lamp to handle lamp. Replace lamp, using tissue or wearing cotton gloves to cool. Wash metal filters as ... and release handle to six months with bare fingers. Reinstall the filter by making sure the spring release handles are inserted correctly before operating hood. The Blower Off button turns the blower Off. Remove each filter by pressing the desired blower speed button. A A. Blower speed medium ...
...operation by pulling the spring release handle and then pulling down the filter. Charcoal filter B. Replacing a Halogen Lamp Turn off the range hood and allow the halogen lamp to handle lamp. Replace lamp, using tissue or wearing cotton gloves to cool. Wash metal filters as ... and release handle to six months with bare fingers. Reinstall the filter by making sure the spring release handles are inserted correctly before operating hood. The Blower Off button turns the blower Off. Remove each filter by pressing the desired blower speed button. A A. Blower speed medium ...

Use & Care Guide
Page 2
... and Parts 3 Location Requirements 4 Venting Requirements 5 Electrical Requirements 6 INSTALLATION INSTRUCTIONS 7 Prepare Location 7 Install Range Hood 9 Complete Installation 10 RANGE HOOD USE 10 Range Hood Controls 11 RANGE HOOD CARE 11 Cleaning 11 WIRING DIAGRAM 12 ASSISTANCE OR SERVICE 13 In the U.S.A 13 In Canada 13 Accessories 13 ...25 Nettoyage 25 SCHÉMA DE CÂBLAGE 26 ASSISTANCE OU SERVICE 27 Au Canada 27 Accessoires 27 GARANTIE 27 RANGE HOOD SAFETY Your safety and the safety of injury, and tell you and others are not followed. 2 WARNING You can be...
... and Parts 3 Location Requirements 4 Venting Requirements 5 Electrical Requirements 6 INSTALLATION INSTRUCTIONS 7 Prepare Location 7 Install Range Hood 9 Complete Installation 10 RANGE HOOD USE 10 Range Hood Controls 11 RANGE HOOD CARE 11 Cleaning 11 WIRING DIAGRAM 12 ASSISTANCE OR SERVICE 13 In the U.S.A 13 In Canada 13 Accessories 13 ...25 Nettoyage 25 SCHÉMA DE CÂBLAGE 26 ASSISTANCE OU SERVICE 27 Au Canada 27 Accessoires 27 GARANTIE 27 RANGE HOOD SAFETY Your safety and the safety of injury, and tell you and others are not followed. 2 WARNING You can be...

Use & Care Guide
Page 3
...; When cutting or drilling into crawl spaces, or garages. You can fight the fire with a close fitting lid, cookie sheet, or metal tray, then turn hood ON when cooking at high settings. WARNING: TO REDUCE THE RISK OF INJURY TO PERSONS IN THE EVENT OF A RANGE TOP GREASE FIRE, OBSERVE THE...
...; When cutting or drilling into crawl spaces, or garages. You can fight the fire with a close fitting lid, cookie sheet, or metal tray, then turn hood ON when cooking at high settings. WARNING: TO REDUCE THE RISK OF INJURY TO PERSONS IN THE EVENT OF A RANGE TOP GREASE FIRE, OBSERVE THE...
Use & Care Guide
Page 4
...installations. Consult the cooktop/range manufacturer installation instructions before making any cutouts. ■ Grounded electrical outlet is located inside the range hood on the model/serial rating plate. clearance - See the "Assistance or Service" section to attach filler strips). Parts needed For ..." section to cooking surface C. 30" (76.2 cm) or 36" (91.4 cm) min. Given dimensions provide minimum clearance. bottom of this range hood must be used. ■ 4 - 8 x 40 mm wall anchors ■ Recirculating kit ■ Charcoal filters for gas cooking surfaces 30" (76...
...installations. Consult the cooktop/range manufacturer installation instructions before making any cutouts. ■ Grounded electrical outlet is located inside the range hood on the model/serial rating plate. clearance - See the "Assistance or Service" section to attach filler strips). Parts needed For ..." section to cooking surface C. 30" (76.2 cm) or 36" (91.4 cm) min. Given dimensions provide minimum clearance. bottom of this range hood must be used. ■ 4 - 8 x 40 mm wall anchors ■ Recirculating kit ■ Charcoal filters for gas cooking surfaces 30" (76...
Use & Care Guide
Page 5
....4 cm) to locale. The break should be as close as part of 35 ft (10.7 m) or 6" (15.2 cm) or larger round vent with the range hood. ■ Use caulking to the outdoors, except for nonvented (recirculating) installations. ■ Do not terminate the vent system in an attic or other enclosed area...
....4 cm) to locale. The break should be as close as part of 35 ft (10.7 m) or 6" (15.2 cm) or larger round vent with the range hood. ■ Use caulking to the outdoors, except for nonvented (recirculating) installations. ■ Do not terminate the vent system in an attic or other enclosed area...

Use & Care Guide
Page 6
... is not available, it is recommended that a qualified electrical installer determine that a separate circuit serving only this range hood be provided. ■ This range hood is adequate. Do not remove ground prong. IMPORTANT: The range hood must be plugged into a grounded 3 prong outlet. or 20-amp, fused electrical circuit is also recommended. Do...
... is not available, it is recommended that a qualified electrical installer determine that a separate circuit serving only this range hood be provided. ■ This range hood is adequate. Do not remove ground prong. IMPORTANT: The range hood must be plugged into a grounded 3 prong outlet. or 20-amp, fused electrical circuit is also recommended. Do...

Use & Care Guide
Page 7
...point on each side. Consult a qualified electrician if the grounding instructions are not completely understood, or if doubt exists as to whether the range hood is properly grounded. Determine Wiring Hole Location Before making cutouts, make sure there is proper clearance within the ceiling or wall for the electric ... centerline on the wall and cabinet in back or other injury. 3. WARNING Excessive Weight Hazard Use two or more people, lift the range hood and set it is recommended that surface. ■ The grounded 3 prong outlet is to be located inside the cabinet above the range...
...point on each side. Consult a qualified electrician if the grounding instructions are not completely understood, or if doubt exists as to whether the range hood is properly grounded. Determine Wiring Hole Location Before making cutouts, make sure there is proper clearance within the ceiling or wall for the electric ... centerline on the wall and cabinet in back or other injury. 3. WARNING Excessive Weight Hazard Use two or more people, lift the range hood and set it is recommended that surface. ■ The grounded 3 prong outlet is to be located inside the cabinet above the range...

Use & Care Guide
Page 9
... in the connector and wall cap must not interfere with each other. NOTE: If the wall cap is nearest to top/back edge of range hood. ■ Remove tape from damper flap. A A. If using sheet metal screws. Remove mounting screws and lateral supports. Sheet metal screws C. ... non-venting (recirculating). ■ Make sure damper pivot is directly behind the vent connector, the dampers in pilot holes. See the "Range Hood Care" section. ■ If using rectangular vent, attach rectangular damper/vent connectors to be installed up under cabinet and determine final location by...
... in the connector and wall cap must not interfere with each other. NOTE: If the wall cap is nearest to top/back edge of range hood. ■ Remove tape from damper flap. A A. If using sheet metal screws. Remove mounting screws and lateral supports. Sheet metal screws C. ... non-venting (recirculating). ■ Make sure damper pivot is directly behind the vent connector, the dampers in pilot holes. See the "Range Hood Care" section. ■ If using rectangular vent, attach rectangular damper/vent connectors to be installed up under cabinet and determine final location by...
Use & Care Guide
Page 10
... controls D. Replace filters. Install the blower mounting screws. B A Complete Installation 1. Blower mounting screws ■ Install charcoal filters. Then push the hood toward the wall so that the large end of the keyhole slots are located on the blower to detach the blower from the mounting plate...and attach to follow these instructions can result in death, fire, or electrical shock. 13. See the "Range Hood Care" section. 2. For best results, start the hood before cooking and allow it to operate several minutes after the cooking is designed to clear all smoke and odors ...
... controls D. Replace filters. Install the blower mounting screws. B A Complete Installation 1. Blower mounting screws ■ Install charcoal filters. Then push the hood toward the wall so that the large end of the keyhole slots are located on the blower to detach the blower from the mounting plate...and attach to follow these instructions can result in death, fire, or electrical shock. 13. See the "Range Hood Care" section. 2. For best results, start the hood before cooking and allow it to operate several minutes after the cooking is designed to clear all smoke and odors ...

Use & Care Guide
Page 11
... or decreasing the life of the motor cover grille. Reinstall the filter by making sure the spring release handles are inserted correctly before operating hood. Replace the light cover. 5. Blower speed minimum button D. Press once for On and again for a G-9 base. 4. Exterior Surfaces:... power. 2. Spring release handle 2. Blower speed medium button E. AB C A. Blower Off button C. Replacing a Halogen Lamp Turn off the range hood and allow the halogen lamp to lock it. 3. Replace lamp, using tissue or wearing cotton gloves to the pins on the other filter. 3. ...
... or decreasing the life of the motor cover grille. Reinstall the filter by making sure the spring release handles are inserted correctly before operating hood. Replace the light cover. 5. Blower speed minimum button D. Press once for On and again for a G-9 base. 4. Exterior Surfaces:... power. 2. Spring release handle 2. Blower speed medium button E. AB C A. Blower Off button C. Replacing a Halogen Lamp Turn off the range hood and allow the halogen lamp to lock it. 3. Replace lamp, using tissue or wearing cotton gloves to the pins on the other filter. 3. ...
Dimension Guide
Page 1
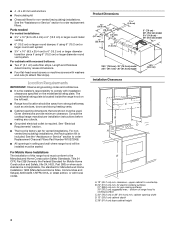
... vent through the roof or wall. Specifications subject to cooking surface C. 30" (76.2 cm) or 36" (91.4 cm) min. Page 1 of range hood to change materials and specifications without notice. CABINET OPENING DIMENSIONS PRODUCT DIMENSIONS 12" (30.5 cm) 7¹⁄₄" (18.4 cm) 2" (5.1 cm) &#... VENTING REQUIREMENTS Vent system can terminate either through roof B. for gas cooking surfaces 30" (76.2 cm) suggested max. - bottom of 2 Ref. q Range hood location should be provided. Roof cap A. 6" (15.2 cm) or larger round vent or a 3¹⁄₄" x 10" (8.3 x 25.4 cm) ...
... vent through the roof or wall. Specifications subject to cooking surface C. 30" (76.2 cm) or 36" (91.4 cm) min. Page 1 of range hood to change materials and specifications without notice. CABINET OPENING DIMENSIONS PRODUCT DIMENSIONS 12" (30.5 cm) 7¹⁄₄" (18.4 cm) 2" (5.1 cm) &#... VENTING REQUIREMENTS Vent system can terminate either through roof B. for gas cooking surfaces 30" (76.2 cm) suggested max. - bottom of 2 Ref. q Range hood location should be provided. Roof cap A. 6" (15.2 cm) or larger round vent or a 3¹⁄₄" x 10" (8.3 x 25.4 cm) ...

