

User Manual
Page 1
Kodak EasyShare C530/C315/CD50 digital camera User's guide www.kodak.com For interactive tutorials, www.kodak.com/go/howto For help with your camera, www.kodak.com/go/c530support
Kodak EasyShare C530/C315/CD50 digital camera User's guide www.kodak.com For interactive tutorials, www.kodak.com/go/howto For help with your camera, www.kodak.com/go/c530support

User Manual
Page 5
...digital zoom 7 Using the flash 8 Reviewing pictures and videos 8 Protecting pictures and videos from deletion 12 3 Transferring and printing pictures 14 Installing the software 14 Transferring pictures with the USB cable 15 Printing pictures 16 Dock compatibility for your camera 19 4 Doing more with your camera... 20 Using the self-timer 20 Running a slide show 21 Copying pictures and videos 23 Choosing a flash setting 24 Changing picture-taking settings 25 Customizing your camera 27 Viewing picture/video information 29 www.kodak....
...digital zoom 7 Using the flash 8 Reviewing pictures and videos 8 Protecting pictures and videos from deletion 12 3 Transferring and printing pictures 14 Installing the software 14 Transferring pictures with the USB cable 15 Printing pictures 16 Dock compatibility for your camera 19 4 Doing more with your camera... 20 Using the self-timer 20 Running a slide show 21 Copying pictures and videos 23 Choosing a flash setting 24 Changing picture-taking settings 25 Customizing your camera 27 Viewing picture/video information 29 www.kodak....

User Manual
Page 6
Table of contents Pre-tagging for album names 30 Sharing your pictures 33 5 Troubleshooting 38 Camera problems 38 Camera/computer communications 41 LCD screen messages 41 Camera ready light status 44 6 Getting help 46 Helpful Web links 46 Software help 46 Telephone customer support 47 7 Appendix 48 Camera specifications 48 Storage capacities 50 Power-saving features 52 Important safety instructions 52 Battery information 54 Upgrading your software and firmware 55 Additional care and maintenance 55 Warranty...56 Regulatory compliance 58 iv www.kodak.com/go/support
Table of contents Pre-tagging for album names 30 Sharing your pictures 33 5 Troubleshooting 38 Camera problems 38 Camera/computer communications 41 LCD screen messages 41 Camera ready light status 44 6 Getting help 46 Helpful Web links 46 Software help 46 Telephone customer support 47 7 Appendix 48 Camera specifications 48 Storage capacities 50 Power-saving features 52 Important safety instructions 52 Battery information 54 Upgrading your software and firmware 55 Additional care and maintenance 55 Warranty...56 Regulatory compliance 58 iv www.kodak.com/go/support

User Manual
Page 7
1 Setting up your camera Attaching the wrist strap Loading the batteries CRV3 lithium Ni-MH KAA2HR 2-AA lithium, Ni-MH, or (non-rechargeable) (rechargeable) (non-rechargeable oxy-alkaline AA) For information on replacing batteries and extending battery life, see page 54. www.kodak.com/go/support 1
1 Setting up your camera Attaching the wrist strap Loading the batteries CRV3 lithium Ni-MH KAA2HR 2-AA lithium, Ni-MH, or (non-rechargeable) (rechargeable) (non-rechargeable oxy-alkaline AA) For information on replacing batteries and extending battery life, see page 54. www.kodak.com/go/support 1
User Manual
Page 8
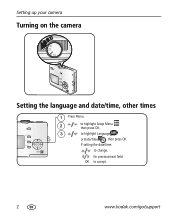
Setting up your camera Turning on the camera Setting the language and date/time, other times 1 Press Menu. 2 to highlight Setup Menu then press OK. 3 to accept. 2 www.kodak.com/go/support OK to highlight Language or Date/Time , then press OK. If setting the date/time: to change. for previous/next field.
Setting up your camera Turning on the camera Setting the language and date/time, other times 1 Press Menu. 2 to highlight Setup Menu then press OK. 3 to accept. 2 www.kodak.com/go/support OK to highlight Language or Date/Time , then press OK. If setting the date/time: to change. for previous/next field.
User Manual
Page 9
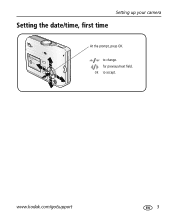
for previous/next field. to accept. OK to change. www.kodak.com/go/support 3 Setting up your camera Setting the date/time, first time At the prompt, press OK.
for previous/next field. to accept. OK to change. www.kodak.com/go/support 3 Setting up your camera Setting the date/time, first time At the prompt, press OK.
User Manual
Page 10
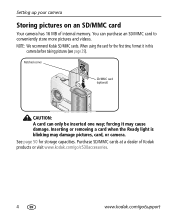
See page 50 for the first time, format it may damage pictures, card, or camera. Purchase SD/MMC cards at a dealer of internal memory. NOTE: We recommend Kodak SD/MMC cards. When using the card for storage capacities. Notched corner SD/MMC card (optional) CAUTION: A card can purchase ... a card when the Ready light is blinking may cause damage. Setting up your camera Storing pictures on an SD/MMC card Your camera has 16 MB of Kodak products or visit www.kodak.com/go/c530accessories. 4 www.kodak.com/go/support forcing it in this camera before taking pictures (see page 29).
See page 50 for the first time, format it may damage pictures, card, or camera. Purchase SD/MMC cards at a dealer of internal memory. NOTE: We recommend Kodak SD/MMC cards. When using the card for storage capacities. Notched corner SD/MMC card (optional) CAUTION: A card can purchase ... a card when the Ready light is blinking may cause damage. Setting up your camera Storing pictures on an SD/MMC card Your camera has 16 MB of Kodak products or visit www.kodak.com/go/c530accessories. 4 www.kodak.com/go/support forcing it in this camera before taking pictures (see page 29).
User Manual
Page 11
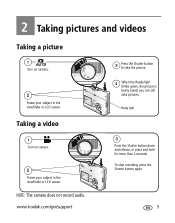
you can still take the picture. 4 When the Ready light blinks green, the picture is being saved; www.kodak.com/go/support 3 Press the Shutter button to take pictures. 2 Taking pictures and videos Taking a picture 1 Turn on camera. 2 Frame your subject in the viewfinder or LCD screen. NOTE: The camera does not record audio. Ready light 3 Press the Shutter button down and release, or press and hold for more than 2 seconds. To stop recording, press the Shutter button again. 5 Taking a video 1 Turn on camera. 2 Frame your subject in the viewfinder or LCD screen.
you can still take the picture. 4 When the Ready light blinks green, the picture is being saved; www.kodak.com/go/support 3 Press the Shutter button to take pictures. 2 Taking pictures and videos Taking a picture 1 Turn on camera. 2 Frame your subject in the viewfinder or LCD screen. NOTE: The camera does not record audio. Ready light 3 Press the Shutter button down and release, or press and hold for more than 2 seconds. To stop recording, press the Shutter button again. 5 Taking a video 1 Turn on camera. 2 Frame your subject in the viewfinder or LCD screen.

User Manual
Page 13
Zoom indicator 3 Press the Shutter button to zoom in . (10 x 15 cm) print. 1 Press the OK button to take the picture. www.kodak.com/go/support 7 NOTE: You cannot use it sparingly. 1 Turn the Mode dial to . 2 Press the OK button to turn on the zoom indicator ...notice a decrease in the LCD screen. 4 Press the Shutter button to turn off digital zoom, from the lowest setting, press . Digital zoom is available only when Liveview is on (see Liveview, page 28. To turn on whenever the camera is turned on , see page 28). Taking pictures and videos Using the LCD screen...
Zoom indicator 3 Press the Shutter button to zoom in . (10 x 15 cm) print. 1 Press the OK button to take the picture. www.kodak.com/go/support 7 NOTE: You cannot use it sparingly. 1 Turn the Mode dial to . 2 Press the OK button to turn on the zoom indicator ...notice a decrease in the LCD screen. 4 Press the Shutter button to turn off digital zoom, from the lowest setting, press . Digital zoom is available only when Liveview is on (see Liveview, page 28. To turn on whenever the camera is turned on , see page 28). Taking pictures and videos Using the LCD screen...

User Manual
Page 14
... Reviewing pictures and videos Press the Review button to view and work with a black bar at the top of the screen. 8 www.kodak.com/go /c530accessories.) NOTE: Pictures taken at 4.4 MP (3:2) quality setting are displayed at night, indoors, or outdoors in Auto mode....3.3 - 7.9 ft (1.0 - 2.4 m). Press the button repeatedly to exit) 2 (previous/next) To save battery power, use the optional Kodak EasyShare camera or printer dock. (Visit www.kodak.com/go /support Videos: OK to play/pause Rewind to beginning (during playback) Next picture/video (during playback) 1 Review (Press again ...
... Reviewing pictures and videos Press the Review button to view and work with a black bar at the top of the screen. 8 www.kodak.com/go /c530accessories.) NOTE: Pictures taken at 4.4 MP (3:2) quality setting are displayed at night, indoors, or outdoors in Auto mode....3.3 - 7.9 ft (1.0 - 2.4 m). Press the button repeatedly to exit) 2 (previous/next) To save battery power, use the optional Kodak EasyShare camera or printer dock. (Visit www.kodak.com/go /support Videos: OK to play/pause Rewind to beginning (during playback) Next picture/video (during playback) 1 Review (Press again ...

User Manual
Page 17
... crop pictures under 2.1 MP or previously cropped pictures. NOTE: Cropping may not be supported for images captured on -screen instructions. The on -screen instructions. www.kodak.com/go/support 11 Press OK. 5 Press Save to move the crop box. to keep the cropped image (the original picture is kept). Press OK...
... crop pictures under 2.1 MP or previously cropped pictures. NOTE: Cropping may not be supported for images captured on -screen instructions. The on -screen instructions. www.kodak.com/go/support 11 Press OK. 5 Press Save to move the crop box. to keep the cropped image (the original picture is kept). Press OK...

User Manual
Page 20
...keeps your camera and software. Select Custom to choose the applications you wish to automatically install the most commonly used applications. Registering lets you turned off anti-virus software, turn it back on the Kodak EasyShare software CD, click the Help button in the Kodak EasyShare software. 14 www.kodak.com/...-screen instructions. NOTE: When prompted, register your system up for details. 3 Transferring and printing pictures Installing the software CAUTION: Install Kodak EasyShare software before connecting the camera or optional dock to install the software.
...keeps your camera and software. Select Custom to choose the applications you wish to automatically install the most commonly used applications. Registering lets you turned off anti-virus software, turn it back on the Kodak EasyShare software CD, click the Help button in the Kodak EasyShare software. 14 www.kodak.com/...-screen instructions. NOTE: When prompted, register your system up for details. 3 Transferring and printing pictures Installing the software CAUTION: Install Kodak EasyShare software before connecting the camera or optional dock to install the software.

User Manual
Page 21
I Kodak EasyShare camera dock, Kodak EasyShare printer dock (see page 19) I Kodak multi-card reader, Kodak SD multimedia card reader-writer Purchase these Kodak products to transfer your computer. The software prompts you through the transfer process. Also available for an online tutorial on connecting. www.kodak.com/go /c530accessories. Kodak EasyShare software opens on your computer user's guide for details. 3 Plug...
I Kodak EasyShare camera dock, Kodak EasyShare printer dock (see page 19) I Kodak multi-card reader, Kodak SD multimedia card reader-writer Purchase these Kodak products to transfer your computer. The software prompts you through the transfer process. Also available for an online tutorial on connecting. www.kodak.com/go /c530accessories. Kodak EasyShare software opens on your computer user's guide for details. 3 Plug...

User Manual
Page 22
... compatible with or without a computer. Purchase this and other accessories at a dealer of Kodak products or visit www.kodak.com/go /support Transferring and printing pictures Printing pictures Printing with a Kodak EasyShare printer dock Dock your camera to the Kodak EasyShare printer dock and print directly-with PictBridge technology, so you can print directly to the printer...
... compatible with or without a computer. Purchase this and other accessories at a dealer of Kodak products or visit www.kodak.com/go /support Transferring and printing pictures Printing pictures Printing with a Kodak EasyShare printer dock Dock your camera to the Kodak EasyShare printer dock and print directly-with PictBridge technology, so you can print directly to the printer...

User Manual
Page 23
Transferring and printing pictures Printing from a PictBridge enabled printer 1 Turn on the camera. Tagged Pictures If your computer, see page 14. www.kodak.com/go/support 17 Image Storage Access internal memory, a card, or Favorites. NOTE: During direct printing, pictures are found, a message is displayed.) If the menu ...
Transferring and printing pictures Printing from a PictBridge enabled printer 1 Turn on the camera. Tagged Pictures If your computer, see page 14. www.kodak.com/go/support 17 Image Storage Access internal memory, a card, or Favorites. NOTE: During direct printing, pictures are found, a message is displayed.) If the menu ...

User Manual
Page 24
... details. I Edit, enhance, and add borders to your computer, click the Help button in the Kodak EasyShare software. Printing from the camera and the printer. Using a printer that is one of the many online print services offered in the Kodak EasyShare software. I Order high-quality prints, photo greeting cards, frames, and albums-and have them...
... details. I Edit, enhance, and add borders to your computer, click the Help button in the Kodak EasyShare software. Printing from the camera and the printer. Using a printer that is one of the many online print services offered in the Kodak EasyShare software. I Order high-quality prints, photo greeting cards, frames, and albums-and have them...

User Manual
Page 25
... Dock compatibility for your camera Kodak EasyShare dock I printer dock plus series 3 I series 3 printer docks and camera docks Docking configuration Custom dock insert Dock Others, including: I printer dock I printer dock plus I printer dock 6000 I camera dock 6000 Custom dock insert Kodak dock adapter kit D-22 Dock I printer dock 4000 I camera dock II I LS420, LS443 camera dock Not compatible...
... Dock compatibility for your camera Kodak EasyShare dock I printer dock plus series 3 I series 3 printer docks and camera docks Docking configuration Custom dock insert Dock Others, including: I printer dock I printer dock plus I printer dock 6000 I camera dock 6000 Custom dock insert Kodak dock adapter kit D-22 Dock I printer dock 4000 I camera dock II I LS420, LS443 camera dock Not compatible...
User Manual
Page 26
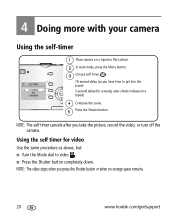
...NOTE: The video stops when you take the picture, record the video, or turn off the camera. NOTE: The self timer cancels after you press the Shutter button or when no storage space remains. 20 www.kodak.com/go/support Using the self timer for a steady, auto-shutter release on a tripod)... 4 Compose the scene. 5 Press the Shutter button. 4 Doing more with your camera Using the self-timer 1 Place camera on a tripod or flat surface. 2 In Auto mode...
...NOTE: The video stops when you take the picture, record the video, or turn off the camera. NOTE: The self timer cancels after you press the Shutter button or when no storage space remains. 20 www.kodak.com/go/support Using the self timer for a steady, auto-shutter release on a tripod)... 4 Compose the scene. 5 Press the Shutter button. 4 Doing more with your camera Using the self-timer 1 Place camera on a tripod or flat surface. 2 In Auto mode...

User Manual
Page 27
... seconds. 1 On the Slide Show menu, press OK button. You can set the display interval from 3 to display your camera Running a slide show on a television or on the LCD screen. www.kodak.com/go/support 21 Starting the slide show display interval The default interval setting displays each picture for 5 seconds. to...
... seconds. 1 On the Slide Show menu, press OK button. You can set the display interval from 3 to display your camera Running a slide show on a television or on the LCD screen. www.kodak.com/go/support 21 Starting the slide show display interval The default interval setting displays each picture for 5 seconds. to...

User Manual
Page 28
...Image quality on a television screen may not be as good as on a television, computer monitor, or any device equipped with your camera Running a continuous slide show loop When you turn on Loop, the slide show repeats until you press the OK button or until ... details. Purchase these and other accessories at a dealer of Kodak products or visit www.kodak.com/go/c530accessories. 22 www.kodak.com/go/support Video input devices include a compatible Kodak EasyShare printer dock or camera dock (see page 28). See the printer dock or camera dock user's guide for more with a video input using...
...Image quality on a television screen may not be as good as on a television, computer monitor, or any device equipped with your camera Running a continuous slide show loop When you turn on Loop, the slide show repeats until you press the OK button or until ... details. Purchase these and other accessories at a dealer of Kodak products or visit www.kodak.com/go/c530accessories. 22 www.kodak.com/go/support Video input devices include a compatible Kodak EasyShare printer dock or camera dock (see page 28). See the printer dock or camera dock user's guide for more with a video input using...


