User Manual
Page 1
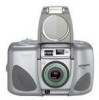
ENGLISH/ESPAÑOL/FRANÇAIS CAMERA IDENTIFICATION 3 2 1 10 1 Shutter button 2 Zoom dial 3 Format-selector switch 4 Lens cover/flash 4 5 Light sensor 6 Viewfinder 7 Auto-focus sensors 8 Lens 9 Red-eye-reduction/ self-timer lamp 10 Film-door lever 5 6 7 8 9 Unfold the front and back flaps of this manual to view the camera's parts. Unfold the front and back flaps of this manual to view the camera's parts. Consumer Imaging EASTMAN KODAK COMPANY Rochester, NY 14650 Kodak C750 Zoom Camera © Eastman Kodak Company, 2000 Pt. No. 919 5504 Printed in U.S.A.
ENGLISH/ESPAÑOL/FRANÇAIS CAMERA IDENTIFICATION 3 2 1 10 1 Shutter button 2 Zoom dial 3 Format-selector switch 4 Lens cover/flash 4 5 Light sensor 6 Viewfinder 7 Auto-focus sensors 8 Lens 9 Red-eye-reduction/ self-timer lamp 10 Film-door lever 5 6 7 8 9 Unfold the front and back flaps of this manual to view the camera's parts. Unfold the front and back flaps of this manual to view the camera's parts. Consumer Imaging EASTMAN KODAK COMPANY Rochester, NY 14650 Kodak C750 Zoom Camera © Eastman Kodak Company, 2000 Pt. No. 919 5504 Printed in U.S.A.

User Manual
Page 2
...-off and on, you may reduce the interference by the following two conditions: (1) this device may not cause harmful interference, and (2) this camera does cause interference to radio or television reception, which can radiate radio frequency energy and, if not used in residential use. These limits provide... icon 35 Portrait icon 36 Infinity-focus icon 37 Frame counter 38 Film-presence indicator 39 Date/time display 40 Battery symbol The camera generates, uses and can be determined by the party responsible for help. Operation is no guarantee that may cause interference to comply ...
...-off and on, you may reduce the interference by the following two conditions: (1) this device may not cause harmful interference, and (2) this camera does cause interference to radio or television reception, which can radiate radio frequency energy and, if not used in residential use. These limits provide... icon 35 Portrait icon 36 Infinity-focus icon 37 Frame counter 38 Film-presence indicator 39 Date/time display 40 Battery symbol The camera generates, uses and can be determined by the party responsible for help. Operation is no guarantee that may cause interference to comply ...

User Manual
Page 3
... sales receipt as proof of the date of the Advanced Photo System! For warranty purposes, please keep your camera available. Kodak (Canada only) from 9:00 a.m. ENGLISH KODAK ADVANTIX C750 Zoom Camera Welcome to the world of purchase. © Eastman Kodak Company, 2000 1 And thank you call (416) 766-8233, ext. 36100. to 7:00 p.m. (Eastern time) Monday through...
... sales receipt as proof of the date of the Advanced Photo System! For warranty purposes, please keep your camera available. Kodak (Canada only) from 9:00 a.m. ENGLISH KODAK ADVANTIX C750 Zoom Camera Welcome to the world of purchase. © Eastman Kodak Company, 2000 1 And thank you call (416) 766-8233, ext. 36100. to 7:00 p.m. (Eastern time) Monday through...

User Manual
Page 4
CONTENTS ADVANCED PHOTO SYSTEM FEATURES AVAILABLE WITH THIS CAMERA 3 GETTING STARTED 5 Loading the battery 5 Setting the language 6 List of languages 7 Date and time imprinting 8 Setting the date and time 8 ATTACHING THE STRAP 9 CONTROL-BUTTON ... PRINT-QUANTITY SELECTION (PQS) .. 26 ISO FILM-SPEED DISPLAY 26 UNLOADING THE FILM 27 Automatic rewind 27 Mid-roll change (MRC 27 CARING FOR YOUR CAMERA 28 TROUBLESHOOTING 29 SPECIFICATIONS 31 2
CONTENTS ADVANCED PHOTO SYSTEM FEATURES AVAILABLE WITH THIS CAMERA 3 GETTING STARTED 5 Loading the battery 5 Setting the language 6 List of languages 7 Date and time imprinting 8 Setting the date and time 8 ATTACHING THE STRAP 9 CONTROL-BUTTON ... PRINT-QUANTITY SELECTION (PQS) .. 26 ISO FILM-SPEED DISPLAY 26 UNLOADING THE FILM 27 Automatic rewind 27 Mid-roll change (MRC 27 CARING FOR YOUR CAMERA 28 TROUBLESHOOTING 29 SPECIFICATIONS 31 2

User Manual
Page 5
... Indicator (FSI) on the back of the prints. recharges quickly so it easy to match each format selection. ADVANCED PHOTO SYSTEM FEATURES AVAILABLE WITH THIS CAMERA Triple format selection • You can choose from the same film cassette. Flip flash plus • This system automatically adjusts to print on the film...
... Indicator (FSI) on the back of the prints. recharges quickly so it easy to match each format selection. ADVANCED PHOTO SYSTEM FEATURES AVAILABLE WITH THIS CAMERA Triple format selection • You can choose from the same film cassette. Flip flash plus • This system automatically adjusts to print on the film...

User Manual
Page 6
The camera uses KODAK ADVANTIX Film. Mid-roll change (MRC) • You can remove your... advances from one symbol to another to match scene requirements, - Picture quality information exchange (PQix) • This camera records vital scene data on the film's magnetic information strip and communicates that information to the photo lab to specific subjects,... and - share a family camera in mid-roll to identify the status of film and becomes the carrier and storage container for betterlooking prints...
The camera uses KODAK ADVANTIX Film. Mid-roll change (MRC) • You can remove your... advances from one symbol to another to match scene requirements, - Picture quality information exchange (PQix) • This camera records vital scene data on the film's magnetic information strip and communicates that information to the photo lab to specific subjects,... and - share a family camera in mid-roll to identify the status of film and becomes the carrier and storage container for betterlooking prints...

User Manual
Page 7
Insert the battery into the camera, reset the date and time. 5 Snap the battery door closed. • After you need to open the battery door (11). 2. GETTING STARTED Before you take pictures, you load a new battery into the battery chamber. 3. Slide the battery-door latch and lift to load the battery, set the language, and set the date and time. Loading the battery This camera uses one 3-volt lithium KODAK KCR2 (or equivalent) Battery that supplies power for all camera operations. 1.
Insert the battery into the camera, reset the date and time. 5 Snap the battery door closed. • After you need to open the battery door (11). 2. GETTING STARTED Before you take pictures, you load a new battery into the battery chamber. 3. Slide the battery-door latch and lift to load the battery, set the language, and set the date and time. Loading the battery This camera uses one 3-volt lithium KODAK KCR2 (or equivalent) Battery that supplies power for all camera operations. 1.
User Manual
Page 8
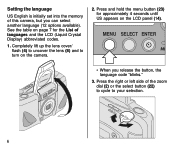
...up the lens cover/ flash (4) to uncover the lens (8) and to your selection. C H P 6 Press and hold the menu button (23) for the List of this camera, but you release the button, the language code "blinks." 3. Setting the language US English is initially set into the memory of languages and the LCD... (Liquid Crystal Display) abbreviated codes. 1. See the table on page 7 for approximately 4 seconds until US appears on the camera. 2. Press the right or left side of the zoom dial (2) or the select button (22) to cycle to turn on the LCD panel (14).
...up the lens cover/ flash (4) to uncover the lens (8) and to your selection. C H P 6 Press and hold the menu button (23) for the List of this camera, but you release the button, the language code "blinks." 3. Setting the language US English is initially set into the memory of languages and the LCD... (Liquid Crystal Display) abbreviated codes. 1. See the table on page 7 for approximately 4 seconds until US appears on the camera. 2. Press the right or left side of the zoom dial (2) or the select button (22) to cycle to turn on the LCD panel (14).
User Manual
Page 10
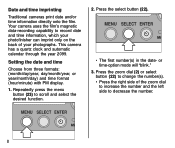
... a quartz clock and automatic calendar through the year 2099. MENU SELECT ENTER 8 Your camera uses the film's magnetic data-recording capability to scroll and select the desired function. 2. Repeatedly press the menu button (23) to record date and time .... 1. Press the zoom dial (2) or select button (22) to change the number(s). • Press the right side of your photographs. Date and time imprinting Traditional cameras print date and/or time information directly onto the film. Press the select button (22).
... a quartz clock and automatic calendar through the year 2099. MENU SELECT ENTER 8 Your camera uses the film's magnetic data-recording capability to scroll and select the desired function. 2. Repeatedly press the menu button (23) to record date and time .... 1. Press the zoom dial (2) or select button (22) to change the number(s). • Press the right side of your photographs. Date and time imprinting Traditional cameras print date and/or time information directly onto the film. Press the select button (22).

User Manual
Page 12
... be used for an extended length of the indicators, except for a steady battery symbol, appear on the camera. CONTROL-BUTTON ACTUATOR You can use the knob on the clasp of the camera strap to actuate the small control buttons on the LCD panel and the shutter button (1) cannot be operated,... or fire. • Store batteries in their original packaging prior to use. • Do not use rechargable batteries. • Remove the battery from the camera when the camera is not going to replace the battery when- • the battery symbol (40) "blinks" on the LCD panel (14), • none of time....
... be used for an extended length of the indicators, except for a steady battery symbol, appear on the camera. CONTROL-BUTTON ACTUATOR You can use the knob on the clasp of the camera strap to actuate the small control buttons on the LCD panel and the shutter button (1) cannot be operated,... or fire. • Store batteries in their original packaging prior to use. • Do not use rechargable batteries. • Remove the battery from the camera when the camera is not going to replace the battery when- • the battery symbol (40) "blinks" on the LCD panel (14), • none of time....

User Manual
Page 13
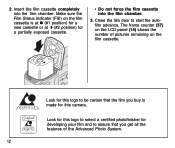
... running. 11 Customers outside the U.S. You can load film into the camera with the lens cover/flash opened or closed. 1. When the camera is not operated for more than 2 1/2 minutes. customers can contact their local Kodak Customer Service representative. Rotate the film-door lever (10) to completely... turn off the camera. LOADING THE FILM You can press almost any of the...
... running. 11 Customers outside the U.S. You can load film into the camera with the lens cover/flash opened or closed. 1. When the camera is not operated for more than 2 1/2 minutes. customers can contact their local Kodak Customer Service representative. Rotate the film-door lever (10) to completely... turn off the camera. LOADING THE FILM You can press almost any of the...
User Manual
Page 14
... 43 Look for this logo to be certain that the film you buy is at q (#1 position) for a new cassette or at (#2 position) for this camera. Close the film door to assure that you get all the features of pictures remaining on the LCD panel (14) shows the number of the...
... 43 Look for this logo to be certain that the film you buy is at q (#1 position) for a new cassette or at (#2 position) for this camera. Close the film door to assure that you get all the features of pictures remaining on the LCD panel (14) shows the number of the...

User Manual
Page 15
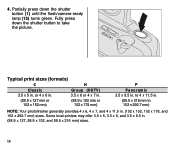
... C, H, or P format. C C H P H P * High Definition Television (HDTV) prints are the same aspect ratio as the TV for Typical print sizes (formats). See the table on the camera. 2. For a sharp picture, stand at least 2 ft (0.6 m) from your subject. 13 The viewfinder changes to turn on page 14 for CD interface capabilities. Completely lift...
... C, H, or P format. C C H P H P * High Definition Television (HDTV) prints are the same aspect ratio as the TV for Typical print sizes (formats). See the table on the camera. 2. For a sharp picture, stand at least 2 ft (0.6 m) from your subject. 13 The viewfinder changes to turn on page 14 for CD interface capabilities. Completely lift...
User Manual
Page 16
... mm or 102 x 178 mm) P Panoramic 3.5 x 8.5 in . (102 x 152, 102 x 178, and 102 x 292.7 mm) sizes. Fully press down the shutter button (1) until the flash/camera-ready lamp (13) turns green. Partially press down the shutter button to 102 x 292.7 mm) NOTE: Your photofinisher generally provides 4 x 6, 4 x 7, and 4 x 11.5 in .
... mm or 102 x 178 mm) P Panoramic 3.5 x 8.5 in . (102 x 152, 102 x 178, and 102 x 292.7 mm) sizes. Fully press down the shutter button (1) until the flash/camera-ready lamp (13) turns green. Partially press down the shutter button to 102 x 292.7 mm) NOTE: Your photofinisher generally provides 4 x 6, 4 x 7, and 4 x 11.5 in .
User Manual
Page 17
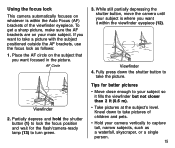
...focus position and wait for better pictures • Move close enough to your subject is within the viewfinder eyepiece (12). Tips for the flash/camera-ready lamp (13) to turn green. 3. AF Circle Viewfinder 2. Fully press down to take pictures of the viewfinder eyepiece. Viewfinder 4. Kneel... brackets, use the focus lock as a waterfall, skyscraper, or a single person. 15 While still partially depressing the shutter button, move the camera until your subject so it within the Auto Focus (AF) brackets of children and pets. • Hold your main subject. Using the focus...
...focus position and wait for better pictures • Move close enough to your subject is within the viewfinder eyepiece (12). Tips for the flash/camera-ready lamp (13) to turn green. 3. AF Circle Viewfinder 2. Fully press down to take pictures of the viewfinder eyepiece. Viewfinder 4. Kneel... brackets, use the focus lock as a waterfall, skyscraper, or a single person. 15 While still partially depressing the shutter button, move the camera until your subject so it within the Auto Focus (AF) brackets of children and pets. • Hold your main subject. Using the focus...
User Manual
Page 18
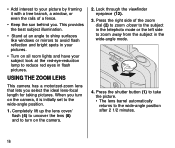
... is initially set to the wide-angle position after 2 1/2 minutes. 16 USING THE ZOOM LENS This camera has a motorized-zoom lens that lets you . Look through the viewfinder eyepiece (12). 3. When you turn on the camera, it with a tree branch, a window, or even the rails of the zoom dial (2) to zoom closer... to zoom away from the subject in flash pictures. Completely lift up the lens cover/ flash (4) to uncover the lens (8) and to turn on the camera. 2.
... is initially set to the wide-angle position after 2 1/2 minutes. 16 USING THE ZOOM LENS This camera has a motorized-zoom lens that lets you . Look through the viewfinder eyepiece (12). 3. When you turn on the camera, it with a tree branch, a window, or even the rails of the zoom dial (2) to zoom closer... to zoom away from the subject in flash pictures. Completely lift up the lens cover/ flash (4) to uncover the lens (8) and to turn on the camera. 2.

User Manual
Page 19
...). 17 TAKING FLASH PICTURES In dim light, such as indoors or outdoors in heavy shade, or on dark overcast days, you need flash. Your camera features an automatic flash that fires when you need it. Keep the subject within the recommended distance range for the speed of this.... 3. The special flip-flash plus system of film in close-up the lens cover/ flash (4) to uncover the lens (8) and to turn on the camera. 2. Completely lift up pictures. Partially press down the shutter button to conserve the battery life. 1. This enhances your flash pictures and helps to take pictures...
...). 17 TAKING FLASH PICTURES In dim light, such as indoors or outdoors in heavy shade, or on dark overcast days, you need flash. Your camera features an automatic flash that fires when you need it. Keep the subject within the recommended distance range for the speed of this.... 3. The special flip-flash plus system of film in close-up the lens cover/ flash (4) to uncover the lens (8) and to turn on the camera. 2. Completely lift up pictures. Partially press down the shutter button to conserve the battery life. 1. This enhances your flash pictures and helps to take pictures...

User Manual
Page 20
Shutter button locks. • Flash not fully charged • Camera movement • Beyond the flash range 18 Flash-to-subject distance ISO Film Wide Speed (24 mm) Tele (60 mm) 50 2 to 10 ft 2 to 7 ... 8.5 m) 1600 2 to 57 ft 2 to 39 ft (0.6 to 17.4 m) (0.6 to 11.9 m) Flash/warning-lamp signals Lamp Indicator Situation Glows green Glows red "Blinks" red • Camera ready for picture-taking • Subject between 8 in. (20 cm) and 2 ft (0.6 m) from...
Shutter button locks. • Flash not fully charged • Camera movement • Beyond the flash range 18 Flash-to-subject distance ISO Film Wide Speed (24 mm) Tele (60 mm) 50 2 to 10 ft 2 to 7 ... 8.5 m) 1600 2 to 57 ft 2 to 39 ft (0.6 to 17.4 m) (0.6 to 11.9 m) Flash/warning-lamp signals Lamp Indicator Situation Glows green Glows red "Blinks" red • Camera ready for picture-taking • Subject between 8 in. (20 cm) and 2 ft (0.6 m) from...
User Manual
Page 21
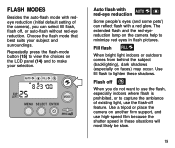
... suits your selection. Fill flash FILL When bright light indoors or outdoors comes from behind the subject (backlighting), dark shadows (especially on the camera help to minimize red eyes in these shadows. Use fill flash to lighten these situations will most likely be slow. 19 FLASH MODES Besides ...the auto-flash mode with redeye reduction (initial default setting of the camera), you do not want to use the flash, especially indoors where flash is prohibited, or to capture the ambiance of existing light, use ...
... suits your selection. Fill flash FILL When bright light indoors or outdoors comes from behind the subject (backlighting), dark shadows (especially on the camera help to minimize red eyes in these shadows. Use fill flash to lighten these situations will most likely be slow. 19 FLASH MODES Besides ...the auto-flash mode with redeye reduction (initial default setting of the camera), you do not want to use the flash, especially indoors where flash is prohibited, or to capture the ambiance of existing light, use ...
User Manual
Page 22
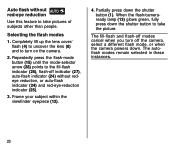
... (15) until the mode-selector arrow (28) points to turn off modes cancel when you turn on the camera. 2. The fill-flash and flash-off the camera, select a different flash mode, or when the camera powers down the shutter button (1). Frame your subject within the viewfinder eyepiece (12). 4. Partially press down . The autoflash...
... (15) until the mode-selector arrow (28) points to turn off modes cancel when you turn on the camera. 2. The fill-flash and flash-off the camera, select a different flash mode, or when the camera powers down the shutter button (1). Frame your subject within the viewfinder eyepiece (12). 4. Partially press down . The autoflash...

