
User Manual
Page 1
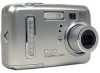
Kodak EasyShare CX7525 zoom digital camera User's guide www.kodak.com For interactive tutorials, www.kodak.com/go/howto For help with your camera, www.kodak.com/go/cx7525support
Kodak EasyShare CX7525 zoom digital camera User's guide www.kodak.com For interactive tutorials, www.kodak.com/go/howto For help with your camera, www.kodak.com/go/cx7525support

User Manual
Page 5
... pictures on an SD or MMC card 7 2 Taking pictures and videos 8 Taking a picture 8 Taking a video 8 Camera modes 9 Using the camera screen as a viewfinder 10 Reviewing the picture or video just taken 12 Using optical zoom 13 Using digital zoom 13 Using the flash 14 Putting yourself in the picture 16 Putting yourself in... videos from deletion 26 Tagging pictures/videos for albums 27 Running a slide show 28 Copying pictures and videos 29 Viewing picture/video information 30 www.kodak.com/go/support iii
... pictures on an SD or MMC card 7 2 Taking pictures and videos 8 Taking a picture 8 Taking a video 8 Camera modes 9 Using the camera screen as a viewfinder 10 Reviewing the picture or video just taken 12 Using optical zoom 13 Using digital zoom 13 Using the flash 14 Putting yourself in the picture 16 Putting yourself in... videos from deletion 26 Tagging pictures/videos for albums 27 Running a slide show 28 Copying pictures and videos 29 Viewing picture/video information 30 www.kodak.com/go/support iii

User Manual
Page 6
... 35 Tagging pictures as favorites 36 6 Transferring and printing pictures 38 Transferring pictures with the USB cable 38 Printing with a Kodak EasyShare printer dock 38 Direct printing with a PictBridge printer 39 Ordering prints online 40 Printing pictures from your computer 40 Printing from ...an optional SD or MMC card 40 7 Troubleshooting 41 Camera problems 41 Camera screen messages 44 Camera ready light status 46 Direct printing problems 47 8 Getting help 48 Helpful links 48 Telephone customer support 49 9 ...
... 35 Tagging pictures as favorites 36 6 Transferring and printing pictures 38 Transferring pictures with the USB cable 38 Printing with a Kodak EasyShare printer dock 38 Direct printing with a PictBridge printer 39 Ordering prints online 40 Printing pictures from your computer 40 Printing from ...an optional SD or MMC card 40 7 Troubleshooting 41 Camera problems 41 Camera screen messages 44 Camera ready light status 46 Direct printing problems 47 8 Getting help 48 Helpful links 48 Telephone customer support 49 9 ...
User Manual
Page 7
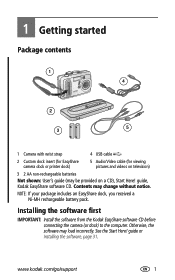
... pack. Contents may load incorrectly. Otherwise, the software may change without notice. guide, Kodak EasyShare software CD. See the Start Here! www.kodak.com/go/support 1 Installing the software first IMPORTANT: Install the software from the Kodak EasyShare software CD before connecting the camera (or dock) to the computer. guide or Installing the software, page 31...
... pack. Contents may load incorrectly. Otherwise, the software may change without notice. guide, Kodak EasyShare software CD. See the Start Here! www.kodak.com/go/support 1 Installing the software first IMPORTANT: Install the software from the Kodak EasyShare software CD before connecting the camera (or dock) to the computer. guide or Installing the software, page 31...
User Manual
Page 8
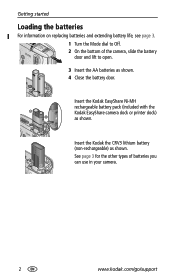
Insert the Kodak the CRV3 lithium battery (non-rechargeable) as shown. 4 Close the battery door. Getting started Loading the batteries For information on replacing batteries and extending battery life, see page 3. 1 Turn the Mode dial to Off. 2 On the bottom of batteries you can use in your camera. 2 www.kodak.com/go/support Insert the Kodak EasyShare Ni-MH rechargeable battery pack (included with the Kodak EasyShare camera dock or printer dock) as shown. See page 3 for the other types of the camera, slide the battery door and lift to open. 3 Insert the AA batteries as shown.
Insert the Kodak the CRV3 lithium battery (non-rechargeable) as shown. 4 Close the battery door. Getting started Loading the batteries For information on replacing batteries and extending battery life, see page 3. 1 Turn the Mode dial to Off. 2 On the bottom of batteries you can use in your camera. 2 www.kodak.com/go/support Insert the Kodak EasyShare Ni-MH rechargeable battery pack (included with the Kodak EasyShare camera dock or printer dock) as shown. See page 3 for the other types of the camera, slide the battery door and lift to open. 3 Insert the AA batteries as shown.
User Manual
Page 9
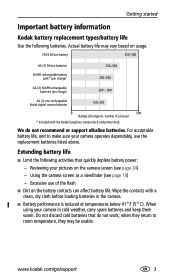
... battery pack* (per charge) 200-300 AA (2) Ni-MH rechargeable batteries (per charge) 200 - 300 AA (2) non-rechargeable Kodak digital camera batteries 150-250 0 500 Battery Life (Approx. Reviewing your pictures on the battery contacts can affect battery life. when they may ...deplete battery power: - number of the flash ■ Dirt on the camera screen (see page 10) - Using the camera screen as a viewfinder (see page 24) - Wipe the contacts with the Kodak EasyShare camera dock and printer dock. Extending battery life ■ Limit the following batteries...
... battery pack* (per charge) 200-300 AA (2) Ni-MH rechargeable batteries (per charge) 200 - 300 AA (2) non-rechargeable Kodak digital camera batteries 150-250 0 500 Battery Life (Approx. Reviewing your pictures on the battery contacts can affect battery life. when they may ...deplete battery power: - number of the flash ■ Dirt on the camera screen (see page 10) - Using the camera screen as a viewfinder (see page 24) - Wipe the contacts with the Kodak EasyShare camera dock and printer dock. Extending battery life ■ Limit the following batteries...

User Manual
Page 10
.... ■ For more information on batteries, see www.kodak.com/global/en/service/batteries/batteryUsage.jhtml Turning the camera on . The camera completes operations that are in process. 4 www.kodak.com/go /cx7525accessories for: Kodak EasyShare camera dock-powers your camera, makes 4 x 6-in. (10 x 15 cm) prints with the Kodak EasyShare camera dock or printer dock to any other position. IMPORTANT...
.... ■ For more information on batteries, see www.kodak.com/global/en/service/batteries/batteryUsage.jhtml Turning the camera on . The camera completes operations that are in process. 4 www.kodak.com/go /cx7525accessories for: Kodak EasyShare camera dock-powers your camera, makes 4 x 6-in. (10 x 15 cm) prints with the Kodak EasyShare camera dock or printer dock to any other position. IMPORTANT...

User Manual
Page 11
..., Setting the date & time, anytime. NOTE: Depending on the camera. Setting the date & time, anytime 1 Turn on your computer operating system, Kodak EasyShare software may let your computer update the camera clock when you connect the camera. See the EasyShare software Help for an extended time. 1 SET DATE & TIME is...time. to advance to the next 5 When finished, press the OK button. 6 Press the Menu button to Turn the camera screen on or off. www.kodak.com/go/support 5 Press . Then do this Press the OK button. Press setting. Getting started Changing the display If...
..., Setting the date & time, anytime. NOTE: Depending on the camera. Setting the date & time, anytime 1 Turn on your computer operating system, Kodak EasyShare software may let your computer update the camera clock when you connect the camera. See the EasyShare software Help for an extended time. 1 SET DATE & TIME is...time. to advance to the next 5 When finished, press the OK button. 6 Press the Menu button to Turn the camera screen on or off. www.kodak.com/go/support 5 Press . Then do this Press the OK button. Press setting. Getting started Changing the display If...
User Manual
Page 12
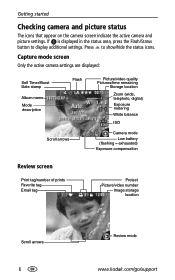
...stamp Album name Mode description Flash Scroll arrows Picture/video quality Pictures/time remaining Storage location Zoom (wide, telephoto, digital) Exposure metering White balance ISO Camera mode Low battery (flashing = exhausted) Exposure compensation Review screen Print tag/number of prints Favorite tag Email tag... Protect Picture/video number Image storage location Scroll arrows 6 Review mode www.kodak.com/go/support Getting started Checking camera and picture status The icons that appear on the camera screen indicate the active camera and picture settings.
...stamp Album name Mode description Flash Scroll arrows Picture/video quality Pictures/time remaining Storage location Zoom (wide, telephoto, digital) Exposure metering White balance ISO Camera mode Low battery (flashing = exhausted) Exposure compensation Review screen Print tag/number of prints Favorite tag Email tag... Protect Picture/video number Image storage location Scroll arrows 6 Review mode www.kodak.com/go/support Getting started Checking camera and picture status The icons that appear on the camera screen indicate the active camera and picture settings.

User Manual
Page 13
... the slot to seat the connector. 5 Close the door. Notched To insert an SD or MMC card: corner 1 Turn off the camera. www.kodak.com/go /cx7525accessories. NOTE: We recommend Kodak SD or MMC cards. CAUTION: The card can purchase optional SD or MMC cards for removable, reusable storage for the first time... the card as shown on an SD or MMC card Your camera has 16 MB of the SD Card Association.) When using the card for your pictures, card, or camera. Push the card in the bottom half of Kodak products or www.kodak.com/go /support 7 Purchase SD or MMC cards at a dealer of...
... the slot to seat the connector. 5 Close the door. Notched To insert an SD or MMC card: corner 1 Turn off the camera. www.kodak.com/go /cx7525accessories. NOTE: We recommend Kodak SD or MMC cards. CAUTION: The card can purchase optional SD or MMC cards for removable, reusable storage for the first time... the card as shown on an SD or MMC card Your camera has 16 MB of the SD Card Association.) When using the card for your pictures, card, or camera. Push the card in the bottom half of Kodak products or www.kodak.com/go /support 7 Purchase SD or MMC cards at a dealer of...

User Manual
Page 14
... the Mode dial to Video . 2 Use the viewfinder or camera screen to frame your subject. (Press the OK button to use. NOTE: If you want to turn the camera screen on. To stop recording, release the Shutter button. 8 www.kodak.com/go/support you can still take the picture. To stop... recording, press and release the Shutter button again. The camera screen displays the mode name and description. When ...
... the Mode dial to Video . 2 Use the viewfinder or camera screen to frame your subject. (Press the OK button to use. NOTE: If you want to turn the camera screen on. To stop recording, release the Shutter button. 8 www.kodak.com/go/support you can still take the picture. To stop... recording, press and release the Shutter button again. The camera screen displays the mode name and description. When ...
User Manual
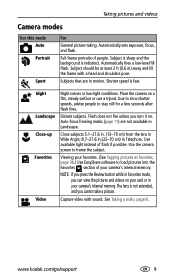
Page 15
...tripod. Full-frame portraits of flash if possible. Viewing your favorites. (See Tagging pictures as favorites, page 36.) Use EasyShare software to load pictures into the Favorites section of your camera's internal memory. See Taking a video, page 8. Close subjects 5.1-27.6 in. (13-70 cm) from the lens..., you turn it on. www.kodak.com/go/support 9 Due to slow shutter speeds, advise people to frame the subject. Capture video with a head and shoulders pose. Automatically sets exposure, focus, and flash. Taking pictures and videos Camera modes Use this mode Auto Portrait ...
...tripod. Full-frame portraits of flash if possible. Viewing your favorites. (See Tagging pictures as favorites, page 36.) Use EasyShare software to load pictures into the Favorites section of your camera's internal memory. See Taking a video, page 8. Close subjects 5.1-27.6 in. (13-70 cm) from the lens..., you turn it on. www.kodak.com/go/support 9 Due to slow shutter speeds, advise people to frame the subject. Capture video with a head and shoulders pose. Automatically sets exposure, focus, and flash. Taking pictures and videos Camera modes Use this mode Auto Portrait ...

User Manual
Page 16
... and hold to turn off the camera screen, press the OK button. To make the camera screen turn on whenever the camera is on the camera screen. 3 Frame your subject in the camera screen. For more about auto-focus framing marks, see Liveview, page 21. 10 www.kodak.com/go/support When the framing... marks change color, press the rest of the way down to take the picture. 5 To turn on , see page 11. Taking pictures and videos Using the camera screen as a viewfinder IMPORTANT: The Liveview feature quickly...
... and hold to turn off the camera screen, press the OK button. To make the camera screen turn on whenever the camera is on the camera screen. 3 Frame your subject in the camera screen. For more about auto-focus framing marks, see Liveview, page 21. 10 www.kodak.com/go/support When the framing... marks change color, press the rest of the way down to take the picture. 5 To turn on , see page 11. Taking pictures and videos Using the camera screen as a viewfinder IMPORTANT: The Liveview feature quickly...

User Manual
Page 17
... Left and right focus 3 Press the Shutter button the rest of the way down to take the picture. 4 If the camera is on the camera screen. 2 Press the Shutter button halfway and hold. www.kodak.com/go to turn green, focus is focusing. NOTE: Framing marks appear only when the... camera screen is not focusing on foreground subjects, even if the subjects are not centered in Landscape mode. For the best possible pictures, the camera attempts to focus on the...
... Left and right focus 3 Press the Shutter button the rest of the way down to take the picture. 4 If the camera is on the camera screen. 2 Press the Shutter button halfway and hold. www.kodak.com/go to turn green, focus is focusing. NOTE: Framing marks appear only when the... camera screen is not focusing on foreground subjects, even if the subjects are not centered in Landscape mode. For the best possible pictures, the camera attempts to focus on the...
User Manual
Page 18
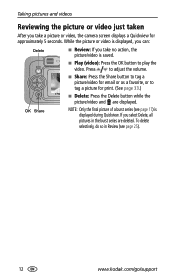
NOTE: Only the final picture of a burst series (see page 25). 12 www.kodak.com/go/support While the picture or video is displayed, you can: Delete ■ Review: If you take a picture or video, the camera screen displays a Quickview for email or as a favorite, or to play the video. If you select...
NOTE: Only the final picture of a burst series (see page 25). 12 www.kodak.com/go/support While the picture or video is displayed, you can: Delete ■ Review: If you take a picture or video, the camera screen displays a Quickview for email or as a favorite, or to play the video. If you select...

User Manual
Page 19
...Telephoto (T) button to the optical zoom limit (3X). Press Wide Angle (W) to zoom out. You must turn on the camera screen to activate digital zoom. 1 Press the OK button to turn on , the zoom indicator shows you are from 3.6X to 15X in .... the rest of the way down to take the picture. (When taking videos, press and release the Shutter button.) Using digital zoom Use digital zoom in Close-up to 3X closer to your subject. 2 Press Telephoto (T) to the subject or 5 in. (13... settings are in . (10 x 15 cm) print. Release the button, then press it again. www.kodak.com/go/support 13
...Telephoto (T) button to the optical zoom limit (3X). Press Wide Angle (W) to zoom out. You must turn on the camera screen to activate digital zoom. 1 Press the OK button to turn on , the zoom indicator shows you are from 3.6X to 15X in .... the rest of the way down to take the picture. (When taking videos, press and release the Shutter button.) Using digital zoom Use digital zoom in Close-up to 3X closer to your subject. 2 Press Telephoto (T) to the subject or 5 in. (13... settings are in . (10 x 15 cm) print. Release the button, then press it again. www.kodak.com/go/support 13

User Manual
Page 20
...icon is taken. (If the lighting conditions require flash but do not require Red-eye reduction, the flash may fire only once.) 14 www.kodak.com/go/support Red-eye Once, so the subject's eyes become accustomed to scroll through the flash options. You can change the flash setting ...in shadow or is "backlit" (when bright light is restored when you exit the mode or turn off the camera. the default flash setting is behind the subject). Never Fill Every time you take a picture, regardless of the lighting conditions. Taking pictures and videos...
...icon is taken. (If the lighting conditions require flash but do not require Red-eye reduction, the flash may fire only once.) 14 www.kodak.com/go/support Red-eye Once, so the subject's eyes become accustomed to scroll through the flash options. You can change the flash setting ...in shadow or is "backlit" (when bright light is restored when you exit the mode or turn off the camera. the default flash setting is behind the subject). Never Fill Every time you take a picture, regardless of the lighting conditions. Taking pictures and videos...
User Manual
Page 21
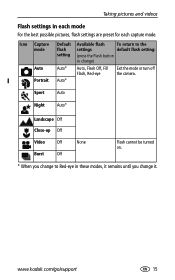
www.kodak.com/go/support 15 Taking pictures and videos Flash settings in these modes, it . Icon Capture mode Auto Portrait Default flash setting Auto* Auto* Available ... on. * When you change to change it remains until you change ) Auto, Flash Off, Fill Exit the mode or turn off Flash, Red-eye the camera.
www.kodak.com/go/support 15 Taking pictures and videos Flash settings in these modes, it . Icon Capture mode Auto Portrait Default flash setting Auto* Auto* Available ... on. * When you change to change it remains until you change ) Auto, Flash Off, Fill Exit the mode or turn off Flash, Red-eye the camera.

User Manual
Page 22
... the scene. The video will stop when you change the video length, see Video Length, page 21. 16 www.kodak.com/go/support The Self-timer icon appears in the video 1 Place the camera on a flat surface or tripod. 2 In any Still mode, press the Self-timer button . The Self-timer light... blinks slowly for 8 seconds (then quickly for 2 seconds) before the picture is taken. 1 Place the camera on a flat surface or tripod. 2 Turn the Mode dial to set the exposure and focus, then press the rest of the way down . Then press...
... the scene. The video will stop when you change the video length, see Video Length, page 21. 16 www.kodak.com/go/support The Self-timer icon appears in the video 1 Place the camera on a flat surface or tripod. 2 In any Still mode, press the Self-timer button . The Self-timer light... blinks slowly for 8 seconds (then quickly for 2 seconds) before the picture is taken. 1 Place the camera on a flat surface or tripod. 2 Turn the Mode dial to set the exposure and focus, then press the rest of the way down . Then press...

User Manual
Page 23
... orientation are taken, or when there is ideal for capturing sporting events or objects in the status area. Burst is no more storage space. The camera takes up to 5 pictures in the sequence. 2 Press the Shutter button the rest of pictures Burst lets you change it to take up to 5 ...pictures in quick succession. The Burst icon appears in motion. www.kodak.com/go/support 17 Turn on burst Burst Icon Burst button In any Still mode, press the Self-timer/Burst button twice. Taking pictures and...
... orientation are taken, or when there is ideal for capturing sporting events or objects in the status area. Burst is no more storage space. The camera takes up to 5 pictures in the sequence. 2 Press the Shutter button the rest of pictures Burst lets you change it to take up to 5 ...pictures in quick succession. The Burst icon appears in motion. www.kodak.com/go/support 17 Turn on burst Burst Icon Burst button In any Still mode, press the Self-timer/Burst button twice. Taking pictures and...


