
User Manual
Page 6
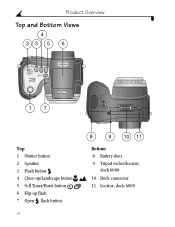
Product Overview Top and Bottom Views 4 23 5 6 17 Top 1 Shutter button 2 Speaker 3 Flash button 4 Close-up/Landscape button 5 Self Timer/Burst button 6 Flip-up flash 7 Open flash button vi 8 9 10 11 Bottom 8 Battery door 9 Tripod socket/locator, dock 6000 10 Dock connector 11 Locator, dock 6000
Product Overview Top and Bottom Views 4 23 5 6 17 Top 1 Shutter button 2 Speaker 3 Flash button 4 Close-up/Landscape button 5 Self Timer/Burst button 6 Flip-up flash 7 Open flash button vi 8 9 10 11 Bottom 8 Battery door 9 Tripod socket/locator, dock 6000 10 Dock connector 11 Locator, dock 6000

User Manual
Page 7
...Need This Guide in Larger Print 1 Package Contents 2 Charging the Battery 3 Loading the Battery 4 Attaching the Neck Strap and Lens Cap 4 Turning On the Camera 5 Setting the Date and Time 6 Changing the Display, EVF or LCD 7 Checking Camera and Picture Status 8 Inserting an SD/MMC Card 11 Choosing ...Battery Information 14 2 Taking Pictures 17 Take a Picture 17 Picture-Taking Modes 18 PASM Mode 19 Shooting Close-Up and Landscape Pictures 22 Using the Auto Focus Framing Marks 23 Quickview-Reviewing the Picture Just Taken 24 Using the Optical Zoom 25 Using the Advanced Digital...
...Need This Guide in Larger Print 1 Package Contents 2 Charging the Battery 3 Loading the Battery 4 Attaching the Neck Strap and Lens Cap 4 Turning On the Camera 5 Setting the Date and Time 6 Changing the Display, EVF or LCD 7 Checking Camera and Picture Status 8 Inserting an SD/MMC Card 11 Choosing ...Battery Information 14 2 Taking Pictures 17 Take a Picture 17 Picture-Taking Modes 18 PASM Mode 19 Shooting Close-Up and Landscape Pictures 22 Using the Auto Focus Framing Marks 23 Quickview-Reviewing the Picture Just Taken 24 Using the Optical Zoom 25 Using the Advanced Digital...

User Manual
Page 11
... 82 Connecting the Camera Dock 6000 83 Docking the Camera 84 Charging the Battery 85 Transferring Pictures With the Dock 86 Reviewing Pictures and Videos 87 Troubleshooting-Camera Dock 6000 87 Camera Dock 6000 Specifications 88 Using the AC Adapter to Power the Camera 88 Earlier Cameras and Docks 89 10 Troubleshooting 91 Camera Problems 91 Camera/Computer Communications...
... 82 Connecting the Camera Dock 6000 83 Docking the Camera 84 Charging the Battery 85 Transferring Pictures With the Dock 86 Reviewing Pictures and Videos 87 Troubleshooting-Camera Dock 6000 87 Camera Dock 6000 Specifications 88 Using the AC Adapter to Power the Camera 88 Earlier Cameras and Docks 89 10 Troubleshooting 91 Camera Problems 91 Camera/Computer Communications...
User Manual
Page 14
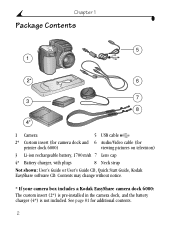
Contents may change without notice. * If your camera box includes a Kodak EasyShare camera dock 6000: The custom insert (2*) is pre-installed in the camera dock, and the battery charger (4*) is not included. See page 81 for printer dock 6000) viewing pictures on television) 3 Li-ion rechargeable battery, 1700 mAh 7 Lens cap 4* Battery charger, with plugs 8 Neck strap Not shown...
Contents may change without notice. * If your camera box includes a Kodak EasyShare camera dock 6000: The custom insert (2*) is pre-installed in the camera dock, and the battery charger (4*) is not included. See page 81 for printer dock 6000) viewing pictures on television) 3 Li-ion rechargeable battery, 1700 mAh 7 Lens cap 4* Battery charger, with plugs 8 Neck strap Not shown...

User Manual
Page 15
... these and other accessories at a dealer of Kodak products or visit www.kodak.com/go/accessories. NOTE: If your battery (see Chapter 9, Using the Camera Dock 6000). 3 For expected battery life, see page 81). You can also charge the battery using the optional Kodak EasyShare printer dock 6000 or the Kodak EasyShare camera dock 6000 (see page 14. In that matches...
... these and other accessories at a dealer of Kodak products or visit www.kodak.com/go/accessories. NOTE: If your battery (see Chapter 9, Using the Camera Dock 6000). 3 For expected battery life, see page 81). You can also charge the battery using the optional Kodak EasyShare printer dock 6000 or the Kodak EasyShare camera dock 6000 (see page 14. In that matches...
User Manual
Page 16
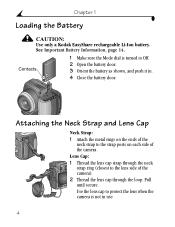
... 1 Make sure the Mode dial is not in . 4 Close the battery door. Attaching the Neck Strap and Lens Cap Neck Strap: 1 Attach the metal rings on the ends of the neck strap to the lens side of the camera). 2 Thread the lens cap through the neck strap ring (closest to ...of the camera. Use the lens cap to protect the lens when the camera is turned to Off. 2 Open the battery door. 3 Orient the battery as shown, and push it in use. 4 Pull until secure. Lens Cap: 1 Thread the lens cap strap through the loop. Chapter 1 Loading the Battery CAUTION: Use only a Kodak EasyShare rechargeable Li...
... 1 Make sure the Mode dial is not in . 4 Close the battery door. Attaching the Neck Strap and Lens Cap Neck Strap: 1 Attach the metal rings on the ends of the neck strap to the lens side of the camera). 2 Thread the lens cap through the neck strap ring (closest to ...of the camera. Use the lens cap to protect the lens when the camera is turned to Off. 2 Open the battery door. 3 Orient the battery as shown, and push it in use. 4 Pull until secure. Lens Cap: 1 Thread the lens cap strap through the loop. Chapter 1 Loading the Battery CAUTION: Use only a Kodak EasyShare rechargeable Li...
User Manual
Page 18
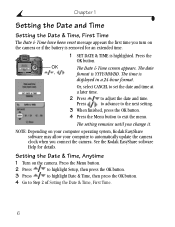
... the Menu button to adjust the date and time. Press the OK button. Setting the Date & Time, Anytime 1 Turn on your computer operating system, Kodak EasyShare software may allow your computer to Step 2 of Setting the Date & Time, First Time. 6 Press the Menu button. 2 Press to highlight Setup, then...turn on the camera or if the battery is removed for details. The time is YYYY/MM/DD. Chapter 1 Setting the Date and Time Setting the Date & Time, First Time The Date & Time have been reset message appears the first time you change it. See the Kodak EasyShare software Help ...
... the Menu button to adjust the date and time. Press the OK button. Setting the Date & Time, Anytime 1 Turn on your computer operating system, Kodak EasyShare software may allow your computer to Step 2 of Setting the Date & Time, First Time. 6 Press the Menu button. 2 Press to highlight Setup, then...turn on the camera or if the battery is removed for details. The time is YYYY/MM/DD. Chapter 1 Setting the Date and Time Setting the Date & Time, First Time The Date & Time have been reset message appears the first time you change it. See the Kodak EasyShare software Help ...
User Manual
Page 19
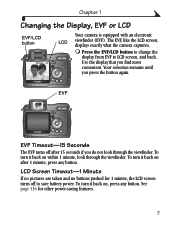
The EVF, like the LCD screen, displays exactly what the camera captures. ! Use the display that you press the button again. Your selection remains until you find most convenient. To turn it back on after 15 ... for 1 minute, the LCD screen turns off after 1 minute, press any button. Press the EVF/LCD button to change the display from EVF to save battery power. LCD Screen Timeout-1 Minute If no pictures are taken and no buttons pushed for other power-saving features. 7 To turn it back on within...
The EVF, like the LCD screen, displays exactly what the camera captures. ! Use the display that you press the button again. Your selection remains until you find most convenient. To turn it back on after 15 ... for 1 minute, the LCD screen turns off after 1 minute, press any button. Press the EVF/LCD button to change the display from EVF to save battery power. LCD Screen Timeout-1 Minute If no pictures are taken and no buttons pushed for other power-saving features. 7 To turn it back on within...
User Manual
Page 20
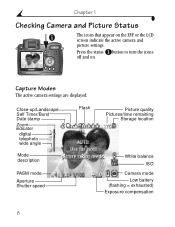
Press the status button to turn the icons off and on the EVF or the LCD screen indicate the active camera and picture settings. Capture Modes The active camera settings are displayed: Close-up/Landscape Self Timer/Burst Date stamp Zoom indicator digital telephoto wide angle Mode description Flash PASM mode Aperture Shutter speed Picture quality Pictures/time remaining Storage location White balance ISO Camera mode Low battery (flashing = exhausted) Exposure compensation 8 Chapter 1 Checking Camera and Picture Status The icons that appear on .
Press the status button to turn the icons off and on the EVF or the LCD screen indicate the active camera and picture settings. Capture Modes The active camera settings are displayed: Close-up/Landscape Self Timer/Burst Date stamp Zoom indicator digital telephoto wide angle Mode description Flash PASM mode Aperture Shutter speed Picture quality Pictures/time remaining Storage location White balance ISO Camera mode Low battery (flashing = exhausted) Exposure compensation 8 Chapter 1 Checking Camera and Picture Status The icons that appear on .
User Manual
Page 22
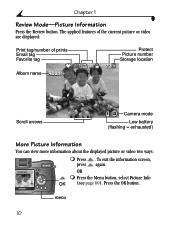
Press the OK button. The applied features of the current picture or video are displayed: Print tag/number of prints Email tag Favorite tag Protect Picture number Storage location Album name Scroll arrows Camera mode Low battery (flashing = exhausted) More Picture Information You can view more information about the displayed picture or video two ways: ! To exit the information screen, press again. OR ! menu 10 Chapter 1 Review Mode-Picture Information Press the Review button. Press . Press the Menu button, select Picture Info OK (see page 60).
Press the OK button. The applied features of the current picture or video are displayed: Print tag/number of prints Email tag Favorite tag Protect Picture number Storage location Album name Scroll arrows Camera mode Low battery (flashing = exhausted) More Picture Information You can view more information about the displayed picture or video two ways: ! To exit the information screen, press again. OR ! menu 10 Chapter 1 Review Mode-Picture Information Press the Review button. Press . Press the Menu button, select Picture Info OK (see page 60).

User Manual
Page 26
... information on usage. Actual battery life may vary based on batteries, visit http://www.kodak.com/global/en/service/batteries/batteryUsage.jhtml. 14 Li-Ion rechargeable battery, 1700 mAh (included with the camera. We recommend using only a Kodak EasyShare Li-Ion rechargeable battery. Not all manufacturer's 3.7V Li-Ion rechargeable batteries are compatible with camera) 125 - 210 0 250 Battery Life (Approx. HOWEVER...
... information on usage. Actual battery life may vary based on batteries, visit http://www.kodak.com/global/en/service/batteries/batteryUsage.jhtml. 14 Li-Ion rechargeable battery, 1700 mAh (included with the camera. We recommend using only a Kodak EasyShare Li-Ion rechargeable battery. Not all manufacturer's 3.7V Li-Ion rechargeable batteries are compatible with camera) 125 - 210 0 250 Battery Life (Approx. HOWEVER...

User Manual
Page 27
... for the Li-Ion battery included with the Kodak EasyShare camera dock 6000 (see page 24 and page 46). - Chapter 1 Extending Battery Life ! The camera dock 6000 powers your camera in the camera. ! Dirt on the battery contacts can affect battery life. Carry spare batteries when using your camera, transfers pictures, and is also a battery charger for the Li-Ion battery included with a clean...
... for the Li-Ion battery included with the Kodak EasyShare camera dock 6000 (see page 24 and page 46). - Chapter 1 Extending Battery Life ! The camera dock 6000 powers your camera in the camera. ! Dirt on the battery contacts can affect battery life. Carry spare batteries when using your camera, transfers pictures, and is also a battery charger for the Li-Ion battery included with a clean...
User Manual
Page 36
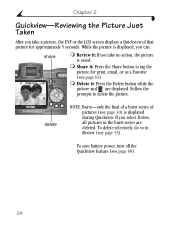
... approximately 5 seconds. delete NOTE: Burst-only the final of a burst series of that picture for print, email, or as a Favorite (see page 63). ! To save battery power, turn off the Quickview feature (see page 53). Share it : Press the Delete button while the picture and are deleted. Chapter 2 Quickview-Reviewing the...
... approximately 5 seconds. delete NOTE: Burst-only the final of a burst series of that picture for print, email, or as a Favorite (see page 63). ! To save battery power, turn off the Quickview feature (see page 53). Share it : Press the Delete button while the picture and are deleted. Chapter 2 Quickview-Reviewing the...
User Manual
Page 63
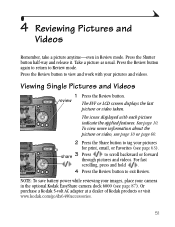
...print, email, or Favorites (see page 63). The icons displayed with your camera in Review mode. See page 10. To view more information about the picture or video, see page 87). NOTE: To save battery power while reviewing your images, place your pictures and videos. Take a ... displays the last picture or video taken. Or purchase a Kodak 5-volt AC adapter at a dealer of Kodak products or visit www.kodak.com/go/dx6490accessories. 51 4 Reviewing Pictures and Videos Remember, take a picture anytime-even in the optional Kodak EasyShare camera dock 6000 (see page 10 or page 60. 2 Press...
...print, email, or Favorites (see page 63). The icons displayed with your camera in Review mode. See page 10. To view more information about the picture or video, see page 87). NOTE: To save battery power while reviewing your images, place your pictures and videos. Take a ... displays the last picture or video taken. Or purchase a Kodak 5-volt AC adapter at a dealer of Kodak products or visit www.kodak.com/go/dx6490accessories. 51 4 Reviewing Pictures and Videos Remember, take a picture anytime-even in the optional Kodak EasyShare camera dock 6000 (see page 10 or page 60. 2 Press...
User Manual
Page 69
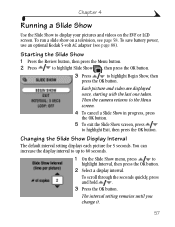
...scroll through the seconds quickly, press and hold . 3 Press the OK button. To run a slide show on the EVF or LCD screen. Then the camera returns to the Menu screen. 4 To cancel a Slide Show in progress, press the OK button. 5 To exit the Slide Show screen, press to ... on a television, see page 88). Changing the Slide Show Display Interval The default interval setting displays each picture for 5 seconds. To save battery power, use an optional Kodak 5-volt AC adapter (see page 58. Chapter 4 Running a Slide Show Use the Slide Show to highlight Exit, then press the OK button...
...scroll through the seconds quickly, press and hold . 3 Press the OK button. To run a slide show on the EVF or LCD screen. Then the camera returns to the Menu screen. 4 To cancel a Slide Show in progress, press the OK button. 5 To exit the Slide Show screen, press to ... on a television, see page 88). Changing the Slide Show Display Interval The default interval setting displays each picture for 5 seconds. To save battery power, use an optional Kodak 5-volt AC adapter (see page 58. Chapter 4 Running a Slide Show Use the Slide Show to highlight Exit, then press the OK button...
User Manual
Page 70
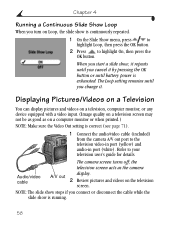
... a television, computer monitor, or any device equipped with a video input. (Image quality on a television screen may not be as good as the camera Audio/video cable A/V out display. 2 Review pictures and videos on Loop, the slide show is continuously repeated. 1 On the Slide Show menu, ...Video Out setting is correct (see page 71). 1 Connect the audio/video cable (included) from the camera A/V out port to your television user's guide for details. The Loop setting remains until battery power is exhausted. NOTE: The slide show stops if you turn on the television screen. Chapter 4 ...
... a television, computer monitor, or any device equipped with a video input. (Image quality on a television screen may not be as good as the camera Audio/video cable A/V out display. 2 Review pictures and videos on Loop, the slide show is continuously repeated. 1 On the Slide Show menu, ...Video Out setting is correct (see page 71). 1 Connect the audio/video cable (included) from the camera A/V out port to your television user's guide for details. The Loop setting remains until battery power is exhausted. NOTE: The slide show stops if you turn on the television screen. Chapter 4 ...
User Manual
Page 80
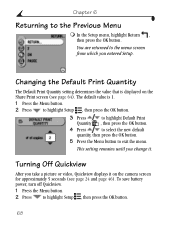
You are returned to exit the menu. The default value is displayed on the camera screen for approximately 5 seconds (see page 64). In the Setup menu, highlight Return , then press the OK button. Turning Off Quickview After you change it ... select the new default quantity, then press the OK button. 5 Press the Menu button to the menu screen from which you entered Setup. To save battery power, turn off Quickview. 1 Press the Menu button. 2 Press to the Previous Menu !
You are returned to exit the menu. The default value is displayed on the camera screen for approximately 5 seconds (see page 64). In the Setup menu, highlight Return , then press the OK button. Turning Off Quickview After you change it ... select the new default quantity, then press the OK button. 5 Press the Menu button to the menu screen from which you entered Setup. To save battery power, turn off Quickview. 1 Press the Menu button. 2 Press to the Previous Menu !

User Manual
Page 93
... Note about the Ni-MH Battery Do not use the Li-Ion rechargeable battery that came with your camera). ! NOTE: If your DX6490 zoom digital camera. 9 Using the Camera Dock 6000 The Kodak EasyShare camera dock 6000: ! It is compatible with your camera (see page 4). Charges the Kodak EasyShare Li-Ion rechargeable battery (included with other Kodak EasyShare digital cameras, but not the DX6490. Makes it easy to transfer...
... Note about the Ni-MH Battery Do not use the Li-Ion rechargeable battery that came with your camera). ! NOTE: If your DX6490 zoom digital camera. 9 Using the Camera Dock 6000 The Kodak EasyShare camera dock 6000: ! It is compatible with your camera (see page 4). Charges the Kodak EasyShare Li-Ion rechargeable battery (included with other Kodak EasyShare digital cameras, but not the DX6490. Makes it easy to transfer...
User Manual
Page 95
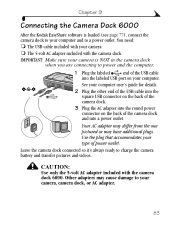
.... The 5-volt AC adapter included with the camera dock IMPORTANT: Make sure your camera is loaded (see page 77), connect the camera dock to your type of power outlet. Leave the camera dock connected so it's always ready to charge the camera battery and transfer pictures and videos. CAUTION: Use ... power outlet. Your AC adapter may differ from the one pictured or may cause damage to your camera ! Chapter 9 Connecting the Camera Dock 6000 After the Kodak EasyShare software is NOT in the camera dock when you are connecting to power and the computer. 1 Plug the labeled end of the...
.... The 5-volt AC adapter included with the camera dock IMPORTANT: Make sure your camera is loaded (see page 77), connect the camera dock to your type of power outlet. Leave the camera dock connected so it's always ready to charge the camera battery and transfer pictures and videos. CAUTION: Use ... power outlet. Your AC adapter may differ from the one pictured or may cause damage to your camera ! Chapter 9 Connecting the Camera Dock 6000 After the Kodak EasyShare software is NOT in the camera dock when you are connecting to power and the computer. 1 Plug the labeled end of the...
User Manual
Page 96
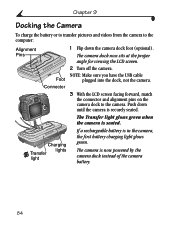
... to transfer pictures and videos from the camera to the camera. The Transfer light glows green when the camera is now powered by the camera dock instead of the camera battery. 84 Charging lights Transfer light If a rechargeable battery is in the camera, the first battery charging light glows green. The camera dock now sits at the proper angle for...
... to transfer pictures and videos from the camera to the camera. The Transfer light glows green when the camera is now powered by the camera dock instead of the camera battery. 84 Charging lights Transfer light If a rechargeable battery is in the camera, the first battery charging light glows green. The camera dock now sits at the proper angle for...


