
User Manual
Page 1
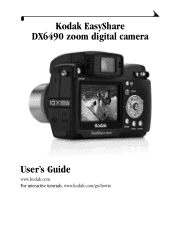
Kodak EasyShare DX6490 zoom digital camera User's Guide www.kodak.com For interactive tutorials, www.kodak.com/go/howto
Kodak EasyShare DX6490 zoom digital camera User's Guide www.kodak.com For interactive tutorials, www.kodak.com/go/howto
User Manual
Page 4
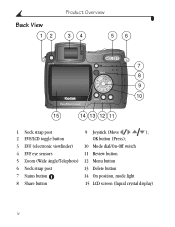
Back View 12 Product Overview 34 56 7 8 9 10 15 14 13 12 11 1 Neck strap post 9 Joystick (Move ); 2 EVF/LCD toggle button OK button (Press); 3 EVF (electronic viewfinder) 10 Mode dial/On-Off switch 4 EVF eye sensors 11 Review button 5 Zoom (Wide Angle/Telephoto) 12 Menu button 6 Neck strap post 13 Delete button 7 Status button 14 On position, mode light 8 Share button 15 LCD screen (liquid crystal display) iv
Back View 12 Product Overview 34 56 7 8 9 10 15 14 13 12 11 1 Neck strap post 9 Joystick (Move ); 2 EVF/LCD toggle button OK button (Press); 3 EVF (electronic viewfinder) 10 Mode dial/On-Off switch 4 EVF eye sensors 11 Review button 5 Zoom (Wide Angle/Telephoto) 12 Menu button 6 Neck strap post 13 Delete button 7 Status button 14 On position, mode light 8 Share button 15 LCD screen (liquid crystal display) iv

User Manual
Page 7
... Print 1 Package Contents 2 Charging the Battery 3 Loading the Battery 4 Attaching the Neck Strap and Lens Cap 4 Turning On the Camera 5 Setting the Date and Time 6 Changing the Display, EVF or LCD 7 Checking Camera and Picture Status 8 Inserting an SD/MMC Card 11 Choosing Internal Memory or SD/MMC Card 12 Important Battery... 19 Shooting Close-Up and Landscape Pictures 22 Using the Auto Focus Framing Marks 23 Quickview-Reviewing the Picture Just Taken 24 Using the Optical Zoom 25 Using the Advanced Digital Zoom 25 vii
... Print 1 Package Contents 2 Charging the Battery 3 Loading the Battery 4 Attaching the Neck Strap and Lens Cap 4 Turning On the Camera 5 Setting the Date and Time 6 Changing the Display, EVF or LCD 7 Checking Camera and Picture Status 8 Inserting an SD/MMC Card 11 Choosing Internal Memory or SD/MMC Card 12 Important Battery... 19 Shooting Close-Up and Landscape Pictures 22 Using the Auto Focus Framing Marks 23 Quickview-Reviewing the Picture Just Taken 24 Using the Optical Zoom 25 Using the Advanced Digital Zoom 25 vii
User Manual
Page 8
... 42 Setting the Orientation Sensor 43 3 Taking Videos 45 Taking a Video 45 Quickview-Reviewing the Video Just Taken 46 Using the Optical Zoom 46 Changing Optional Video Settings 47 Eliminate Camera Noise During Recording 47 Setting Video Length 48 Pre-tagging for Album Names 49 Putting Yourself in the Video 50 viii
... 42 Setting the Orientation Sensor 43 3 Taking Videos 45 Taking a Video 45 Quickview-Reviewing the Video Just Taken 46 Using the Optical Zoom 46 Changing Optional Video Settings 47 Eliminate Camera Noise During Recording 47 Setting Video Length 48 Pre-tagging for Album Names 49 Putting Yourself in the Video 50 viii
User Manual
Page 10
6 Customizing Your Camera Settings 67 To Access Setup Mode/Menus 67 Setup Menus 67 Returning to the Previous Menu 68 Changing the Default Print Quantity 68 Turning Off Quickview 68 Changing Advanced Digital Zoom 69 Turning Off the Shutter Sound 70 Turning Off the Mode Description 70 ...Setting Video Out 71 Selecting a Language 71 Formatting Internal Memory or Card 72 Viewing Camera Information 73 7 Installing the Software 75 Windows ...
6 Customizing Your Camera Settings 67 To Access Setup Mode/Menus 67 Setup Menus 67 Returning to the Previous Menu 68 Changing the Default Print Quantity 68 Turning Off Quickview 68 Changing Advanced Digital Zoom 69 Turning Off the Shutter Sound 70 Turning Off the Mode Description 70 ...Setting Video Out 71 Selecting a Language 71 Formatting Internal Memory or Card 72 Viewing Camera Information 73 7 Installing the Software 75 Windows ...
User Manual
Page 20
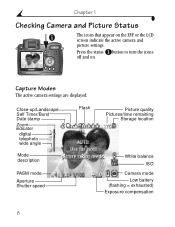
Capture Modes The active camera settings are displayed: Close-up/Landscape Self Timer/Burst Date stamp Zoom indicator digital telephoto wide angle Mode description Flash PASM mode Aperture Shutter speed Picture quality Pictures/time remaining Storage location White balance ISO Camera mode Low battery (flashing = exhausted) Exposure compensation 8 Press the status button to turn the icons off and on the EVF or the LCD screen indicate the active camera and picture settings. Chapter 1 Checking Camera and Picture Status The icons that appear on .
Capture Modes The active camera settings are displayed: Close-up/Landscape Self Timer/Burst Date stamp Zoom indicator digital telephoto wide angle Mode description Flash PASM mode Aperture Shutter speed Picture quality Pictures/time remaining Storage location White balance ISO Camera mode Low battery (flashing = exhausted) Exposure compensation 8 Press the status button to turn the icons off and on the EVF or the LCD screen indicate the active camera and picture settings. Chapter 1 Checking Camera and Picture Status The icons that appear on .
User Manual
Page 30
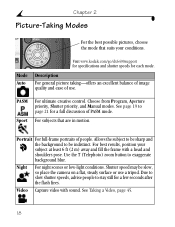
...of use a tripod. Video Capture video with a head and shoulders pose. Mode Auto Visit www.kodak.com/go/dx6490support for specifications and shutter speeds for a full discussion of people. For subjects that...night scenes or low-light conditions. For best results, position your conditions. Use the T (Telephoto) zoom button to stay still for a few seconds after the flash fires. See Taking a Video, page... 45. 18 See page 19 to be slow, so place the camera on a flat, steady surface or use . Allows the subject to be sharp and the background ...
...of use a tripod. Video Capture video with a head and shoulders pose. Mode Auto Visit www.kodak.com/go/dx6490support for specifications and shutter speeds for a full discussion of people. For subjects that...night scenes or low-light conditions. For best results, position your conditions. Use the T (Telephoto) zoom button to stay still for a few seconds after the flash fires. See Taking a Video, page... 45. 18 See page 19 to be slow, so place the camera on a flat, steady surface or use . Allows the subject to be sharp and the background ...
User Manual
Page 31
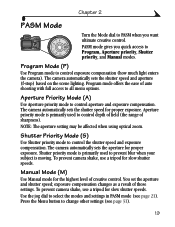
...gives you want ultimate creative control. Program Mode (P) Use Program mode to control aperture and exposure compensation. The camera automatically sets the shutter speed for proper exposure. Shutter priority mode is primarily used to prevent blur when your subject... speed; Aperture Priority Mode (A) Use Aperture priority mode to control exposure compensation (how much light enters the camera). NOTE: The aperture setting may be affected when using optical zoom. exposure compensation changes as a result of creative control. Shutter Priority Mode (S) Use Shutter priority mode to...
...gives you want ultimate creative control. Program Mode (P) Use Program mode to control aperture and exposure compensation. The camera automatically sets the shutter speed for proper exposure. Shutter priority mode is primarily used to prevent blur when your subject... speed; Aperture Priority Mode (A) Use Aperture priority mode to control exposure compensation (how much light enters the camera). NOTE: The aperture setting may be affected when using optical zoom. exposure compensation changes as a result of creative control. Shutter Priority Mode (S) Use Shutter priority mode to...
User Manual
Page 32
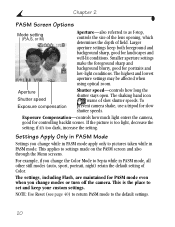
...settings make the foreground sharp and background blurry, good for slow shutter speeds. The highest and lowest aperture settings may be affected when using optical zoom. NOTE: Use Reset (see page 40) to return PASM mode to settings made on the PASM screen and also through the Menu screens. ...The shaking hand icon warns of field. To prevent camera shake, use a tripod for portraits and low-light conditions. Settings Apply Only in PASM Mode Settings you change the Color Mode to Sepia ...
...settings make the foreground sharp and background blurry, good for slow shutter speeds. The highest and lowest aperture settings may be affected when using optical zoom. NOTE: Use Reset (see page 40) to return PASM mode to settings made on the PASM screen and also through the Menu screens. ...The shaking hand icon warns of field. To prevent camera shake, use a tripod for portraits and low-light conditions. Settings Apply Only in PASM Mode Settings you change the Color Mode to Sepia ...

User Manual
Page 34
.... 2 Press the Close-Up/Landscape button repeatedly until the appropriate icon appears in the status bar. 3 Take a picture as usual. The camera automatically sets the focus distance depending on the zoom position: Zoom position Wide Angle Telephoto Close-Up focus distance 4.7 to 27.6 in. (12 to 70 cm) 3.9 to 6.9 ft (1.2 to 2.1 m) Landscape Pictures... flash if possible. Use available light instead of scenes that are not available in pictures at close or very far away. With this setting, the camera uses a fixed, infinite focus.
.... 2 Press the Close-Up/Landscape button repeatedly until the appropriate icon appears in the status bar. 3 Take a picture as usual. The camera automatically sets the focus distance depending on the zoom position: Zoom position Wide Angle Telephoto Close-Up focus distance 4.7 to 27.6 in. (12 to 70 cm) 3.9 to 6.9 ft (1.2 to 2.1 m) Landscape Pictures... flash if possible. Use available light instead of scenes that are not available in pictures at close or very far away. With this setting, the camera uses a fixed, infinite focus.

User Manual
Page 37
... when you turn off the camera. Zoom indicator 1 Push the Zoom button toward W Zoom button (Wide Angle) to take the picture. Chapter 2 Using the Optical Zoom Use Optical Zoom to get up to 10X closer to get an additional 3.0X magnification beyond Optical Zoom; To zoom more W T quickly, push further. Using the Advanced Digital Zoom Use Advanced Digital Zoom to your subject.
... when you turn off the camera. Zoom indicator 1 Push the Zoom button toward W Zoom button (Wide Angle) to take the picture. Chapter 2 Using the Optical Zoom Use Optical Zoom to get up to 10X closer to get an additional 3.0X magnification beyond Optical Zoom; To zoom more W T quickly, push further. Using the Advanced Digital Zoom Use Advanced Digital Zoom to your subject.
User Manual
Page 57
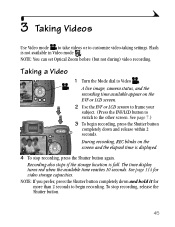
NOTE: You can set Optical Zoom before (but not during) video recording. Taking a Video 1 Turn the Mode dial to begin recording, press the Shutter button completely down and hold it for ... display turns red when the available time reaches 10 seconds. 3 Taking Videos Use Video mode to take videos or to the other screen. A live image, camera status, and the recording time available appear on the screen and the elapsed time is displayed. 4 To stop recording, release the Shutter button. 45 Flash...
NOTE: You can set Optical Zoom before (but not during) video recording. Taking a Video 1 Turn the Mode dial to begin recording, press the Shutter button completely down and hold it for ... display turns red when the available time reaches 10 seconds. 3 Taking Videos Use Video mode to take videos or to the other screen. A live image, camera status, and the recording time available appear on the screen and the elapsed time is displayed. 4 To stop recording, release the Shutter button. 45 Flash...
User Manual
Page 58
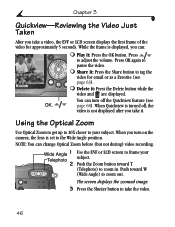
... not during) video recording. Push toward T (Telephoto) to take the video. 46 Press OK again to zoom out. Press to the Wide Angle position. You can turn on the camera, the lens is set to adjust the volume. When you take a video, the EVF or LCD screen displays..., the video is displayed, you take it : Press the Delete button while the video and are displayed. The screen displays the zoomed image. 3 Press the Shutter button to zoom in. Chapter 3 Quickview-Reviewing the Video Just Taken After you can: ! Play it : Press the Share button to your Telephoto ...
... not during) video recording. Push toward T (Telephoto) to take the video. 46 Press OK again to zoom out. Press to the Wide Angle position. You can turn on the camera, the lens is set to adjust the volume. When you take a video, the EVF or LCD screen displays..., the video is displayed, you take it : Press the Delete button while the video and are displayed. The screen displays the zoomed image. 3 Press the Shutter button to zoom in. Chapter 3 Quickview-Reviewing the Video Just Taken After you can: ! Play it : Press the Share button to your Telephoto ...
User Manual
Page 59
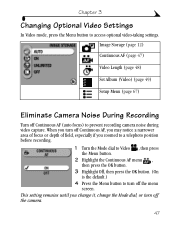
... Storage (page 12) Continuous AF (page 47) Video Length (page 48) Set Album (Video) (page 49) Setup Menu (page 67) Eliminate Camera Noise During Recording Turn off Continuous AF (auto focus) to access optional video-taking settings. When you turn off Continuous AF, you may notice a narrower... area of focus or depth of field, especially if you change it, change the Mode dial, or turn off the camera. 47 This setting remains until you zoomed to a telephoto position before recording. 1 Turn the Mode dial to Video , then press the Menu button. 2 Highlight the Continuous ...
... Storage (page 12) Continuous AF (page 47) Video Length (page 48) Set Album (Video) (page 49) Setup Menu (page 67) Eliminate Camera Noise During Recording Turn off Continuous AF (auto focus) to access optional video-taking settings. When you turn off Continuous AF, you may notice a narrower... area of focus or depth of field, especially if you change it, change the Mode dial, or turn off the camera. 47 This setting remains until you zoomed to a telephoto position before recording. 1 Turn the Mode dial to Video , then press the Menu button. 2 Highlight the Continuous ...

User Manual
Page 79
Setup is the last menu option on the menu screens. 2 Press to your preferences. 1 In any mode (including Review), press the Menu button. 6 Customizing Your Camera Settings To Access Setup Mode/Menus Use Setup to customize camera settings according to highlight Setup , then press the OK button. Setup Menus Return to previous menu (page 68) Default Print Quantity (page 68) Quickview (page 68) Date & Time Set (page 6) Video Out (page 71) Language (page 71) Advanced Digital Zoom (page 69) Shutter Sound (page 70) Mode Description (page 70) Format (page 72) About (page 73) 67
Setup is the last menu option on the menu screens. 2 Press to your preferences. 1 In any mode (including Review), press the Menu button. 6 Customizing Your Camera Settings To Access Setup Mode/Menus Use Setup to customize camera settings according to highlight Setup , then press the OK button. Setup Menus Return to previous menu (page 68) Default Print Quantity (page 68) Quickview (page 68) Date & Time Set (page 6) Video Out (page 71) Language (page 71) Advanced Digital Zoom (page 69) Shutter Sound (page 70) Mode Description (page 70) Format (page 72) About (page 73) 67
User Manual
Page 81
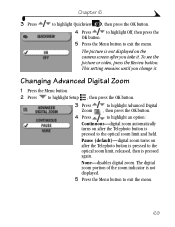
...This setting remains until you take it . None-disables digital zoom. To see the picture or video, press the Review button. The digital zoom portion of the zoom indicator is pressed to the optical zoom limit and held. Pause (default)-digital zoom turns on after the Telephoto button is not displayed. 5...-digital zoom automatically turns on after you change it . Chapter 6 3 Press to highlight Quickview , then press the OK button. 4 Press to highlight Off, then press the OK button. 5 Press the Menu button to exit the menu. 69 The picture is not displayed on the camera ...
...This setting remains until you take it . None-disables digital zoom. To see the picture or video, press the Review button. The digital zoom portion of the zoom indicator is pressed to the optical zoom limit and held. Pause (default)-digital zoom turns on after the Telephoto button is not displayed. 5...-digital zoom automatically turns on after you change it . Chapter 6 3 Press to highlight Quickview , then press the OK button. 4 Press to highlight Off, then press the OK button. 5 Press the Menu button to exit the menu. 69 The picture is not displayed on the camera ...

User Manual
Page 93
... can purchase a camera dock at a dealer of Kodak products or visit www.kodak.com/go/dx6490accessories. Instead, use the Ni-MH rechargeable battery pack in your camera is packaged with a camera dock 6000, the Ni-MH battery pack is rechargeable with other Kodak EasyShare digital cameras, but not the DX6490. NOTE: If your DX6490 zoom digital camera. 9 Using the Camera Dock 6000 The Kodak EasyShare camera dock 6000...
... can purchase a camera dock at a dealer of Kodak products or visit www.kodak.com/go/dx6490accessories. Instead, use the Ni-MH rechargeable battery pack in your camera is packaged with a camera dock 6000, the Ni-MH battery pack is rechargeable with other Kodak EasyShare digital cameras, but not the DX6490. NOTE: If your DX6490 zoom digital camera. 9 Using the Camera Dock 6000 The Kodak EasyShare camera dock 6000...
User Manual
Page 94
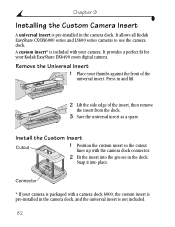
...It allows all Kodak EasyShare CX/DX6000 series and LS600 series cameras to use the camera dock. Remove the Universal Insert 1 Place your camera. Snap it into the groove in the camera dock, and the... universal insert is not included. 82 Press in the camera dock. A custom insert* is included with the camera dock connector. 2 Fit the insert into place. Chapter 9 Installing the Custom Camera Insert A universal insert is pre-installed in and lift. 2 Lift the side edge of the universal insert. Connector * If your Kodak EasyShare DX6490 zoom digital camera...
...It allows all Kodak EasyShare CX/DX6000 series and LS600 series cameras to use the camera dock. Remove the Universal Insert 1 Place your camera. Snap it into the groove in the camera dock, and the... universal insert is not included. 82 Press in the camera dock. A custom insert* is included with the camera dock connector. 2 Fit the insert into place. Chapter 9 Installing the Custom Camera Insert A universal insert is pre-installed in and lift. 2 Lift the side edge of the universal insert. Connector * If your Kodak EasyShare DX6490 zoom digital camera...
User Manual
Page 101
Chapter 9 Earlier Cameras and Docks Your Kodak EasyShare DX6490 zoom digital camera is not compatible with the Kodak EasyShare camera dock 6000 described here. It is compatible with the earlier dock models: the Kodak EasyShare camera dock or camera dock II. For a list of Kodak EasyShare camera/dock compatibility, visit www.kodak.com/global/en/service/docks/dockCompatibility.jhtml. 89
Chapter 9 Earlier Cameras and Docks Your Kodak EasyShare DX6490 zoom digital camera is not compatible with the Kodak EasyShare camera dock 6000 described here. It is compatible with the earlier dock models: the Kodak EasyShare camera dock or camera dock II. For a list of Kodak EasyShare camera/dock compatibility, visit www.kodak.com/global/en/service/docks/dockCompatibility.jhtml. 89

User Manual
Page 121
..., Fill, Red-eye, Off Range Wide: 2.0-16.1 ft (0.6-4.9 m) ISO 140 Tele: 3.9-13.8 ft (1.0-4.2 m) ISO 200 Charging Time Less than 7 seconds with program modes; 12 Appendix Camera Specifications Kodak EasyShare DX6490 zoom digital camera Color modes Saturated color, neutral color, black & white, sepia Communication with computer USB, via: USB cable...
..., Fill, Red-eye, Off Range Wide: 2.0-16.1 ft (0.6-4.9 m) ISO 140 Tele: 3.9-13.8 ft (1.0-4.2 m) ISO 200 Charging Time Less than 7 seconds with program modes; 12 Appendix Camera Specifications Kodak EasyShare DX6490 zoom digital camera Color modes Saturated color, neutral color, black & white, sepia Communication with computer USB, via: USB cable...


