User Guide
Page 2
... 1-7 Taiwan 1-8 Peoples Republic of China 1-8 Korea 1-8 European Union 1-8 Acoustic emission 1-8 Power system connection 1-8 2 Getting Started 2-1 Scanner components 2-1 Front view 2-1 Internal components 2-4 Rear view 2-5 3 Using the Scanner 3-1 Turning the scanner on 3-1 Turning the scanner off 3-3 Starting and stopping scanning 3-3 Document preparation 3-3 Adjusting the input elevator 3-5 Adjusting the side guides 3-5 Selecting your feeding position 3-5 Locking the side...
... 1-7 Taiwan 1-8 Peoples Republic of China 1-8 Korea 1-8 European Union 1-8 Acoustic emission 1-8 Power system connection 1-8 2 Getting Started 2-1 Scanner components 2-1 Front view 2-1 Internal components 2-4 Rear view 2-5 3 Using the Scanner 3-1 Turning the scanner on 3-1 Turning the scanner off 3-3 Starting and stopping scanning 3-3 Document preparation 3-3 Adjusting the input elevator 3-5 Adjusting the side guides 3-5 Selecting your feeding position 3-5 Locking the side...

User Guide
Page 3
Adjusting the height of the scanner 3-14 Feeding documents using multi-feed detection 3-15 Automatic feeding 3-15 Continuous feeding 3-16 Manual feeding 3-16 Feeding documents that require special handling 3-17 Using the operator control panel touchscreen 3-18 Setting screen 3-19 ...Changing the alarm volume 3-20 Selecting the tone 3-21 Selecting a language 3-22 Enabling/disabling image addressing 3-23 Calibrating the scanner 3-25 Printer units...
Adjusting the height of the scanner 3-14 Feeding documents using multi-feed detection 3-15 Automatic feeding 3-15 Continuous feeding 3-16 Manual feeding 3-16 Feeding documents that require special handling 3-17 Using the operator control panel touchscreen 3-18 Setting screen 3-19 ...Changing the alarm volume 3-20 Selecting the tone 3-21 Selecting a language 3-22 Enabling/disabling image addressing 3-23 Calibrating the scanner 3-25 Printer units...
User Guide
Page 5
provides maintenance procedures for the i1800 Series Scanners, including cleaning and replacement procedures for the Kodak i1800 Series Scanners. Appendix A, Accessories - includes information on how to support the Kodak i1800 Series Scanners. Chapter 5, Maintenance - Instructions for using and...elevator, output tray and workspace table adjustments, scanning your documents and using the touchscreen operator control panel. provides information about the i1800 Series Scanners including a product description, scanner features, safety information, user precautions and how to contact ...
provides maintenance procedures for the i1800 Series Scanners, including cleaning and replacement procedures for the Kodak i1800 Series Scanners. Appendix A, Accessories - includes information on how to support the Kodak i1800 Series Scanners. Chapter 5, Maintenance - Instructions for using and...elevator, output tray and workspace table adjustments, scanning your documents and using the touchscreen operator control panel. provides information about the i1800 Series Scanners including a product description, scanner features, safety information, user precautions and how to contact ...
User Guide
Page 6
allows you to quickly reload small stacks of the Kodak i1800 Series Scanners. • Quick reload - allows you to feed poor quality documents through the scanner transport at a slower pace for Kodak i1800 Series Scanners, Firmware Version 2.1.1 (or higher). • Fast elevator - the elevator speed is ...descending. New features These features are several small batches of documents that you want to scan separately, this feature allows you to place the documents in the elevator tray as the previous versions of documents before returning to the 500-sheet Paper Source position. ...
allows you to quickly reload small stacks of the Kodak i1800 Series Scanners. • Quick reload - allows you to feed poor quality documents through the scanner transport at a slower pace for Kodak i1800 Series Scanners, Firmware Version 2.1.1 (or higher). • Fast elevator - the elevator speed is ...descending. New features These features are several small batches of documents that you want to scan separately, this feature allows you to place the documents in the elevator tray as the previous versions of documents before returning to the 500-sheet Paper Source position. ...
User Guide
Page 7
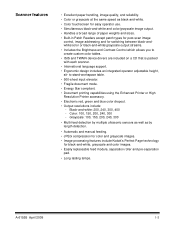
... • Automatic and manual feeding. • JPEG compression for color and grayscale images. • Image processing features include Kodak's Perfect Page technology for switching between black-andwhite/color or black-and-white/grayscale output streams. • Includes the Brightness ...compliant. • Document printing capabilities using the Enhanced Printer or High Resolution Printer accessory. • Electronic red, green and blue color dropout. • Output resolutions include: - Black-and-white: 200, 240, 300, 400 - Color: 100, 150, 200, 240, 300 - Scanner features • ...
... • Automatic and manual feeding. • JPEG compression for color and grayscale images. • Image processing features include Kodak's Perfect Page technology for switching between black-andwhite/color or black-and-white/grayscale output streams. • Includes the Brightness ...compliant. • Document printing capabilities using the Enhanced Printer or High Resolution Printer accessory. • Electronic red, green and blue color dropout. • Output resolutions include: - Black-and-white: 200, 240, 300, 400 - Color: 100, 150, 200, 240, 300 - Scanner features • ...

User Guide
Page 8
... • Microsoft Windows 2000 Professional, Windows XP (Professional/ Home) • 512 MB RAM Supporting documentation The following documentation is a summary of this document provides instructions on the scanning application, choice of how to install the accessory. • High Resolution Printer...own custom color tables. • Image Processing Guide, A-61580 - provides site specification information to run the Kodak i1800 Series Scanners. when you purchase the White Background Accessory, these instructions are included and provide a description of supplies and consumables...
... • Microsoft Windows 2000 Professional, Windows XP (Professional/ Home) • 512 MB RAM Supporting documentation The following documentation is a summary of this document provides instructions on the scanning application, choice of how to install the accessory. • High Resolution Printer...own custom color tables. • Image Processing Guide, A-61580 - provides site specification information to run the Kodak i1800 Series Scanners. when you purchase the White Background Accessory, these instructions are included and provide a description of supplies and consumables...
User Guide
Page 9
... the Professional Services number to assist you have purchased a Service Contract. Kodak will provide you with your scanner, Kodak can send a trained and experienced technician to request additional training for contacting your scanner is specifically designed for the i1800 Series Scanners. Only a trained scanner operator should place a call to ensure your local support center. You may...
... the Professional Services number to assist you have purchased a Service Contract. Kodak will provide you with your scanner, Kodak can send a trained and experienced technician to request additional training for contacting your scanner is specifically designed for the i1800 Series Scanners. Only a trained scanner operator should place a call to ensure your local support center. You may...

User Guide
Page 10
... the consumable for the Material Safety Data Sheet you are available on the Kodak website at: www.kodak.com/go/msds. When accessing the MSDSs from the area that could be replaced by a Kodak Field Engineer. 1-6 A-61555 April 2009 See Chapter 5, "Supplies, consumables and... accessories" for operation of the job description for consumables and catalog numbers. Users and their practices and make compliance with these precautions a part of the scanner or any machinery. CAUTION...
... the consumable for the Material Safety Data Sheet you are available on the Kodak website at: www.kodak.com/go/msds. When accessing the MSDSs from the area that could be replaced by a Kodak Field Engineer. 1-6 A-61555 April 2009 See Chapter 5, "Supplies, consumables and... accessories" for operation of the job description for consumables and catalog numbers. Users and their practices and make compliance with these precautions a part of the scanner or any machinery. CAUTION...
User Guide
Page 11
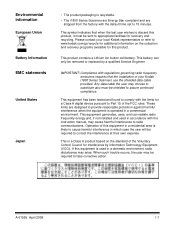
...Environmental information European Union Battery Information EMC statements United States Japan • The product packaging is recyclable. • The i1800 Series Scanners are Energy Star compliant and are designed to provide reasonable protection against harmful interference when the equipment is operated in accordance with regulations... last user wishes to discard this product, it must be shielded to assure continued compliance. Please contact your Kodak i1800 Series Scanners use the shielded data cable provided. IMPORTANT: Compliance with the instruction manual, may arise.
...Environmental information European Union Battery Information EMC statements United States Japan • The product packaging is recyclable. • The i1800 Series Scanners are Energy Star compliant and are designed to provide reasonable protection against harmful interference when the equipment is operated in accordance with regulations... last user wishes to discard this product, it must be shielded to assure continued compliance. Please contact your Kodak i1800 Series Scanners use the shielded data cable provided. IMPORTANT: Compliance with the instruction manual, may arise.
User Guide
Page 13
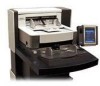
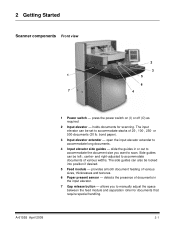
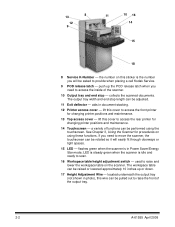
...Scanner components Front view 2 3 1 5 6 7 4 1 Power switch - slide the guides in the input elevator. 7 Gap release button - Side guides can be locked into position if desired. 5 Feed module - provides smooth document feeding of 25-, 100-, 250- A-61555 April 2009 2-1 The input elevator can also be left-, center- or 500-documents... press the power switch on (I) or off (O) as required. 2 Input elevator - and right-adjusted to accommodate long documents. 4 Input elevator side guides - detects the presence of various widths. bond paper). 3 Input elevator extender - holds...
...Scanner components Front view 2 3 1 5 6 7 4 1 Power switch - slide the guides in the input elevator. 7 Gap release button - Side guides can be locked into position if desired. 5 Feed module - provides smooth document feeding of 25-, 100-, 250- A-61555 April 2009 2-1 The input elevator can also be left-, center- or 500-documents... press the power switch on (I) or off (O) as required. 2 Input elevator - and right-adjusted to accommodate long documents. 4 Input elevator side guides - detects the presence of various widths. bond paper). 3 Input elevator extender - holds...
User Guide
Page 14
collects the scanned documents. aids in Power Saver/Energy Star mode; If you need to provide when placing a call Kodak Service. 9 POD release latch - located underneath the output tray (not shown in photo), this cover to access the inside of the output tray....doorways or tight spaces. 15 LED - See Chapter 3, Using the Scanner for changing printer positions and maintenance. 14 Touchscreen - the number on the scanner. used to scan. 16 Workspace table height adjustment switch - lift this sticker is in document stacking. 12 Printer access cover - LED is steady green when ...
collects the scanned documents. aids in Power Saver/Energy Star mode; If you need to provide when placing a call Kodak Service. 9 POD release latch - located underneath the output tray (not shown in photo), this cover to access the inside of the output tray....doorways or tight spaces. 15 LED - See Chapter 3, Using the Scanner for changing printer positions and maintenance. 14 Touchscreen - the number on the scanner. used to scan. 16 Workspace table height adjustment switch - lift this sticker is in document stacking. 12 Printer access cover - LED is steady green when ...
User Guide
Page 16
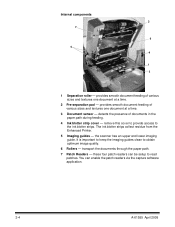
the scanner has an upper and lower imaging guide. It is important to keep the imaging guides clean to the ink blotter strips. You can be setup to read patches. provides smooth document feeding of various sizes and textures one document at a time. 2 Pre-separation ...pad - these four patch readers can enable the patch readers via the capture software application. 2-4 A-61555 April 2009 provides smooth document feeding of documents in the paper path during feeding. 4 Ink blotter strip cover - remove this cover to provide access to obtain optimum image quality. ...
the scanner has an upper and lower imaging guide. It is important to keep the imaging guides clean to the ink blotter strips. You can be setup to read patches. provides smooth document feeding of various sizes and textures one document at a time. 2 Pre-separation ...pad - these four patch readers can enable the patch readers via the capture software application. 2-4 A-61555 April 2009 provides smooth document feeding of documents in the paper path during feeding. 4 Ink blotter strip cover - remove this cover to provide access to obtain optimum image quality. ...
User Guide
Page 17
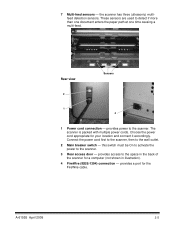
...in illustration). 4 FireWire (IEEE-1394) connection - provides power to detect if more than one document enters the paper path at one time causing a multi-feed. 7 Multi-feed sensors - the scanner has three (ultrasonic) multifeed detection sensors. A-61555 April 2009 2-5 These sensors are used to the...wall outlet. 2 Main breaker switch - Connect the power cord first to the scanner, then to the scanner. 3 Rear access door - provides a port for a computer (not shown in the back of the scanner for the FireWire cable. Choose the power cord appropriate for your location and ...
...in illustration). 4 FireWire (IEEE-1394) connection - provides power to detect if more than one document enters the paper path at one time causing a multi-feed. 7 Multi-feed sensors - the scanner has three (ultrasonic) multifeed detection sensors. A-61555 April 2009 2-5 These sensors are used to the...wall outlet. 2 Main breaker switch - Connect the power cord first to the scanner, then to the scanner. 3 Rear access door - provides a port for a computer (not shown in the back of the scanner for the FireWire cable. Choose the power cord appropriate for your location and ...
User Guide
Page 18
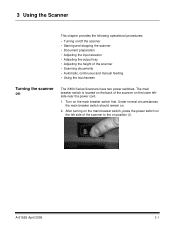
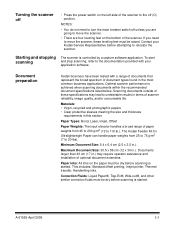
..., continuous and manual feeding • Using the touchscreen Turning the scanner on The i1800 Series Scanners have two power switches. A-61555 April 2009 3-1 3 Using the Scanner This chapter provides the following operational procedures: • Turning on/off the scanner • Starting and stopping the scanner • Document preparation • Adjusting the input elevator • Adjusting the...
..., continuous and manual feeding • Using the touchscreen Turning the scanner on The i1800 Series Scanners have two power switches. A-61555 April 2009 3-1 3 Using the Scanner This chapter provides the following operational procedures: • Turning on/off the scanner • Starting and stopping the scanner • Document preparation • Adjusting the input elevator • Adjusting the...

User Guide
Page 19
IMPORTANT: Always power up the host computer to its ready state before powering up the scanner. 3-2 A-61555 April 2009 See the section entitled, Using the touchscreen" later in this chapter for information about the Idle screen. When the scanner completes the power-up sequence, the Idle screen will be displayed. After you power up the scanner, the following screen will be displayed.
IMPORTANT: Always power up the host computer to its ready state before powering up the scanner. 3-2 A-61555 April 2009 See the section entitled, Using the touchscreen" later in this chapter for information about the Idle screen. When the scanner completes the power-up sequence, the Idle screen will be displayed. After you power up the scanner, the following screen will be displayed.
User Guide
Page 20
... installation of optional document extenders. Document preparation Kodak Scanners have been tested with your Kodak Service Representative before scanning is started . The Kodak Feeder Kit for Ultralightweight Paper can handle paper weights from 45 to 200 g/m2 (12 to 110 lb.). Starting and stopping scanning The scanner is achieved when scanning documents within the recommended document specifications listed below...
... installation of optional document extenders. Document preparation Kodak Scanners have been tested with your Kodak Service Representative before scanning is started . The Kodak Feeder Kit for Ultralightweight Paper can handle paper weights from 45 to 200 g/m2 (12 to 110 lb.). Starting and stopping scanning The scanner is achieved when scanning documents within the recommended document specifications listed below...

User Guide
Page 21
...the Enhanced Printer. • If in doubt about whether a specific damaged document can be transported through the scanner, place the document in a clear protective sleeve with the lead edge of the document aligned with missing corners, perforated edges, hole punches in addition to lead-...time, folded edge first, while using plastic sleeves. Before you may damage the scanner and documents. or right-edge align the documents. These documents may require manual feeding. • When scanning mixed-sized documents, in the margins, irregular and curled edges, torn, damaged, or crushed pages...
...the Enhanced Printer. • If in doubt about whether a specific damaged document can be transported through the scanner, place the document in a clear protective sleeve with the lead edge of the document aligned with missing corners, perforated edges, hole punches in addition to lead-...time, folded edge first, while using plastic sleeves. Before you may damage the scanner and documents. or right-edge align the documents. These documents may require manual feeding. • When scanning mixed-sized documents, in the margins, irregular and curled edges, torn, damaged, or crushed pages...
User Guide
Page 24
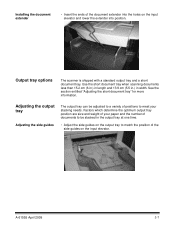
...your paper and the number of documents to be adjusted to a variety of positions to match the position of the document extender into position. A-61555 April 2009 3-7 Output tray options The scanner is shipped with a standard output tray and a short document tray. Adjusting the output tray ...Adjusting the side guides The output tray can be stacked in width. Installing the document extender • Insert the ends of the side...
...your paper and the number of documents to be adjusted to a variety of positions to match the position of the document extender into position. A-61555 April 2009 3-7 Output tray options The scanner is shipped with a standard output tray and a short document tray. Adjusting the output tray ...Adjusting the side guides The output tray can be stacked in width. Installing the document extender • Insert the ends of the side...

User Guide
Page 31
If the workspace table will not move up or down from its highest or lowest position. • Be sure the scanner is on and is nothing close to the scanner that would interfere with the upward and downward movement (e.g., chair, table, etc.). • Press the upper portion of the button on the ... the lower portion of the button on the control panel to lower the workspace table. When you are sitting or standing at the scanner. Adjusting the height of the scanner The workspace table can be sure that there is not in .) from its position, check the following: • Be sure the front...
If the workspace table will not move up or down from its highest or lowest position. • Be sure the scanner is on and is nothing close to the scanner that would interfere with the upward and downward movement (e.g., chair, table, etc.). • Press the upper portion of the button on the ... the lower portion of the button on the control panel to lower the workspace table. When you are sitting or standing at the scanner. Adjusting the height of the scanner The workspace table can be sure that there is not in .) from its position, check the following: • Be sure the front...
User Guide
Page 32
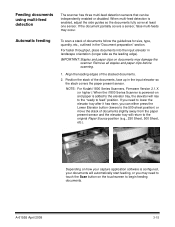
... multi-feeds may damage the scanner. Position the stack of the stacked documents. 2. When multi-feed detection is added to the elevator tray, the elevator will automatically start feeding, or you can be independently enabled or disabled. NOTE: For Kodak i1800 Series Scanners, Firmware Version 2.1.X (or ...higher): When the i1800 Series Scanner is powered-on and paper is enabled, adjust the side guides so the documents fully cover at least one sensor.
... multi-feeds may damage the scanner. Position the stack of the stacked documents. 2. When multi-feed detection is added to the elevator tray, the elevator will automatically start feeding, or you can be independently enabled or disabled. NOTE: For Kodak i1800 Series Scanners, Firmware Version 2.1.X (or ...higher): When the i1800 Series Scanner is powered-on and paper is enabled, adjust the side guides so the documents fully cover at least one sensor.


