
User Manual
Page 4
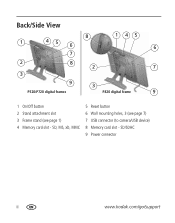
SD/SDHC 9 Power connector ii www.kodak.com/go/support SD, MS, xD, MMC 5 Reset button 6 Wall mounting holes, 3 (see page 1) 4 Memory card slot - Back/Side View 8 1 45 6 7 145 6 2 8 2 7 3 9 3 P520/P720 digital frames P820 digital frame 9 1 On/Off button 2 Stand attachment slot 3 Frame stand (see page 7) 7 USB connector (to camera/USB device) 8 Memory card slot -
SD/SDHC 9 Power connector ii www.kodak.com/go/support SD, MS, xD, MMC 5 Reset button 6 Wall mounting holes, 3 (see page 1) 4 Memory card slot - Back/Side View 8 1 45 6 7 145 6 2 8 2 7 3 9 3 P520/P720 digital frames P820 digital frame 9 1 On/Off button 2 Stand attachment slot 3 Frame stand (see page 7) 7 USB connector (to camera/USB device) 8 Memory card slot -
User Manual
Page 5
... 1 Getting started 1 Setting up your frame 1 Turning your frame on and off 2 Using your frame's Quick Touch Borders 3 Setting your language 4 Enjoying your pictures immediately 4 Inserting a memory card 5 Connecting a digital camera or other USB device 6 Changing your frame orientation 7 Mounting your frame on the wall 7 2 Viewing pictures 8... Selecting multiple pictures 12 Copying from your computer 13 3 Doing more 16 P520-Changing frame and slide show settings 16 P720/P820-Changing frame and slide show settings 18 Setting the clock and timer 21 Upgrading your firmware 22 ...
... 1 Getting started 1 Setting up your frame 1 Turning your frame on and off 2 Using your frame's Quick Touch Borders 3 Setting your language 4 Enjoying your pictures immediately 4 Inserting a memory card 5 Connecting a digital camera or other USB device 6 Changing your frame orientation 7 Mounting your frame on the wall 7 2 Viewing pictures 8... Selecting multiple pictures 12 Copying from your computer 13 3 Doing more 16 P520-Changing frame and slide show settings 16 P720/P820-Changing frame and slide show settings 18 Setting the clock and timer 21 Upgrading your firmware 22 ...

User Manual
Page 6
Table of contents Learning more about your frame 25 4 Troubleshooting and support 26 Picture frame problems 26 Screen messages 28 5 Appendix 30 Digital frame specifications 30 Important safety instructions 31 Upgrading your software and firmware 31 Additional care and maintenance 31 Limited warranty 32 FCC compliance and advisory 34 iv www.kodak.com/go/support
Table of contents Learning more about your frame 25 4 Troubleshooting and support 26 Picture frame problems 26 Screen messages 28 5 Appendix 30 Digital frame specifications 30 Important safety instructions 31 Upgrading your software and firmware 31 Additional care and maintenance 31 Limited warranty 32 FCC compliance and advisory 34 iv www.kodak.com/go/support
User Manual
Page 7
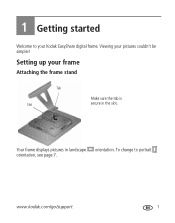
Your frame displays pictures in the slot. Setting up your pictures couldn't be simpler! To change to your Kodak EasyShare digital frame. www.kodak.com/go/support 1 Viewing your frame Attaching the frame stand Tab Slot Make sure the tab is secure in landscape orientation. 1 Getting started Welcome to portrait orientation, see page 7.
Your frame displays pictures in the slot. Setting up your pictures couldn't be simpler! To change to your Kodak EasyShare digital frame. www.kodak.com/go/support 1 Viewing your frame Attaching the frame stand Tab Slot Make sure the tab is secure in landscape orientation. 1 Getting started Welcome to portrait orientation, see page 7.
User Manual
Page 8
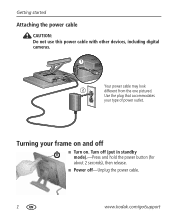
Use the plug that accommodates your frame on . Getting started Attaching the power cable CAUTION: Do not use this power cable with other devices, including digital cameras. 1 Your power cable may look 2 different from the one pictured. Turning your type of power outlet. Turn off (put in standby mode).-Press and hold the power button (for about 2 seconds), then release. ■ Power off ■ Turn on and off -Unplug the power cable. 2 www.kodak.com/go/support
Use the plug that accommodates your frame on . Getting started Attaching the power cable CAUTION: Do not use this power cable with other devices, including digital cameras. 1 Your power cable may look 2 different from the one pictured. Turning your type of power outlet. Turn off (put in standby mode).-Press and hold the power button (for about 2 seconds), then release. ■ Power off ■ Turn on and off -Unplug the power cable. 2 www.kodak.com/go/support
User Manual
Page 11
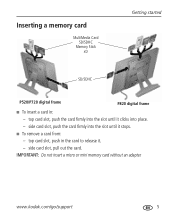
www.kodak.com/go/support 5 top card slot, push the card firmly into the slot until it stops. ■ To remove a card from: - IMPORTANT: Do not insert a micro or mini memory card without an adapter. side card slot, push the card firmly into place. - side card slot, pull out the card. top card slot, push in : - Inserting a memory card MultiMedia Card SD/SDHC Memory Stick xD Getting started SD/SDHC P520/P720 digital frame P820 digital frame ■ To insert a card in the card to release it clicks into the slot until it . -
www.kodak.com/go/support 5 top card slot, push the card firmly into the slot until it stops. ■ To remove a card from: - IMPORTANT: Do not insert a micro or mini memory card without an adapter. side card slot, push the card firmly into place. - side card slot, pull out the card. top card slot, push in : - Inserting a memory card MultiMedia Card SD/SDHC Memory Stick xD Getting started SD/SDHC P520/P720 digital frame P820 digital frame ■ To insert a card in the card to release it clicks into the slot until it . -
User Manual
Page 12
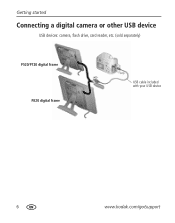
Getting started Connecting a digital camera or other USB device USB devices: camera, flash drive, card reader, etc. (sold separately) P520/P720 digital frame P820 digital frame USB cable included with your USB device 6 www.kodak.com/go/support
Getting started Connecting a digital camera or other USB device USB devices: camera, flash drive, card reader, etc. (sold separately) P520/P720 digital frame P820 digital frame USB cable included with your USB device 6 www.kodak.com/go/support
User Manual
Page 14
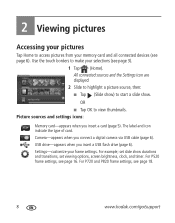
...slide show durations and transitions, set slide show . USB drive-appears when you connect a digital camera via USB cable (page 6). set viewing options, screen brightness, clock, and timer. For P520 frame settings, see page 6). Camera-appears when you insert a USB flash drive (page 6)....and settings icons: Memory card-appears when you insert a card (page 5). Settings-customize your selections (see page 18. 8 www.kodak.com/go/support For P720 and P820 frame settings, see page 3). 1 Tap (Home). All connected sources and the Settings icon are displayed. 2 Slide to highlight a ...
...slide show durations and transitions, set slide show . USB drive-appears when you connect a digital camera via USB cable (page 6). set viewing options, screen brightness, clock, and timer. For P520 frame settings, see page 6). Camera-appears when you insert a USB flash drive (page 6)....and settings icons: Memory card-appears when you insert a card (page 5). Settings-customize your selections (see page 18. 8 www.kodak.com/go/support For P720 and P820 frame settings, see page 3). 1 Tap (Home). All connected sources and the Settings icon are displayed. 2 Slide to highlight a ...

User Manual
Page 19
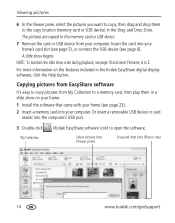
... drive or camera). The memory card and connected devices appear in the Drag and Drop Zone. Viewing pictures Copying from your computer Use Kodak EasyShare digital display software to drag and drop pictures easily from your desktop to open the software. Click Help for Select pictures here more info (... devices and their folders. 5 In Pictures and Videos, click the folder or location on your computer that came with your frame (see page 23). 2 Insert a removable device into your frame and play a slide show right away. 1 Install the software that contains the pictures you want to copy.
... drive or camera). The memory card and connected devices appear in the Drag and Drop Zone. Viewing pictures Copying from your computer Use Kodak EasyShare digital display software to drag and drop pictures easily from your desktop to open the software. Click Help for Select pictures here more info (... devices and their folders. 5 In Pictures and Videos, click the folder or location on your computer that came with your frame (see page 23). 2 Insert a removable device into your frame and play a slide show right away. 1 Install the software that contains the pictures you want to copy.
User Manual
Page 20
... to a memory card, then play them to the copy location (memory card or USB device) in a slide show on the features included in the Kodak EasyShare digital display software, click the Help button. Insert the card into the computer's USB port. 3 Double-click My Collection... Drag and Drop Zone. Or insert a removable USB device or card reader into your frame's card slot (see page 5), or connect the USB device (see page 6). For more information on your frame. 1 Install the software that came with your frame (see page 10 and select Filename, A to Z. Select pictures here (Viewer pane)...
... to a memory card, then play them to the copy location (memory card or USB device) in a slide show on the features included in the Kodak EasyShare digital display software, click the Help button. Insert the card into the computer's USB port. 3 Double-click My Collection... Drag and Drop Zone. Or insert a removable USB device or card reader into your frame's card slot (see page 5), or connect the USB device (see page 6). For more information on your frame. 1 Install the software that came with your frame (see page 10 and select Filename, A to Z. Select pictures here (Viewer pane)...

User Manual
Page 29
... computer, you turned off anti-virus software, turn it back on. see page 13). ■ Kodak EasyShare software -organize, edit, and share your desktop when the installation is the drive letter that was packaged with your frame ■ Kodak EasyShare digital display software - Doing more Installing the software Follow these directions to install the software that...
... computer, you turned off anti-virus software, turn it back on. see page 13). ■ Kodak EasyShare software -organize, edit, and share your desktop when the installation is the drive letter that was packaged with your frame ■ Kodak EasyShare digital display software - Doing more Installing the software Follow these directions to install the software that...
User Manual
Page 36
... DC, 1.5 A with EIAJ class 2 DC connector Input: 100-240V AC, 50/60 Hz, 0.5 Amp max. SD/SDHC (Secure Digital/Secure Digital High Capacity); 5 Appendix Digital frame specifications For more specifications, visit www.kodak.com/go /support Kodak EasyShare P520, P720, P820 digital frames Color display P520 12.7 cm (5 in.) diagonal analog LCD, 320 x 234 pixels, 4:3 aspect ratio, 103 x 75 mm...
... DC, 1.5 A with EIAJ class 2 DC connector Input: 100-240V AC, 50/60 Hz, 0.5 Amp max. SD/SDHC (Secure Digital/Secure Digital High Capacity); 5 Appendix Digital frame specifications For more specifications, visit www.kodak.com/go /support Kodak EasyShare P520, P720, P820 digital frames Color display P520 12.7 cm (5 in.) diagonal analog LCD, 320 x 234 pixels, 4:3 aspect ratio, 103 x 75 mm...

User Manual
Page 37
... your local authorities. Do not allow chemicals, such as suntan lotion, to the latest versions of Kodak products for more information. ■ For digital frame disposal or recycling information, contact your computer manufacturer if you have questions. Do not use cleaning solutions...to shock and/or electrical or mechanical hazards. For approved accessories, visit www.kodak/go /digitalframedownloads. Contact a dealer of the software included on the Kodak EasyShare software CD and the frame firmware-www.kodak.com/go /accessories. ■ Use only a USB-certified computer equipped with ...
... your local authorities. Do not allow chemicals, such as suntan lotion, to the latest versions of Kodak products for more information. ■ For digital frame disposal or recycling information, contact your computer manufacturer if you have questions. Do not use cleaning solutions...to shock and/or electrical or mechanical hazards. For approved accessories, visit www.kodak/go /digitalframedownloads. Contact a dealer of the software included on the Kodak EasyShare software CD and the frame firmware-www.kodak.com/go /accessories. ■ Use only a USB-certified computer equipped with ...

User Manual
Page 40
Appendix FCC compliance and advisory Kodak EasyShare P520/P720/P820 digital frame This equipment has been tested and found to comply with the limits for a Class B digital device, pursuant to Part 15 of the following two conditions: (1) this device may not cause harmful interference, and ... no guarantee that to provide reasonable protection against harmful interference in accordance with the instructions, may cause undesired operation. 34 www.kodak.com/go/support These limits are designed to which can radiate radio frequency energy and, if not installed or used with Industry...
Appendix FCC compliance and advisory Kodak EasyShare P520/P720/P820 digital frame This equipment has been tested and found to comply with the limits for a Class B digital device, pursuant to Part 15 of the following two conditions: (1) this device may not cause harmful interference, and ... no guarantee that to provide reasonable protection against harmful interference in accordance with the instructions, may cause undesired operation. 34 www.kodak.com/go/support These limits are designed to which can radiate radio frequency energy and, if not installed or used with Industry...
User Manual
Page 43
..., 31 clock and timer, setting, 17, 19, 21, 27 copying from computer, 13 from EasyShare software, 14 on frame, 11 D deleting pictures, 11 displaying slide show, 9 disposal, recycling, 31 E EasyShare digital display software copying pictures, 13 installing, 23 EasyShare software www.kodak.com/go/support 1 copying pictures from, 14 installing, 23 error messages, 28 F faceplate, 24...
..., 31 clock and timer, setting, 17, 19, 21, 27 copying from computer, 13 from EasyShare software, 14 on frame, 11 D deleting pictures, 11 displaying slide show, 9 disposal, recycling, 31 E EasyShare digital display software copying pictures, 13 installing, 23 EasyShare software www.kodak.com/go/support 1 copying pictures from, 14 installing, 23 error messages, 28 F faceplate, 24...


