
User Guide
Page 5
......1-2 Safety Warnings...1-2 Operational Warnings ...1-2 Important Safeguards and Precautions ...1-3 Electromagnetic Emissions...1-6 VCCI ...1-6 2 About Your Camera Nomenclature...2-1 Camera Front...2-1 Camera Back ...2-2 Camera Top ...2-2 Camera Bottom...2-3 Left Side...2-3 Open Media Door ...2-4 Turning the Camera On and Off...2-4 Viewfinder...2-5 Digital Buttons...2-6 Four-way Switch...2-6 Locking and Unlocking the Four-way Switch 2-7 OK Button ...2-7 Cancel Button ...2-7 Menu Button...2-8 Nav+ Button ...2-8 HotKey Button...
......1-2 Safety Warnings...1-2 Operational Warnings ...1-2 Important Safeguards and Precautions ...1-3 Electromagnetic Emissions...1-6 VCCI ...1-6 2 About Your Camera Nomenclature...2-1 Camera Front...2-1 Camera Back ...2-2 Camera Top ...2-2 Camera Bottom...2-3 Left Side...2-3 Open Media Door ...2-4 Turning the Camera On and Off...2-4 Viewfinder...2-5 Digital Buttons...2-6 Four-way Switch...2-6 Locking and Unlocking the Four-way Switch 2-7 OK Button ...2-7 Cancel Button ...2-7 Menu Button...2-8 Nav+ Button ...2-8 HotKey Button...
User Guide
Page 6
...Turning On the Image LCD ...2-11 Turning Off the Image LCD...2-11 Digital Status LCD...2-12 Using the Menus ...2-13 Navigating Through the Menus ...2-14 Using the Digital Status Button and Digital Status LCD to Highlight Menu Options 2-15 Using the HotKey Button to......2-21 PC Sync Terminal...2-21 Remote Release Accessory Port ...2-21 Camera Straps ...2-22 Attaching the Neck Strap ...2-22 Attaching the Hand Strap...2-22 3 Powering Your Camera Powering Your Camera using the Power Module 3-2 Powering Your Camera using a Battery ...3-2 Charging Batteries...3-2 Inserting/Removing Batteries ...3-3 ...
...Turning On the Image LCD ...2-11 Turning Off the Image LCD...2-11 Digital Status LCD...2-12 Using the Menus ...2-13 Navigating Through the Menus ...2-14 Using the Digital Status Button and Digital Status LCD to Highlight Menu Options 2-15 Using the HotKey Button to......2-21 PC Sync Terminal...2-21 Remote Release Accessory Port ...2-21 Camera Straps ...2-22 Attaching the Neck Strap ...2-22 Attaching the Hand Strap...2-22 3 Powering Your Camera Powering Your Camera using the Power Module 3-2 Powering Your Camera using a Battery ...3-2 Charging Batteries...3-2 Inserting/Removing Batteries ...3-3 ...
User Guide
Page 7
...Camera Operations ...4-1 Inserting/Removing Batteries ...4-1 Mounting the Lens ...4-2 Inserting a Memory Card ...4-3 Setting Focus...4-3 Setting the Metering System and Exposure Mode 4-4 Composing, Focusing, and Capturing ...4-5 Using the Built-in Speedlight ...4-6 Basic Mode ...4-7 Setting Basic Mode...4-8 Accessing Functions Using the Basic Menu 4-8 Digital Status LCD...4-9 Using the Digital... Status LCD to Highlight Menu Options 4-9 Setting ISO ...4-10 White Balance...4-11 Setting Raw Resolution...4-12 Setting JPEG Resolution...4-13 Formatting...
...Camera Operations ...4-1 Inserting/Removing Batteries ...4-1 Mounting the Lens ...4-2 Inserting a Memory Card ...4-3 Setting Focus...4-3 Setting the Metering System and Exposure Mode 4-4 Composing, Focusing, and Capturing ...4-5 Using the Built-in Speedlight ...4-6 Basic Mode ...4-7 Setting Basic Mode...4-8 Accessing Functions Using the Basic Menu 4-8 Digital Status LCD...4-9 Using the Digital... Status LCD to Highlight Menu Options 4-9 Setting ISO ...4-10 White Balance...4-11 Setting Raw Resolution...4-12 Setting JPEG Resolution...4-13 Formatting...

User Guide
Page 8
... a Job Tracker File to a Card...5-9 Loading a Job Tracker File From a Card 5-10 Loading a Job Tracker File from Camera Memory 5-11 Selecting a Language...5-11 Resetting Defaults ...5-12 Time and Date ...5-12 Setting the User Mode...5-13 Using the Vertical Release...5-14 Intervalometer ...5-15 Changing Intervalometer Settings ...5-16 Lens Optimization ...5-17 Long Exposure...5-18...
... a Job Tracker File to a Card...5-9 Loading a Job Tracker File From a Card 5-10 Loading a Job Tracker File from Camera Memory 5-11 Selecting a Language...5-11 Resetting Defaults ...5-12 Time and Date ...5-12 Setting the User Mode...5-13 Using the Vertical Release...5-14 Intervalometer ...5-15 Changing Intervalometer Settings ...5-16 Lens Optimization ...5-17 Long Exposure...5-18...
User Guide
Page 9
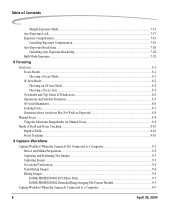
... the Crop Aspect Ratio ...6-11 Setting Raw Resolution...6-12 Setting JPEG Resolution...6-13 Setting JPEG Quality ...6-14 Correcting Digital Exposure ...6-15 Exposure Bias...6-15 Look ...6-16 Noise Reduction...6-16 Sharpening Level...Camera...7-6 Loading Settings from a Card...7-7 Deleting Settings...7-7 Exposure...7-8 Exposure Metering Systems...7-8 Choosing a Metering System...7-8 Matrix Metering/3D Matrix Metering 7-8 Center-Weighted Metering...7-9 Spot Metering...7-9 Capturing Images in Each Exposure Mode 7-10 Programmed Auto Exposure Mode 7-11 Shutter-Priority Auto Exposure Mode 7-13...
... the Crop Aspect Ratio ...6-11 Setting Raw Resolution...6-12 Setting JPEG Resolution...6-13 Setting JPEG Quality ...6-14 Correcting Digital Exposure ...6-15 Exposure Bias...6-15 Look ...6-16 Noise Reduction...6-16 Sharpening Level...Camera...7-6 Loading Settings from a Card...7-7 Deleting Settings...7-7 Exposure...7-8 Exposure Metering Systems...7-8 Choosing a Metering System...7-8 Matrix Metering/3D Matrix Metering 7-8 Center-Weighted Metering...7-9 Spot Metering...7-9 Capturing Images in Each Exposure Mode 7-10 Programmed Auto Exposure Mode 7-11 Shutter-Priority Auto Exposure Mode 7-13...
User Guide
Page 10
... Focus Tracking ...8-10 Depth of Field ...8-10 Focus Tracking ...8-10 9 Capture Workflow Capture Workflow When the Camera Is Not Connected to a Computer 9-1 Device and Media Preparation ...9-2 Capturing and Evaluating Test Images ...9-3 Capturing Images ...9-3 Occasional Verification ...9-4 Transferring Images...9-4 Editing Images ...9-4 KODAK PROFESSIONAL DCS Photo Desk 9-5 KODAK PROFESSIONAL Extended Range Imaging File Format Module 9-5 Capture Workflow When the...
... Focus Tracking ...8-10 Depth of Field ...8-10 Focus Tracking ...8-10 9 Capture Workflow Capture Workflow When the Camera Is Not Connected to a Computer 9-1 Device and Media Preparation ...9-2 Capturing and Evaluating Test Images ...9-3 Capturing Images ...9-3 Occasional Verification ...9-4 Transferring Images...9-4 Editing Images ...9-4 KODAK PROFESSIONAL DCS Photo Desk 9-5 KODAK PROFESSIONAL Extended Range Imaging File Format Module 9-5 Capture Workflow When the...

User Guide
Page 11
... ...10-9 Flash Sync Modes for Optional Speedlights 10-11 Flash Exposure Compensation...10-12 Using Optional Speedlights ...10-13 Notes for Using an Optional Speedlight 10-15 11 Working with Images on the Camera Reviewing Images...11-1 Selecting an Image Mode ...11-1 Changing the Duration of the Image Mode Menu Display 11...
... ...10-9 Flash Sync Modes for Optional Speedlights 10-11 Flash Exposure Compensation...10-12 Using Optional Speedlights ...10-13 Notes for Using an Optional Speedlight 10-15 11 Working with Images on the Camera Reviewing Images...11-1 Selecting an Image Mode ...11-1 Changing the Duration of the Image Mode Menu Display 11...

User Guide
Page 12
... the Video Output Port Connecting ...12-1 Enabling/Disabling External Video...12-2 13 Connecting to Your Computer Advantages to an IEEE 1394 Connection ...13-1 Advantages to a Card Reader...13-1 Connecting Your Camera to the Computer ...13-2 Quitting-Disconnecting from the Computer 13-4 Using the Card Reader ...13-4 14 Camera Care Handling ...14-1 Cleaning ...14-2 The Imager...14-3 Determining if...
... the Video Output Port Connecting ...12-1 Enabling/Disabling External Video...12-2 13 Connecting to Your Computer Advantages to an IEEE 1394 Connection ...13-1 Advantages to a Card Reader...13-1 Connecting Your Camera to the Computer ...13-2 Quitting-Disconnecting from the Computer 13-4 Using the Card Reader ...13-4 14 Camera Care Handling ...14-1 Cleaning ...14-2 The Imager...14-3 Determining if...

User Guide
Page 13
... B: Lens Compatibility Compatible Lenses and Lens Accessories...B-2 Incompatible Lenses and Lens Accessories...B-3 Appendix C: Troubleshooting Problems Indicated in the Top Status LCD ...C-1 Other Problems...C-3 Appendix D: Warranty KODAK PROFESSI0NAL DCS Pro 14n Digital Camera D-1 Warranty Repair Coverage ...D-1 Limitations ...D-2 Outside the United States ...D-3 Warranty is Not Transferable ...D-3 How to Obtain Service ...D-4 Product Support Options...D-5 Glossary April 29, 2004 9
... B: Lens Compatibility Compatible Lenses and Lens Accessories...B-2 Incompatible Lenses and Lens Accessories...B-3 Appendix C: Troubleshooting Problems Indicated in the Top Status LCD ...C-1 Other Problems...C-3 Appendix D: Warranty KODAK PROFESSI0NAL DCS Pro 14n Digital Camera D-1 Warranty Repair Coverage ...D-1 Limitations ...D-2 Outside the United States ...D-3 Warranty is Not Transferable ...D-3 How to Obtain Service ...D-4 Product Support Options...D-5 Glossary April 29, 2004 9
User Guide
Page 15
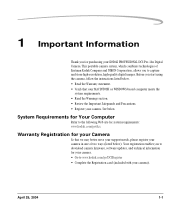
... computer meets the system requirements. • Read the Warnings section. • Review the Important Safeguards and Precautions. • Register your KODAK PROFESSIONAL DCS Pro 14n Digital Camera. April 29, 2004 1-1 Warranty Registration for system requirements: www.kodak.com/go /DCSRegister • Complete the Registration card (included with your camera. • Go to capture and store high-resolution, high-quality...
... computer meets the system requirements. • Read the Warnings section. • Review the Important Safeguards and Precautions. • Register your KODAK PROFESSIONAL DCS Pro 14n Digital Camera. April 29, 2004 1-1 Warranty Registration for system requirements: www.kodak.com/go /DCSRegister • Complete the Registration card (included with your camera. • Go to capture and store high-resolution, high-quality...

User Guide
Page 16
... April 29, 2004 A line voltage outside this time. • Operate your camera. If dropped, the card may lose data if you connect the IEEE 1394 cable to verify that data is for the KODAK PROFESSIONAL DCS Pro 14n Digital Camera. • Use the Image LCD to the computer. Do not plug other ...than for indoor use only. • Do not use IEEE 1394 repeaters when connecting your camera only from the camera while the memory card icon on the...
... April 29, 2004 A line voltage outside this time. • Operate your camera. If dropped, the card may lose data if you connect the IEEE 1394 cable to verify that data is for the KODAK PROFESSIONAL DCS Pro 14n Digital Camera. • Use the Image LCD to the computer. Do not plug other ...than for indoor use only. • Do not use IEEE 1394 repeaters when connecting your camera only from the camera while the memory card icon on the...

User Guide
Page 17
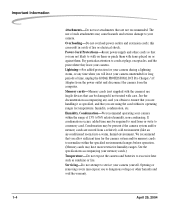
... Handling-Handle your camera. Do not use the KODAK PROFESSIONAL DCS Pro Charger/AC Adapter near water-for example, near salt spray, and do not immerse your local authorities or, in a wet room or basement. For disposal or recycling information, please contact your camera in water or ...safety and operating instructions before operating your camera needs to be regulated due to your camera with excessive dust levels, dust may be shipped. Do not drop your camera. Water and Moisture-Do not use if your camera. Disposal-This digital camera contains lead. Disposal of any kind...
... Handling-Handle your camera. Do not use the KODAK PROFESSIONAL DCS Pro Charger/AC Adapter near water-for example, near salt spray, and do not immerse your local authorities or, in a wet room or basement. For disposal or recycling information, please contact your camera in water or ...safety and operating instructions before operating your camera needs to be regulated due to your camera with excessive dust levels, dust may be shipped. Do not drop your camera. Water and Moisture-Do not use if your camera. Disposal-This digital camera contains lead. Disposal of any kind...
User Guide
Page 18
...Do not expose the camera and batteries to excessive heat such as specified, and that you are handling it as sunshine or fire. See the documentation accompanying any time when you allow sufficient time for long periods of time, unplug the KODAK PROFESSIONAL DCS Pro Charger / AC Adapter... from the power outlet and disconnect the camera from the computer. If condensation occurs, added time may be required to read from a relatively cold...
...Do not expose the camera and batteries to excessive heat such as specified, and that you are handling it as sunshine or fire. See the documentation accompanying any time when you allow sufficient time for long periods of time, unplug the KODAK PROFESSIONAL DCS Pro Charger / AC Adapter... from the power outlet and disconnect the camera from the computer. If condensation occurs, added time may be required to read from a relatively cold...

User Guide
Page 19
... the manufacturer under the following conditions: • If liquid has been spilled or if objects have fallen into your camera. • If your camera has been exposed to heavy rain or water. (While it is designed to tolerate a reasonable amount of moisture, your... camera exhibits a distinct change in performance. April 29, 2004 1-5 The camera is not waterproof.) • If your camera does not operate normally according to take the camera apart. Disassembling the Camera-Never attempt to the operating instructions. • If your camera has been dropped or the...
... the manufacturer under the following conditions: • If liquid has been spilled or if objects have fallen into your camera. • If your camera has been exposed to heavy rain or water. (While it is designed to tolerate a reasonable amount of moisture, your... camera exhibits a distinct change in performance. April 29, 2004 1-5 The camera is not waterproof.) • If your camera does not operate normally according to take the camera apart. Disassembling the Camera-Never attempt to the operating instructions. • If your camera has been dropped or the...

User Guide
Page 20
... and, if not installed and used near a radio or television receiver in accordance with the limits for a Class B digital device, pursuant to Part 15 of the following measures: • Reorient or relocate the receiving antenna. • Increase the separation between ...your camera and receiver. • Connect your camera into an outlet on a circuit different from Information Technology Equipment (VCCI). If this equipment does cause harmful interference to correct...
... and, if not installed and used near a radio or television receiver in accordance with the limits for a Class B digital device, pursuant to Part 15 of the following measures: • Reorient or relocate the receiving antenna. • Increase the separation between ...your camera and receiver. • Connect your camera into an outlet on a circuit different from Information Technology Equipment (VCCI). If this equipment does cause harmful interference to correct...

User Guide
Page 21
2 About Your Camera Nomenclature Camera Front Self Timer / AF-Assist Illuminator / Red-eye Reduction lamp Shutter Release button Sub-Command dial Depth of Field Preview button Vertical Shutter release Exposure Mode dial PC Sync terminal Lens Release button Focus Mode selector Remote Release accessory port April 29, 2004 2-1
2 About Your Camera Nomenclature Camera Front Self Timer / AF-Assist Illuminator / Red-eye Reduction lamp Shutter Release button Sub-Command dial Depth of Field Preview button Vertical Shutter release Exposure Mode dial PC Sync terminal Lens Release button Focus Mode selector Remote Release accessory port April 29, 2004 2-1

User Guide
Page 22
... Mode dial Flash Sync Mode button Auto Exposure Bracketing button Image LCD Menu button Nav+ button HotKey button Digital Status button Digital Status LCD Camera Top Flash Lock Release button Drive Mode selector lock release Camera Strap eyelet Exposure Mode dial Drive Mode selector Hot shoe 2-2 Viewfinder eyepiece Diopter Adjustment lever AE-L/AF-L...-way switch lock Delete button Tag/Record button Media door Power switch Shutter Release button Flash Exposure Compensation button Exposure Compensation button LCD Illuminator Camera Strap eyelet Top Status LCD Imager Plane indicator April 29, 2004
... Mode dial Flash Sync Mode button Auto Exposure Bracketing button Image LCD Menu button Nav+ button HotKey button Digital Status button Digital Status LCD Camera Top Flash Lock Release button Drive Mode selector lock release Camera Strap eyelet Exposure Mode dial Drive Mode selector Hot shoe 2-2 Viewfinder eyepiece Diopter Adjustment lever AE-L/AF-L...-way switch lock Delete button Tag/Record button Media door Power switch Shutter Release button Flash Exposure Compensation button Exposure Compensation button LCD Illuminator Camera Strap eyelet Top Status LCD Imager Plane indicator April 29, 2004

User Guide
Page 24
About Your Camera Open Media Door CF Eject button CF Card slot Card Busy LED SD/MMC card slot Turning the Camera On and Off Connect your camera to a power source (see page 3-1) before turning it on. • Turn the Power Switch On or Off. 2-4 April 29, 2004
About Your Camera Open Media Door CF Eject button CF Card slot Card Busy LED SD/MMC card slot Turning the Camera On and Off Connect your camera to a power source (see page 3-1) before turning it on. • Turn the Power Switch On or Off. 2-4 April 29, 2004

User Guide
Page 25
Viewfinder About Your Camera Focus Indicator Focus area Metering system Auto Exposure Lock indicator Shutter Speed Aperture Flash Ready light Exposure Compensation value / Flash Exposure Compensation value Exposure Compensation Flash Exposure Compensation Exposure mode / Electronic analog exposure display / Exposure Compensation value display April 29, 2004 2-5
Viewfinder About Your Camera Focus Indicator Focus area Metering system Auto Exposure Lock indicator Shutter Speed Aperture Flash Ready light Exposure Compensation value / Flash Exposure Compensation value Exposure Compensation Flash Exposure Compensation Exposure mode / Electronic analog exposure display / Exposure Compensation value display April 29, 2004 2-5
User Guide
Page 26
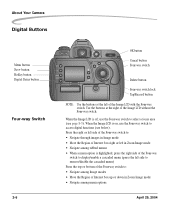
... Region of Interest box up or down in Zoom Image mode • Navigate among menu options April 29, 2004 About Your Camera Digital Buttons Menu button Nav+ button HotKey button Digital Status button Four-way Switch 2-6 OK button Cancel button Four-way switch Delete button Four-way switch lock Tag/Record button NOTE...). Use the buttons at the left side to remove/disable the cascaded menu) Press the top or bottom of the Four-way switch to access digital functions (see page 8-3).
... Region of Interest box up or down in Zoom Image mode • Navigate among menu options April 29, 2004 About Your Camera Digital Buttons Menu button Nav+ button HotKey button Digital Status button Four-way Switch 2-6 OK button Cancel button Four-way switch Delete button Four-way switch lock Tag/Record button NOTE...). Use the buttons at the left side to remove/disable the cascaded menu) Press the top or bottom of the Four-way switch to access digital functions (see page 8-3).


