

Extended user guide
Page 5
... the strap 1 Loading the battery 1 Turning on the camera 2 Setting the language, date/time 2 Storing pictures on an optional SD or SDHC card 3 2 Taking pictures/videos 4 Taking a picture 4 Capture modes 6 Using optical zoom 8 Using the flash 9 ...videos 13 Reviewing pictures/videos 13 Deleting pictures/videos 15 Using the menu button in Review 16 Adding sound tags 17 Cropping pictures 18 Using Kodak Perfect Touch technology 18 Editing videos 19 Running a slide show 21 Viewing pictures/videos in different ways 24 Selecting multiple pictures/videos 25 Copying pictures/videos...
... the strap 1 Loading the battery 1 Turning on the camera 2 Setting the language, date/time 2 Storing pictures on an optional SD or SDHC card 3 2 Taking pictures/videos 4 Taking a picture 4 Capture modes 6 Using optical zoom 8 Using the flash 9 ...videos 13 Reviewing pictures/videos 13 Deleting pictures/videos 15 Using the menu button in Review 16 Adding sound tags 17 Cropping pictures 18 Using Kodak Perfect Touch technology 18 Editing videos 19 Running a slide show 21 Viewing pictures/videos in different ways 24 Selecting multiple pictures/videos 25 Copying pictures/videos...
Extended user guide
Page 9
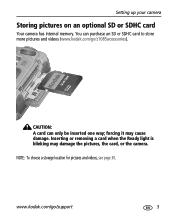
Inserting or removing a card when the Ready light is blinking may cause damage. www.kodak.com/go /z1085accessories). CAUTION: A card can purchase an SD or SDHC card to store more pictures and videos (www.kodak.com/go /support 3 NOTE: To choose a storage location for pictures and videos, see page 30. You can only be inserted one way; forcing it may damage the pictures, the card, or the camera. Setting up your camera Storing pictures on an optional SD or SDHC card Your camera has internal memory.
Inserting or removing a card when the Ready light is blinking may cause damage. www.kodak.com/go /z1085accessories). CAUTION: A card can purchase an SD or SDHC card to store more pictures and videos (www.kodak.com/go /support 3 NOTE: To choose a storage location for pictures and videos, see page 30. You can only be inserted one way; forcing it may damage the pictures, the card, or the camera. Setting up your camera Storing pictures on an optional SD or SDHC card Your camera has internal memory.
Extended user guide
Page 10
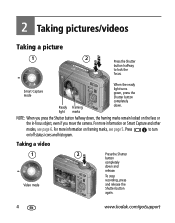
NOTE: When you move the camera. Press to lock the focus. For more information on framing marks, see page 6. 2 Taking pictures/videos Taking a picture 1 2 Press the Shutter button halfway to turn on the face or the in-focus object, even if you press.... For more information on Smart Capture and other modes, see page 5. Taking a video 1 Video mode 2 Press the Shutter button completely down . To stop recording, press and release the Shutter button again. 4 www.kodak.com/go/support Smart Capture mode Ready Framing light marks When the ready light turns ...
NOTE: When you move the camera. Press to lock the focus. For more information on framing marks, see page 6. 2 Taking pictures/videos Taking a picture 1 2 Press the Shutter button halfway to turn on the face or the in-focus object, even if you press.... For more information on Smart Capture and other modes, see page 5. Taking a video 1 Video mode 2 Press the Shutter button completely down . To stop recording, press and release the Shutter button again. 4 www.kodak.com/go/support Smart Capture mode Ready Framing light marks When the ready light turns ...
Extended user guide
Page 11
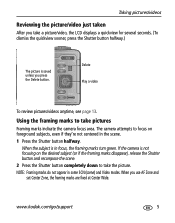
...camera is not focusing on foreground subjects, even if they're not centered in the scene. 1 Press the Shutter button halfway. NOTE: Framing marks do not appear in focus, the framing marks turn green. When the subject is in some SCN (scene) and Video modes. Delete Play a video To review pictures/videos... anytime, see page 13. When you press the Delete button. Taking pictures/videos Reviewing the picture/video just taken After you take a picture/video...Framing marks indicate the camera focus area. The camera attempts to focus on...
...camera is not focusing on foreground subjects, even if they're not centered in the scene. 1 Press the Shutter button halfway. NOTE: Framing marks do not appear in focus, the framing marks turn green. When the subject is in some SCN (scene) and Video modes. Delete Play a video To review pictures/videos... anytime, see page 13. When you press the Delete button. Taking pictures/videos Reviewing the picture/video just taken After you take a picture/video...Framing marks indicate the camera focus area. The camera attempts to focus on...
Extended user guide
Page 12
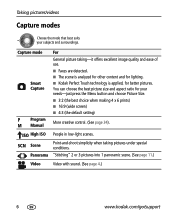
Panorama "Stitching" 2 or 3 pictures into 1 panoramic scene. (See page 11.) Video Video with sound. (See page 4.) 6 www.kodak.com/go/support ISO High ISO People in low-light scenes. You can choose the best picture size and aspect ratio for better pictures. ... of use. ■ Faces are detected. ■ The scene is analyzed for other content and for lighting. ■ Kodak Perfect Touch technology is applied, for your subjects and surroundings. Taking pictures/videos Capture modes Choose the mode that best suits your needs-just press the Menu button and choose Picture Size...
Panorama "Stitching" 2 or 3 pictures into 1 panoramic scene. (See page 11.) Video Video with sound. (See page 4.) 6 www.kodak.com/go/support ISO High ISO People in low-light scenes. You can choose the best picture size and aspect ratio for better pictures. ... of use. ■ Faces are detected. ■ The scene is analyzed for other content and for lighting. ■ Kodak Perfect Touch technology is applied, for your subjects and surroundings. Taking pictures/videos Capture modes Choose the mode that best suits your needs-just press the Menu button and choose Picture Size...
Extended user guide
Page 13
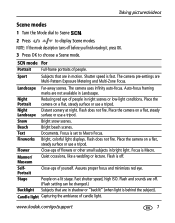
... use a tripod. Fast shutter speed, high ISO. www.kodak.com/go/support 7 Night Portrait Reducing red eye of candle light. Night Distant scenery at night. Place the camera on a flat, steady surface or use a tripod. Place the camera on a lit stage. Candle light Capturing the ambiance of people...). Sport Subjects that are in motion. Taking pictures/videos Scene modes 1 Turn the Mode dial to Scene . 2 Press to Macro Focus. SCN mode For Portrait Full-frame portraits of flowers or other small subjects in Landscape. The camera uses infinity auto-focus. Flash does not fire. ...
... use a tripod. Fast shutter speed, high ISO. www.kodak.com/go/support 7 Night Portrait Reducing red eye of candle light. Night Distant scenery at night. Place the camera on a flat, steady surface or use a tripod. Place the camera on a lit stage. Candle light Capturing the ambiance of people...). Sport Subjects that are in motion. Taking pictures/videos Scene modes 1 Turn the Mode dial to Scene . 2 Press to Macro Focus. SCN mode For Portrait Full-frame portraits of flowers or other small subjects in Landscape. The camera uses infinity auto-focus. Flash does not fire. ...
Extended user guide
Page 14
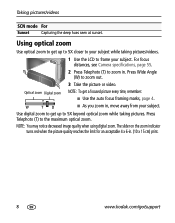
...focus distances, see Camera specifications, page 55. 2 Press Telephoto (T) to get a focused picture every time, remember: ■ Use the auto focus framing marks, page 4. Press Wide Angle (W) to the maximum optical zoom. Use digital zoom to zoom in . (10 x 15 cm) print. 8 www.kodak.com/go/support ...W TD ■ As you zoom in, move away from your subject while taking pictures. Taking pictures/videos SCN mode For Sunset Capturing the deep...
...focus distances, see Camera specifications, page 55. 2 Press Telephoto (T) to get a focused picture every time, remember: ■ Use the auto focus framing marks, page 4. Press Wide Angle (W) to the maximum optical zoom. Use digital zoom to zoom in . (10 x 15 cm) print. 8 www.kodak.com/go/support ...W TD ■ As you zoom in, move away from your subject while taking pictures. Taking pictures/videos SCN mode For Sunset Capturing the deep...
Extended user guide
Page 15
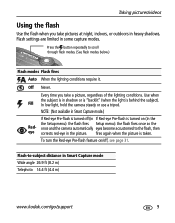
... a tripod. once and the camera automatically eyes become accustomed to -subject distance in Smart Capture mode Wide angle 26.9 ft (8.2 m) Telephoto 14.4 ft (4.4 m) www.kodak.com/go/support 9 Flash-to the flash, then eye corrects red-eye in If Red-eye Pre-flash is taken. Taking pictures/videos Using the flash Use the...
... a tripod. once and the camera automatically eyes become accustomed to -subject distance in Smart Capture mode Wide angle 26.9 ft (8.2 m) Telephoto 14.4 ft (4.4 m) www.kodak.com/go/support 9 Flash-to the flash, then eye corrects red-eye in If Red-eye Pre-flash is taken. Taking pictures/videos Using the flash Use the...
Extended user guide
Page 16
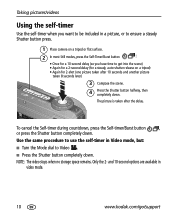
...-second options are available in a picture, or to ensure a steady Shutter button press. 1 Place camera on a tripod) • Again for 2-shot (one picture taken after the delay. Only the 2- Taking pictures/videos Using the self-timer Use the self-timer when you have time to get into the scene...most Still modes, press the Self-Timer/Burst button : • Once for a 10-second delay (so you want to be included in video mode. 10 www.kodak.com/go/support To cancel the Self-timer during countdown, press the Self-timer/Burst button , or press the Shutter button completely down . Use...
...-second options are available in a picture, or to ensure a steady Shutter button press. 1 Place camera on a tripod) • Again for 2-shot (one picture taken after the delay. Only the 2- Taking pictures/videos Using the self-timer Use the self-timer when you have time to get into the scene...most Still modes, press the Self-Timer/Burst button : • Once for a 10-second delay (so you want to be included in video mode. 10 www.kodak.com/go/support To cancel the Self-timer during countdown, press the Self-timer/Burst button , or press the Shutter button completely down . Use...
Extended user guide
Page 17
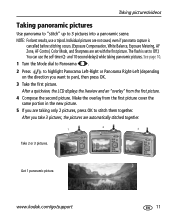
... to Panorama . 2 Press to highlight Panorama Left-Right or Panorama Right-Left (depending on the direction you want to 3 pictures into a panoramic scene. Taking pictures/videos Taking panoramic pictures Use panorama to "stitch" up to pan), then press OK. 3 Take the first picture. Get 1 panoramic picture. Make the overlay from the...
... to Panorama . 2 Press to highlight Panorama Left-Right or Panorama Right-Left (depending on the direction you want to 3 pictures into a panoramic scene. Taking pictures/videos Taking panoramic pictures Use panorama to "stitch" up to pan), then press OK. 3 Take the first picture. Get 1 panoramic picture. Make the overlay from the...
Extended user guide
Page 18
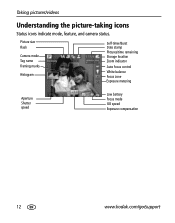
Taking pictures/videos Understanding the picture-taking icons Status icons indicate mode, feature, and camera status. Picture size Flash Camera mode Tag name Framing marks Histogram Self-timer/Burst Date stamp Pictures/time remaining Storage location Zoom indicator Auto focus control White balance Focus zone Exposure metering Aperture Shutter speed Low battery Focus mode ISO speed Exposure compensation 12 www.kodak.com/go/support
Taking pictures/videos Understanding the picture-taking icons Status icons indicate mode, feature, and camera status. Picture size Flash Camera mode Tag name Framing marks Histogram Self-timer/Burst Date stamp Pictures/time remaining Storage location Zoom indicator Auto focus control White balance Focus zone Exposure metering Aperture Shutter speed Low battery Focus mode ISO speed Exposure compensation 12 www.kodak.com/go/support

Extended user guide
Page 20
...; Press during playback to adjust the volume. (Press during 4X to jump to previous/next frame. Viewing picture/video information 1 Press the Review button. 2 Repeatedly press the Info picture/video info. press again for 4X. ■ Press during playback to reverse at 2X speed; Press during pause to go /support ...Playback speed 4X 2X 1X 2X 4X Reverse Forward 3 Press to play at 2X speed; button to locate previous/next video. Working with pictures/videos Playing a video 1 Press the Review button. 2 Press to turn on/off status icons and 14 www...
...; Press during playback to adjust the volume. (Press during 4X to jump to previous/next frame. Viewing picture/video information 1 Press the Review button. 2 Repeatedly press the Info picture/video info. press again for 4X. ■ Press during playback to reverse at 2X speed; Press during pause to go /support ...Playback speed 4X 2X 1X 2X 4X Reverse Forward 3 Press to play at 2X speed; button to locate previous/next video. Working with pictures/videos Playing a video 1 Press the Review button. 2 Press to turn on/off status icons and 14 www...

Extended user guide
Page 21
.... CAUTION: Formatting internal memory or an SD or SDHC card deletes all (including protected) pictures/videos. (Formatting internal memory also deletes email addresses, tag names, and favorites.) www.kodak.com/go/support 15 Working with the protected picture/video. ■ Press the Menu button to exit the menu. The Protect icon appears with...
.... CAUTION: Formatting internal memory or an SD or SDHC card deletes all (including protected) pictures/videos. (Formatting internal memory also deletes email addresses, tag names, and favorites.) www.kodak.com/go/support 15 Working with the protected picture/video. ■ Press the Menu button to exit the menu. The Protect icon appears with...
Extended user guide
Page 22
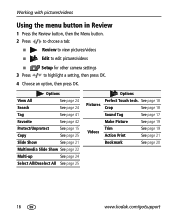
... See page 18 Sound Tag See page 17 Make Picture See page 19 Trim Videos Action Print See page 19 See page 21 Bookmark See page 20 16 www.kodak.com/go/support Working with pictures/videos Using the menu button in Review 1 Press the Review button, then the Menu... button. 2 Press to choose a tab: ■ Review to view pictures/videos ■ Edit to edit pictures/videos ■ 3 Press Setup for other camera settings to highlight a ...
... See page 18 Sound Tag See page 17 Make Picture See page 19 Trim Videos Action Print See page 19 See page 21 Bookmark See page 20 16 www.kodak.com/go/support Working with pictures/videos Using the menu button in Review 1 Press the Review button, then the Menu... button. 2 Press to choose a tab: ■ Review to view pictures/videos ■ Edit to edit pictures/videos ■ 3 Press Setup for other camera settings to highlight a ...

Extended user guide
Page 23
... press OK. 4 Follow the screen prompts. to highlight the Edit tab. 3 Press to stop playback. Working with pictures/videos Adding sound tags You can be added to each picture (not to videos). to find a picture. The sound tag is applied to your picture. ■ Press the Menu button to play the... sound tag. www.kodak.com/go/support 17 Recording a sound tag 1 Press the Review button, then 2 Press the Menu button,...
... press OK. 4 Follow the screen prompts. to highlight the Edit tab. 3 Press to stop playback. Working with pictures/videos Adding sound tags You can be added to each picture (not to videos). to find a picture. The sound tag is applied to your picture. ■ Press the Menu button to play the... sound tag. www.kodak.com/go/support 17 Recording a sound tag 1 Press the Review button, then 2 Press the Menu button,...
Extended user guide
Page 24
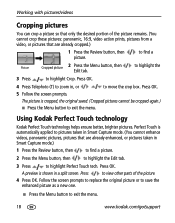
...Press OK. 4 Press Telephoto (T) to highlight Crop. Perfect Touch is automatically applied to pictures taken in Smart Capture mode. (You cannot enhance videos, panoramic pictures, pictures that are already enhanced, or pictures taken in Smart Capture mode.) 1 Press the Review button, then to find a... saved. (Cropped pictures cannot be cropped again.) ■ Press the Menu button to exit the menu. 18 www.kodak.com/go/support Using Kodak Perfect Touch technology Kodak Perfect Touch technology helps ensure better, brighter pictures. Press OK. 5 Follow the screen prompts.
...Press OK. 4 Press Telephoto (T) to highlight Crop. Perfect Touch is automatically applied to pictures taken in Smart Capture mode. (You cannot enhance videos, panoramic pictures, pictures that are already enhanced, or pictures taken in Smart Capture mode.) 1 Press the Review button, then to find a... saved. (Cropped pictures cannot be cropped again.) ■ Press the Menu button to exit the menu. 18 www.kodak.com/go/support Using Kodak Perfect Touch technology Kodak Perfect Touch technology helps ensure better, brighter pictures. Press OK. 5 Follow the screen prompts.

Extended user guide
Page 25
... suitable for printing. 1 Press the Review button, then to find a video. 2 Press the Menu button, then Edit tab. www.kodak.com/go/support 19 Working with pictures/videos Editing videos Making a picture from a video You can choose a single frame from the beginning or end of... a video. 1 Press the Review button, then to find a video. 2 Press the Menu button, then Edit tab. Video Trimmed video 4 Follow...
... suitable for printing. 1 Press the Review button, then to find a video. 2 Press the Menu button, then Edit tab. www.kodak.com/go/support 19 Working with pictures/videos Editing videos Making a picture from a video You can choose a single frame from the beginning or end of... a video. 1 Press the Review button, then to find a video. 2 Press the Menu button, then Edit tab. Video Trimmed video 4 Follow...

Extended user guide
Page 26
.... To jump to the first bookmark, press and hold for 4 seconds while the video is playing. ■ After you jump to a bookmark, press to jump to normal view, press the telephoto (T) button. 20 www.kodak.com/go/support When finished adding up to 9 bookmarks, press . ■ Press... the Menu button to exit the menu. 1 Press the Review button, then to highlight Bookmark, then press OK. to highlight the 3 Press to find a video. 2 Press the Menu button, then...
.... To jump to the first bookmark, press and hold for 4 seconds while the video is playing. ■ After you jump to a bookmark, press to jump to normal view, press the telephoto (T) button. 20 www.kodak.com/go/support When finished adding up to 9 bookmarks, press . ■ Press... the Menu button to exit the menu. 1 Press the Review button, then to highlight Bookmark, then press OK. to highlight the 3 Press to find a video. 2 Press the Menu button, then...
Extended user guide
Page 27
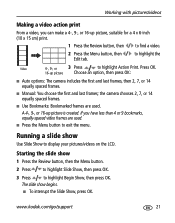
... Slide Show to highlight Begin Show, then press OK. www.kodak.com/go/support 21 Running a slide show begins. ■ To interrupt the Slide Show, press OK. to highlight the Video 4-, 9-, or 3 Press to find a video. 2 Press the Menu button, then Edit tab. the camera chooses 2, 7, or 14 equally spaced frames. ■ Use Bookmarks...
... Slide Show to highlight Begin Show, then press OK. www.kodak.com/go/support 21 Running a slide show begins. ■ To interrupt the Slide Show, press OK. to highlight the Video 4-, 9-, or 3 Press to find a video. 2 Press the Menu button, then Edit tab. the camera chooses 2, 7, or 14 equally spaced frames. ■ Use Bookmarks...
Extended user guide
Page 28
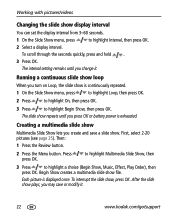
Then: 1 Press the Review button. 2 Press the Menu button. After the slide show plays, you change it . 22 www.kodak.com/go/support Working with pictures/videos Changing the slide show , press OK. The interval setting remains until you press OK or battery power is displayed once. Creating a multimedia slide show Multimedia ...
Then: 1 Press the Review button. 2 Press the Menu button. After the slide show plays, you change it . 22 www.kodak.com/go/support Working with pictures/videos Changing the slide show , press OK. The interval setting remains until you press OK or battery power is displayed once. Creating a multimedia slide show Multimedia ...


