
User Manual
Page 4
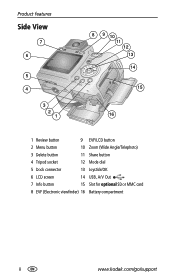
Product features Side View 7 6 5 4 3 2 1 8 9 10 11 12 13 14 15 16 1 Review button 9 EVF/LCD button 2 Menu button 10 Zoom (Wide Angle/Telephoto) 3 Delete button 11 Share button 4 Tripod socket 12 Mode dial 5 Dock connector 13 Joystick/OK 6 LCD screen 14 USB, A/V Out 7 Info button 15 Slot for optional SD or MMC card 8 EVF (Electronic viewfinder) 16 Battery compartment ii www.kodak.com/go/support
Product features Side View 7 6 5 4 3 2 1 8 9 10 11 12 13 14 15 16 1 Review button 9 EVF/LCD button 2 Menu button 10 Zoom (Wide Angle/Telephoto) 3 Delete button 11 Share button 4 Tripod socket 12 Mode dial 5 Dock connector 13 Joystick/OK 6 LCD screen 14 USB, A/V Out 7 Info button 15 Slot for optional SD or MMC card 8 EVF (Electronic viewfinder) 16 Battery compartment ii www.kodak.com/go/support
User Manual
Page 5
... lens cap 1 Attaching the neck strap 1 Loading the batteries 2 Turning on the camera 2 Setting the date/time, first time 3 Storing pictures on an SD or MMC... pictures with the USB cable 14 Printing pictures 14 Dock compatibility for your camera 17 4 Doing more with your camera 18 Using the self-timer 18 Using burst 19 Taking close-up and ... show 20 Changing the flash settings 22 Picture-taking modes 23 Changing picture-taking settings 27 Customizing your camera 30 Viewing picture/video information 32 Copying pictures and videos 32 Adjusting exposure compensation 33 P, A, S,...
... lens cap 1 Attaching the neck strap 1 Loading the batteries 2 Turning on the camera 2 Setting the date/time, first time 3 Storing pictures on an SD or MMC... pictures with the USB cable 14 Printing pictures 14 Dock compatibility for your camera 17 4 Doing more with your camera 18 Using the self-timer 18 Using burst 19 Taking close-up and ... show 20 Changing the flash settings 22 Picture-taking modes 23 Changing picture-taking settings 27 Customizing your camera 30 Viewing picture/video information 32 Copying pictures and videos 32 Adjusting exposure compensation 33 P, A, S,...

User Manual
Page 6
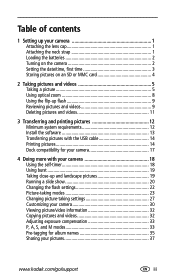
Table of contents 5 Troubleshooting 41 Camera problems 41 Computer/connectivity problems 42 Picture quality problems 43 Direct printing (PictBridge) problems 44 6 Getting help 45 Helpful links 45 Telephone customer support 46 7 Appendix 47 Camera specifications 47 Power-saving features 51 Storage capacities 51 Accessories 52 Important safety instructions 53 Battery life 54 Upgrading your software and firmware 55 Additional care and maintenance 55 Warranty 56 Regulatory compliance 58 iv www.kodak.com/go/support
Table of contents 5 Troubleshooting 41 Camera problems 41 Computer/connectivity problems 42 Picture quality problems 43 Direct printing (PictBridge) problems 44 6 Getting help 45 Helpful links 45 Telephone customer support 46 7 Appendix 47 Camera specifications 47 Power-saving features 51 Storage capacities 51 Accessories 52 Important safety instructions 53 Battery life 54 Upgrading your software and firmware 55 Additional care and maintenance 55 Warranty 56 Regulatory compliance 58 iv www.kodak.com/go/support
User Manual
Page 8
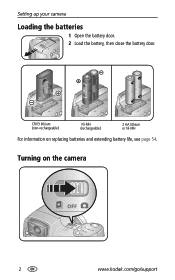
CRV3 lithium (non-rechargeable) Ni-MH (rechargeable) 2 AA lithium or Ni-MH For information on the camera 2 www.kodak.com/go/support Setting up your camera Loading the batteries 1 Open the battery door. 2 Load the battery, then close the battery door. Turning on replacing batteries and extending battery life, see page 54.
CRV3 lithium (non-rechargeable) Ni-MH (rechargeable) 2 AA lithium or Ni-MH For information on the camera 2 www.kodak.com/go/support Setting up your camera Loading the batteries 1 Open the battery door. 2 Load the battery, then close the battery door. Turning on replacing batteries and extending battery life, see page 54.

User Manual
Page 9
for previous/next field. Setting up your camera Setting the date/time, first time 1 At the prompt, press OK. 2 to change . If setting the date/time: to change . OK to accept. for previous/next field. www.kodak.com/go/support 3 OK to accept. Setting the date/time and language, other times 1 Press Menu. 2 to highlight Setup Menu then press OK. 3 to highlight Language or Date/Time , then press OK.
for previous/next field. Setting up your camera Setting the date/time, first time 1 At the prompt, press OK. 2 to change . If setting the date/time: to change . OK to accept. for previous/next field. www.kodak.com/go/support 3 OK to accept. Setting the date/time and language, other times 1 Press Menu. 2 to highlight Setup Menu then press OK. 3 to highlight Language or Date/Time , then press OK.
User Manual
Page 10
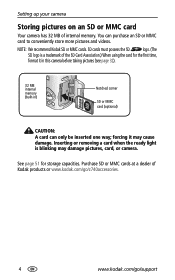
... cards must possess the SD logo. (The SD logo is blinking may cause damage. NOTE: We recommend Kodak SD or MMC cards. forcing it in this camera before taking pictures (see page 32). 32 MB internal memory (built-in) Notched corner SD or MMC card (optional) CAUTION: A card can...ready light is a trademark of the SD Card Association.) When using the card for storage capacities. Setting up your camera Storing pictures on an SD or MMC card Your camera has 32 MB of Kodak products or www.kodak.com/go/z740accessories. 4 www.kodak.com/go/support You can only be inserted one way;
... cards must possess the SD logo. (The SD logo is blinking may cause damage. NOTE: We recommend Kodak SD or MMC cards. forcing it in this camera before taking pictures (see page 32). 32 MB internal memory (built-in) Notched corner SD or MMC card (optional) CAUTION: A card can...ready light is a trademark of the SD Card Association.) When using the card for storage capacities. Setting up your camera Storing pictures on an SD or MMC card Your camera has 32 MB of Kodak products or www.kodak.com/go/z740accessories. 4 www.kodak.com/go/support You can only be inserted one way;

User Manual
Page 11
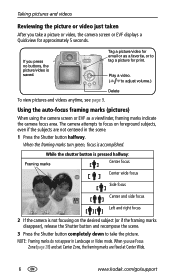
www.kodak.com/go/support 5 When AF/AE Indicator turns green, press Shutter button completely down. 2 Taking a video 1 2 3 Choose LCD or EFV (electronic viewfinder) AF/AE Indicator: Green-successful Red-failed Failed focus Failed exposure 3 Press the Shutter button completely down and release. To stop recording, press and release the Shutter button again. 2 Taking pictures and videos Taking a picture 1 Press Shutter button 4 halfway to focus and set exposure.
www.kodak.com/go/support 5 When AF/AE Indicator turns green, press Shutter button completely down. 2 Taking a video 1 2 3 Choose LCD or EFV (electronic viewfinder) AF/AE Indicator: Green-successful Red-failed Failed focus Failed exposure 3 Press the Shutter button completely down and release. To stop recording, press and release the Shutter button again. 2 Taking pictures and videos Taking a picture 1 Press Shutter button 4 halfway to focus and set exposure.
User Manual
Page 12
... the framing marks disappear), release the Shutter button and recompose the scene. 3 Press the Shutter button completely down to take a picture or video, the camera screen or EVF displays a Quickview for print. Play a video. ( to tag a picture for approximately 5 seconds. Using the auto-focus framing marks... focus Side focus Center and side focus Left and right focus 2 If the camera is not focusing on foreground subjects, even if the subjects are fixed at Center Wide. 6 www.kodak.com/go/support When you press no buttons, the picture/video is accomplished. If you use ...
... the framing marks disappear), release the Shutter button and recompose the scene. 3 Press the Shutter button completely down to take a picture or video, the camera screen or EVF displays a Quickview for print. Play a video. ( to tag a picture for approximately 5 seconds. Using the auto-focus framing marks... focus Side focus Center and side focus Left and right focus 2 If the camera is not focusing on foreground subjects, even if the subjects are fixed at Center Wide. 6 www.kodak.com/go/support When you press no buttons, the picture/video is accomplished. If you use ...

User Manual
Page 13
...-up Date stamp Album name Flash Zoom: digital telephoto wide PASM Setting Aperture Shutter speed Picture size Pictures/time remaining Storage location AF mode Focus zone Exposure metering White balance ISO Low battery Camera mode Exposure compensation Capture modes-shutter pressed halfway... Open flash warning Slow shutter speed warning Auto Focus/ Auto Exposure (AF/AE indicator) ISO Aperture Shutter speed Exposure compensation www.kodak.com/go/support 7
...-up Date stamp Album name Flash Zoom: digital telephoto wide PASM Setting Aperture Shutter speed Picture size Pictures/time remaining Storage location AF mode Focus zone Exposure metering White balance ISO Low battery Camera mode Exposure compensation Capture modes-shutter pressed halfway... Open flash warning Slow shutter speed warning Auto Focus/ Auto Exposure (AF/AE indicator) ISO Aperture Shutter speed Exposure compensation www.kodak.com/go/support 7
User Manual
Page 14
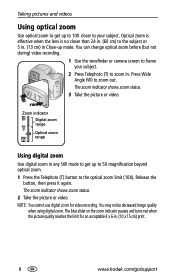
...(but not during) video recording. 1 Use the viewfinder or camera screen to frame your subject. The zoom indicator shows zoom status. 2 Take the picture or video. Zoom indicator Digital zoom range Optical zoom range Using digital zoom Use digital zoom in . Optical zoom is effective when the lens is ...no closer than 24 in. (60 cm) to the subject or 5 in. (13 cm) in . (10 x 15 cm) print. 8 www.kodak.com/go/support The blue slider...
...(but not during) video recording. 1 Use the viewfinder or camera screen to frame your subject. The zoom indicator shows zoom status. 2 Take the picture or video. Zoom indicator Digital zoom range Optical zoom range Using digital zoom Use digital zoom in . Optical zoom is effective when the lens is ...no closer than 24 in. (60 cm) to the subject or 5 in. (13 cm) in . (10 x 15 cm) print. 8 www.kodak.com/go/support The blue slider...
User Manual
Page 15
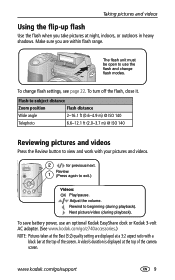
Review. 1 (Press again to use an optional Kodak EasyShare dock or Kodak 3-volt AC adapter. (See www.kodak.com/go /support 9 To turn off the flash, close it. Next picture/video (during playback). www.kodak.com/go /z740accessories.) NOTE: Pictures taken at the top of the camera screen. To change flash modes. To save battery power, use the...
Review. 1 (Press again to use an optional Kodak EasyShare dock or Kodak 3-volt AC adapter. (See www.kodak.com/go /support 9 To turn off the flash, close it. Next picture/video (during playback). www.kodak.com/go /z740accessories.) NOTE: Pictures taken at the top of the camera screen. To change flash modes. To save battery power, use the...
User Manual
Page 16
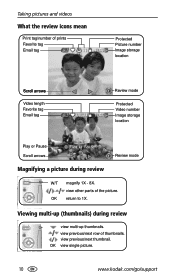
view previous/next row of the picture. OK return to 1X. OK view single picture. 10 www.kodak.com/go/support Viewing multi-up (thumbnails) during review W/T magnify 1X - 8X. view previous/next thumbnail. view other parts of thumbnails. Taking pictures and videos What the review ...
view previous/next row of the picture. OK return to 1X. OK view single picture. 10 www.kodak.com/go/support Viewing multi-up (thumbnails) during review W/T magnify 1X - 8X. view previous/next thumbnail. view other parts of thumbnails. Taking pictures and videos What the review ...
User Manual
Page 17
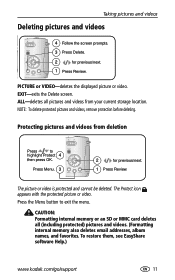
Press Menu. 3 2 for previous/next. 1 Press Review. Protecting pictures and videos from your current storage location. To restore them, see EasyShare software Help.) www.kodak.com/go/support 11 PICTURE or VIDEO-deletes the displayed picture or video. ALL-deletes all (including protected) pictures and videos. (Formatting internal memory also deletes email addresses, ...
Press Menu. 3 2 for previous/next. 1 Press Review. Protecting pictures and videos from your current storage location. To restore them, see EasyShare software Help.) www.kodak.com/go/support 11 PICTURE or VIDEO-deletes the displayed picture or video. ALL-deletes all (including protected) pictures and videos. (Formatting internal memory also deletes email addresses, ...
User Manual
Page 18
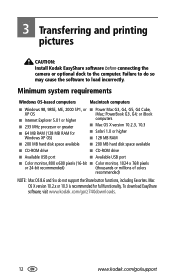
... SP1, or ■ Power Mac G3, G4, G5, G4 Cube, XP OS iMac; 3 Transferring and printing pictures CAUTION: Install Kodak EasyShare software before connecting the camera or optional dock to load incorrectly. or iBook ■ Internet Explorer 5.01 or higher computers ■ 233 MHz processor or greater &#...millions of colors recommended) NOTE: Mac OS 8.6 and 9.x do so may cause the software to the computer. To download EasyShare software, visit www.kodak.com/go/z740downloads. 12 www.kodak.com/go/support Failure to do not support the Share button functions, including Favorites.
... SP1, or ■ Power Mac G3, G4, G5, G4 Cube, XP OS iMac; 3 Transferring and printing pictures CAUTION: Install Kodak EasyShare software before connecting the camera or optional dock to load incorrectly. or iBook ■ Internet Explorer 5.01 or higher computers ■ 233 MHz processor or greater &#...millions of colors recommended) NOTE: Mac OS 8.6 and 9.x do so may cause the software to the computer. To download EasyShare software, visit www.kodak.com/go/z740downloads. 12 www.kodak.com/go/support Failure to do not support the Share button functions, including Favorites.
User Manual
Page 19
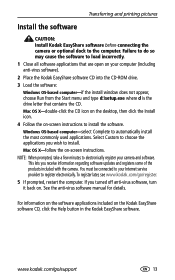
... /support 13 www.kodak.com/go /register. 5 If prompted, restart the computer. NOTE: When prompted, take a few minutes to install. Windows OS-based computer-select Complete to register electronically. You must be connected to your camera and software. See the anti-virus software manual for details. Mac OS X-follow the on the Kodak EasyShare software...
... /support 13 www.kodak.com/go /register. 5 If prompted, restart the computer. NOTE: When prompted, take a few minutes to install. Windows OS-based computer-select Complete to register electronically. You must be connected to your camera and software. See the anti-virus software manual for details. Mac OS X-follow the on the Kodak EasyShare software...
User Manual
Page 20
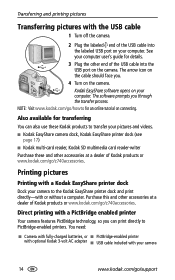
...camera to the Kodak EasyShare printer dock and print directly-with or without a computer. Also available for transferring You can print directly to transfer your computer user's guide for an online tutorial on connecting. Purchase this and other accessories at a dealer of Kodak products or www.kodak.com/go /support...computer. See your pictures and videos. ■ Kodak EasyShare camera dock, Kodak EasyShare printer dock (see page 17) ■ Kodak multi-card reader, Kodak SD multimedia card reader-writer Purchase these Kodak products to PictBridge-enabled printers. The arrow icon on...
...camera to the Kodak EasyShare printer dock and print directly-with or without a computer. Also available for transferring You can print directly to transfer your computer user's guide for an online tutorial on connecting. Purchase this and other accessories at a dealer of Kodak products or www.kodak.com/go /support...computer. See your pictures and videos. ■ Kodak EasyShare camera dock, Kodak EasyShare printer dock (see page 17) ■ Kodak multi-card reader, Kodak SD multimedia card reader-writer Purchase these Kodak products to PictBridge-enabled printers. The arrow icon on...

User Manual
Page 21
.... Tagged Pictures-If your printer is capable, choose a print size. All Pictures-Print all pictures. www.kodak.com/go /z740accessories to order cables.) Printing from the camera to the computer or printer. The PictBridge logo is displayed, followed by the current picture and menu. (... memory, a card, or Favorites. Choose the number of paper. To transfer pictures to redisplay it into the camera and into an electrical outlet. See www.kodak.com/go /support 15 IMPORTANT: Do not use the AC adapter included with the Kodak EasyShare camera dock or printer dock to choose a picture.
.... Tagged Pictures-If your printer is capable, choose a print size. All Pictures-Print all pictures. www.kodak.com/go /z740accessories to order cables.) Printing from the camera to the computer or printer. The PictBridge logo is displayed, followed by the current picture and menu. (... memory, a card, or Favorites. Choose the number of paper. To transfer pictures to redisplay it into the camera and into an electrical outlet. See www.kodak.com/go /support 15 IMPORTANT: Do not use the AC adapter included with the Kodak EasyShare camera dock or printer dock to choose a picture.

User Manual
Page 22
... cards, frames, and albums-and have them delivered to your card into a printer with an SD/MMC slot. See www.kodak.com/go /support Printing pictures from your computer For details on printing pictures from an optional SD or MMC card ■ Automatically print tagged pictures... when you insert your door. Transferring and printing pictures Ordering prints online Kodak EasyShare print service (provided by Ofoto www.ofoto.com) is...
... cards, frames, and albums-and have them delivered to your card into a printer with an SD/MMC slot. See www.kodak.com/go /support Printing pictures from your computer For details on printing pictures from an optional SD or MMC card ■ Automatically print tagged pictures... when you insert your door. Transferring and printing pictures Ordering prints online Kodak EasyShare print service (provided by Ofoto www.ofoto.com) is...

User Manual
Page 23
.../go /z740accessories. Transferring and printing pictures Dock compatibility for your camera Kodak EasyShare dock ■ printer dock 4000 ■ camera dock II ■ LS420, LS433 camera dock ■ printer dock ■ printer dock plus ■ printer dock 6000 ■ camera dock 6000 Docking configuration Not compatible Custom camera insert Adapter Dock ■ others, including series 3 printer docks...
.../go /z740accessories. Transferring and printing pictures Dock compatibility for your camera Kodak EasyShare dock ■ printer dock 4000 ■ camera dock II ■ LS420, LS433 camera dock ■ printer dock ■ printer dock plus ■ printer dock 6000 ■ camera dock 6000 Docking configuration Not compatible Custom camera insert Adapter Dock ■ others, including series 3 printer docks...

User Manual
Page 24
... completely down . Once for a steady, auto-shutter release on a tripod or flat surface. 2 In any still mode, press : . Once more with your camera Using the self-timer 1 Place camera on a tripod) 3 Compose the scene. 4 Press the Shutter button halfway, then completely down . The picture is taken, press the Self-timer button. (The... to take a video, but: ■ Turn the Mode dial to get into the scene) . NOTE: The video stops when no storage space remains. 18 www.kodak.com/go/support
... completely down . Once for a steady, auto-shutter release on a tripod or flat surface. 2 In any still mode, press : . Once more with your camera Using the self-timer 1 Place camera on a tripod) 3 Compose the scene. 4 Press the Shutter button halfway, then completely down . The picture is taken, press the Self-timer button. (The... to take a video, but: ■ Turn the Mode dial to get into the scene) . NOTE: The video stops when no storage space remains. 18 www.kodak.com/go/support


