
User Manual
Page 7
... started 1 Installing the software first 1 Charging the battery 1 Inserting the battery 2 Important battery information 2 Battery safety and handling 4 Turning the camera on and off 5 Setting the language 5 Setting the date and time 6 Changing the display, EVF or LCD 7 Checking camera and picture status 7 Storing... pictures on a SD or MMC card 8 2 Taking pictures and videos 9 Taking a picture 9 Taking a video 14 Quickview-Reviewing the picture or video just taken 15 Using optical zoom 16 Using advanced digital zoom 16 Picture-...
... started 1 Installing the software first 1 Charging the battery 1 Inserting the battery 2 Important battery information 2 Battery safety and handling 4 Turning the camera on and off 5 Setting the language 5 Setting the date and time 6 Changing the display, EVF or LCD 7 Checking camera and picture status 7 Storing... pictures on a SD or MMC card 8 2 Taking pictures and videos 9 Taking a picture 9 Taking a video 14 Quickview-Reviewing the picture or video just taken 15 Using optical zoom 16 Using advanced digital zoom 16 Picture-...

User Manual
Page 8
... albums 50 Running a slide show 51 Displaying pictures and videos on a television 52 Copying pictures and videos 53 4 Installing the software 54 Install the software 55 5 Sharing pictures and videos 56 When can I tag my pictures and videos 56 Tagging pictures for printing 57 Tagging pictures...pictures/videos with the USB cable 62 Printing from a Kodak EasyShare printer dock or your computer 63 Printing from an optional SD or MMC card 63 Ordering prints online 63 Direct printing with a PictBridge-enabled printer 64 Dock compatibility for your camera 66 vi www.kodak.com/go/support
... albums 50 Running a slide show 51 Displaying pictures and videos on a television 52 Copying pictures and videos 53 4 Installing the software 54 Install the software 55 5 Sharing pictures and videos 56 When can I tag my pictures and videos 56 Tagging pictures for printing 57 Tagging pictures...pictures/videos with the USB cable 62 Printing from a Kodak EasyShare printer dock or your computer 63 Printing from an optional SD or MMC card 63 Ordering prints online 63 Direct printing with a PictBridge-enabled printer 64 Dock compatibility for your camera 66 vi www.kodak.com/go/support
User Manual
Page 9
Table of contents 7 Troubleshooting 67 Camera problems 67 Computer/connectivity problems 70 Picture quality problems 70 Power-ring-light status 72 Direct printing (PictBridge) problems 73 8 Getting help 74 Helpful links 74 Telephone customer support 75 9 Appendix 76 Camera specifications 76 Storage capacities 79 Power-saving features 81 Accessories 82 Upgrading your software and firmware 83 Additional care and maintenance 83 Warranty...84 Regulatory compliance 86 www.kodak.com/go/support vii
Table of contents 7 Troubleshooting 67 Camera problems 67 Computer/connectivity problems 70 Picture quality problems 70 Power-ring-light status 72 Direct printing (PictBridge) problems 73 8 Getting help 74 Helpful links 74 Telephone customer support 75 9 Appendix 76 Camera specifications 76 Storage capacities 79 Power-saving features 81 Accessories 82 Upgrading your software and firmware 83 Additional care and maintenance 83 Warranty...84 Regulatory compliance 86 www.kodak.com/go/support vii
User Manual
Page 11
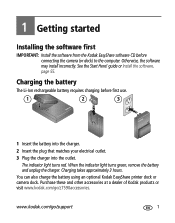
...) to the computer. The indicator light turns red. Otherwise, the software may install incorrectly. You can also charge the battery using an optional Kodak EasyShare printer dock or camera dock. www.kodak.com/go /z7590accessories. 1 Getting started Installing the software first IMPORTANT: Install the software from the Kodak EasyShare software CD before first use. 1 2 3 1 Insert the battery into the charger...
...) to the computer. The indicator light turns red. Otherwise, the software may install incorrectly. You can also charge the battery using an optional Kodak EasyShare printer dock or camera dock. www.kodak.com/go /z7590accessories. 1 Getting started Installing the software first IMPORTANT: Install the software from the Kodak EasyShare software CD before first use. 1 2 3 1 Insert the battery into the charger...

User Manual
Page 16
..., anytime. NOTE: Depending on your computer operating system, Kodak EasyShare software may update the camera clock when you turn on the camera. Setting the date & time, anytime 1 Turn on the camera or if the battery is highlighted. See the EasyShare software Help for an extended time. 1 SET DATE & TIME... is removed for details. 6 www.kodak.com/go/support to adjust the date and time. to highlight Date & ...
..., anytime. NOTE: Depending on your computer operating system, Kodak EasyShare software may update the camera clock when you turn on the camera. Setting the date & time, anytime 1 Turn on the camera or if the battery is highlighted. See the EasyShare software Help for an extended time. 1 SET DATE & TIME... is removed for details. 6 www.kodak.com/go/support to adjust the date and time. to highlight Date & ...
User Manual
Page 44
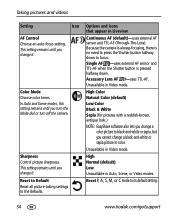
... to black-and-white or sepia, but you turn the Mode dial or turn off the camera. High Color Natural Color (default) Low Color Black & White Sepia (for pictures with a reddish-brown, antique look.) NOTE: EasyShare software also lets you change a black-and-white or sepia picture to press the Shutter button halfway.... This setting remains until you change it . Sharpness Control picture sharpness. Reset to Default Reset all picture-taking settings to its default setting. 34 www.kodak.com/go/support This setting remains until you change it .
... to black-and-white or sepia, but you turn the Mode dial or turn off the camera. High Color Natural Color (default) Low Color Black & White Sepia (for pictures with a reddish-brown, antique look.) NOTE: EasyShare software also lets you change a black-and-white or sepia picture to press the Shutter button halfway.... This setting remains until you change it . Sharpness Control picture sharpness. Reset to Default Reset all picture-taking settings to its default setting. 34 www.kodak.com/go/support This setting remains until you change it .
User Manual
Page 49
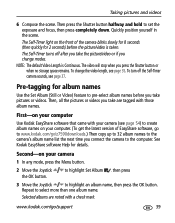
...the Joystick the OK button. The video will stop when you connect the camera to the camera's album name list the next time you press the Shutter button or when no storage space remains. See Kodak EasyShare software Help for 2 seconds) before you take the picture/video or if you...Then press the Shutter button halfway and hold to www.kodak.com/go /support 39 To change modes. First-on your computer Use Kodak EasyShare software that came with your camera (see page 54) to create album names on the front of EasyShare software, go to set the exposure and focus, then press ...
...the Joystick the OK button. The video will stop when you connect the camera to the camera's album name list the next time you press the Shutter button or when no storage space remains. See Kodak EasyShare software Help for 2 seconds) before you take the picture/video or if you...Then press the Shutter button halfway and hold to www.kodak.com/go /support 39 To change modes. First-on your computer Use Kodak EasyShare software that came with your camera (see page 54) to create album names on the front of EasyShare software, go to set the exposure and focus, then press ...

User Manual
Page 50
Your selections are saved. See the Kodak EasyShare software Help for better pictures Zoom When you use a tripod. 1X 10X 30X (digital) Images taken at f/3.7, 1/500 second 40 www.kodak.com/go/support Third-transfer to your computer When you turn on the camera screen, your pictures and videos in the appropriate album. Taking pictures and videos...
Your selections are saved. See the Kodak EasyShare software Help for better pictures Zoom When you use a tripod. 1X 10X 30X (digital) Images taken at f/3.7, 1/500 second 40 www.kodak.com/go/support Third-transfer to your computer When you turn on the camera screen, your pictures and videos in the appropriate album. Taking pictures and videos...

User Manual
Page 59
... and videos Changing optional review settings In Review, press the Menu button to highlight Protect , then press the OK button. To restore them, see EasyShare software Help.) www.kodak.com/go/support 49 Album (page 50) Copy (page 53) Protect (page 49) Multi-Up (page 47) Image Storage (page 35) Picture/Video Information...
... and videos Changing optional review settings In Review, press the Menu button to highlight Protect , then press the OK button. To restore them, see EasyShare software Help.) www.kodak.com/go/support 49 Album (page 50) Copy (page 53) Protect (page 49) Multi-Up (page 47) Image Storage (page 35) Picture/Video Information...
User Manual
Page 60
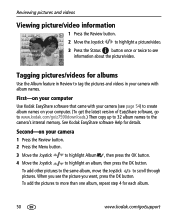
...feature in Review to tag the pictures and videos in your camera with your camera (see page 54) to create album names on your computer. (To get the latest version of EasyShare software, go to www.kodak.com/go /support Second-on your camera 1 Press the Review button. 2 Press the Menu button... to more than one album, repeat step 4 for each album. 50 www.kodak.com/go /z7590downloads.) Then copy up to 32 album names to the camera's internal memory. First-on your computer Use Kodak EasyShare software that came with album names. To add the pictures to scroll through pictures. ...
...feature in Review to tag the pictures and videos in your camera with your camera (see page 54) to create album names on your computer. (To get the latest version of EasyShare software, go to www.kodak.com/go /support Second-on your camera 1 Press the Review button. 2 Press the Menu button... to more than one album, repeat step 4 for each album. 50 www.kodak.com/go /z7590downloads.) Then copy up to 32 album names to the camera's internal memory. First-on your computer Use Kodak EasyShare software that came with album names. To add the pictures to scroll through pictures. ...

User Manual
Page 61
...took them. You can change the display interval from 3 seconds to highlight Begin Show, then press the OK button. See Kodak EasyShare software Help for 5 seconds. Each picture and video is displayed once, in the order in the appropriate album. To interrupt the ...camera screen. Reviewing pictures and videos The album name appears with the picture. To run a slide show Use the Slide Show to your pictures and videos in which you transfer the tagged pictures and videos to display your pictures and videos on any external device, see page 62), the Kodak EasyShare software...
...took them. You can change the display interval from 3 seconds to highlight Begin Show, then press the OK button. See Kodak EasyShare software Help for 5 seconds. Each picture and video is displayed once, in the order in the appropriate album. To interrupt the ...camera screen. Reviewing pictures and videos The album name appears with the picture. To run a slide show Use the Slide Show to your pictures and videos in which you transfer the tagged pictures and videos to display your pictures and videos on any external device, see page 62), the Kodak EasyShare software...
User Manual
Page 64
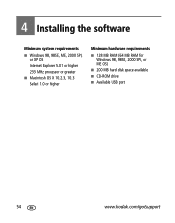
4 Installing the software Minimum system requirements ■ Windows 98, 98SE, ME, 2000 SPI, or XP OS Internet Explorer 5.01 or higher 233 MHz processor or greater ■ Macintosh OS X 10.2.3, 10.3 Safari 1.0 or higher Minimum hardware requirements ■ 128 MB RAM (64 MB RAM for Windows 98, 98SE, 2000 SPI, or ME OS) ■ 200 MB hard disk space available ■ CD-ROM drive ■ Available USB port 54 www.kodak.com/go/support
4 Installing the software Minimum system requirements ■ Windows 98, 98SE, ME, 2000 SPI, or XP OS Internet Explorer 5.01 or higher 233 MHz processor or greater ■ Macintosh OS X 10.2.3, 10.3 Safari 1.0 or higher Minimum hardware requirements ■ 128 MB RAM (64 MB RAM for Windows 98, 98SE, 2000 SPI, or ME OS) ■ 200 MB hard disk space available ■ CD-ROM drive ■ Available USB port 54 www.kodak.com/go/support
User Manual
Page 65
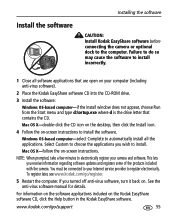
... X-follow the on . If you receive information regarding software updates and registers some of the products included with the camera. For information on the software applications included on the Kodak EasyShare software CD, click the Help button in the Kodak EasyShare software. Install the software Installing the software CAUTION: Install Kodak EasyShare software before connecting the camera or optional dock to install. See the anti...
... X-follow the on . If you receive information regarding software updates and registers some of the products included with the camera. For information on the software applications included on the Kodak EasyShare software CD, click the Help button in the Kodak EasyShare software. Install the software Installing the software CAUTION: Install Kodak EasyShare software before connecting the camera or optional dock to install. See the anti...
User Manual
Page 66
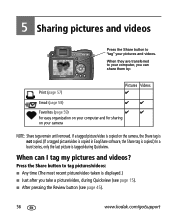
...10004; Email (page 58) ✔ ✔ Favorites (page 59) ✔ ✔ for sharing on the camera, the Share tag is not copied. (If a tagged picture/video is copied in EasyShare software, the Share tag is copied.) In a burst series, only the last picture is copied on your computer, you...? Press the Share button to "tag" your computer and for easy organization on your pictures and videos. When they are transferred to your camera NOTE: Share tags remain until removed. If a tagged picture/video is tagged during Quickview (see page 15). ■ After pressing the ...
...10004; Email (page 58) ✔ ✔ Favorites (page 59) ✔ ✔ for sharing on the camera, the Share tag is not copied. (If a tagged picture/video is copied in EasyShare software, the Share tag is copied.) In a burst series, only the last picture is copied on your computer, you...? Press the Share button to "tag" your computer and for easy organization on your pictures and videos. When they are transferred to your camera NOTE: Share tags remain until removed. If a tagged picture/video is tagged during Quickview (see page 15). ■ After pressing the ...
User Manual
Page 67
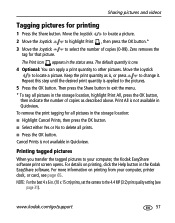
... Select either Yes or No to other pictures. Keep the print quantity as described above. For details on printing from your computer, the Kodak EasyShare software print screen opens. to change it. Sharing pictures and videos Tagging pictures for that picture. The default quantity is , or press to ... All is not available in . (10 x 15 cm) prints, set the camera to highlight Print , then press the OK button.* 3 Move the Joystick tag for printing 1 Press the Share button. www.kodak.com/go/support 57 Repeat this step until the desired print quantity is applied to...
... Select either Yes or No to other pictures. Keep the print quantity as described above. For details on printing from your computer, the Kodak EasyShare software print screen opens. to change it. Sharing pictures and videos Tagging pictures for that picture. The default quantity is , or press to ... All is not available in . (10 x 15 cm) prints, set the camera to highlight Print , then press the OK button.* 3 Move the Joystick tag for printing 1 Press the Share button. www.kodak.com/go/support 57 Repeat this step until the desired print quantity is applied to...
User Manual
Page 68
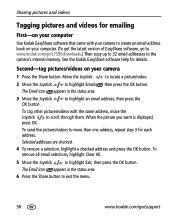
...to scroll through them. See the Kodak EasyShare software Help for each address. The Email icon appears in the status area. 6 Press the Share button to exit the menu. 58 www.kodak.com/go /z7590downloads.) Then copy up to 32 email addresses to the camera's internal memory. To send the ... to highlight an email address, then press the To tag other pictures/videos with your camera to create an email address book on your computer. (To get the latest version of EasyShare software, go to www.kodak.com/go /support Move the Joystick to locate a picture/video. 2 Move the Joystick...
...to scroll through them. See the Kodak EasyShare software Help for each address. The Email icon appears in the status area. 6 Press the Share button to exit the menu. 58 www.kodak.com/go /z7590downloads.) Then copy up to 32 email addresses to the camera's internal memory. To send the ... to highlight an email address, then press the To tag other pictures/videos with your camera to create an email address book on your computer. (To get the latest version of EasyShare software, go to www.kodak.com/go /support Move the Joystick to locate a picture/video. 2 Move the Joystick...
User Manual
Page 69
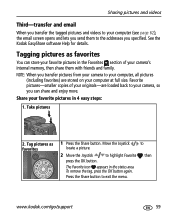
Favorite pictures-smaller copies of your camera's internal memory, then share them to the addresses you can store your favorite pictures in 4 easy steps: 1. to exit the menu. Share your favorite pictures ... the status area. NOTE: When you transfer pictures from your camera to your computer, all pictures (including favorites) are loaded back to your camera, so you specified. www.kodak.com/go/support 59 Tagging pictures as favorites 1 Press the Share button. See the Kodak EasyShare software Help for details. Move the Joystick to locate a picture. 2 Move...
Favorite pictures-smaller copies of your camera's internal memory, then share them to the addresses you can store your favorite pictures in 4 easy steps: 1. to exit the menu. Share your favorite pictures ... the status area. NOTE: When you transfer pictures from your camera to your computer, all pictures (including favorites) are loaded back to your camera, so you specified. www.kodak.com/go/support 59 Tagging pictures as favorites 1 Press the Share button. See the Kodak EasyShare software Help for details. Move the Joystick to locate a picture. 2 Move...

User Manual
Page 70
... the Joystick to the computer using the USB cable (see page 62) or an EasyShare dock. your camera Favorites section. Use Camera Favorites in the EasyShare software to customize the size of the screen. (See Picture Size, page 31.) 60 www.kodak.com/go/support Favorite pictures are loaded to the Favorites section of favorites. Optional...
... the Joystick to the computer using the USB cable (see page 62) or an EasyShare dock. your camera Favorites section. Use Camera Favorites in the EasyShare software to customize the size of the screen. (See Picture Size, page 31.) 60 www.kodak.com/go/support Favorite pictures are loaded to the Favorites section of favorites. Optional...
User Manual
Page 71
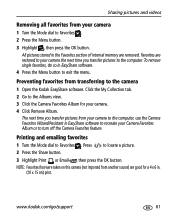
... Mode dial to Favorites . 2 Press the Menu button. 3 Highlight , then press the OK button. To remove single favorites, do so in EasyShare software to recreate your camera. 4 Click Remove Album. www.kodak.com/go/support 61 All pictures stored in . (10 x 15 cm) print. Click the My Collection tab. 2 Go to the Albums view...
... Mode dial to Favorites . 2 Press the Menu button. 3 Highlight , then press the OK button. To remove single favorites, do so in EasyShare software to recreate your camera. 4 Click Remove Album. www.kodak.com/go/support 61 All pictures stored in . (10 x 15 cm) print. Click the My Collection tab. 2 Go to the Albums view...
User Manual
Page 72
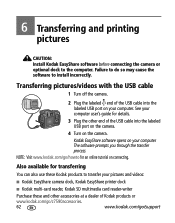
... labeled USB port on the camera. Kodak EasyShare software opens on your pictures and videos: ■ Kodak EasyShare camera dock, Kodak EasyShare printer dock ■ Kodak multi-card reader, Kodak SD multimedia card reader-writer Purchase these Kodak products to transfer your computer. NOTE: Visit www.kodak.com/go /support 6 Transferring and printing pictures CAUTION: Install Kodak EasyShare software before connecting the camera or optional dock to...
... labeled USB port on the camera. Kodak EasyShare software opens on your pictures and videos: ■ Kodak EasyShare camera dock, Kodak EasyShare printer dock ■ Kodak multi-card reader, Kodak SD multimedia card reader-writer Purchase these Kodak products to transfer your computer. NOTE: Visit www.kodak.com/go /support 6 Transferring and printing pictures CAUTION: Install Kodak EasyShare software before connecting the camera or optional dock to...


