
KIP 7770 User Manual
Page 2
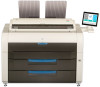
... Program is subject to said equipment. Their standards and logos are office equipment such as computers, monitors, printers, facsimiles, copiers, scanners, and multifunction devices. This USER'S MANUAL contains functional and operational explanations for purchasing the KIP 7770. This equipment generates, uses, and can participate voluntarily. Operation is an international program that may cause...
... Program is subject to said equipment. Their standards and logos are office equipment such as computers, monitors, printers, facsimiles, copiers, scanners, and multifunction devices. This USER'S MANUAL contains functional and operational explanations for purchasing the KIP 7770. This equipment generates, uses, and can participate voluntarily. Operation is an international program that may cause...
KIP 7770 User Manual
Page 4
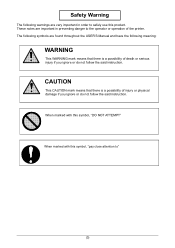
... marked with this product. These notes are important in order to safely use this symbol, "pay close attention to the operator or operation of the printer. Safety Warning The following warnings are found throughout the USER'S Manual and have the following symbols are very important in preventing danger to " (3)
... marked with this product. These notes are important in order to safely use this symbol, "pay close attention to the operator or operation of the printer. Safety Warning The following warnings are found throughout the USER'S Manual and have the following symbols are very important in preventing danger to " (3)

KIP 7770 User Manual
Page 5
..., 20A or higher 2. If you wish to outlet overheating. 2. If you ignore this User's Manual. It may cause a fire due to move the printer, please contact your service personnel. 1. REPLACE THE CORD IF DAMAGED! 1. Spilt water could cause a fire or an electric shock. 2. Do not remove the...generates an abnormal smell or noise, turn it off and unplug it . Use a circuit with the printer. Do not plug in the printer into a multi-wire connector in which some other sources of the printer. 2. Do not disassemble or tamper with a dedicated breaker. 3. Install the product as it may ...
..., 20A or higher 2. If you wish to outlet overheating. 2. If you ignore this User's Manual. It may cause a fire due to move the printer, please contact your service personnel. 1. REPLACE THE CORD IF DAMAGED! 1. Spilt water could cause a fire or an electric shock. 2. Do not remove the...generates an abnormal smell or noise, turn it off and unplug it . Use a circuit with the printer. Do not plug in the printer into a multi-wire connector in which some other sources of the printer. 2. Do not disassemble or tamper with a dedicated breaker. 3. Install the product as it may ...

KIP 7770 User Manual
Page 6
... pull the cord when you print in a fire or electric shock. 2. Ventilate the room well if you unplug the printer as injuries may be damaged and it . CAUTION Do not install the printer in a humidified room or a dusty room. If you remove mis-fed media. There are hot items inside of the... printer. Take great care not to touch these items when you do not install the printer on an unstable floor as you move it may damage the Power Cord. Also, do not use the...
... pull the cord when you print in a fire or electric shock. 2. Ventilate the room well if you unplug the printer as injuries may be damaged and it . CAUTION Do not install the printer in a humidified room or a dusty room. If you remove mis-fed media. There are hot items inside of the... printer. Take great care not to touch these items when you do not install the printer on an unstable floor as you move it may damage the Power Cord. Also, do not use the...
KIP 7770 User Manual
Page 9
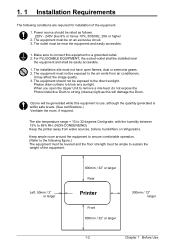
... will damage the Drum. The site temperature range = 10 to 32 degrees Centigrade, with the humidity between 15% to 85% RH. (NON-CONDENSING) Keep the printer away from air conditioners. The equipment must be near the equipment and shall be easily accessible. 1. The outlet must be on an exclusive circuit. 3. 1. 1 Installation...
... will damage the Drum. The site temperature range = 10 to 32 degrees Centigrade, with the humidity between 15% to 85% RH. (NON-CONDENSING) Keep the printer away from air conditioners. The equipment must be near the equipment and shall be easily accessible. 1. The outlet must be on an exclusive circuit. 3. 1. 1 Installation...

KIP 7770 User Manual
Page 11
... screen offers smooth, various and intuitive user operation that can make a print in various environments. • The combination of 120mm per second. The KIP HDP process generates no Waste Toner. • Flange type loading mechanism eases operator's media loading work. • Easy access to USB port allows... 12.1 inch screen for the UI, wider than before since we adopt a minute toner for our old products. 1. 3 Features • KIP 7770 Digital Printer can sort the prints to the rear side, and "Paper Exit Kit" that a pressure sensing device lacks. • The Energy Star ® ...
... screen offers smooth, various and intuitive user operation that can make a print in various environments. • The combination of 120mm per second. The KIP HDP process generates no Waste Toner. • Flange type loading mechanism eases operator's media loading work. • Easy access to USB port allows... 12.1 inch screen for the UI, wider than before since we adopt a minute toner for our old products. 1. 3 Features • KIP 7770 Digital Printer can sort the prints to the rear side, and "Paper Exit Kit" that a pressure sensing device lacks. • The Energy Star ® ...

KIP 7770 User Manual
Page 16
1. 6 Optional Configurations You can combine the KIP 7770 Printer with optional outer devices. KIP 7770 + KIP Scanner KIP Scanner KIP 7770 KIP 7770 on network Scanner Controller USB2.0 KIP Scanner Other printers KIP 7770 Workstation WEB Please contact your dealer for further information of integrating KIP 7770 to your network and other devices. 1-9 Chapter 1 Before Use
1. 6 Optional Configurations You can combine the KIP 7770 Printer with optional outer devices. KIP 7770 + KIP Scanner KIP Scanner KIP 7770 KIP 7770 on network Scanner Controller USB2.0 KIP Scanner Other printers KIP 7770 Workstation WEB Please contact your dealer for further information of integrating KIP 7770 to your network and other devices. 1-9 Chapter 1 Before Use
KIP 7770 User Manual
Page 17
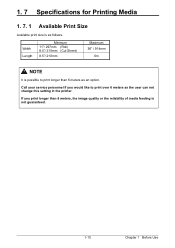
If you would like to print longer than 6 meters, the image quality or the reliability of media feeding is not guaranteed. 1-10 Chapter 1 Before Use 1. 7 Specifications for Printing Media 1. 7. 1 Available Print Size Available print size is possible to print over 6 meters as the user can not change this setting in the printer. Call your service personnel if you print longer than 6 meters as follows. Width Length Minimum 11"/ 297mm (Roll) 8.5"/ 210mm (Cut Sheet) 8.5"/ 210mm Maximum 36" / 914mm 6m NOTE It is as an option.
If you would like to print longer than 6 meters, the image quality or the reliability of media feeding is not guaranteed. 1-10 Chapter 1 Before Use 1. 7 Specifications for Printing Media 1. 7. 1 Available Print Size Available print size is possible to print over 6 meters as the user can not change this setting in the printer. Call your service personnel if you print longer than 6 meters as follows. Width Length Minimum 11"/ 297mm (Roll) 8.5"/ 210mm (Cut Sheet) 8.5"/ 210mm Maximum 36" / 914mm 6m NOTE It is as an option.

KIP 7770 User Manual
Page 18
Excessively curled Folded Creased Torn Punched 1-11 Chapter 1 Before Use Doing so may damage the printer. 1. 7. 2 Media not to be used Do not use the following kinds of printing paper.
Excessively curled Folded Creased Torn Punched 1-11 Chapter 1 Before Use Doing so may damage the printer. 1. 7. 2 Media not to be used Do not use the following kinds of printing paper.

KIP 7770 User Manual
Page 23
... outlet must satisfy the following rated power condition. 220V to turn on KIP 7770 1. Press " " side to 240V plus 6% or minus 10%, 50/60Hz, 20A or higher 2. 2. 1 Turning on the printer. There is Power Switch on the right-front of the printer. WARNING (1) Do not handle the Power Plug with wet hands, or you... may result in which other devices are plugged into. It may overheat the outlet and may receive an electrical shock. (2) Ground the printer for safety. (3) Do not plug the printer into an exclusive wall outlet. Press this side. 2-2 Chapter 2 Basic Operations
... outlet must satisfy the following rated power condition. 220V to turn on KIP 7770 1. Press " " side to 240V plus 6% or minus 10%, 50/60Hz, 20A or higher 2. 2. 1 Turning on the printer. There is Power Switch on the right-front of the printer. WARNING (1) Do not handle the Power Plug with wet hands, or you... may result in which other devices are plugged into. It may overheat the outlet and may receive an electrical shock. (2) Ground the printer for safety. (3) Do not plug the printer into an exclusive wall outlet. Press this side. 2-2 Chapter 2 Basic Operations

KIP 7770 User Manual
Page 25
... 2 minutes after Power Switch operation for Roll Decks, the printer should be shut down when you turn off the printer. Refer to turn off KIP 7770 1. Doing so may damage data or the device. (2) If you use Dehumidify Heater for the controller's shutdown. 2. 2 Turning off KIP 7770. Press " " side on the Power Switch to [2.7 Dehumidifying Roll...
... 2 minutes after Power Switch operation for Roll Decks, the printer should be shut down when you turn off the printer. Refer to turn off KIP 7770 1. Doing so may damage data or the device. (2) If you use Dehumidify Heater for the controller's shutdown. 2. 2 Turning off KIP 7770. Press " " side on the Power Switch to [2.7 Dehumidifying Roll...
KIP 7770 User Manual
Page 26
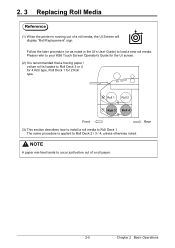
... mis-feed tends to occur just before out of a roll media, the UI Screen will display "Roll Replacement" sign. 2. 3 Replacing Roll Media Reference (1) When the printer is loaded to Roll Deck 2 / 3 / 4, unless otherwise noted.
... mis-feed tends to occur just before out of a roll media, the UI Screen will display "Roll Replacement" sign. 2. 3 Replacing Roll Media Reference (1) When the printer is loaded to Roll Deck 2 / 3 / 4, unless otherwise noted.

KIP 7770 User Manual
Page 34
... the used toner cartridge. Manual Table 2. Handle Upper Frame Unit 2-13 Chapter 2 Basic Operations NOTE (1) The KIP 7770 will indicate Toner Empty sign if an incorrect toner cartridge or no toner cartridge is installed to the printer. (2) At the machine's installation, some amount of initial toner powders will display Toner Empty sign. Open...
... the used toner cartridge. Manual Table 2. Handle Upper Frame Unit 2-13 Chapter 2 Basic Operations NOTE (1) The KIP 7770 will indicate Toner Empty sign if an incorrect toner cartridge or no toner cartridge is installed to the printer. (2) At the machine's installation, some amount of initial toner powders will display Toner Empty sign. Open...

KIP 7770 User Manual
Page 37
Rotate Toner Cartridge to the arrow direction in Upper Frame Unit firmly. Push in 180 degrees or more. (The new Toner Cartridge is closed firmly so as not to lose the toner during the transportation) NOTE Even if the Joint is not fit to the Toner Cartridge, when you turn on the printer, it is automatically fit properly. 10. Close the Manual Table. Upper Frame Unit Manual Table 2-16 Chapter 2 Basic Operations 8. Slightly pull Toner Cartridge rightward and insert the swelling tab in the arrowed slot. 1 2 9.
Rotate Toner Cartridge to the arrow direction in Upper Frame Unit firmly. Push in 180 degrees or more. (The new Toner Cartridge is closed firmly so as not to lose the toner during the transportation) NOTE Even if the Joint is not fit to the Toner Cartridge, when you turn on the printer, it is automatically fit properly. 10. Close the Manual Table. Upper Frame Unit Manual Table 2-16 Chapter 2 Basic Operations 8. Slightly pull Toner Cartridge rightward and insert the swelling tab in the arrowed slot. 1 2 9.
KIP 7770 User Manual
Page 38
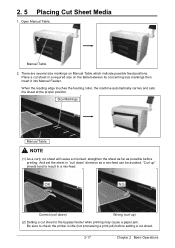
Open Manual Table. Be sure to check the printer is idle (not processing a print job) before printing. When the leading edge touches the feeding roller, the machine automatically carries and sets the sheet at ...
Open Manual Table. Be sure to check the printer is idle (not processing a print job) before printing. When the leading edge touches the feeding roller, the machine automatically carries and sets the sheet at ...

KIP 7770 User Manual
Page 39
...the power supply for Fuser Unit. • Cold Sleep Mode will enter Sleep Mode after a 60 minute of inactivity. It may take time for the printer to stop the power supply for printing. 2-18 Chapter 2 Basic Operations Sleep Mode is canceled and the machine gets ready when; • the machine ... (option). • you tap on Fuser Unit. NOTE (1) It may need another waiting time to reduce the power consumption. The KIP 7770 will start after a certain period of inactivity to get ready. (2) Tapping on the UI screen can cancel the screensaver but cannot recover temperature on ...
...the power supply for Fuser Unit. • Cold Sleep Mode will enter Sleep Mode after a 60 minute of inactivity. It may take time for the printer to stop the power supply for printing. 2-18 Chapter 2 Basic Operations Sleep Mode is canceled and the machine gets ready when; • the machine ... (option). • you tap on Fuser Unit. NOTE (1) It may need another waiting time to reduce the power consumption. The KIP 7770 will start after a certain period of inactivity to get ready. (2) Tapping on the UI screen can cancel the screensaver but cannot recover temperature on ...

KIP 7770 User Manual
Page 41
... Heater Switch 2-20 Chapter 2 Basic Operations When these settings are several dehumidifying settings which can not change the switch setting. With any setting, the printer must be plugged in the "H" position. Press "H" to change the setting. (2) To achieve the best image quality, we recommend that you would ...like to turn on the left-rear side of the machine. "Dehumidify Heater Switch" is unpacked long before installing it into the printer. Note that the user can be in and the switch noted above must be set by service personnel. If media is located on ...
... Heater Switch 2-20 Chapter 2 Basic Operations When these settings are several dehumidifying settings which can not change the switch setting. With any setting, the printer must be plugged in the "H" position. Press "H" to change the setting. (2) To achieve the best image quality, we recommend that you would ...like to turn on the left-rear side of the machine. "Dehumidify Heater Switch" is unpacked long before installing it into the printer. Note that the user can be in and the switch noted above must be set by service personnel. If media is located on ...
KIP 7770 User Manual
Page 42
... Paper Vellum Film Number of sheets (approx.) 100 sheets 10 sheets 1 sheets Note The correct stack capacity of these number of ejected prints behind the printer.
... Paper Vellum Film Number of sheets (approx.) 100 sheets 10 sheets 1 sheets Note The correct stack capacity of these number of ejected prints behind the printer.
KIP 7770 User Manual
Page 43
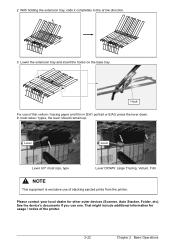
Please contact your local dealer for usage / notice of the printer. 2-22 Chapter 2 Basic Operations That might include additional information for other outer devices (Scanner, Auto Stacker, Folder, etc). In most size, type Lever DOWN: Large ... D/A1 portrait or E/A0, press the lever down. Hook For use one. See the device's documents if you use of stacking ejected prints from the printer. With holding the extension tray, slide it completely to the arrow direction. 3. Lower the extension tray and insert the hooks on the base tray. Lever...
Please contact your local dealer for usage / notice of the printer. 2-22 Chapter 2 Basic Operations That might include additional information for other outer devices (Scanner, Auto Stacker, Folder, etc). In most size, type Lever DOWN: Large ... D/A1 portrait or E/A0, press the lever down. Hook For use one. See the device's documents if you use of stacking ejected prints from the printer. With holding the extension tray, slide it completely to the arrow direction. 3. Lower the extension tray and insert the hooks on the base tray. Lever...

KIP 7770 User Manual
Page 52
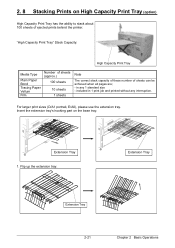
If your system does not have High Capacity Print Tray, go to "release position". First remove stacked prints from the tray. J-13, J-14: Fuser Unit J-13, J-14 Roll 1 Roll 2 Roll 3 Roll 4 Front Clear the Paper Mis-feed using the following procedure: Rear 1. It is necessary for a printer with High Capacity Print Tray (option) to move it aside to step 4. Prints High Capacity Print Tray Support Rod 3-9 Chapter 3 Error Correction 3. 1. 4 Fuser Section (J-13, J-14) When a Paper Mis-feed occurs in the Fuser Section, the UI shows J-13 / J-14.
If your system does not have High Capacity Print Tray, go to "release position". First remove stacked prints from the tray. J-13, J-14: Fuser Unit J-13, J-14 Roll 1 Roll 2 Roll 3 Roll 4 Front Clear the Paper Mis-feed using the following procedure: Rear 1. It is necessary for a printer with High Capacity Print Tray (option) to move it aside to step 4. Prints High Capacity Print Tray Support Rod 3-9 Chapter 3 Error Correction 3. 1. 4 Fuser Section (J-13, J-14) When a Paper Mis-feed occurs in the Fuser Section, the UI shows J-13 / J-14.

