

KM-NET ADMIN Operation Guide for Ver 2.0
Page 12
...with a role that does not have the roles, full control privilege, cannot assign any role that was in different ways, depending on to the original data that does have assigned them to the application and can log on their own) assigned role. Subscribers Only users cannot log on to . .... Once a user is selected, you first opened it. Deleting a User You can click the Change Password icon to delete. You can also click Reset to go back to the application and edit settings in the dialog when you can delete any role except Administrator, Subscribers Only, Accounting Admin, and...
...with a role that does not have the roles, full control privilege, cannot assign any role that was in different ways, depending on to the original data that does have assigned them to the application and can log on their own) assigned role. Subscribers Only users cannot log on to . .... Once a user is selected, you first opened it. Deleting a User You can click the Change Password icon to delete. You can also click Reset to go back to the application and edit settings in the dialog when you can delete any role except Administrator, Subscribers Only, Accounting Admin, and...

PRESCRIBE Commands Command Reference Manual Rev 4.8
Page 124
...6 of the Technical Reference manual. File !R! This reset applies to their original, factory default values. FRPO-INITialize Format FRPO INIT; To activate the changes made with the FRPO INIT command, turn the printer power off then on again or reset the printer using the control panel keys. The FRPO... a page break. EXIT; FRPO INIT; PRESCRIBE Command Reference FRPO INIT - Printout Omitted 114 Parameter None Function The FRPO INIT command resets all FRPO parameters to the interface dependent parameters for the current interface as well as all non-interface dependent parameters.
...6 of the Technical Reference manual. File !R! This reset applies to their original, factory default values. FRPO-INITialize Format FRPO INIT; To activate the changes made with the FRPO INIT command, turn the printer power off then on again or reset the printer using the control panel keys. The FRPO... a page break. EXIT; FRPO INIT; PRESCRIBE Command Reference FRPO INIT - Printout Omitted 114 Parameter None Function The FRPO INIT command resets all FRPO parameters to the interface dependent parameters for the current interface as well as all non-interface dependent parameters.
PRESCRIBE Commands Command Reference Manual Rev 4.8
Page 235
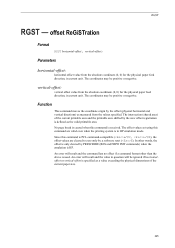
... system is received. vertical-offset: vertical offset value from the values specified. An error will be positive or negative. Function This command moves the coordinate origin by a software reset (E). offset ReGiSTration Format RGST horizontal-offset, vertical-offset;
... system is received. vertical-offset: vertical offset value from the values specified. An error will be positive or negative. Function This command moves the coordinate origin by a software reset (E). offset ReGiSTration Format RGST horizontal-offset, vertical-offset;

PRESCRIBE Commands Command Reference Manual Rev 4.8
Page 289
..., the printing system will execute them. BLK 1.3, 1.3; SCRC L; EXIT; !R! BOX 1.6, 1.6, E; Set Command Recognition Character Format SCRC character; Originally the command recognition character is not changed, then instead of !R!. RES; BOX 1.6, 1.6, E; CMNT Now list the above commands; File !R! GPAT...The SCRC command changes the command recognition character between the exclamation points in effect until power is turned off or a RES (reset) command is to ASCII code 126 (~) except the apostrophe ('), quotation mark (") or semicolon (;). GPAT .5; BLK 1.6, 1.6;...
..., the printing system will execute them. BLK 1.3, 1.3; SCRC L; EXIT; !R! BOX 1.6, 1.6, E; Set Command Recognition Character Format SCRC character; Originally the command recognition character is not changed, then instead of !R!. RES; BOX 1.6, 1.6, E; CMNT Now list the above commands; File !R! GPAT...The SCRC command changes the command recognition character between the exclamation points in effect until power is turned off or a RES (reset) command is to ASCII code 126 (~) except the apostrophe ('), quotation mark (") or semicolon (;). GPAT .5; BLK 1.6, 1.6;...

KX Driver User Guide Version 5.90
Page 97
... by using the Access code. Availability of text and vector graphics. PRESCRIBE Kyocera's scripting language that distributes print jobs to embed commands into specific locations in a larger size than the original document size. After the first copy has been reviewed, the remaining copies ...its settings to print a document. K KM-NET Software that smoothes the edges of some printing options depends on the Hard disk. This feature requires an optional finishing device such as a Sorter stacker, Document finisher, or Mailbox is reset or powered off. P PDL Page Description ...
... by using the Access code. Availability of text and vector graphics. PRESCRIBE Kyocera's scripting language that distributes print jobs to embed commands into specific locations in a larger size than the original document size. After the first copy has been reviewed, the remaining copies ...its settings to print a document. K KM-NET Software that smoothes the edges of some printing options depends on the Hard disk. This feature requires an optional finishing device such as a Sorter stacker, Document finisher, or Mailbox is reset or powered off. P PDL Page Description ...

KX Driver Operation Guide Rev. 1.3.1
Page 89
...the slider to the right or left to increase or decrease the values between -10 and +10. • Default settings: Click Reset to return to the original factory default settings. 7 Adjust the Saturation and Lightness. • Drag the slider to adjust the Saturation, Lightness, and Contrast, or... increase or decrease the values between -10 and +10. • Click Reset to return to increase or decrease the value between -180 and +...
...the slider to the right or left to increase or decrease the values between -10 and +10. • Default settings: Click Reset to return to the original factory default settings. 7 Adjust the Saturation and Lightness. • Drag the slider to adjust the Saturation, Lightness, and Contrast, or... increase or decrease the values between -10 and +10. • Click Reset to return to increase or decrease the value between -180 and +...

KX Driver Operation Guide Rev. 1.3.1
Page 91
... the monitor settings. • Drag each of the RGB setting, or increase or decrease the values between -10 and +10 in the box. • Click Reset to restore the original default settings. 87
... the monitor settings. • Drag each of the RGB setting, or increase or decrease the values between -10 and +10 in the box. • Click Reset to restore the original default settings. 87
Kyocera Extended Driver 4.0 User Guide Rev-2.1
Page 117
... the power is turned off or reset. Glossary Glossary-3 Use this feature to embed a PRESCRIBE command that sends secure print jobs to overlay PRESCRIBE form data or a graphic object, such as a poster. PRESCRIBE Kyocera's scripting language that sends to embed commands into specific lo-...on the printing system's optional Hard disk temporarily for later access. digit Access code and stores them in a larger size than the original document size. Higher resolution improves the quality of existing printing system memory. For some models, a barcode can use this feature to...
... the power is turned off or reset. Glossary Glossary-3 Use this feature to embed a PRESCRIBE command that sends secure print jobs to overlay PRESCRIBE form data or a graphic object, such as a poster. PRESCRIBE Kyocera's scripting language that sends to embed commands into specific lo-...on the printing system's optional Hard disk temporarily for later access. digit Access code and stores them in a larger size than the original document size. Higher resolution improves the quality of existing printing system memory. For some models, a barcode can use this feature to...

Kyocera Extended Driver 3.x User Guide Rev-1.4
Page 84
Complete the Hue Adjustment. 4. Drag the slider to the right or left to the original factory default settings. 78 Since the colors emphasized by each of hues. • Coordinated Hue Adjustment: Select Master from three different photographic images. Crayons Saturation ... list. Or drag the slider to the right or left to increase or decrease the value between -10 and +10. • Default settings: Click the Reset button to return to increase or decrease the values between -180 and +180. • Specific Hue Adjustment: Select Red, Yellow, Green, Cyan, Blue, or Magenta...
Complete the Hue Adjustment. 4. Drag the slider to the right or left to the original factory default settings. 78 Since the colors emphasized by each of hues. • Coordinated Hue Adjustment: Select Master from three different photographic images. Crayons Saturation ... list. Or drag the slider to the right or left to increase or decrease the value between -10 and +10. • Default settings: Click the Reset button to return to increase or decrease the values between -180 and +180. • Specific Hue Adjustment: Select Red, Yellow, Green, Cyan, Blue, or Magenta...

Kyocera Extended Driver 3.x User Guide Rev-1.4
Page 85
Adjust the Saturation and Lightness. • Drag the slider to adjust the Saturation, Lightness, and Contrast, or increase or decrease the values between -10 and +10. • Click the Reset button to return to save the settings. 79 Click OK. 8. Click OK to the original factory default settings. 7. Printing from Applications 6.
Adjust the Saturation and Lightness. • Drag the slider to adjust the Saturation, Lightness, and Contrast, or increase or decrease the values between -10 and +10. • Click the Reset button to return to save the settings. 79 Click OK. 8. Click OK to the original factory default settings. 7. Printing from Applications 6.

Kyocera Extended Driver 3.x User Guide Rev-1.4
Page 87
...of the RGB setting, or increase or decrease the values between -10 and +10 in the spin box. • Click the Reset button to save the color adjustment settings. 7. Printing from three different photographic images. Crayons Saturation or RGB Adjustment Portrait Skin tone and ...mid-tone Adjustment Fruits Hue Adjustment 5. Click OK to restore the original default settings. 6. The color adjustment process is simplified since the colors emphasized by each slider of the photographs below varies. Click...
...of the RGB setting, or increase or decrease the values between -10 and +10 in the spin box. • Click the Reset button to save the color adjustment settings. 7. Printing from three different photographic images. Crayons Saturation or RGB Adjustment Portrait Skin tone and ...mid-tone Adjustment Fruits Hue Adjustment 5. Click OK to restore the original default settings. 6. The color adjustment process is simplified since the colors emphasized by each slider of the photographs below varies. Click...
1650/2050/2550 Operation Guide (Advanced)
Page 15
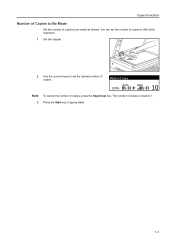
Ready to 1. Copying starts. 1-7 Auto 100% Auto 10 Note 3 To cancel the number of copies, press the Stop/Clear key. The number of copies is reset to copy. Press the Start key. You can set the number of copies to 999 at the maximum. 1 Set the original. 2 Use the numeric keys to be made as follows. Copier Functions Number of Copies to Be Made Set the number of copies to set the desired number of copies.
Ready to 1. Copying starts. 1-7 Auto 100% Auto 10 Note 3 To cancel the number of copies, press the Stop/Clear key. The number of copies is reset to copy. Press the Start key. You can set the number of copies to 999 at the maximum. 1 Set the original. 2 Use the numeric keys to be made as follows. Copier Functions Number of Copies to Be Made Set the number of copies to set the desired number of copies.

1650/2050/2550 Operation Guide (Advanced)
Page 71
... 3 Press the Enter key. 4 Press the S key or the T key to select Zoom (Reduce). Reduction Printing If you specify the paper size (original size) and the output size, the machine reduces the image at a preset magnification ratio to print onto the specified output size paper. 1 Display the Page... Landscape. Zoom(Reduce) Paper size Print size 8.5x11 8.5x11 98% 98% 7 Press the Enter key. 8 Press the Reset key. Copies 1 Printer Settings 5 Press the Enter key. 6 Press the Reset key. The message display returns to input the number of copies. 4 Press the < key or the > key to the...
... 3 Press the Enter key. 4 Press the S key or the T key to select Zoom (Reduce). Reduction Printing If you specify the paper size (original size) and the output size, the machine reduces the image at a preset magnification ratio to print onto the specified output size paper. 1 Display the Page... Landscape. Zoom(Reduce) Paper size Print size 8.5x11 8.5x11 98% 98% 7 Press the Enter key. 8 Press the Reset key. Copies 1 Printer Settings 5 Press the Enter key. 6 Press the Reset key. The message display returns to input the number of copies. 4 Press the < key or the > key to the...

1650/2050/2550 Operation Guide (Advanced)
Page 98
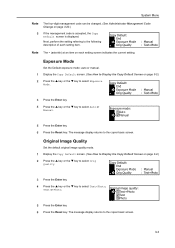
...Machine Default Settings. The settings of use. These settings can set the following items as copier default settings. • Exposure Mode • Original Image Quality • EcoPrint Mode • Background Color Adjustment • Paper Selection • Paper Type in the initial mode are called... Adjustment for Text Originals • Exposure Adjustment for Photo Originals • Sort Copying • Offset Copying • Auto Rotation Copy • Margin Width Default Value • Border Erase Width Default Value • Limit of Number of warm-up or when the Reset key is pressed ...
...Machine Default Settings. The settings of use. These settings can set the following items as copier default settings. • Exposure Mode • Original Image Quality • EcoPrint Mode • Background Color Adjustment • Paper Selection • Paper Type in the initial mode are called... Adjustment for Text Originals • Exposure Adjustment for Photo Originals • Sort Copying • Offset Copying • Auto Rotation Copy • Margin Width Default Value • Border Erase Width Default Value • Limit of Number of warm-up or when the Reset key is pressed ...
1650/2050/2550 Operation Guide (Advanced)
Page 99
... The four-digit management code can be changed. (See Administrator Management Code Change on each setting item. Original image quality: * Text+Photo Text Photo 5 Press the Enter key. 6 Press the Reset key. Copy Default: End Exposure Mode Orig Quality : Manual : Text+Photo Note The * (asterisk) ...See How to Display the Copy Default Screen on page 3-2.) 2 Press the S key or the T key to select Orig Quality. Original Image Quality Set the default original image quality mode. 1 Display the Copy Default screen. (See How to Display the Copy Default Screen on page 3-2.) 2 Press ...
... The four-digit management code can be changed. (See Administrator Management Code Change on each setting item. Original image quality: * Text+Photo Text Photo 5 Press the Enter key. 6 Press the Reset key. Copy Default: End Exposure Mode Orig Quality : Manual : Text+Photo Note The * (asterisk) ...See How to Display the Copy Default Screen on page 3-2.) 2 Press the S key or the T key to select Orig Quality. Original Image Quality Set the default original image quality mode. 1 Display the Copy Default screen. (See How to Display the Copy Default Screen on page 3-2.) 2 Press ...

1650/2050/2550 Operation Guide (Advanced)
Page 100
... 3-2.) 2 Press the S key or the T key to select EcoPrint. System Menu EcoPrint Mode Select whether or not to set the ecoprint mode as the original when it is dark, use this item to lighten it . 1 2 *3 4 5 5 Press the Enter key. 6 Press the Reset key. EcoPrint: * Off On 5 Press the Enter key. 6 Press the...
... 3-2.) 2 Press the S key or the T key to select EcoPrint. System Menu EcoPrint Mode Select whether or not to set the ecoprint mode as the original when it is dark, use this item to lighten it . 1 2 *3 4 5 5 Press the Enter key. 6 Press the Reset key. EcoPrint: * Off On 5 Press the Enter key. 6 Press the...
1650/2050/2550 Operation Guide (Advanced)
Page 103
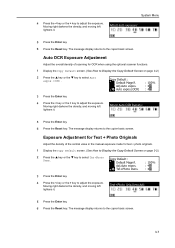
...Dens.Adj: 5 Press the Enter key. 6 Press the Reset key. Moving right darkens the density, and moving left lightens it . Copy Default : Default Magnif. Exposure Adjustment for Text + Photo Originals Adjust the density of scanning for text + photo originals. 1 Display the Copy Default screen. (See How to ... 4 Press the < key or the > key to the copier basic screen. Adjust auto exposure: 5 Press the Enter key. 6 Press the Reset key. Auto OCR Exposure Adjustment Adjust the overall density of the central value in the manual exposure mode for OCR when using the optional scanner...
...Dens.Adj: 5 Press the Enter key. 6 Press the Reset key. Moving right darkens the density, and moving left lightens it . Copy Default : Default Magnif. Exposure Adjustment for Text + Photo Originals Adjust the density of scanning for text + photo originals. 1 Display the Copy Default screen. (See How to ... 4 Press the < key or the > key to the copier basic screen. Adjust auto exposure: 5 Press the Enter key. 6 Press the Reset key. Auto OCR Exposure Adjustment Adjust the overall density of the central value in the manual exposure mode for OCR when using the optional scanner...

1650/2050/2550 Operation Guide (Advanced)
Page 104
Text original density adjust: 5 Press the Enter key. 6 Press the Reset key. Moving right darkens the density, and moving left lightens it . Note This item is displayed only if the optional document processor is installed, select ... Ori Density : 4 Photo Ori Dnsity : 4 3 Press the Enter key. 4 Press the < key or the > key to the copier basic screen. Photo original density adjust: 5 Press the Enter key. 6 Press the Reset key. Sort Copying If the optional document finisher is installed. 1 Display the Copy Default screen. (See How to select Photo Ori...
Text original density adjust: 5 Press the Enter key. 6 Press the Reset key. Moving right darkens the density, and moving left lightens it . Note This item is displayed only if the optional document processor is installed, select ... Ori Density : 4 Photo Ori Dnsity : 4 3 Press the Enter key. 4 Press the < key or the > key to the copier basic screen. Photo original density adjust: 5 Press the Enter key. 6 Press the Reset key. Sort Copying If the optional document finisher is installed. 1 Display the Copy Default screen. (See How to select Photo Ori...

1650/2050/2550 Operation Guide (Advanced)
Page 107
... How to Display the Copy Default Screen on page 3-2.) 2 Press the S key or the T key to the copier basic screen. 3-11 Press the Reset key. Since the black streaking reduction processing reduces the reproducibility of fine characters, it is not reduced, select Strong. The message display returns to select... Corr. System Menu Limit of Number of Copies Set the limit of the number of copies that are not contained in the original image) appear on copies from the optional document processor, you can be set the maximum number of copies (1 to use the black streaking...
... How to Display the Copy Default Screen on page 3-2.) 2 Press the S key or the T key to the copier basic screen. 3-11 Press the Reset key. Since the black streaking reduction processing reduces the reproducibility of fine characters, it is not reduced, select Strong. The message display returns to select... Corr. System Menu Limit of Number of Copies Set the limit of the number of copies that are not contained in the original image) appear on copies from the optional document processor, you can be set the maximum number of copies (1 to use the black streaking...
1650/2050/2550 Operation Guide (Advanced)
Page 114
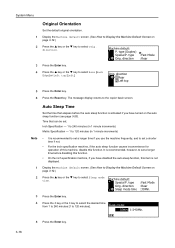
... this function. • On the inch specification machine, if you have turned on the auto sleep function (see page 3-23). Orig. System Menu Original Orientation Set the default original orientation. 1 Display the Machine default screen. (See How to Display the Machine Default Screen on page 3-12.) 2 Press the S key or the T key... that elapses before disabling this function. Sleep mode: 30Min. 1-240Min. 3-18 5 Press the Enter key. direction * Rear Left top 5 Press the Enter key. 6 Press the Reset key. direction.
... this function. • On the inch specification machine, if you have turned on the auto sleep function (see page 3-23). Orig. System Menu Original Orientation Set the default original orientation. 1 Display the Machine default screen. (See How to Display the Machine Default Screen on page 3-12.) 2 Press the S key or the T key... that elapses before disabling this function. Sleep mode: 30Min. 1-240Min. 3-18 5 Press the Enter key. direction * Rear Left top 5 Press the Enter key. 6 Press the Reset key. direction.


