
2552ci/3252ci/4052ci/5052ci/6052ci KX Printer Driver User Guide
Page 28
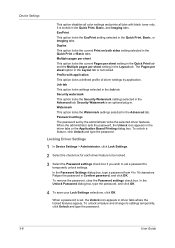
...Security Watermark is not locked. In the Password Settings dialog box, type a password from 4 to temporarily unlock settings. Profile with black toner only. Job tab This option locks settings selected in driver tabs where the locked features appear. Password settings The password set a password... to 16 characters. To remove the password, clear the Password settings check box. Device Settings This option disables all color settings and prints all jobs with application...
...Security Watermark is not locked. In the Password Settings dialog box, type a password from 4 to temporarily unlock settings. Profile with black toner only. Job tab This option locks settings selected in driver tabs where the locked features appear. Password settings The password set a password... to 16 characters. To remove the password, clear the Password settings check box. Device Settings This option disables all color settings and prints all jobs with application...

2552ci/3252ci4052ci/5052ci/6052ci Operation Guide
Page 9
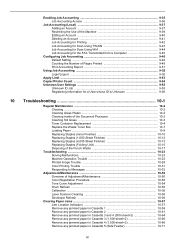
Priority Override for Waiting Jobs 7-11 Reordering Print Jobs 7-12 Device/Communication 7-13 Checking the Remaining Amount of Toner and Paper (Paper/Supplies 7-14 8 Setup and Registration (System Menu 8-1 System Menu ...8-2 Operation Method ...8-2 System Menu Settings... 8-4 Counter ...8-7 Cassette/MP Tray Settings 8-7 Common Settings ...8-10 Home ...8-32 Copy ...8-33 Send ...8-34 Document Box/Removable Memory 8-39 FAX ...8-40 Printer ...8-40 Report ...8-43 System/Network ...8-48 Edit Destination ...8-67 User Login/Job Accounting 8-68 User Property ...8-68...
Priority Override for Waiting Jobs 7-11 Reordering Print Jobs 7-12 Device/Communication 7-13 Checking the Remaining Amount of Toner and Paper (Paper/Supplies 7-14 8 Setup and Registration (System Menu 8-1 System Menu ...8-2 Operation Method ...8-2 System Menu Settings... 8-4 Counter ...8-7 Cassette/MP Tray Settings 8-7 Common Settings ...8-10 Home ...8-32 Copy ...8-33 Send ...8-34 Document Box/Removable Memory 8-39 FAX ...8-40 Printer ...8-40 Report ...8-43 System/Network ...8-48 Edit Destination ...8-67 User Login/Job Accounting 8-68 User Property ...8-68...
2552ci/3252ci4052ci/5052ci/6052ci Operation Guide
Page 10
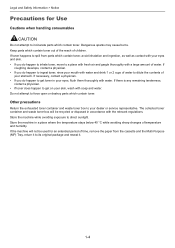
... ...10-2 Cleaning ...10-2 Cleaning Glass Platen 10-2 Cleaning inside of the Document Processor 10-2 Cleaning Slit Grass 10-3 Toner Container Replacement 10-4 Replace the Waste Toner Box 10-7 Loading Paper ...10-9 Replacing Staples (Inner Finisher 10-10 Replacing Staples (1,000-Sheet Finisher 10-12 Replacing ...Clearing Paper Jams ...10-57 Jam Location Indicators 10-57 Remove any jammed paper in Cassette 1 10-58 Remove any jammed paper in Cassette 2 10-61 Remove any jammed paper in Cassette 3 and 4 (500-sheet×2 10-64 Remove any jammed paper in Cassette 3 (1,500-sheet×2...
... ...10-2 Cleaning ...10-2 Cleaning Glass Platen 10-2 Cleaning inside of the Document Processor 10-2 Cleaning Slit Grass 10-3 Toner Container Replacement 10-4 Replace the Waste Toner Box 10-7 Loading Paper ...10-9 Replacing Staples (Inner Finisher 10-10 Replacing Staples (1,000-Sheet Finisher 10-12 Replacing ...Clearing Paper Jams ...10-57 Jam Location Indicators 10-57 Remove any jammed paper in Cassette 1 10-58 Remove any jammed paper in Cassette 2 10-61 Remove any jammed paper in Cassette 3 and 4 (500-sheet×2 10-64 Remove any jammed paper in Cassette 3 (1,500-sheet×2...
2552ci/3252ci4052ci/5052ci/6052ci Operation Guide
Page 53
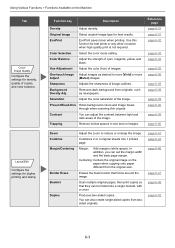
... skin. • If you do happen to ingest toner, rinse your eyes, flush them thoroughly with a large amount of water. Legal and Safety Information > Notice Precautions for an extended period of time, remove the paper from parts which contain toner. If necessary, contact a physician. • If ...you do happen to inhale toner, move to a place with fresh air and gargle thoroughly with water. If toner happens to get toner in your mouth with soap and water...
... skin. • If you do happen to ingest toner, rinse your eyes, flush them thoroughly with a large amount of water. Legal and Safety Information > Notice Precautions for an extended period of time, remove the paper from parts which contain toner. If necessary, contact a physician. • If ...you do happen to inhale toner, move to a place with fresh air and gargle thoroughly with water. If toner happens to get toner in your mouth with soap and water...
2552ci/3252ci4052ci/5052ci/6052ci Operation Guide
Page 283
... Image Adjust images as newspapers. page 6-41 page 6-44 page 6-46 page 6-47 page 6-49 page 6-52 6-3 EcoPrint EcoPrint saves toner when printing. Scan multiple original pages, then print copies so that forms around the image. Using Various Functions > Functions Available on the ...Machine Tab Color/ Image Quality Configure the settings for test prints or any other occasion when high quality print is not required. Removes dark background from twosided originals. Use this function for density, quality of the image. Function key Description Density Adjust density. Saturation...
... Image Adjust images as newspapers. page 6-41 page 6-44 page 6-46 page 6-47 page 6-49 page 6-52 6-3 EcoPrint EcoPrint saves toner when printing. Scan multiple original pages, then print copies so that forms around the image. Using Various Functions > Functions Available on the ...Machine Tab Color/ Image Quality Configure the settings for test prints or any other occasion when high quality print is not required. Removes dark background from twosided originals. Use this function for density, quality of the image. Function key Description Density Adjust density. Saturation...
2552ci/3252ci4052ci/5052ci/6052ci Operation Guide
Page 296
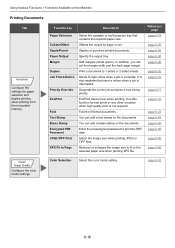
... printed documents. Sends E-mail notice when a job is complete. Use this function for paper selection and duplex printing when printing from the removable memory. Fold the finished documents. Enter the preassigned password to 1-sided or 2-sided sheets. Reduces or enlarges the image size to fit to... output by page or set the margin width and the back page margin. You can add a bates stamp on the documents. EcoPrint saves toner when printing. You can add a text stamp on the documents. Specify the output tray. Using Various Functions > Functions Available on the Machine...
... printed documents. Sends E-mail notice when a job is complete. Use this function for paper selection and duplex printing when printing from the removable memory. Fold the finished documents. Enter the preassigned password to 1-sided or 2-sided sheets. Reduces or enlarges the image size to fit to... output by page or set the margin width and the back page margin. You can add a bates stamp on the documents. EcoPrint saves toner when printing. You can add a text stamp on the documents. Specify the output tray. Using Various Functions > Functions Available on the Machine...
2552ci/3252ci4052ci/5052ci/6052ci Operation Guide
Page 378
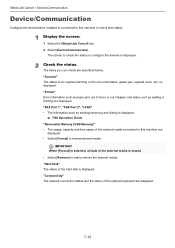
... jam, out of toner, or out of paper, and status such as sending/receiving and dialing is displayed. 2 Check the status. The screen to safely remove the external media. IMPORTANT When [Format] is selected, all data in the external media is erased. • Select [Remove] to check the...the screen. 1 Select the [Status/Job Cancel] key. 2 Select [Device/Communicate]. The items you can check are displayed. 7-13 FAX Operation Guide "Removable Memory (USB Memory)" • The usage, capacity and free space of an original scanning or the error information (paper jam, opened cover, etc.) is ...
... jam, out of toner, or out of paper, and status such as sending/receiving and dialing is displayed. 2 Check the status. The screen to safely remove the external media. IMPORTANT When [Format] is selected, all data in the external media is erased. • Select [Remove] to check the...the screen. 1 Select the [Status/Job Cancel] key. 2 Select [Device/Communicate]. The items you can check are displayed. 7-13 FAX Operation Guide "Removable Memory (USB Memory)" • The usage, capacity and free space of an original scanning or the error information (paper jam, opened cover, etc.) is ...
2552ci/3252ci4052ci/5052ci/6052ci Operation Guide
Page 453
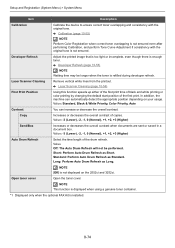
..., Auto Contrast You can automatically detect the appropriate position depending on the 2552ci and 3252ci. Standard: Perform Auto Drum Refresh as Long. Developer Refresh Adjust...or decreases the overall contrast of the first print. Laser Scanner Cleaning Remove vertical white lines from the printout. Laser Scanner Cleaning (page 10... time length of the drum refresh. Calibration (page 10-55) NOTE Perform Color Registration when correct toner overlapping is not ensured even after performing Calibration, and perform Tone Curve Adjustment if consistency with the original...
..., Auto Contrast You can automatically detect the appropriate position depending on the 2552ci and 3252ci. Standard: Perform Auto Drum Refresh as Long. Developer Refresh Adjust...or decreases the overall contrast of the first print. Laser Scanner Cleaning Remove vertical white lines from the printout. Laser Scanner Cleaning (page 10... time length of the drum refresh. Calibration (page 10-55) NOTE Perform Color Registration when correct toner overlapping is not ensured even after performing Calibration, and perform Tone Curve Adjustment if consistency with the original...
2552ci/3252ci4052ci/5052ci/6052ci Operation Guide
Page 511
... Maintenance 10-2 Cleaning 10-2 Cleaning Glass Platen 10-2 Cleaning inside of the Document Processor 10-2 Cleaning Slit Grass 10-3 Toner Container Replacement .......... 10-4 Replace the Waste Toner Box .......... 10-7 Loading Paper 10-9 Replacing Staples (Inner Finisher) .. 10-10 Replacing Staples (1,000-Sheet Finisher 10...Paper Jams 10-57 Jam Location Indicators 10-57 Remove any jammed paper in Cassette 1 10-58 Remove any jammed paper in Cassette 2 10-61 Remove any jammed paper in Cassette 3 and 4 (500-sheet×2) ..... 10-64 Remove any jammed paper in Cassette 3 (1,500-sheet×...
... Maintenance 10-2 Cleaning 10-2 Cleaning Glass Platen 10-2 Cleaning inside of the Document Processor 10-2 Cleaning Slit Grass 10-3 Toner Container Replacement .......... 10-4 Replace the Waste Toner Box .......... 10-7 Loading Paper 10-9 Replacing Staples (Inner Finisher) .. 10-10 Replacing Staples (1,000-Sheet Finisher 10...Paper Jams 10-57 Jam Location Indicators 10-57 Remove any jammed paper in Cassette 1 10-58 Remove any jammed paper in Cassette 2 10-61 Remove any jammed paper in Cassette 3 and 4 (500-sheet×2) ..... 10-64 Remove any jammed paper in Cassette 3 (1,500-sheet×...
2552ci/3252ci4052ci/5052ci/6052ci Operation Guide
Page 514
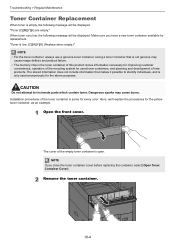
... replacing the container, select [Open Toner Container Cover]. 2 Remove the toner container. 10-4 Using a toner container that makes it possible to incinerate parts which contain toner. The cover of the toner container is same for the above purposes. "Toner is low. [C][M][Y][K] (Replace when empty.)" NOTE • For the toner container, always use a genuine toner container. CAUTION Do not attempt...
... replacing the container, select [Open Toner Container Cover]. 2 Remove the toner container. 10-4 Using a toner container that makes it possible to incinerate parts which contain toner. The cover of the toner container is same for the above purposes. "Toner is low. [C][M][Y][K] (Replace when empty.)" NOTE • For the toner container, always use a genuine toner container. CAUTION Do not attempt...
2552ci/3252ci4052ci/5052ci/6052ci Operation Guide
Page 515
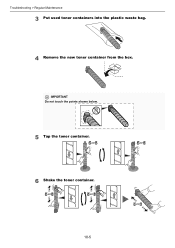
IMPORTANT Do not touch the points shown below. 5 Tap the toner container. 5~6 6 Shake the toner container. 5~6 5~6 10-5 5~6 5~6 Troubleshooting > Regular Maintenance 3 Put used toner containers into the plastic waste bag. 4 Remove the new toner container from the box.
IMPORTANT Do not touch the points shown below. 5 Tap the toner container. 5~6 6 Shake the toner container. 5~6 5~6 10-5 5~6 5~6 Troubleshooting > Regular Maintenance 3 Put used toner containers into the plastic waste bag. 4 Remove the new toner container from the box.
2552ci/3252ci4052ci/5052ci/6052ci Operation Guide
Page 517
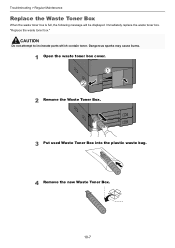
"Replace the waste toner box." CAUTION Do not attempt to incinerate parts which contain toner. Dangerous sparks may cause burns. 1 Open the waste toner box cover. 2 Remove the Waste Toner Box. 3 Put used Waste Toner Box into the plastic waste bag. 4 Remove the new Waste Toner Box. 10-7 Troubleshooting > Regular Maintenance Replace the Waste Toner Box When the waste toner box is full, the following message will be displayed. Immediately replace the waste toner box.
"Replace the waste toner box." CAUTION Do not attempt to incinerate parts which contain toner. Dangerous sparks may cause burns. 1 Open the waste toner box cover. 2 Remove the Waste Toner Box. 3 Put used Waste Toner Box into the plastic waste bag. 4 Remove the new Waste Toner Box. 10-7 Troubleshooting > Regular Maintenance Replace the Waste Toner Box When the waste toner box is full, the following message will be displayed. Immediately replace the waste toner box.
2552ci/3252ci4052ci/5052ci/6052ci Operation Guide
Page 546
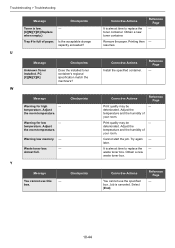
... on the screen. NOTE If you select [Open Toner Container Cover], you can open the Toner Container Cover that you closed accidentally. page 10-17 Open the cassette. Check inside ― the machine and remove the paper. when processing the job externally. retention data... Message Failed to specify Job - The job is canceled. Job is full of time elapses. FAX Operation Guide Remove the paper. Troubleshooting > Troubleshooting Message Checkpoints Corrective Actions Reference Page Check the toner - Finisher tray is canceled. Open the main unit front cover ― and...
... on the screen. NOTE If you select [Open Toner Container Cover], you can open the Toner Container Cover that you closed accidentally. page 10-17 Open the cassette. Check inside ― the machine and remove the paper. when processing the job externally. retention data... Message Failed to specify Job - The job is canceled. Job is full of time elapses. FAX Operation Guide Remove the paper. Troubleshooting > Troubleshooting Message Checkpoints Corrective Actions Reference Page Check the toner - Finisher tray is canceled. Open the main unit front cover ― and...
2552ci/3252ci4052ci/5052ci/6052ci Operation Guide
Page 548
...? Printing then - Troubleshooting > Troubleshooting Message Checkpoints Corrective Actions Reference Page Install the punch - page 10-17 Install the waste toner - Remove the paper and select - [Continue]. The job is set to [On], processing resumes automatically after a set amount of paper...count restricted by Job Accounting. Checkpoints - capacity exceeded? Remove the paper. box. For details on the screen. For details on the screen. Call service. Cannot print any more. The waste toner box is canceled. and install the punch waste box...
...? Printing then - Troubleshooting > Troubleshooting Message Checkpoints Corrective Actions Reference Page Install the punch - page 10-17 Install the waste toner - Remove the paper and select - [Continue]. The job is set to [On], processing resumes automatically after a set amount of paper...count restricted by Job Accounting. Checkpoints - capacity exceeded? Remove the paper. box. For details on the screen. For details on the screen. Call service. Cannot print any more. The waste toner box is canceled. and install the punch waste box...
2552ci/3252ci4052ci/5052ci/6052ci Operation Guide
Page 549
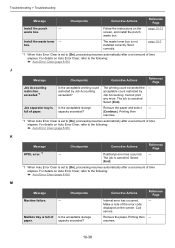
... to the following: Auto Error Clear (page 8-68) N Message Non-genuine toner installed. P Message Paper jam. Follow the instructions on the screen. page 10-57 Remove paper from the finisher - Remove paper from the - Select [Continue] to cancel the job. The process cannot... be continued. Checkpoints Is the installed toner container our own brand? process tray. Memory is full and ...
... to the following: Auto Error Clear (page 8-68) N Message Non-genuine toner installed. P Message Paper jam. Follow the instructions on the screen. page 10-57 Remove paper from the finisher - Remove paper from the - Select [Continue] to cancel the job. The process cannot... be continued. Checkpoints Is the installed toner container our own brand? process tray. Memory is full and ...
2552ci/3252ci4052ci/5052ci/6052ci Operation Guide
Page 551
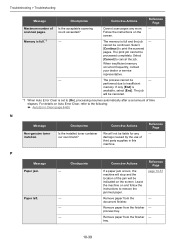
...formatted, it is not compatible with the machine. Use the removable memory formatted by this machine. Select ― [End]. Replace the waste toner box. Select [End]. Connect a compatible removable memory. Remove originals from the ― the document document processor? document ...: Auto Error Clear (page 8-68) 10-41 Select [Cancel] to a removable memory prohibited? Replace the waste toner box. Troubleshooting > Troubleshooting R Message Checkpoints Corrective Actions Reference Page Removable memory error.*1 Is writing to cancel the job. Select [End]. If the...
...formatted, it is not compatible with the machine. Use the removable memory formatted by this machine. Select ― [End]. Replace the waste toner box. Select [End]. Connect a compatible removable memory. Remove originals from the ― the document document processor? document ...: Auto Error Clear (page 8-68) 10-41 Select [Cancel] to a removable memory prohibited? Replace the waste toner box. Troubleshooting > Troubleshooting R Message Checkpoints Corrective Actions Reference Page Removable memory error.*1 Is writing to cancel the job. Select [End]. If the...
2552ci/3252ci4052ci/5052ci/6052ci Operation Guide
Page 553
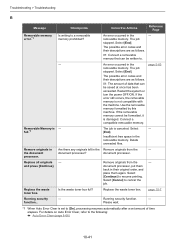
.... The job is canceled. page 10-3 - ― - cleaning. Time for maintenance - Please wait. Put down the receiver. Select [End]. Replace the toner container to maintain its quality. Is the removable memory formatted by selecting [Print in black and white by this ― machine. improperly installed. Select [End]. Is there any cover which...
.... The job is canceled. page 10-3 - ― - cleaning. Time for maintenance - Please wait. Put down the receiver. Select [End]. Replace the toner container to maintain its quality. Is the removable memory formatted by selecting [Print in black and white by this ― machine. improperly installed. Select [End]. Is there any cover which...
2552ci/3252ci4052ci/5052ci/6052ci Operation Guide
Page 554
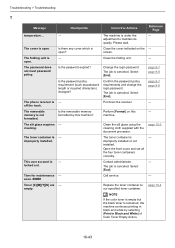
... - It is almost time to replace the - PC [C][M][Y][K] W Checkpoints Does the installed toner container's regional specification match the machine's? Checkpoints Corrective Actions Reference Page It is canceled. Corrective Actions You cannot use this - Remove the paper. later. U Message Unknown Toner Installed. temperature. Reference Page - Try again - Adjust the temperature and the humidity of...
... - It is almost time to replace the - PC [C][M][Y][K] W Checkpoints Does the installed toner container's regional specification match the machine's? Checkpoints Corrective Actions Reference Page It is canceled. Corrective Actions You cannot use this - Remove the paper. later. U Message Unknown Toner Installed. temperature. Reference Page - Try again - Adjust the temperature and the humidity of...
2552ci/3252ci4052ci/5052ci/6052ci Operation Guide
Page 560
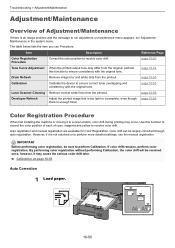
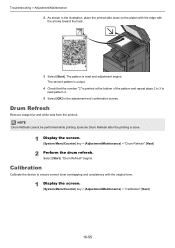
...-55 Auto Correction 1 Load paper. 10-50 Item Description Reference Page Color Registration Procedure Correct the color position to ensure correct toner overlapping and consistency with the original tone. page 10-55 Calibration Calibrate the device to resolve color drift. Auto registration and manual... Overview of cyan, magenta and yellow to a new location, color drift during printing may occur. page 10-55 Laser Scanner Cleaning Remove vertical white lines from the printout. However, if it may differ from the original, perform this function to correct the color position ...
...-55 Auto Correction 1 Load paper. 10-50 Item Description Reference Page Color Registration Procedure Correct the color position to ensure correct toner overlapping and consistency with the original tone. page 10-55 Calibration Calibrate the device to resolve color drift. Auto registration and manual... Overview of cyan, magenta and yellow to a new location, color drift during printing may occur. page 10-55 Laser Scanner Cleaning Remove vertical white lines from the printout. However, if it may differ from the original, perform this function to correct the color position ...
2552ci/3252ci4052ci/5052ci/6052ci Operation Guide
Page 565
.... 4 Check that the number "2" is printed at the bottom of the pattern and repeat steps 2 to 3 to ensure correct toner overlapping and consistency with the arrows toward the back. 3 Select [Start]. NOTE Drum Refresh cannot be performed while printing. Calibration Calibrate... the device to read and adjustment begins. Troubleshooting > Adjustment/Maintenance 2 As shown in the adjustment end confirmation screen. Drum Refresh Remove image blur and white dots from the printout. Select [Start]. Execute Drum Refresh after the printing is read pattern 2. 5 Select [OK...
.... 4 Check that the number "2" is printed at the bottom of the pattern and repeat steps 2 to 3 to ensure correct toner overlapping and consistency with the arrows toward the back. 3 Select [Start]. NOTE Drum Refresh cannot be performed while printing. Calibration Calibrate... the device to read and adjustment begins. Troubleshooting > Adjustment/Maintenance 2 As shown in the adjustment end confirmation screen. Drum Refresh Remove image blur and white dots from the printout. Select [Start]. Execute Drum Refresh after the printing is read pattern 2. 5 Select [OK...


