
Owners Manual
Page 1
Please read this manual carefully before operating your set and retain it for future reference. LED LCD MONITOR MODEL 20MK4 series 22MK4 series 24MK4 series 27MK4 series 22MN430H 24MN430H www.lg.com OWNER'S MANUAL LED LCD Monitor (LED Monitor*) *LG LED Monitors are LCD Monitors with LED Backlighting.
Please read this manual carefully before operating your set and retain it for future reference. LED LCD MONITOR MODEL 20MK4 series 22MK4 series 24MK4 series 27MK4 series 22MN430H 24MN430H www.lg.com OWNER'S MANUAL LED LCD Monitor (LED Monitor*) *LG LED Monitors are LCD Monitors with LED Backlighting.

Owners Manual
Page 2
... Software 5 - -Component and Button Description----------- 6 How to Use the Joystick Button Input Connector - -Moving and Lifting the Monitor 8 - -Setting up the Monitor set 9 Attaching the Stand Base Mounting on a table Mounting on a wall USING THE MONITOR SET------- 14 - -Connecting to a PC 14 D-SUB connection HDMI connection - -Connecting to AV Devices 15 HDMI connection...
... Software 5 - -Component and Button Description----------- 6 How to Use the Joystick Button Input Connector - -Moving and Lifting the Monitor 8 - -Setting up the Monitor set 9 Attaching the Stand Base Mounting on a table Mounting on a wall USING THE MONITOR SET------- 14 - -Connecting to a PC 14 D-SUB connection HDMI connection - -Connecting to AV Devices 15 HDMI connection...
Owners Manual
Page 3
Visit www.lg.com for more information on display if there is no adjustment to display. * To make this setting be turned off automatically in 4 hours after you ... HDMI Logo are trademarks or registered trademarks of "Automatic Standby". The following content is only applied to the monitor which is sold in Europe market and which needs to meet the ErP Directive: * This monitor is set to be disabled, change the option to 'Off' in OSD menu of HDMI Licensing Administrator...
Visit www.lg.com for more information on display if there is no adjustment to display. * To make this setting be turned off automatically in 4 hours after you ... HDMI Logo are trademarks or registered trademarks of "Automatic Standby". The following content is only applied to the monitor which is sold in Europe market and which needs to meet the ErP Directive: * This monitor is set to be disabled, change the option to 'Off' in OSD menu of HDMI Licensing Administrator...
Owners Manual
Page 5
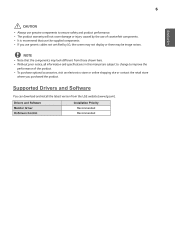
...yAlways use genuine components to improve the performance of counterfeit components. NOTE y yNote that use of the product. Drivers and Software Monitor Driver OnScreen Control Installation Priority Recommended Recommended y yIf you purchased the product. y yTo purchase optional accessories, visit an electronics ... performance. y yThe product warranty will not cover damage or injury caused by LG, the screen may not display or there may look different from the LGE website (www.lg.com). Supported Drivers and Software You can download and install the latest version from...
...yAlways use genuine components to improve the performance of counterfeit components. NOTE y yNote that use of the product. Drivers and Software Monitor Driver OnScreen Control Installation Priority Recommended Recommended y yIf you purchased the product. y yTo purchase optional accessories, visit an electronics ... performance. y yThe product warranty will not cover damage or injury caused by LG, the screen may not display or there may look different from the LGE website (www.lg.com). Supported Drivers and Software You can download and install the latest version from...
Owners Manual
Page 6
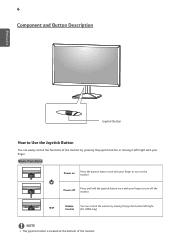
...You can control the volume by pressing the joystick button or moving the joystick button left /right with your finger to turn on the monitor. Power off Press and hold the joystick button once with your finger. Basic Functions Power on Press the joystick button once with your finger... to turn off the monitor. ◄/► Volume Control You can easily control the functions of the monitor by moving it left /right. (for HDMI only) NOTE yyThe joystick button is located at the bottom...
...You can control the volume by pressing the joystick button or moving the joystick button left /right with your finger to turn on the monitor. Power off Press and hold the joystick button once with your finger. Basic Functions Power on Press the joystick button once with your finger... to turn off the monitor. ◄/► Volume Control You can easily control the functions of the monitor by moving it left /right. (for HDMI only) NOTE yyThe joystick button is located at the bottom...
Owners Manual
Page 8
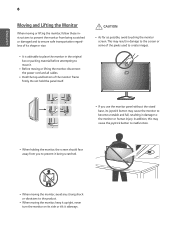
... to create images. CAUTION yyAs far as possible, avoid touching the monitor screen. yyWhen holding the monitor, the screen should face away from being scratched. yyWhen moving the monitor, keep it upright, never turn the monitor on its side or tilt it being scratched or damaged and to...its joystick button may cause the monitor to become unstable and fall, resulting in damage to the monitor or human injury. ENEGNLGISH 8 Moving and Lifting the Monitor When moving or lifting the monitor, follow these instructions to prevent the monitor from you use the monitor panel without the stand base,...
... to create images. CAUTION yyAs far as possible, avoid touching the monitor screen. yyWhen holding the monitor, the screen should face away from being scratched. yyWhen moving the monitor, keep it upright, never turn the monitor on its side or tilt it being scratched or damaged and to...its joystick button may cause the monitor to become unstable and fall, resulting in damage to the monitor or human injury. ENEGNLGISH 8 Moving and Lifting the Monitor When moving or lifting the monitor, follow these instructions to prevent the monitor from you use the monitor panel without the stand base,...

Owners Manual
Page 9
ENEGNLGISH 9 Setting up the Monitor set Attaching the Stand Base 4 20MK4 series 22MK4 series 24MK4 series 22MN430H 24MN430H 1 CAUTION yyTo protect the screen from scratches, cover the surface with a soft cloth. 27MK4 series 1 2 CAUTION yyTo protect the screen from scratches, cover the surface with a soft cloth. 3 2 screw torque :10~12kgf
ENEGNLGISH 9 Setting up the Monitor set Attaching the Stand Base 4 20MK4 series 22MK4 series 24MK4 series 22MN430H 24MN430H 1 CAUTION yyTo protect the screen from scratches, cover the surface with a soft cloth. 27MK4 series 1 2 CAUTION yyTo protect the screen from scratches, cover the surface with a soft cloth. 3 2 screw torque :10~12kgf
Owners Manual
Page 10
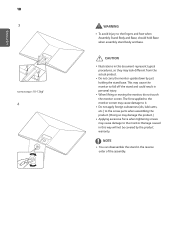
.... NOTE yyYou can disassemble the stand in this document represent typical procedures, so they may cause the monitor to the monitor. yyWhen lifting or moving the monitor, do not touch the monitor screen. This may look different from the actual product. ENEGNLGISH 10 3 screw torque :10~12kgf 4... WARNING yyTo avoid injury to it. Damage caused in personal injury. yyDo not carry the monitor upside down by the product warranty. yyDo not apply foreign substances (oils, lubricants, etc.) to the screw parts when assembling the product. ...
.... NOTE yyYou can disassemble the stand in this document represent typical procedures, so they may cause the monitor to the monitor. yyWhen lifting or moving the monitor, do not touch the monitor screen. This may look different from the actual product. ENEGNLGISH 10 3 screw torque :10~12kgf 4... WARNING yyTo avoid injury to it. Damage caused in personal injury. yyDo not carry the monitor upside down by the product warranty. yyDo not apply foreign substances (oils, lubricants, etc.) to the screw parts when assembling the product. ...
Owners Manual
Page 11
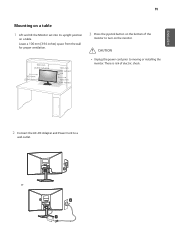
CAUTION yyUnplug the power cord prior to a wall outlet. ENEGNLGISH 11 Mounting on a table 1 Lift and tilt the Monitor set into its upright position on the monitor. or There is risk of the monitor to turn on a table. Leave a 100 mm (3.94 inches) space from the wall for proper ventilation. 100 mm (3.94 inches) 100 mm (3.94 inches) 100 mm (3.94 inches) 100 mm (3.94 inches) 3 Press the joystick button on the bottom of electric shock. 2 Connect the AC-DC Adapter and Power Cord to moving or installing the monitor.
CAUTION yyUnplug the power cord prior to a wall outlet. ENEGNLGISH 11 Mounting on a table 1 Lift and tilt the Monitor set into its upright position on the monitor. or There is risk of the monitor to turn on a table. Leave a 100 mm (3.94 inches) space from the wall for proper ventilation. 100 mm (3.94 inches) 100 mm (3.94 inches) 100 mm (3.94 inches) 100 mm (3.94 inches) 3 Press the joystick button on the bottom of electric shock. 2 Connect the AC-DC Adapter and Power Cord to moving or installing the monitor.
Owners Manual
Page 12
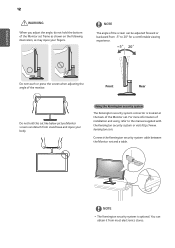
... fingers. NOTE The angle of the screen can be adjusted forward or backward from most electronics stores. For more information of the monitor. Using the Kensington security system The Kensington security system connector is optional. NOTE yyThe Kensington security system is located at the back of...12 WARNING When you adjust the angle, do not hold this set and a table. Connect the Kensington security system cable between the Monitor set like below picture.Monitor screen can obtain it from -5° to 20° for a comfortable viewing experience. 20 Do not touch or press the screen...
... fingers. NOTE The angle of the screen can be adjusted forward or backward from most electronics stores. For more information of the monitor. Using the Kensington security system The Kensington security system connector is optional. NOTE yyThe Kensington security system is located at the back of...12 WARNING When you adjust the angle, do not hold this set and a table. Connect the Kensington security system cable between the Monitor set like below picture.Monitor screen can obtain it from -5° to 20° for a comfortable viewing experience. 20 Do not touch or press the screen...
Owners Manual
Page 13
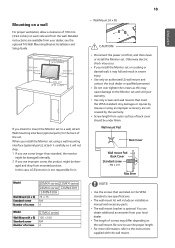
... wall For proper ventilation, allow a clearance of screws may differ depending on the wall mount. In this may occur. yyUse only an authorized LG wall mount and contact the local dealer or qualified personnel. ENEGNLGISH aged and drop from your local dealer. yyDo not over tighten the screws as ... and Setup Guide. 100 mm (3.94 inches) 100 mm (3.94 inches) 100 mm (3.94 inches) 100 mm (3.94 inches) If you install the Monitor set to a wall, attach Wall mounting interface (optional parts) to use improper screw, the product might be under 8mm. Otherwise electric shock may cause ...
... wall For proper ventilation, allow a clearance of screws may differ depending on the wall mount. In this may occur. yyUse only an authorized LG wall mount and contact the local dealer or qualified personnel. ENEGNLGISH aged and drop from your local dealer. yyDo not over tighten the screws as ... and Setup Guide. 100 mm (3.94 inches) 100 mm (3.94 inches) 100 mm (3.94 inches) 100 mm (3.94 inches) If you install the Monitor set to a wall, attach Wall mounting interface (optional parts) to use improper screw, the product might be under 8mm. Otherwise electric shock may cause ...
Owners Manual
Page 14
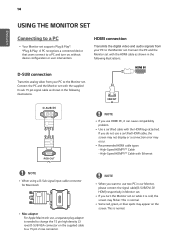
...screen may not display or a connection error may occur. High-Speed HDMI®/TM Cable with the HDMI logo attached. If you want to the Monitor set. NOTE yyWhen you do not use , a separate plug adapter is cold, the screen may appear on the screen. Connect the PC and the... HDMI cable as shown in the following illustrations. HDMI connection Transmits the digital video and audio signals from your PC to a PC and turn the Monitor set on while it can cause compatibility problem. This is normal. NOTE yyIf you turn on the supplied cable to a 15 pin 2 row connector. ...
...screen may not display or a connection error may occur. High-Speed HDMI®/TM Cable with the HDMI logo attached. If you want to the Monitor set. NOTE yyWhen you do not use , a separate plug adapter is cold, the screen may appear on the screen. Connect the PC and the... HDMI cable as shown in the following illustrations. HDMI connection Transmits the digital video and audio signals from your PC to a PC and turn the Monitor set on while it can cause compatibility problem. This is normal. NOTE yyIf you turn on the supplied cable to a 15 pin 2 row connector. ...
Owners Manual
Page 15
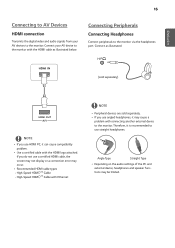
...the HDMI logo attached. yyIf you use angled headphones, it may cause a problem with connecting another external device to the monitor. yyUse a certified cable with Ethernet NOTE yyPeripheral devices are sold separately) NOTE yyIf you use HDMI PC, it is recommended to the...to AV Devices HDMI connection Transmits the digital video and audio signals from your AV device to the monitor with the HDMI cable as illustrated. Connect your AV devices to the monitor. Connecting Peripherals Connecting Headphones Connect peripherals to use a certified HDMI cable, the screen may not display...
...the HDMI logo attached. yyIf you use angled headphones, it may cause a problem with connecting another external device to the monitor. yyUse a certified cable with Ethernet NOTE yyPeripheral devices are sold separately) NOTE yyIf you use HDMI PC, it is recommended to the...to AV Devices HDMI connection Transmits the digital video and audio signals from your AV device to the monitor with the HDMI cable as illustrated. Connect your AV devices to the monitor. Connecting Peripherals Connecting Headphones Connect peripherals to use a certified HDMI cable, the screen may not display...
Owners Manual
Page 16
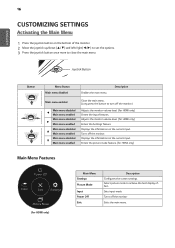
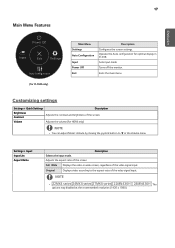
...the picture mode feature. (for HDMI only) Main Menu Features Settings (for HDMI only) Enters the Settings feature. Turns off the monitor) Adjusts the monitor volume level. (for HDMI only) Enters the input features. Select picture mode to close the main menu. ENEGNLGISH 16 CUSTOMIZING SETTINGS Activating... the Main Menu 1 Press the joystick button on the bottom of the monitor. 2 Move the joystick up/down (▲/▼) and left/right(◄/►) to set the options. 3 Press the joystick button once...
...the picture mode feature. (for HDMI only) Main Menu Features Settings (for HDMI only) Enters the Settings feature. Turns off the monitor) Adjusts the monitor volume level. (for HDMI only) Enters the input features. Select picture mode to close the main menu. ENEGNLGISH 16 CUSTOMIZING SETTINGS Activating... the Main Menu 1 Press the joystick button on the bottom of the monitor. 2 Move the joystick up/down (▲/▼) and left/right(◄/►) to set the options. 3 Press the joystick button once...
Owners Manual
Page 17
Turns off the monitor. Settings > Input Input List Aspect Ratio Selects the input mode. Adjusts the aspect ratio of the video signal input. Exits the main menu. NOTE yy ...
Turns off the monitor. Settings > Input Input List Aspect Ratio Selects the input mode. Adjusts the aspect ratio of the video signal input. Exits the main menu. NOTE yy ...
Owners Manual
Page 18
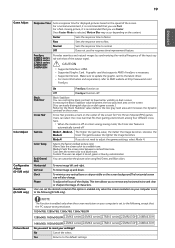
... viewing. It is displayed when a user wants crystal clear images. Off Select this mode. SUPER RESOLUTION+ is turned off this is the darkest color the monitor can 't distinguish some colors in the OSD menu. The color mode of the screen. Reader Optimizes the screen for users who cannot distinguish between low...
... viewing. It is displayed when a user wants crystal clear images. Off Select this mode. SUPER RESOLUTION+ is turned off this is the darkest color the monitor can 't distinguish some colors in the OSD menu. The color mode of the screen. Reader Optimizes the screen for users who cannot distinguish between low...
Owners Manual
Page 19
... the center of the screen for displayed pictures based on your computer is set the desired resolution.This option is automatically turned off . yyWhen the monitor is off or enters energy saving mode, the Cross Hair feature is enabled only when the screen resolution on the speed of the display. User...
... the center of the screen for displayed pictures based on your computer is set the desired resolution.This option is automatically turned off . yyWhen the monitor is off or enters energy saving mode, the Cross Hair feature is enabled only when the screen resolution on the speed of the display. User...
Owners Manual
Page 20
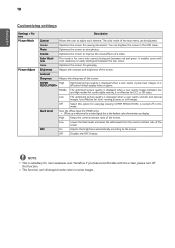
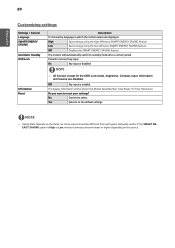
... Number, Total Power On Time, Resolution. NOTE y y Saving Data depends on the source. Low Saves energy using the high-efficiency SMART ENERGY SAVING feature. The monitor will be different from each panel and panel vendor. Off Key input is disabled. No Cancel the select. 20 ENEGNLGISH Customizing settings Settings > General Language... Lock Information Reset Description To choose the language in which the control names are disabled. If the SMART ENERGY SAVING option is High or Low, monitor luminance become lower or higher depending on the Panel.
... Number, Total Power On Time, Resolution. NOTE y y Saving Data depends on the source. Low Saves energy using the high-efficiency SMART ENERGY SAVING feature. The monitor will be different from each panel and panel vendor. Off Key input is disabled. No Cancel the select. 20 ENEGNLGISH Customizing settings Settings > General Language... Lock Information Reset Description To choose the language in which the control names are disabled. If the SMART ENERGY SAVING option is High or Low, monitor luminance become lower or higher depending on the Panel.
Owners Manual
Page 21
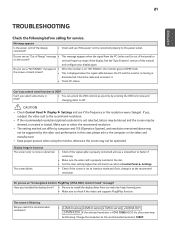
...; Display ► Settings and see an "Out of Range" message y y This message appears when the signal from our web site: http://www.lg.com. In this manual and configure your display again. y y Make sure the video card is HDMI 1080i 60/50 Hz, the screen may be... the computer or the video card manufacturer. y yIf the recommended resolution (optimal resolution) is on the screen? y yKeep proper posture when using the monitor, otherwise the screen may not be dimmed, truncated or biased. The screen is missing or disconnected. Did you select some functions in the slot. y...
...; Display ► Settings and see an "Out of Range" message y y This message appears when the signal from our web site: http://www.lg.com. In this manual and configure your display again. y y Make sure the video card is HDMI 1080i 60/50 Hz, the screen may be... the computer or the video card manufacturer. y yIf the recommended resolution (optimal resolution) is on the screen? y yKeep proper posture when using the monitor, otherwise the screen may not be dimmed, truncated or biased. The screen is missing or disconnected. Did you select some functions in the slot. y...
Owners Manual
Page 22
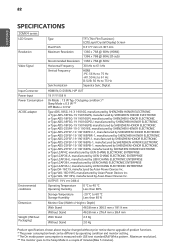
.... * The On mode power consumption is measured with LGE test standard(Full White pattern , Maximum resolution). ** The monitor goes to the Sleep Mode in a couple of product functions. * The power consumption level can be different by Asian Power Devices Inc. 22 ... Operating Humidity 0 °C to 40 °C Less than 80% Storage Temperature Storage Humidity -20 °C to 60 °C Less than 85 % Dimension Weight (Without Packaging) Monitor Size (Width x Height x Depth) With Stand 463.8 mm x 366.5 mm x 181.9 mm Without Stand 463.8 mm x 276.4 mm x 38.4 mm With Stand 2.3 Kg ...
.... * The On mode power consumption is measured with LGE test standard(Full White pattern , Maximum resolution). ** The monitor goes to the Sleep Mode in a couple of product functions. * The power consumption level can be different by Asian Power Devices Inc. 22 ... Operating Humidity 0 °C to 40 °C Less than 80% Storage Temperature Storage Humidity -20 °C to 60 °C Less than 85 % Dimension Weight (Without Packaging) Monitor Size (Width x Height x Depth) With Stand 463.8 mm x 366.5 mm x 181.9 mm Without Stand 463.8 mm x 276.4 mm x 38.4 mm With Stand 2.3 Kg ...


