
Owner's Manual
Page 4
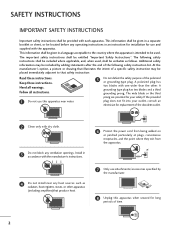
... following safety instructions shall be included where applicable, and, when used . If the provided plug does not fit into your safety. At the manufacturer's option, a picture or drawing that illustrates the intent of a specific safety instruction may be included by the manufacturer. 8 Unplug this apparatus near any ventilation openings. Heed all...
... following safety instructions shall be included where applicable, and, when used . If the provided plug does not fit into your safety. At the manufacturer's option, a picture or drawing that illustrates the intent of a specific safety instruction may be included by the manufacturer. 8 Unplug this apparatus near any ventilation openings. Heed all...
Owner's Manual
Page 6
... - Preset 42 Color Tone - Black (Darkness) Level 49 Image Sticking Minimization (ISM) Method 50 Low - Power Picture Mode 51 Picture Reset 52 SOUND & LANGUAGE CONTROL Preset Sound Setting (Sound Mode 53 Sound Frequency Adjustment 54 Auto Volume Leveler 55 Balance... 58 On-Screen Menus Language Selection 59 Caption/Text 60 Auto Scan (Auto Tuning 32 - Color Tone - Picture Improvement Technology 46 XD Demo 47 Advanced - Picture Mode - Picture Mode - CONTENTS WARNING / CAUTION 1 SAFETY INSTRUCTIONS 2 FEATURES OF THIS TV 6 PREPARATION Accessories 7 Front Panel...
... - Preset 42 Color Tone - Black (Darkness) Level 49 Image Sticking Minimization (ISM) Method 50 Low - Power Picture Mode 51 Picture Reset 52 SOUND & LANGUAGE CONTROL Preset Sound Setting (Sound Mode 53 Sound Frequency Adjustment 54 Auto Volume Leveler 55 Balance... 58 On-Screen Menus Language Selection 59 Caption/Text 60 Auto Scan (Auto Tuning 32 - Color Tone - Picture Improvement Technology 46 XD Demo 47 Advanced - Picture Mode - Picture Mode - CONTENTS WARNING / CAUTION 1 SAFETY INSTRUCTIONS 2 FEATURES OF THIS TV 6 PREPARATION Accessories 7 Front Panel...

Owner's Manual
Page 8
HDMITM, the HDMI logo and High-Definition Multimedia Interface are trademarks or registered trademarks of a full digital image processor, six different main picture quality factors. FEATURES OF THIS TV LG's own special digital image generator, consisting of HDMI Licensing." 6 With HDMI CEC support of LG's audio/video device connected to the HDMI (high-definition multimedia interface), LG TV with this logo works easily with one remote control.
HDMITM, the HDMI logo and High-Definition Multimedia Interface are trademarks or registered trademarks of a full digital image processor, six different main picture quality factors. FEATURES OF THIS TV LG's own special digital image generator, consisting of HDMI Licensing." 6 With HDMI CEC support of LG's audio/video device connected to the HDMI (high-definition multimedia interface), LG TV with this logo works easily with one remote control.
Owner's Manual
Page 12
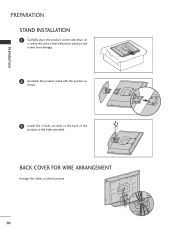
BACK COVER FOR WIRE ARRANGEMENT Arrange the cables as shown. 3 Install the 4 bolts securely, in the back of the product in the holes provided. PREPARATION PREPARATION STAND INSTALLATION 1 Carefully place the product screen side down on a cushioned surface that will protect product and screen from damage. 2 Assemble the product stand with the product as shown picture. 10
BACK COVER FOR WIRE ARRANGEMENT Arrange the cables as shown. 3 Install the 4 bolts securely, in the back of the product in the holes provided. PREPARATION PREPARATION STAND INSTALLATION 1 Carefully place the product screen side down on a cushioned surface that will protect product and screen from damage. 2 Assemble the product stand with the product as shown picture. 10
Owner's Manual
Page 13
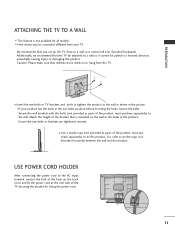
... as parts of the TV by using the bracket for all models. Secure the wall brackets with the bolts (not provided as shown in the picture. * If your TV. It is mounted on the back cover and fix the power cord at the rear side of the product, must purchase separately...
... as parts of the TV by using the bracket for all models. Secure the wall brackets with the bolts (not provided as shown in the picture. * If your TV. It is mounted on the back cover and fix the power cord at the rear side of the product, must purchase separately...
Owner's Manual
Page 15
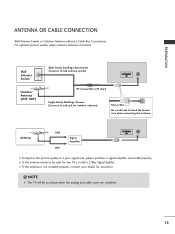
...) Bronze Wire Be careful not to wall jack for two TV's, install a 2-Way Signal Splitter. I To improve the picture quality in a poor signal area, please purchase a signal amplifier and install properly. For optimum picture quality, adjust antenna direction if needed. Antenna UHF Signal Amplifier VHF I If the antenna is not installed properly...
...) Bronze Wire Be careful not to wall jack for two TV's, install a 2-Way Signal Splitter. I To improve the picture quality in a poor signal area, please purchase a signal amplifier and install properly. For optimum picture quality, adjust antenna direction if needed. Antenna UHF Signal Amplifier VHF I If the antenna is not installed properly...
Owner's Manual
Page 19
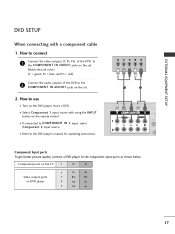
... Component 1 input source with a component cable 1. I If connected to the COMPONENT IN VIDEO1 jacks on the set . 2. Y PB PR L R 1 2 Component Input ports To get better picture quality, connect a DVD player to the DVD player's manual for operating instructions. Component ports on the TV Y PB PR Video output ports on the DVD...
... Component 1 input source with a component cable 1. I If connected to the COMPONENT IN VIDEO1 jacks on the set . 2. Y PB PR L R 1 2 Component Input ports To get better picture quality, connect a DVD player to the DVD player's manual for operating instructions. Component ports on the TV Y PB PR Video output ports on the DVD...
Owner's Manual
Page 21
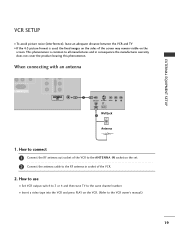
... VCR output switch to 3 or 4 and then tune TV to the same channel number. VCR SETUP I To avoid picture noise (interference), leave an adequate distance between the VCR and TV I If the 4:3 picture format is common to all manufactures and in socket of the VCR to the ANTENNA IN socket on the...
... VCR output switch to 3 or 4 and then tune TV to the same channel number. VCR SETUP I To avoid picture noise (interference), leave an adequate distance between the VCR and TV I If the 4:3 picture format is common to all manufactures and in socket of the VCR to the ANTENNA IN socket on the...

Owner's Manual
Page 24
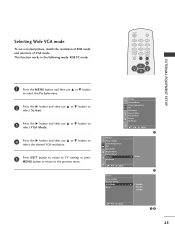
How to another rate or adjust the brightness and contrast on the Picture menu until the picture is clear. I Turn on the PC and the set. The fixed image may be changed, change the refresh rate to use I Select RGB PC input ... to 852x480, 60Hz. How to connect 1 Connect the RGB output of time. I This TV doesn't support DVI-PC mode. 1 2 ! NOTE G To get the the best picture quality, adjust the PC graphics card to the RGB IN (P C) jack on the set. If the refresh rate of the PC graphic card. G Avoid keeping...
How to another rate or adjust the brightness and contrast on the Picture menu until the picture is clear. I Turn on the PC and the set. The fixed image may be changed, change the refresh rate to use I Select RGB PC input ... to 852x480, 60Hz. How to connect 1 Connect the RGB output of time. I This TV doesn't support DVI-PC mode. 1 2 ! NOTE G To get the the best picture quality, adjust the PC graphics card to the RGB IN (P C) jack on the set. If the refresh rate of the PC graphic card. G Avoid keeping...
Owner's Manual
Page 25
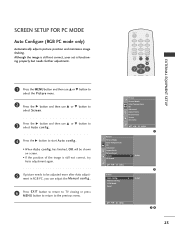
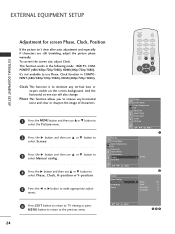
...INPUT 2 3 5 6 8 9 0 MUTE RATIO EXIT MENU ENTER CH VOL VOL CH EXTERNAL EQUIPMENT SETUP 1 Press the MENU button and then use D or E button to select the Picture menu. 2 Press the G button and then use D or E button to select Screen. 3 Press the G button and then use D or E button to select Auto config.. 4...further adjustment. Manual Config. Although the image is still not correct, your set is still not correct, try Auto adjustment again. 5 If picture needs to be adjusted more after Auto adjustment in RGB PC, you can adjust the Manual config.. 6 Press EXIT button to return to ...
...INPUT 2 3 5 6 8 9 0 MUTE RATIO EXIT MENU ENTER CH VOL VOL CH EXTERNAL EQUIPMENT SETUP 1 Press the MENU button and then use D or E button to select the Picture menu. 2 Press the G button and then use D or E button to select Screen. 3 Press the G button and then use D or E button to select Auto config.. 4...further adjustment. Manual Config. Although the image is still not correct, your set is still not correct, try Auto adjustment again. 5 If picture needs to be adjusted more after Auto adjustment in RGB PC, you can adjust the Manual config.. 6 Press EXIT button to return to ...
Owner's Manual
Page 26
... horizontal noise and clear or sharpen the image of characters. 1 Press the MENU button and then use D or E button to select the Picture menu. 2 Press the G button and then use D or E button to select Screen. 3 Press the G button and then use .../720p/1080i), HDMI (480p/720p/1080i). And the horizontal screen size will also change. Picture Picture Mode Color Temperature XD Advanced Aspect Ratio Picture Reset Screen XD Demo DE F G MENU 1 Picture Picture Mode Color Temperature XD Advanced Aspect Ratio Picture Reset Screen XD Demo G To Set DE F G MENU Screen Auto Config. POWER TV...
... horizontal noise and clear or sharpen the image of characters. 1 Press the MENU button and then use D or E button to select the Picture menu. 2 Press the G button and then use D or E button to select Screen. 3 Press the G button and then use .../720p/1080i), HDMI (480p/720p/1080i). And the horizontal screen size will also change. Picture Picture Mode Color Temperature XD Advanced Aspect Ratio Picture Reset Screen XD Demo DE F G MENU 1 Picture Picture Mode Color Temperature XD Advanced Aspect Ratio Picture Reset Screen XD Demo G To Set DE F G MENU Screen Auto Config. POWER TV...
Owner's Manual
Page 27
... 8 9 0 MUTE RATIO EXIT MENU ENTER CH VOL VOL CH EXTERNAL EQUIPMENT SETUP 1 Press the MENU button and then use D or E button to select the Picture menu. 2 Press the G button and then use D or E button to select Screen. 3 Press the G button and then use D or E button to ...Manual Config. This function works in the following mode: RGB PC mode. Picture Picture Mode Color Temperature XD Advanced Aspect Ratio Picture Reset Screen XD Demo DE F G MENU 1 Picture Picture Mode Color Temperature XD Advanced Aspect Ratio Picture Reset Screen XD Demo G To Set DE F G MENU 2 Screen ...
... 8 9 0 MUTE RATIO EXIT MENU ENTER CH VOL VOL CH EXTERNAL EQUIPMENT SETUP 1 Press the MENU button and then use D or E button to select the Picture menu. 2 Press the G button and then use D or E button to select Screen. 3 Press the G button and then use D or E button to ...Manual Config. This function works in the following mode: RGB PC mode. Picture Picture Mode Color Temperature XD Advanced Aspect Ratio Picture Reset Screen XD Demo DE F G MENU 1 Picture Picture Mode Color Temperature XD Advanced Aspect Ratio Picture Reset Screen XD Demo G To Set DE F G MENU 2 Screen ...
Owner's Manual
Page 28
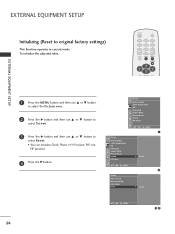
... 8 9 0 MUTE RATIO EXIT MENU ENTER CH VOL VOL CH EXTERNAL EQUIPMENT SETUP 1 Press the MENU button and then use D or E button to select the Picture menu. 2 Press the G button and then use D or E button to select Screen. 3 Press the G button and then use D or E button to ...original factory settings) This function operates in current mode. Picture Picture Mode Color Temperature XD Advanced Aspect Ratio Picture Reset Screen XD Demo DE F G MENU 1 Picture Picture Mode Color Temperature XD Advanced Aspect Ratio Picture Reset Screen XD Demo G To Set DE F G MENU 2 Screen ...
... 8 9 0 MUTE RATIO EXIT MENU ENTER CH VOL VOL CH EXTERNAL EQUIPMENT SETUP 1 Press the MENU button and then use D or E button to select the Picture menu. 2 Press the G button and then use D or E button to select Screen. 3 Press the G button and then use D or E button to ...original factory settings) This function operates in current mode. Picture Picture Mode Color Temperature XD Advanced Aspect Ratio Picture Reset Screen XD Demo DE F G MENU 1 Picture Picture Mode Color Temperature XD Advanced Aspect Ratio Picture Reset Screen XD Demo G To Set DE F G MENU 2 Screen ...

Owner's Manual
Page 31
... back side and install the batteries matching correct polarity (+ with +, - Right/ENTER) SIMPLINK control buttons Control the SIMPLINK compatible devices. G p.40 PIP Switches the sub picture PIP/DW mode. with new ones. R POWER TV 1 4 7 INPUT 2 3 5 6 8 9 0 MUTE I Close cover. Don't mix old or used ...batteries in PIP/DW mode. G p.40 PIP INPUT Selects the input source for the sub picture. G p.40 PIP CH -/+ Selects a program for the sub picture in a recycle bin to your preference. G p.40 POSITION Moves the sub...
... back side and install the batteries matching correct polarity (+ with +, - Right/ENTER) SIMPLINK control buttons Control the SIMPLINK compatible devices. G p.40 PIP Switches the sub picture PIP/DW mode. with new ones. R POWER TV 1 4 7 INPUT 2 3 5 6 8 9 0 MUTE I Close cover. Don't mix old or used ...batteries in PIP/DW mode. G p.40 PIP INPUT Selects the input source for the sub picture. G p.40 PIP CH -/+ Selects a program for the sub picture in a recycle bin to your preference. G p.40 POSITION Moves the sub...
Owner's Manual
Page 32
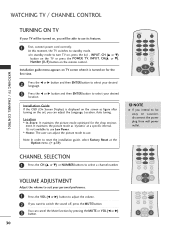
.... 2 If you want to switch the sound off, press the MUTE button. 3 You can adjust the picture mode to select a channel number. Installation guide menu appears on TV screen when it is displayed on the ... TV, INPUT, CH(D or E), Number (0~9) button on the remote control. It maintains the picture mode as figure after turning on the set, you can adjust the Language, Location, Auto tuning. Location * In...-Store: It maintains the picture mode optimized for the first time. 2 Press the F or G button and then ENTER button to...
.... 2 If you want to switch the sound off, press the MUTE button. 3 You can adjust the picture mode to select a channel number. Installation guide menu appears on TV screen when it is displayed on the ... TV, INPUT, CH(D or E), Number (0~9) button on the remote control. It maintains the picture mode as figure after turning on the set, you can adjust the Language, Location, Auto tuning. Location * In...-Store: It maintains the picture mode optimized for the first time. 2 Press the F or G button and then ENTER button to...
Owner's Manual
Page 33
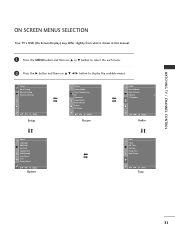
... then use D E F G button to display the available menus. Setup Auto Tuning Manual Tuning Favorite Channel DE F G MENU Setup Picture Picture Mode Color Temperature XD Advanced Aspect Ratio Picture Reset Screen XD Demo DE F G MENU Picture Audio Sound Mode Auto Volume Balance 0 TV Speaker DE F G MENU Audio Option Language SIMPLINK Key Lock Caption/Text ISM...
... then use D E F G button to display the available menus. Setup Auto Tuning Manual Tuning Favorite Channel DE F G MENU Setup Picture Picture Mode Color Temperature XD Advanced Aspect Ratio Picture Reset Screen XD Demo DE F G MENU Picture Audio Sound Mode Auto Volume Balance 0 TV Speaker DE F G MENU Audio Option Language SIMPLINK Key Lock Caption/Text ISM...

Owner's Manual
Page 36
... use D or E button to select Manual Tuning. 3 Press the G button and then use D or E button to select Fine. 4 Press the F or G button to adjust the picture to your preference. 5 Press the ENTER button to store it. 6 Press EXIT button to return to TV viewing or press MENU button to return to...
... use D or E button to select Manual Tuning. 3 Press the G button and then use D or E button to select Fine. 4 Press the F or G button to adjust the picture to your preference. 5 Press the ENTER button to store it. 6 Press EXIT button to return to TV viewing or press MENU button to return to...

Owner's Manual
Page 42
... CH +/- With S I Z E button in the Component, RGB, HDMI mode. (But, it can be large, and the other source will show a smaller inset image. PICTURE CONTROL PIP / DOUBLE WINDOW PIP lets you view 2 different inputs (sources) on the TV screen at the same time. The selected channel number is adjusted.... One source will be selected only TV, AV) Sub Picture Size Adjustment (PIP mode only) Press the S I P button to adjust the sub picture size. PIP Mode DW Mode PIP Off FAV REVIEW CH EDIT SLEEP CAPTION MTS SIZE POSITION PIP PIP CH ...
... CH +/- With S I Z E button in the Component, RGB, HDMI mode. (But, it can be large, and the other source will show a smaller inset image. PICTURE CONTROL PIP / DOUBLE WINDOW PIP lets you view 2 different inputs (sources) on the TV screen at the same time. The selected channel number is adjusted.... One source will be selected only TV, AV) Sub Picture Size Adjustment (PIP mode only) Press the S I P button to adjust the sub picture size. PIP Mode DW Mode PIP Off FAV REVIEW CH EDIT SLEEP CAPTION MTS SIZE POSITION PIP PIP CH ...

Owner's Manual
Page 43
... the manufactures warranty does not cover the product bearing this phenomenon. Zoom 2 Choose Zoom 2 when you want the picture to be cropped. The picture taking a halfway trade off between alteration and screen coverage. This phenomenon is displayed on the screen for a long ...the Zoom2 screen using D or E button. 16:9 Adjust the picture horizontally, in the Picture menu. 4:3 Choose 4:3 when you want to view the picture without any alteration. You can move the Zoom1 screen using D or E button. PICTURE CONTROL PICTURE SIZE (ASPECT RATIO) CONTROL This feature lets you choose the ...
... the manufactures warranty does not cover the product bearing this phenomenon. Zoom 2 Choose Zoom 2 when you want the picture to be cropped. The picture taking a halfway trade off between alteration and screen coverage. This phenomenon is displayed on the screen for a long ...the Zoom2 screen using D or E button. 16:9 Adjust the picture horizontally, in the Picture menu. 4:3 Choose 4:3 when you want to view the picture without any alteration. You can move the Zoom1 screen using D or E button. PICTURE CONTROL PICTURE SIZE (ASPECT RATIO) CONTROL This feature lets you choose the ...
Owner's Manual
Page 44
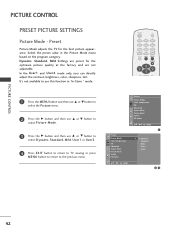
... INPUT 2 3 5 6 8 9 0 MUTE RATIO EXIT MENU ENTER CH VOL VOL CH Picture Picture Mode Color Temperature XD Advanced Aspect Ratio Picture Reset Screen XD Demo DE F G MENU Picture Picture Mode Color Temperature XD Advanced Aspect Ratio Picture Reset Screen XD Demo DE F G MENU 1 G Dynamic Standard Mild User1 User2 23 42 ...Dynamic, Standard, Mild Settings are preset for the best picture appearance. It's not available to use D or E button to select Dynamic, Standard, Mild, User1 or User2. 4 Press EXIT...
... INPUT 2 3 5 6 8 9 0 MUTE RATIO EXIT MENU ENTER CH VOL VOL CH Picture Picture Mode Color Temperature XD Advanced Aspect Ratio Picture Reset Screen XD Demo DE F G MENU Picture Picture Mode Color Temperature XD Advanced Aspect Ratio Picture Reset Screen XD Demo DE F G MENU 1 G Dynamic Standard Mild User1 User2 23 42 ...Dynamic, Standard, Mild Settings are preset for the best picture appearance. It's not available to use D or E button to select Dynamic, Standard, Mild, User1 or User2. 4 Press EXIT...


