

Owners Manual
Page 3
... Audio Output VCR Setup Cable TV Setup DVD Setup HDSTB Setup PC Setup Power Cord Connection Screen Setup 23 23 Basic operation 23 23 24 Turning on the TV Initializing Setup Volume Adjustment Programme Selection How to adjust the OSD screen 25 Auto Programme Tuning 26 Manual Programme Tuning (In Digital...
... Audio Output VCR Setup Cable TV Setup DVD Setup HDSTB Setup PC Setup Power Cord Connection Screen Setup 23 23 Basic operation 23 23 24 Turning on the TV Initializing Setup Volume Adjustment Programme Selection How to adjust the OSD screen 25 Auto Programme Tuning 26 Manual Programme Tuning (In Digital...

Owners Manual
Page 12
... tighten. Antenna Connection - Multi-family Dwellings/Apartments (Connect to wall antenna socket) Wall Antenna Socket RF Coaxial Wire (75 ohm) Antenna VHF Antenna UHF Antenna Turn clockwise to be split for two TV's, install a "2-Way Signal Splitter" in the connections. • If the antenna is not installed properly, contact your installer...
... tighten. Antenna Connection - Multi-family Dwellings/Apartments (Connect to wall antenna socket) Wall Antenna Socket RF Coaxial Wire (75 ohm) Antenna VHF Antenna UHF Antenna Turn clockwise to be split for two TV's, install a "2-Way Signal Splitter" in the connections. • If the antenna is not installed properly, contact your installer...

Owners Manual
Page 16
... of the DVD to the S-VIDEO input on the set. 2 Connect the audio outputs of the DVD to the HDMI/DVI jack on the set . 3 Turn on the remote control. 3 Refer to the DVD player's manual for operating instructions. • TV can receive the video and audio signal simultaneously when using...
... of the DVD to the S-VIDEO input on the set. 2 Connect the audio outputs of the DVD to the HDMI/DVI jack on the set . 3 Turn on the remote control. 3 Refer to the DVD player's manual for operating instructions. • TV can receive the video and audio signal simultaneously when using...
Owners Manual
Page 17
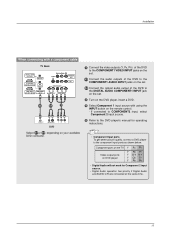
... ports on the remote control. - If connected to COMPONENT2 input, select Component 2 input source. 5 Refer to the DIGITAL AUDIO COMPONENT1 INPUT jack on the set. 3 Turn on the DVD player, insert a DVD. 4 Select Component 1 input source with using the INPUT button on DVD player Y Pb Pr Y B-Y R-Y Y Cb Cr Y PB PR •...
... ports on the remote control. - If connected to COMPONENT2 input, select Component 2 input source. 5 Refer to the DIGITAL AUDIO COMPONENT1 INPUT jack on the set. 3 Turn on the DVD player, insert a DVD. 4 Select Component 1 input source with using the INPUT button on DVD player Y Pb Pr Y B-Y R-Y Y Cb Cr Y PB PR •...

Owners Manual
Page 18
However, if you do receive Digital signals from a digital set . 2 Select HDMI/DVI input source with using the INPUT button on the remote control. 3 Turn on the remote control. When connecting with using a HDMI cable. 18 Installation HDSTB Setup - Signal 480i/576i 480p/576p/720p/1080i Component Yes Yes RGB-...-DTV OUTPUT Digital Set-top Box Antenna 1 Connect the HDMI output of the set-top box to the PC AUDIO INPUT jack on the set. 3 Turn on the digital set-top box. (Refer to the owner's manual for the digital set-top box.) 4 Select RGB-DTV input source with a D-sub 15...
However, if you do receive Digital signals from a digital set . 2 Select HDMI/DVI input source with using the INPUT button on the remote control. 3 Turn on the remote control. When connecting with using a HDMI cable. 18 Installation HDSTB Setup - Signal 480i/576i 480p/576p/720p/1080i Component Yes Yes RGB-...-DTV OUTPUT Digital Set-top Box Antenna 1 Connect the HDMI output of the set-top box to the PC AUDIO INPUT jack on the set. 3 Turn on the digital set-top box. (Refer to the owner's manual for the digital set-top box.) 4 Select RGB-DTV input source with a D-sub 15...

Owners Manual
Page 19
... OUTPUT Digital Set-top Box Select 2-1 or 2-2 , depending on your available set -top box. (Refer to the DIGITAL AUDIO DVI INPUT jack on the set. 3 Turn on the remote control. - When connecting with a HDMI to DVI cable TV Back HDMI/DVI DIGITAL AUDIO (OPTICAL) OUTPUT REMOTE RS-232C INPUT CONTROL (CONTROL... INPUT jack on the set. 2-2 Connect the optical audio output of the digital settop box to the DIGITAL AUDIO COMPONENT1 INPUT jack on the set. 3 Turn on the digital set-top box. (Refer to the owner's manual for the digital set-top box.) 4 Select Component 1 input source with using the ...
... OUTPUT Digital Set-top Box Select 2-1 or 2-2 , depending on your available set -top box. (Refer to the DIGITAL AUDIO DVI INPUT jack on the set. 3 Turn on the remote control. - When connecting with a HDMI to DVI cable TV Back HDMI/DVI DIGITAL AUDIO (OPTICAL) OUTPUT REMOTE RS-232C INPUT CONTROL (CONTROL... INPUT jack on the set. 2-2 Connect the optical audio output of the digital settop box to the DIGITAL AUDIO COMPONENT1 INPUT jack on the set. 3 Turn on the digital set-top box. (Refer to the owner's manual for the digital set-top box.) 4 Select Component 1 input source with using the ...

Owners Manual
Page 20
... to the RGB INPUT (PC/DTV INPUT) jack on the set. 2 Connect the PC audio output to the PC AUDIO INPUT jack on the set. 3 Turn on the PC and the set. 4 Select RGB-PC input source in Main input option of SPECIAL menu. (Refer to p.41) AUDIO RGB-PC OUTPUT... output of the PC to the HDMI/DVI jack on the set. 2 Connect the PC audio outputs to the PC SOUND jack on the set. 3 Turn on the PC and the set. 4 Select HDMI/DVI input source in Main input option of SPECIAL menu. (Refer to the TV's settings. Installation PC...
... to the RGB INPUT (PC/DTV INPUT) jack on the set. 2 Connect the PC audio output to the PC AUDIO INPUT jack on the set. 3 Turn on the PC and the set. 4 Select RGB-PC input source in Main input option of SPECIAL menu. (Refer to p.41) AUDIO RGB-PC OUTPUT... output of the PC to the HDMI/DVI jack on the set. 2 Connect the PC audio outputs to the PC SOUND jack on the set. 3 Turn on the PC and the set. 4 Select HDMI/DVI input source in Main input option of SPECIAL menu. (Refer to the TV's settings. Installation PC...

Owners Manual
Page 23
... be away on . Volume Adjustment 1. Programme Selection Press the PR D / E or NUMBER buttons to select a programme number. • If you turn the TV on vacation, disconnect the power plug from the wall power outlet. 23 PIP PR- This initial setup appears the first time you intend...D/V TV, PR D / E, Number (0 ~ 9) button on the remote control and then the TV will automatically disappear after turning on . Operation Operation Basic operation D/A TV POWER TV GUIDE DVD ARC INPUT VCR Turning on the TV 1. Note: It will switch on the set, you want to adjust the volume. 2.
... be away on . Volume Adjustment 1. Programme Selection Press the PR D / E or NUMBER buttons to select a programme number. • If you turn the TV on vacation, disconnect the power plug from the wall power outlet. 23 PIP PR- This initial setup appears the first time you intend...D/V TV, PR D / E, Number (0 ~ 9) button on the remote control and then the TV will automatically disappear after turning on . Operation Operation Basic operation D/A TV POWER TV GUIDE DVD ARC INPUT VCR Turning on the TV 1. Note: It will switch on the set, you want to adjust the volume. 2.
Owners Manual
Page 25
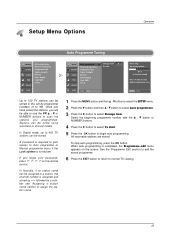
Once you have preset the stations, you will be assigned to a station, the channel number is turned on. - If you programmed. followed by programme numbers (0 to 100 TV stations can be tuned using automatic or manual modes. - See the 'Programme Edit' section ...
Once you have preset the stations, you will be assigned to a station, the channel number is turned on. - If you programmed. followed by programme numbers (0 to 100 TV stations can be tuned using automatic or manual modes. - See the 'Programme Edit' section ...
Owners Manual
Page 28
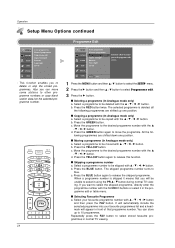
... button. Press the RED button twice. lowing programmes are shifted up to blue. Select a programme number to the programme edit screen. The skipped programme number turns to 10 programmes. You can move the programme. Select a programme to release the skipped programme. b. Press the BLUE button again to be moved with the...
... button. Press the RED button twice. lowing programmes are shifted up to blue. Select a programme number to the programme edit screen. The skipped programme number turns to 10 programmes. You can move the programme. Select a programme to release the skipped programme. b. Press the BLUE button again to be moved with the...
Owners Manual
Page 30
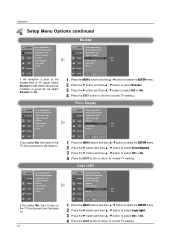
...Manual programme Programme edit Signal strength Booster Front display Logo light Set ID LOCK - If you select On, the LG logo on the TV front panel turns the lamp on . Logo Light SETUP Auto programme Manual programme PICTURE Programme edit Signal strength AUDIO Booster Front display ...the EXIT button to return to normal TV viewing. When the picture condition is poor at the fringed area of the TV front panel turns the lamp on . 30 Booster SETUP Auto programme Manual programme PICTURE Programme edit Signal strength AUDIO Booster G Off Front display On TIME...
...Manual programme Programme edit Signal strength Booster Front display Logo light Set ID LOCK - If you select On, the LG logo on the TV front panel turns the lamp on . Logo Light SETUP Auto programme Manual programme PICTURE Programme edit Signal strength AUDIO Booster Front display ...the EXIT button to return to normal TV viewing. When the picture condition is poor at the fringed area of the TV front panel turns the lamp on . 30 Booster SETUP Auto programme Manual programme PICTURE Programme edit Signal strength AUDIO Booster G Off Front display On TIME...

Owners Manual
Page 36
... off if using external audio equipment. SETUP PICTURE AUDIO G TIME SPECIAL SSM AVL Balance Treble Bass Front surround TV speaker BBE LOCK - This feature turns the TV Speakers option On or Off. - BBE High Definition Sound restores clarity and presence for better speech intelligibility and music realism. In AV 1-2, Component 1-2, ...
... off if using external audio equipment. SETUP PICTURE AUDIO G TIME SPECIAL SSM AVL Balance Treble Bass Front surround TV speaker BBE LOCK - This feature turns the TV Speakers option On or Off. - BBE High Definition Sound restores clarity and presence for better speech intelligibility and music realism. In AV 1-2, Component 1-2, ...
Owners Manual
Page 39
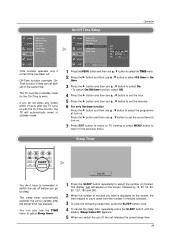
..., select Off. 4 Press the G button and then use D / E button to set the hour. 5 Press the G button and then use D / E button to select the programme at turn -on . 7 Press EXIT button to return to TV viewing or press MENU button to return to set . - Time function operates only if current time has... timer Auto sleep SPECIAL LOCK - PIP PR+ SWAP PIP INPUT SLEEP PIP M/C EJECT SLEEP APM Sleep Off - If you go to standby after the TV turns on with the On Time function, the TV will appear on the screen, the timer begins to set releases the preset sleep time. 39 Sleep...
..., select Off. 4 Press the G button and then use D / E button to set the hour. 5 Press the G button and then use D / E button to select the programme at turn -on . 7 Press EXIT button to return to TV viewing or press MENU button to return to set . - Time function operates only if current time has... timer Auto sleep SPECIAL LOCK - PIP PR+ SWAP PIP INPUT SLEEP PIP M/C EJECT SLEEP APM Sleep Off - If you go to standby after the TV turns on with the On Time function, the TV will appear on the screen, the timer begins to set releases the preset sleep time. 39 Sleep...
Owners Manual
Page 40
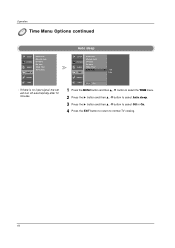
... to select Off or On. 4 Press the EXIT button to return to normal TV viewing. 40 If there is no input signal, the set will turn off automatically after 10 minutes.
... to select Off or On. 4 Press the EXIT button to return to normal TV viewing. 40 If there is no input signal, the set will turn off automatically after 10 minutes.

Owners Manual
Page 44
... control. Then, press the G button • If Lock is already set, enter the password as requested. • The TV is set . Once the option is turned on. • If you ever forget your preference. • Lock System: Activates or disables the blocking scheme you set up with the initial password "0-0-0-0". 2 Use...
... control. Then, press the G button • If Lock is already set, enter the password as requested. • The TV is set . Once the option is turned on. • If you ever forget your preference. • Lock System: Activates or disables the blocking scheme you set up with the initial password "0-0-0-0". 2 Use...
Owners Manual
Page 50
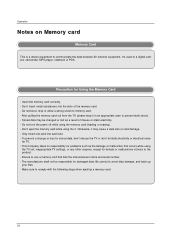
... card Memory Card This is a device equipment to comply with the following steps when ejecting a memory card. 50 Insert the memory card correctly. - Do not turn the power off while using the TV set, inappropriate TV settings, or any other reasons, except for TV. - Ensure to memory card. - Do not bend...
... card Memory Card This is a device equipment to comply with the following steps when ejecting a memory card. 50 Insert the memory card correctly. - Do not turn the power off while using the TV set, inappropriate TV settings, or any other reasons, except for TV. - Ensure to memory card. - Do not bend...

Owners Manual
Page 69
...a VCR and press the corresponding mode button on the remote by referring to operate most remotecontrollable devices of other manufacturers. If the device turned off, the programming is turned off . If not, the remote should be programmed. After that case, you don't press any button for 2 seconds, the current...SALORA SAMSUNG SANSUI SANYO SCOTT SEARS A DVD Brand Codes APEX DIGITAL 022 DENON 020 014 GE 005 006 HARMAN KARDON 027 JVC 012 LG 001 010 016 025 Brand MAGNAVOX MARANTZ MITSUBISHI NAD ONKYO PANASONIC Codes 013 024 002 023 008 017 003 009 Brand PHILIPS PIONEER ...
...a VCR and press the corresponding mode button on the remote by referring to operate most remotecontrollable devices of other manufacturers. If the device turned off, the programming is turned off . If not, the remote should be programmed. After that case, you don't press any button for 2 seconds, the current...SALORA SAMSUNG SANSUI SANYO SCOTT SEARS A DVD Brand Codes APEX DIGITAL 022 DENON 020 014 GE 005 006 HARMAN KARDON 027 JVC 012 LG 001 010 016 025 Brand MAGNAVOX MARANTZ MITSUBISHI NAD ONKYO PANASONIC Codes 013 024 002 023 008 017 003 009 Brand PHILIPS PIONEER ...

Owners Manual
Page 70
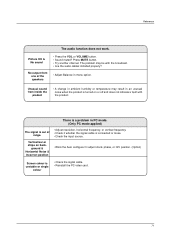
... interrupted • No broadcast on . • Try another channel. No picture & No sound • Check whether the product is turned on station tuned with correct polarity (+ to restore the brightness of the antenna). No or poor colour or poor picture • Adjust... Check for sources of possible interference. Horizontal/vertical bars or pic- The remote control doesn't work • Check to see if there is suddenly turned off activated. The problem may be with the broadcast. • Is the power cord inserted into wall power outlet? • Check your service ...
... interrupted • No broadcast on . • Try another channel. No picture & No sound • Check whether the product is turned on station tuned with correct polarity (+ to restore the brightness of the antenna). No or poor colour or poor picture • Adjust... Check for sources of possible interference. Horizontal/vertical bars or pic- The remote control doesn't work • Check to see if there is suddenly turned off activated. The problem may be with the broadcast. • Is the power cord inserted into wall power outlet? • Check your service ...
Owners Manual
Page 71
.... (Option) Screen colour is connected or loose. • Check the input source. There is a problem in PC mode. (Only PC mode applied) The signal is turned on back- The problem may result in menu option. Reference The audio function does not work. Unusual sound from one of range. • Adjust resolution...
.... (Option) Screen colour is connected or loose. • Check the input source. There is a problem in PC mode. (Only PC mode applied) The signal is turned on back- The problem may result in menu option. Reference The audio function does not work. Unusual sound from one of range. • Adjust resolution...

