
Owners Manual
Page 14
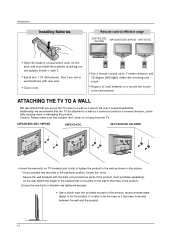
...side and install the batteries matching correct polarity (+with +,-with new ones. I Use a remote control up the TV close to the wall as parts of the bracket that children don't climb on the wall to 7 meters distance and 30 degree (left/right) within the receiving unit scope....Match the height of the product, must purchase separately) to tie the product. Introduction Installing Batteries Remote control effective range 32/37/42LC2D, 32LC2DU 42PC3D/3DC/3DV, 50PC3D 60PC1D/1DC I Open the battery compartment cover on the wall. I Install two 1.5V AA batteries. TV INPUT POWER TV ...
...side and install the batteries matching correct polarity (+with +,-with new ones. I Use a remote control up the TV close to the wall as parts of the bracket that children don't climb on the wall to 7 meters distance and 30 degree (left/right) within the receiving unit scope....Match the height of the product, must purchase separately) to tie the product. Introduction Installing Batteries Remote control effective range 32/37/42LC2D, 32LC2DU 42PC3D/3DC/3DV, 50PC3D 60PC1D/1DC I Open the battery compartment cover on the wall. I Install two 1.5V AA batteries. TV INPUT POWER TV ...

Owners Manual
Page 17
...the set, Do not disengage the lock (C). After unfolding the stand, please insert and tighten the screws (provided as necessary. For 60PC1D/1DC, 42PC3D/3DC/3DV Arrange the cable as shown. To connect an additional equipment, see the External equipment Connections section. 3 Reinstall the CABLE MANAGEMENT as shown.... 17 Basic Connection How to use stand (For 42PC3D/3DC/3DV) 1 Place the set with both hands and push it as shown. 2 Connect the cables as parts of the product) in the holes (B) on the bottom of the stand push outward. 2 ...
...the set, Do not disengage the lock (C). After unfolding the stand, please insert and tighten the screws (provided as necessary. For 60PC1D/1DC, 42PC3D/3DC/3DV Arrange the cable as shown. To connect an additional equipment, see the External equipment Connections section. 3 Reinstall the CABLE MANAGEMENT as shown.... 17 Basic Connection How to use stand (For 42PC3D/3DC/3DV) 1 Place the set with both hands and push it as shown. 2 Connect the cables as parts of the product) in the holes (B) on the bottom of the stand push outward. 2 ...
Owners Manual
Page 57
...Acknowledgement [a][ ][Set ID][ ][OK][Data0][Data1][Data2][Data3][Data4][Data5][x] [a][ ][Set ID][ ][NG][Data0][x] 57 You can also adjust Low Power in 42PC3D/3DC/3DV, 50PC3D, 60PC1D/1DC models only. 18. Tune Command (Command: m a) G To tune channel to following physical/major/minor number Transmission [m][a][...(20), major (30), minor (5)), main picture Command: ma 00 14 00 1E 00 05 02 attribute(0x02): main picture, two part, using one part channel number, minor channel does not need. Low Power (Command2:q) G To control the Low Power function on Acknowledgement [q][ ][Set ID...
...Acknowledgement [a][ ][Set ID][ ][OK][Data0][Data1][Data2][Data3][Data4][Data5][x] [a][ ][Set ID][ ][NG][Data0][x] 57 You can also adjust Low Power in 42PC3D/3DC/3DV, 50PC3D, 60PC1D/1DC models only. 18. Tune Command (Command: m a) G To tune channel to following physical/major/minor number Transmission [m][a][...(20), major (30), minor (5)), main picture Command: ma 00 14 00 1E 00 05 02 attribute(0x02): main picture, two part, using one part channel number, minor channel does not need. Low Power (Command2:q) G To control the Low Power function on Acknowledgement [q][ ][Set ID...


