

Owners Manual
Page 5
... 7 8~11 Warning Safety Instructions Accessories Controls Connection Options 12~13 Remote Control Key Functions Installation External Equipment Connections Basic operation Setup Menu Options Video Menu Options Audio Menu Options 14 15 16~17 18 19~20 20 21~22 23~24 25 25 26~28 Attaching the TV to... Signal Strength Input Source Input Label Auto Picture Control(EZ Picture) Color Temperature Control XD Advanced-Cinema 3:2 Mode / Black Level Video Reset Audio Language Auto Sound Control(EZ Sound) Manual Sound Control (EZ Sound-User option) Balance TV Speakers On/Off Setup Operation Contents 5
... 7 8~11 Warning Safety Instructions Accessories Controls Connection Options 12~13 Remote Control Key Functions Installation External Equipment Connections Basic operation Setup Menu Options Video Menu Options Audio Menu Options 14 15 16~17 18 19~20 20 21~22 23~24 25 25 26~28 Attaching the TV to... Signal Strength Input Source Input Label Auto Picture Control(EZ Picture) Color Temperature Control XD Advanced-Cinema 3:2 Mode / Black Level Video Reset Audio Language Auto Sound Control(EZ Sound) Manual Sound Control (EZ Sound-User option) Balance TV Speakers On/Off Setup Operation Contents 5
Owners Manual
Page 9
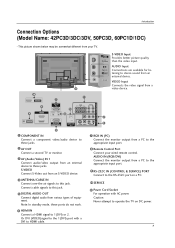
... tening to stereo sound from an S-VIDEO device. 4 ANTENNA/CABLE IN Connect over-the air signals to this jack. S-VIDEO Input AV IN 2 Provides better picture quality than the video input. VIDEO Input Connects the video signal from various types of equipment. ... 6 4 ANTENNA/ CABLE IN HDMI IN 2 1(DVI) 7 RGB IN 5 8 (CONTROL & SERVICE) 9 OPTICAL OUT 1 VIDEO AUDIO VIDEO AUDIO 2 (MONO) 3 S-VIDEO VIDEO AUDIO S-VIDEO VIDEO ( ) AUDIO 1 COMPONENT IN Connect a component video/audio device to these jacks. 7 RGB IN (PC) Connect the monitor output from a PC to the 1(DVI) port with...
... tening to stereo sound from an S-VIDEO device. 4 ANTENNA/CABLE IN Connect over-the air signals to this jack. S-VIDEO Input AV IN 2 Provides better picture quality than the video input. VIDEO Input Connects the video signal from various types of equipment. ... 6 4 ANTENNA/ CABLE IN HDMI IN 2 1(DVI) 7 RGB IN 5 8 (CONTROL & SERVICE) 9 OPTICAL OUT 1 VIDEO AUDIO VIDEO AUDIO 2 (MONO) 3 S-VIDEO VIDEO AUDIO S-VIDEO VIDEO ( ) AUDIO 1 COMPONENT IN Connect a component video/audio device to these jacks. 7 RGB IN (PC) Connect the monitor output from a PC to the 1(DVI) port with...
Owners Manual
Page 11
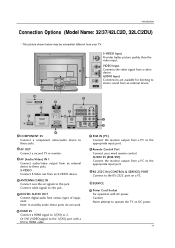
...to these ports do not work. 8 Remote Control Port Connect your TV. S-VIDEO Input Provides better picture quality than the video input. Note: In standby mode, these jacks. VIDEO Input Connects the video signal from an external device to the appropriate input port. 2 AV OUT ...Connect the monitor output from your wired remote control. COMPONENT IN VIDEO AUDIO AV OUT AV IN 1 COMPONENT IN VIDEO AUDIO Introduction S-VIDEO VIDEO ( ) AUDIO AV OUT Connection Options (Model Name: 32/37/42LC2D, 32LC2DU) AV IN 1 S-VIDEO VIDEO ( ) AUDIO - This picture shown below may be somewhat ...
...to these ports do not work. 8 Remote Control Port Connect your TV. S-VIDEO Input Provides better picture quality than the video input. Note: In standby mode, these jacks. VIDEO Input Connects the video signal from an external device to the appropriate input port. 2 AV OUT ...Connect the monitor output from your wired remote control. COMPONENT IN VIDEO AUDIO AV OUT AV IN 1 COMPONENT IN VIDEO AUDIO Introduction S-VIDEO VIDEO ( ) AUDIO AV OUT Connection Options (Model Name: 32/37/42LC2D, 32LC2DU) AV IN 1 S-VIDEO VIDEO ( ) AUDIO - This picture shown below may be somewhat ...
Owners Manual
Page 13
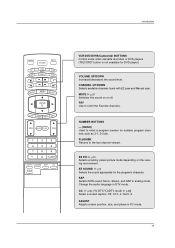
... BRIGHT + ENTER EXIT TIMER RATIO INFO VOL MUTE FAV CH 1 2 3 4 5 6 7 8 9 0 FLASHBK EZ PIC EZ SOUND SAP CC ADJUST VCR/DVD/DVHS/Camcorder BUTTONS Control some video cassette recorders or DVD players ("RECORD" button is not available for the program's character. CHANNEL UP/DOWN Selects available channels found with EZ scan and...
... BRIGHT + ENTER EXIT TIMER RATIO INFO VOL MUTE FAV CH 1 2 3 4 5 6 7 8 9 0 FLASHBK EZ PIC EZ SOUND SAP CC ADJUST VCR/DVD/DVHS/Camcorder BUTTONS Control some video cassette recorders or DVD players ("RECORD" button is not available for the program's character. CHANNEL UP/DOWN Selects available channels found with EZ scan and...

Owners Manual
Page 19
...the VCR. (Refer to the VCR owner's manual.) VCR ANT IN OUT S-VIDEO (R) AUDIO (L) VIDEO OUTPUT SWITCH IN 34 VIDEO AUDIO ANT OUT 1 OPTICAL DIGITAL AUDIO ( ) VIDEOS-VIDEO VIDEOAUDIO AUDIO OUT 1 Connect the AUDIO/VIDEO jacks between the VCR and TV. - Installation VCR Setup - To avoid ...picture noise (interference), leave an adequate distance between TV and VCR. If the 4:3 picture format is used; VIDEO AUDIO OPTICAL DIGITAL AUDIO VIDEOS-VIDEO OUT ( ) VIDAEUODIO AUDIO 19 COMPONENT IN AV OUT AV IN 1 COMPONENT IN AV OUT A Typically a frozen still picture...
...the VCR. (Refer to the VCR owner's manual.) VCR ANT IN OUT S-VIDEO (R) AUDIO (L) VIDEO OUTPUT SWITCH IN 34 VIDEO AUDIO ANT OUT 1 OPTICAL DIGITAL AUDIO ( ) VIDEOS-VIDEO VIDEOAUDIO AUDIO OUT 1 Connect the AUDIO/VIDEO jacks between the VCR and TV. - Installation VCR Setup - To avoid ...picture noise (interference), leave an adequate distance between TV and VCR. If the 4:3 picture format is used; VIDEO AUDIO OPTICAL DIGITAL AUDIO VIDEOS-VIDEO OUT ( ) VIDAEUODIO AUDIO 19 COMPONENT IN AV OUT AV IN 1 COMPONENT IN AV OUT A Typically a frozen still picture...
Owners Manual
Page 20
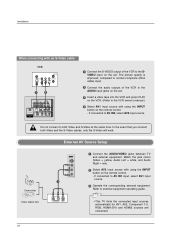
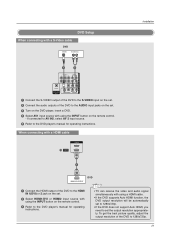
...4 Select AV1 input source with an S-Video cable VCR ANT IN S-VIDEO OUT ANT OUT OUTPUT SWITCH (R) AUDIO (L) VIDEO 3 4 IN 1 2 VIDEO AUDIO COMPONENT IN AV OUT AV IN 1 OPTICAL DIGITAL AUDIO OUT S-VIDEO VIDEO (MONO) AUDIO 1 Connect the S-VIDEO output of the VCR to the SVIDEO ...input source. 3 Operate the corresponding external equipment. If connected to both Video and the S-Video cables, only the S-Video will work. Installation COMPONENT IN AV OUT AV IN 1 VIDEO AUDIO OPTICAL DIGITAL AUDIO S-VIDEO VIDEO ( ) AUDIO When conOUnT ecting with using the INPUT button on ...
...4 Select AV1 input source with an S-Video cable VCR ANT IN S-VIDEO OUT ANT OUT OUTPUT SWITCH (R) AUDIO (L) VIDEO 3 4 IN 1 2 VIDEO AUDIO COMPONENT IN AV OUT AV IN 1 OPTICAL DIGITAL AUDIO OUT S-VIDEO VIDEO (MONO) AUDIO 1 Connect the S-VIDEO output of the VCR to the SVIDEO ...input source. 3 Operate the corresponding external equipment. If connected to both Video and the S-Video cables, only the S-Video will work. Installation COMPONENT IN AV OUT AV IN 1 VIDEO AUDIO OPTICAL DIGITAL AUDIO S-VIDEO VIDEO ( ) AUDIO When conOUnT ecting with using the INPUT button on ...
Owners Manual
Page 21
... INPUT button on the set the output resolution appropriately. When connecting with a HDMI cable ANTENNA/ CABLE IN HDMI IN 2 1(DVI) VIDEO AUDIO 1 COMPONENT IN HDMI-DVD OUTPUT DVD 1 Connect the HDMI output of the DVD to the DVD player's manual for operating instructions.... VIDEO AUDIO COMPONENT IN AV OUT AV IN 1 OPTICAL DIGITAL AUDIO OUT S-VIDEO VIDEO ( ) AUDIO • TV can receive the video and audio signal simultaneously with using a HDMI cable. • If the DVD supports Auto ...
... INPUT button on the set the output resolution appropriately. When connecting with a HDMI cable ANTENNA/ CABLE IN HDMI IN 2 1(DVI) VIDEO AUDIO 1 COMPONENT IN HDMI-DVD OUTPUT DVD 1 Connect the HDMI output of the DVD to the DVD player's manual for operating instructions.... VIDEO AUDIO COMPONENT IN AV OUT AV IN 1 OPTICAL DIGITAL AUDIO OUT S-VIDEO VIDEO ( ) AUDIO • TV can receive the video and audio signal simultaneously with using a HDMI cable. • If the DVD supports Auto ...
Owners Manual
Page 22
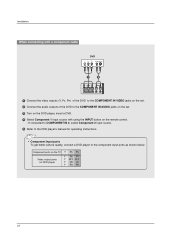
...input ports as shown below. Component ports on the TV Video output ports on the remote control. - Installation When connecting with a component cable DVD B R (R) AUDIO (L) 1 2 VIDEO AUDIO ANTENNA/ CABLE IN HDMI / DVI IN COMPONENT IN 1 Connect the video outputs (Y, PB, PR) of the DVD to the... COMPONENT IN VIDEO jacks on the set. 2 Connect the audio outputs of the DVD to the COMPONENT...
...input ports as shown below. Component ports on the TV Video output ports on the remote control. - Installation When connecting with a component cable DVD B R (R) AUDIO (L) 1 2 VIDEO AUDIO ANTENNA/ CABLE IN HDMI / DVI IN COMPONENT IN 1 Connect the video outputs (Y, PB, PR) of the DVD to the... COMPONENT IN VIDEO jacks on the set. 2 Connect the audio outputs of the DVD to the COMPONENT...
Owners Manual
Page 23
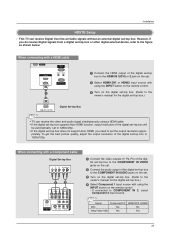
...COMPONENT IN AV OUT AV IN 1 RGB IN (PC) REMORTEGBAIUNDIO IN CONTROL IN (RGB/DVI) RS-232C IN (CONTROL & SERVICE) OPTICAL DIGITAL AUDIO OUT S-VIDEO VIDEO (MONO) AUDIO SERVICE HDMI / DVI IN Signal Component1/2 480i Yes 480p/720p/1080i Yes HDMI1/DVI, HDMI2 No Yes RGB IN (PC) AUDIO IN REMOTE...CONTROL IN 23 However, if you need to 1280x720p. If connected to the figure as shown below. Installation HDSTB Setup - This TV can receive the video and audio signal simultaneously using the INPUT button on the remote control. 3 Turn on the set the output resolution appro- HDMI / DVI IN 3 ...
...COMPONENT IN AV OUT AV IN 1 RGB IN (PC) REMORTEGBAIUNDIO IN CONTROL IN (RGB/DVI) RS-232C IN (CONTROL & SERVICE) OPTICAL DIGITAL AUDIO OUT S-VIDEO VIDEO (MONO) AUDIO SERVICE HDMI / DVI IN Signal Component1/2 480i Yes 480p/720p/1080i Yes HDMI1/DVI, HDMI2 No Yes RGB IN (PC) AUDIO IN REMOTE...CONTROL IN 23 However, if you need to 1280x720p. If connected to the figure as shown below. Installation HDSTB Setup - This TV can receive the video and audio signal simultaneously using the INPUT button on the remote control. 3 Turn on the set the output resolution appro- HDMI / DVI IN 3 ...
Owners Manual
Page 24
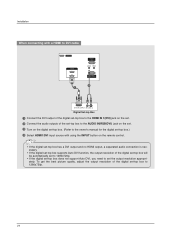
... output resolution of the digital set-top box to set -top box does not support Auto DVI, you need to 1280x720p. 24 Installation VIDEO AUDIO OPTICAL DIGITAL AUDIO OUT S-VIDEO VIDEO ( ) AUDIO When connecting with using the INPUT button on the set. To get the best picture quality, adjust the output resolution of...
... output resolution of the digital set-top box to set -top box does not support Auto DVI, you need to 1280x720p. 24 Installation VIDEO AUDIO OPTICAL DIGITAL AUDIO OUT S-VIDEO VIDEO ( ) AUDIO When connecting with using the INPUT button on the set. To get the best picture quality, adjust the output resolution of...

Owners Manual
Page 25
...on the audio equipment. 3 See the external audio equipment instruction manual for VCR recording. COMPONENT IN AV OUT AV IN 1 VIDEO AUDIO OPTICAL DIGITAL AUDIO OUT S-VIDEO VIDEO (MONO) AUDIO 1/2 1 Connect one end of an optical cable to the TV Digital Audio Optical Output port. 2 Connect the... other end of the second TV or monitor for further details regarding that device's input settings. 1/2 S-VIDEO IN (R) AUDIO (L) VIDEO • Component 1-2, RGB-PC, HDMI1/DVI, HDMI2, DTV input sources cannot be used for Monitor out. • We recommend to ...
...on the audio equipment. 3 See the external audio equipment instruction manual for VCR recording. COMPONENT IN AV OUT AV IN 1 VIDEO AUDIO OPTICAL DIGITAL AUDIO OUT S-VIDEO VIDEO (MONO) AUDIO 1/2 1 Connect one end of an optical cable to the TV Digital Audio Optical Output port. 2 Connect the... other end of the second TV or monitor for further details regarding that device's input settings. 1/2 S-VIDEO IN (R) AUDIO (L) VIDEO • Component 1-2, RGB-PC, HDMI1/DVI, HDMI2, DTV input sources cannot be used for Monitor out. • We recommend to ...

Owners Manual
Page 27
... to another resolution, change the PC graphic card or consult the manufacturer of HDMI/DVI Source Devices or contact your service center. 4. In case that Video Resolution is not connected Cable or poor cable connection, "NO SIGNAL" OSD display in HDMI/DVI Source Devices, "INVALID FORMAT" OSD display. The synchronization input...
... to another resolution, change the PC graphic card or consult the manufacturer of HDMI/DVI Source Devices or contact your service center. 4. In case that Video Resolution is not connected Cable or poor cable connection, "NO SIGNAL" OSD display in HDMI/DVI Source Devices, "INVALID FORMAT" OSD display. The synchronization input...
Owners Manual
Page 30
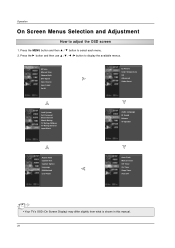
... to display the available menus. EZ Scan Manual Scan Channel Edit DTV Signal Input Source Input Label Set ID EZ Picture Color Temperature XD Advanced Video Reset Lock System Set Password Block Channel Movie Rating TV Rating-Children TV Rating-General Input Block Audio Language EZ Sound Balance TV Speaker Aspect...
... to display the available menus. EZ Scan Manual Scan Channel Edit DTV Signal Input Source Input Label Set ID EZ Picture Color Temperature XD Advanced Video Reset Lock System Set Password Block Channel Movie Rating TV Rating-Children TV Rating-General Input Block Audio Language EZ Sound Balance TV Speaker Aspect...
Owners Manual
Page 35
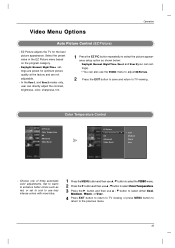
...viewing or press MENU button to return to TV viewing . Color Temperature Control EZ Picture Color Temperature XD Advanced Video Reset EZ Picture Color Temperature G XD Advanced Video Reset Cool Medium Warm User - Daylight, Normal, Night Time settings are preset for the best picture appearance. EZ... Picture adjusts the TV for optimum picture quality at the factory and are not adjustable. - Video Menu Options Operation Auto Picture Control (EZ Picture) - Set to warm to enhance hotter colors such as shown below: Daylight, Normal, Night...
...viewing or press MENU button to return to TV viewing . Color Temperature Control EZ Picture Color Temperature XD Advanced Video Reset EZ Picture Color Temperature G XD Advanced Video Reset Cool Medium Warm User - Daylight, Normal, Night Time settings are preset for the best picture appearance. EZ... Picture adjusts the TV for optimum picture quality at the factory and are not adjustable. - Video Menu Options Operation Auto Picture Control (EZ Picture) - Set to warm to enhance hotter colors such as shown below: Daylight, Normal, Night...
Owners Manual
Page 36
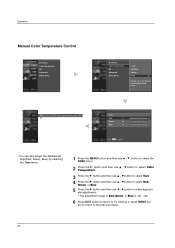
Operation Manual Color Temperature Control EZ Picture Color Temperature XD Advanced Video Reset EZ Picture Color Temperature XD Advanced Video Reset Cool Medium Warm User G Selection ( G or ) leads you to confirm. - Red 0 E User Red 0 G Green 0 Blue 0 Press MENU to the detailed... also adjust the detailed set tings(Red, Green, Blue) by selecting the User menu. 1 Press the MENU button and then use D / E button to select the VIDEO menu. 2 Press the G button and then use D / E button to select Color Temperature . 3 Press the G button and then use D / E button to select User ....
Operation Manual Color Temperature Control EZ Picture Color Temperature XD Advanced Video Reset EZ Picture Color Temperature XD Advanced Video Reset Cool Medium Warm User G Selection ( G or ) leads you to confirm. - Red 0 E User Red 0 G Green 0 Blue 0 Press MENU to the detailed... also adjust the detailed set tings(Red, Green, Blue) by selecting the User menu. 1 Press the MENU button and then use D / E button to select the VIDEO menu. 2 Press the G button and then use D / E button to select Color Temperature . 3 Press the G button and then use D / E button to select User ....
Owners Manual
Page 37
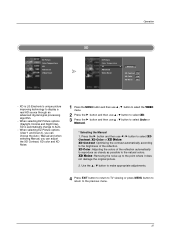
... when selecting Manual, you can adjust the XD Contrast, XD color and XD Noise. 1 Press the MENU button and then use D / E button to select the VIDEO menu. 2 Press the G button and then use D / E button to select XD. 3 Press the G button and then use F / G button to the... selecting EZ Picture options (Daylight, Normal and Night time), XD is LG Electronic's unique picture improving technology to the natural colors. EZ Picture Color Temperature XD Advanced Video Reset Operation XD EZ Picture Color Temperature XD G Advanced Video Reset Manual XD Contrast On XD Color On XD Noise On -
... when selecting Manual, you can adjust the XD Contrast, XD color and XD Noise. 1 Press the MENU button and then use D / E button to select the VIDEO menu. 2 Press the G button and then use D / E button to select XD. 3 Press the G button and then use F / G button to the... selecting EZ Picture options (Daylight, Normal and Night time), XD is LG Electronic's unique picture improving technology to the natural colors. EZ Picture Color Temperature XD Advanced Video Reset Operation XD EZ Picture Color Temperature XD G Advanced Video Reset Manual XD Contrast On XD Color On XD Noise On -
Owners Manual
Page 38
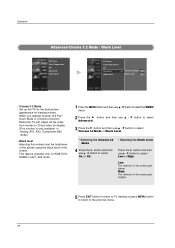
... display (This function is only available in HDMI1/DVI, HDMI2 or AV1, AV2 mode. 1 Press the MENU button and then use D / E button to select the VIDEO menu. 2 Press the G button and then use D / E button to select Advanced . 3 Press the G button and then use D / E button to select Cinema 3:2 Mode or Black ... screen using the black level of the screen. When you operate Cinema (3:2 PullDown Mode or Cinema Correction Mode),the TV will adjust 24 fps video from movies to 30 fps video for viewing movies. Operation Advanced-Cinema 3:2 Mode / Black Level EZ Picture Color Temperature XD Advanced...
... display (This function is only available in HDMI1/DVI, HDMI2 or AV1, AV2 mode. 1 Press the MENU button and then use D / E button to select the VIDEO menu. 2 Press the G button and then use D / E button to select Advanced . 3 Press the G button and then use D / E button to select Cinema 3:2 Mode or Black ... screen using the black level of the screen. When you operate Cinema (3:2 PullDown Mode or Cinema Correction Mode),the TV will adjust 24 fps video from movies to 30 fps video for viewing movies. Operation Advanced-Cinema 3:2 Mode / Black Level EZ Picture Color Temperature XD Advanced...
Owners Manual
Page 39
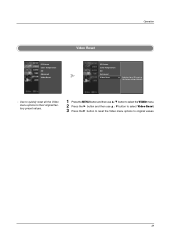
Use to quickly reset all the Video menu options to their original factory preset values. 1 Press the MENU button and then use D / E button to select the VIDEO menu. 2 Press the G button and then use D / E button to select Video Reset. 3 Press the G button to reset the Video menu options to the factory settings (default). - Operation EZ Picture Color Temperature XD Advanced Video Reset Video Reset EZ Picture Color Temperature XD Advanced Video Reset G Selection ( G or ) resets to original values. 39
Use to quickly reset all the Video menu options to their original factory preset values. 1 Press the MENU button and then use D / E button to select the VIDEO menu. 2 Press the G button and then use D / E button to select Video Reset. 3 Press the G button to reset the Video menu options to the factory settings (default). - Operation EZ Picture Color Temperature XD Advanced Video Reset Video Reset EZ Picture Color Temperature XD Advanced Video Reset G Selection ( G or ) resets to original values. 39

Owners Manual
Page 50
... from the screen. To return to normal viewing, press the any fixed image to remain on the screen for prolonged periods will automatically invert the plasma display panel color every 30 minutes. 4 Press EXIT button to return to TV viewing or press MENU button to return to the previous menu. 50... is best not to allow any button. • Orbiter Orbiter may be impossible to Normal. • White Wash White Wash removes permanent images from a PC/video game displayed on the screen.
... from the screen. To return to normal viewing, press the any fixed image to remain on the screen for prolonged periods will automatically invert the plasma display panel color every 30 minutes. 4 Press EXIT button to return to TV viewing or press MENU button to return to the previous menu. 50... is best not to allow any button. • Orbiter Orbiter may be impossible to Normal. • White Wash White Wash removes permanent images from a PC/video game displayed on the screen.
Owners Manual
Page 51
...; R (Restricted) • NC-17 (No one 17 and under admitted) • X (Adult only) If you set PG-13 : G and PG movies will be used to -video movies use this function, the following must be blocked. 2. adult language (applies to TV-PG, TV-14) • Language- able, PG-13, R, NC-17 and...
...; R (Restricted) • NC-17 (No one 17 and under admitted) • X (Adult only) If you set PG-13 : G and PG movies will be used to -video movies use this function, the following must be blocked. 2. adult language (applies to TV-PG, TV-14) • Language- able, PG-13, R, NC-17 and...


