
User Manual
Page 3
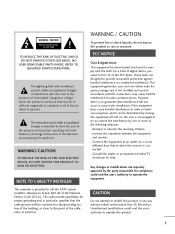
... particular, specifies that interference will not occur in the literature accompanying the appliance. Any changes or modifications not expressly approved by turning the equipment off and on a circuit different from LG Electronics. This equipment generates, uses and can be of sufficient magnitude to radio communications. NO USER SERVICEABLE PARTS INSIDE. NOTE TO...
... particular, specifies that interference will not occur in the literature accompanying the appliance. Any changes or modifications not expressly approved by turning the equipment off and on a circuit different from LG Electronics. This equipment generates, uses and can be of sufficient magnitude to radio communications. NO USER SERVICEABLE PARTS INSIDE. NOTE TO...
User Manual
Page 6
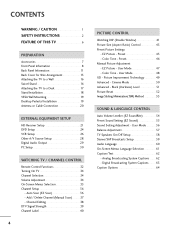
... DVD Setup 24 VCR Setup 26 Other A/V Source Setup 28 Digital Audio Output 29 PC Setup 30 WATCHING TV / CHANNEL CONTROL Remote Control Functions 32 Turning On TV 34 Channel Selection 34 Volume Adjustment 34 On-Screen Menus Selection 35 Channel Setup 36 - Add / Delete Channel (Manual Scan 37 - Black (Darkness...
... DVD Setup 24 VCR Setup 26 Other A/V Source Setup 28 Digital Audio Output 29 PC Setup 30 WATCHING TV / CHANNEL CONTROL Remote Control Functions 32 Turning On TV 34 Channel Selection 34 Volume Adjustment 34 On-Screen Menus Selection 35 Channel Setup 36 - Add / Delete Channel (Manual Scan 37 - Black (Darkness...

User Manual
Page 8
... no adverse effect on the monitor's performance. Do not dispose of cells, known as televisions and common computer monitors. FEATURES OF THIS TV What is turned on. The Plasma TV can be acceptable. Wide angle range of vision Your flat panel plasma screen offers an exceptionally broad viewing angle of locations...
... no adverse effect on the monitor's performance. Do not dispose of cells, known as televisions and common computer monitors. FEATURES OF THIS TV What is turned on. The Plasma TV can be acceptable. Wide angle range of vision Your flat panel plasma screen offers an exceptionally broad viewing angle of locations...
User Manual
Page 10
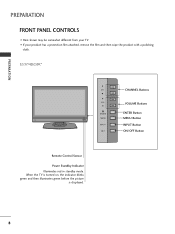
When the TV is turned on, the indicator blinks green and then illuminates green before the picture is displayed. 8 I Here shown may be somewhat different from your product has a protection film attached, remove the film and then wipe the product with a polishing cloth. 32/37/42LC5DC* CH VOL ENTER MENU INPUT CHANNEL Buttons VOLUME Buttons ENTER Button MENU Button INPUT Button ON/OFF Button Remote Control Sensor Power Standby Indicator Illuminates red in standby mode. PREPARATION PREPARATION FRONT PANEL CONTROLS I If your TV.
When the TV is turned on, the indicator blinks green and then illuminates green before the picture is displayed. 8 I Here shown may be somewhat different from your product has a protection film attached, remove the film and then wipe the product with a polishing cloth. 32/37/42LC5DC* CH VOL ENTER MENU INPUT CHANNEL Buttons VOLUME Buttons ENTER Button MENU Button INPUT Button ON/OFF Button Remote Control Sensor Power Standby Indicator Illuminates red in standby mode. PREPARATION PREPARATION FRONT PANEL CONTROLS I If your TV.

User Manual
Page 23
... -top box or other digital external device, refer to the figure as shown below. How to use I . HDMI/DVI IN 1(DVI) 1 2 DIGITAL AUDIO OUT (OPTICAL) 2 M.P.I Turn on the remote control. Match the jack colors (Y = green, PB = blue, and PR = red). HD RECEIVER SETUP This TV can receive Digital Over-the-air...
... -top box or other digital external device, refer to the figure as shown below. How to use I . HDMI/DVI IN 1(DVI) 1 2 DIGITAL AUDIO OUT (OPTICAL) 2 M.P.I Turn on the remote control. Match the jack colors (Y = green, PB = blue, and PR = red). HD RECEIVER SETUP This TV can receive Digital Over-the-air...

User Manual
Page 24
How to connect 1 Connect the digital set-top box to use I Turn on the remote control. ! How to HDMI/DVI IN 1(DVI) or 2 jack on the set the output resolution appropriately. G If the device does not support ...
How to connect 1 Connect the digital set-top box to use I Turn on the remote control. ! How to HDMI/DVI IN 1(DVI) or 2 jack on the set the output resolution appropriately. G If the device does not support ...

User Manual
Page 25
... 1(DVI) DIGITAL AUDIO OUT (OPTICAL) 2 M.P.I Select HDMI1/DVI or HDMI2 input source with using the INPUT button on the remote control. 23 How to use I Turn on the digital set-top box. (Refer to the AUDIO IN (RGB,DVI) jack on the set. 2 Connect the audio output of the digital set...
... 1(DVI) DIGITAL AUDIO OUT (OPTICAL) 2 M.P.I Select HDMI1/DVI or HDMI2 input source with using the INPUT button on the remote control. 23 How to use I Turn on the digital set-top box. (Refer to the AUDIO IN (RGB,DVI) jack on the set. 2 Connect the audio output of the digital set...

User Manual
Page 26
... To get better picture quality, connect a DVD player to the 2 COMPONENT IN AUDIO jacks on the set . HDMI/DVI IN 1(DVI) 1 2 DIGITAL AUDIO OUT (OPTICAL) 2 M.P.I Turn on the remote control. Component ports on the TV Y Y Video output ports Y on the set . 2. Y PB PR L R Connect the audio outputs of the DVD to...
... To get better picture quality, connect a DVD player to the 2 COMPONENT IN AUDIO jacks on the set . HDMI/DVI IN 1(DVI) 1 2 DIGITAL AUDIO OUT (OPTICAL) 2 M.P.I Turn on the remote control. Component ports on the TV Y Y Video output ports Y on the set . 2. Y PB PR L R Connect the audio outputs of the DVD to...

User Manual
Page 27
.... How to connect 1 Connect the HDMI output of the DVD to the HDMI/DVI IN 1(DVI) or 2 jack on the set . 2. I If connected to use I Turn on the set . 2 No separated audio connection is necessary. How to AV IN2, select A V 2 input source. HDMI supports both audio and video. 2. S REMOTE CONTROL UPDATE...
.... How to connect 1 Connect the HDMI output of the DVD to the HDMI/DVI IN 1(DVI) or 2 jack on the set . 2. I If connected to use I Turn on the set . 2 No separated audio connection is necessary. How to AV IN2, select A V 2 input source. HDMI supports both audio and video. 2. S REMOTE CONTROL UPDATE...
User Manual
Page 31
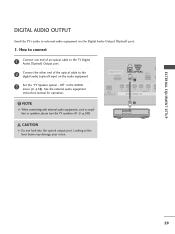
... cable to external audio equipment via the Digital Audio Output (Optical) port. 1. NOTE 2 G When connecting with external audio equipments, such as amplifiers or speakers, please turn the TV speakers off. (G p.58) EXTERNAL EQUIPMENT SETUP CAUTION G Do not look into the optical output port.
... cable to external audio equipment via the Digital Audio Output (Optical) port. 1. NOTE 2 G When connecting with external audio equipments, such as amplifiers or speakers, please turn the TV speakers off. (G p.58) EXTERNAL EQUIPMENT SETUP CAUTION G Do not look into the optical output port.
User Manual
Page 32
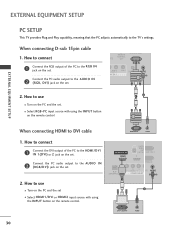
... output to the TV's settings. HDMI/DVI IN 1(DVI) DIGITA AUDIO OUT (OPTICA VICE ONLY 2 Connect the PC audio output to use ( ) 1 I Turn on the PC and the set 2 I Turn on the PC and the set. EXTERNAL EQUIPMENT SETUP PC SETUP This TV provides Plug and Play capability, meaning that the PC...
... output to the TV's settings. HDMI/DVI IN 1(DVI) DIGITA AUDIO OUT (OPTICA VICE ONLY 2 Connect the PC audio output to use ( ) 1 I Turn on the PC and the set 2 I Turn on the PC and the set. EXTERNAL EQUIPMENT SETUP PC SETUP This TV provides Plug and Play capability, meaning that the PC...
User Manual
Page 34
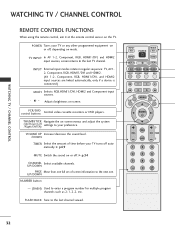
... PIC EZ SOUND SWAP INFO CC EXIT MENU RATIO SAP ENTER VOL TIMER MUTE CH PAGE 1 2 3 4 5 6 7 8 9 0 FLASH BACK 32 G p.34 CHANNEL Select available channels. POWER Turns your TV turns off .
... PIC EZ SOUND SWAP INFO CC EXIT MENU RATIO SAP ENTER VOL TIMER MUTE CH PAGE 1 2 3 4 5 6 7 8 9 0 FLASH BACK 32 G p.34 CHANNEL Select available channels. POWER Turns your TV turns off .
User Manual
Page 36
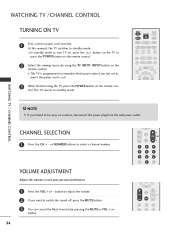
... PAGE 11 22 3 44 55 66 77 88 99 00 FLASH BACK VOL TIMER MUTE CH PAGE 1 2 3 4 5 6 I In standby mode to turn TV on, press the button on the TV or press the POWER button on vacation, disconnect the power plug from the wall power outle7t. 8 9 0 WATCHING...MUTE button. 1 2 3 3 You can cancel the Mute function by using the TV, press the POWER button on the remote control. trol. WATCHING TV /CHANNEL CONTROL TURNING ON TV 1 First, connect power cord correctly. INPUT TV POWER MODE TV INPUT DVD MULTI VCR PIP PIP CH - NOTE 1 2 3 4 5 6 G If you...
... PAGE 11 22 3 44 55 66 77 88 99 00 FLASH BACK VOL TIMER MUTE CH PAGE 1 2 3 4 5 6 I In standby mode to turn TV on, press the button on the TV or press the POWER button on vacation, disconnect the power plug from the wall power outle7t. 8 9 0 WATCHING...MUTE button. 1 2 3 3 You can cancel the Mute function by using the TV, press the POWER button on the remote control. trol. WATCHING TV /CHANNEL CONTROL TURNING ON TV 1 First, connect power cord correctly. INPUT TV POWER MODE TV INPUT DVD MULTI VCR PIP PIP CH - NOTE 1 2 3 4 5 6 G If you...
User Manual
Page 38
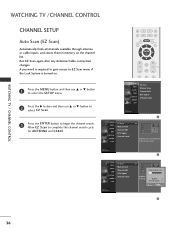
... CABLE. Allow EZ Scan to begin the channel search. CH A password is required to gain access to EZ Scan menu if the Lock System is turned on the channel list. Selection ( G or ) leads you to the EZ scan screAeNnA. Run EZ Scan again after any Antenna/Cable connection changes...
... CABLE. Allow EZ Scan to begin the channel search. CH A password is required to gain access to EZ Scan menu if the Lock System is turned on the channel list. Selection ( G or ) leads you to the EZ scan screAeNnA. Run EZ Scan again after any Antenna/Cable connection changes...

User Manual
Page 39
... EZ Scan Manual Scan Channel Edit DTV Signal Channel Label 2 Channel Type Number D E ANALOG G 2 ANALOG 2 Press to Manual Scan menu if the Lock System is turned on. CH 2 3 5 6 8 9 Press the MENU button and then use D or E button to select channel you want to add or delete. 5 Press the ENTER button to...
... EZ Scan Manual Scan Channel Edit DTV Signal Channel Label 2 Channel Type Number D E ANALOG G 2 ANALOG 2 Press to Manual Scan menu if the Lock System is turned on. CH 2 3 5 6 8 9 Press the MENU button and then use D or E button to select channel you want to add or delete. 5 Press the ENTER button to...
User Manual
Page 60
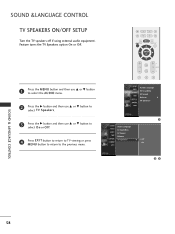
... OPTION TV Speakers G Off SCREEN On LOCK 23 58 SOUND & LANGUAGE CONTROL SOUND &LANGUAGE CONTROL TV SPEAKERS ON/OFF SETUP Turn the TV speakers off if using external audio equipment. Feature turns the TV Speakers option On or Off. CH 1 2 3 4 5 6 7 8 9 0 1 Press the MENU button and then use D or E button to select the...
... OPTION TV Speakers G Off SCREEN On LOCK 23 58 SOUND & LANGUAGE CONTROL SOUND &LANGUAGE CONTROL TV SPEAKERS ON/OFF SETUP Turn the TV speakers off if using external audio equipment. Feature turns the TV Speakers option On or Off. CH 1 2 3 4 5 6 7 8 9 0 1 Press the MENU button and then use D or E button to select the...
User Manual
Page 61
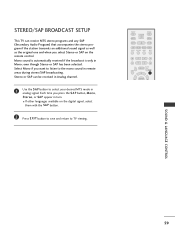
... ENTER SOUND & LANGUAGE CONTROL 59 even though Stereo or SAP has been selected. Select Mono if you press the S A P button, Mono, Stereo, or S A P appear in turn. STEREO/SAP BROADCAST SETUP This TV can be received in Analog channel. 1 Use the S A P button to TV viewing.
... ENTER SOUND & LANGUAGE CONTROL 59 even though Stereo or SAP has been selected. Select Mono if you press the S A P button, Mono, Stereo, or S A P appear in turn. STEREO/SAP BROADCAST SETUP This TV can be received in Analog channel. 1 Use the S A P button to TV viewing.
User Manual
Page 64
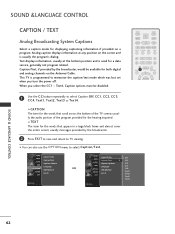
.... I CAPTION The term for the words that scroll across the bottom of the program provided for displaying captioning information if provided on a program. When you turn the power off. INPUT TV POWER MODE TV INPUT DVD MULTI VCR PIP PIP CH - usually messages provided by the broadcaster, would be disabled. Caption...
.... I CAPTION The term for the words that scroll across the bottom of the program provided for displaying captioning information if provided on a program. When you turn the power off. INPUT TV POWER MODE TV INPUT DVD MULTI VCR PIP PIP CH - usually messages provided by the broadcaster, would be disabled. Caption...
User Manual
Page 69
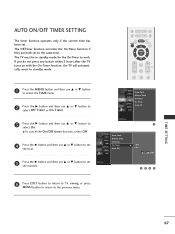
If you do not press any button within 2 hours after the TV CH turns on with the On Timer function, the TV will automati- CC EXIT RATIO MENU SAP ENTER VOL TIMER MUTE CH PAGE 1 2 3 SETUP VIDEO AUDIO TIME ...
If you do not press any button within 2 hours after the TV CH turns on with the On Timer function, the TV will automati- CC EXIT RATIO MENU SAP ENTER VOL TIMER MUTE CH PAGE 1 2 3 SETUP VIDEO AUDIO TIME ...
User Manual
Page 70
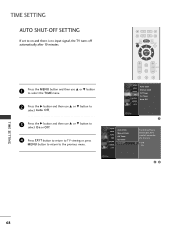
... OPTION SCREEN LOCK Auto Clock Manual Clock Off Timer On Timer Auto Off If set to on and there is no input signal, the TV turns off automatically after 10 minutes. TIME SETTING 3 Press the G button and then use D or E button to On and there is no input signal, the TV...
... OPTION SCREEN LOCK Auto Clock Manual Clock Off Timer On Timer Auto Off If set to on and there is no input signal, the TV turns off automatically after 10 minutes. TIME SETTING 3 Press the G button and then use D or E button to On and there is no input signal, the TV...

