

User Manual
Page 3
Picture Mode-User option 66 Picture Improvement Technology 67 Expert Picture Control 68 Picture ...14 Quick Menu 15 On-Screen Menus Selection and Adjustment ...... 16 Auto Programme Tuning 17 Manual Programme Tuning (In Digital Mode).... 18 Manual Programme Tuning (In Analogue Mode) .... 19 Programme Edit 21 Software Update 23 Diagnostics ...25 Selecting the Programme List 26 Favourite Programme Setup 27 Input List 28 Input Label 29 Simple manual 30 31 AV Mode 34 Initializing (Reset to original factory settings) ..35 MHEG (MULTIMEDIA AND HYPERMEDIA INFORMATION ...
Picture Mode-User option 66 Picture Improvement Technology 67 Expert Picture Control 68 Picture ...14 Quick Menu 15 On-Screen Menus Selection and Adjustment ...... 16 Auto Programme Tuning 17 Manual Programme Tuning (In Digital Mode).... 18 Manual Programme Tuning (In Analogue Mode) .... 19 Programme Edit 21 Software Update 23 Diagnostics ...25 Selecting the Programme List 26 Favourite Programme Setup 27 Input List 28 Input Label 29 Simple manual 30 31 AV Mode 34 Initializing (Reset to original factory settings) ..35 MHEG (MULTIMEDIA AND HYPERMEDIA INFORMATION ...
User Manual
Page 29
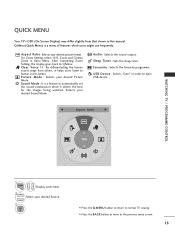
... Selects the sound output. USB Device : Selects "Eject" in Ratio Menu. Q.Menu (Quick Menu) is a feature to automatically set the sound combination which users might use frequently. Aspect Ratio: Selects your desired Picture Mode. Sound Mode : It is a menu of features which it helps...from others, it deems the best for the images being watched. Clear Voice II : By differentiating the human sound range from that shown in this manual. After completing Zoom Setting, the display goes back to eject USB device. Selects your desired Source. 3 OK • Press the Q.MENU button ...
... Selects the sound output. USB Device : Selects "Eject" in Ratio Menu. Q.Menu (Quick Menu) is a feature to automatically set the sound combination which users might use frequently. Aspect Ratio: Selects your desired Picture Mode. Sound Mode : It is a menu of features which it helps...from others, it deems the best for the images being watched. Clear Voice II : By differentiating the human sound range from that shown in this manual. After completing Zoom Setting, the display goes back to eject USB device. Selects your desired Source. 3 OK • Press the Q.MENU button ...

User Manual
Page 37
SETUP Auto Tuning Manual Tuning Programme Edit Software Update Diagnostics Move OK : : OOnn SETUP Auto Tuning Manual Tuning Programme Edit Software Update Diagnostics Move OK :: OOnn Off OOnn 1 MENU 2 OK Select SETUP. Select O n or O f f. • If you select O n, a user confirm message box will be downloaded through the digital terrestrial broadcasting system. Select Software Update. 3 OK 4 OK Save. WATCHING TV / PROGRAMME CONTROL SOFTWARE UPDATE Software Update means software can be displayed to notify that new software is found. 23
SETUP Auto Tuning Manual Tuning Programme Edit Software Update Diagnostics Move OK : : OOnn SETUP Auto Tuning Manual Tuning Programme Edit Software Update Diagnostics Move OK :: OOnn Off OOnn 1 MENU 2 OK Select SETUP. Select O n or O f f. • If you select O n, a user confirm message box will be downloaded through the digital terrestrial broadcasting system. Select Software Update. 3 OK 4 OK Save. WATCHING TV / PROGRAMME CONTROL SOFTWARE UPDATE Software Update means software can be displayed to notify that new software is found. 23

User Manual
Page 49
... 35 Mode Setting :Home Use FFaaccttoorryyRReseestet Yes No WATCHING TV / PROGRAMME CONTROL 1 MENU 2 OK 3 OK Select OPTION. OPTION Input Label SIMPLINK Simple Manual Set ID ISM Method Demo Mode Mode Setting FactoorryyRReesseet t E Move OK : On : 1 : Normal : Off :Home Use OPTION Move OK E ...Input Label SIMPLINK : On Simple Manual Set ID ISM Method Demo Mode : 1 All user settings and channel setti:nNgosrmwailll be initialized. Select Factory Reset. But the settings of D a y and Night of the Picture Mode ...
... 35 Mode Setting :Home Use FFaaccttoorryyRReseestet Yes No WATCHING TV / PROGRAMME CONTROL 1 MENU 2 OK 3 OK Select OPTION. OPTION Input Label SIMPLINK Simple Manual Set ID ISM Method Demo Mode Mode Setting FactoorryyRReesseet t E Move OK : On : 1 : Normal : Off :Home Use OPTION Move OK E ...Input Label SIMPLINK : On Simple Manual Set ID ISM Method Demo Mode : 1 All user settings and channel setti:nNgosrmwailll be initialized. Select Factory Reset. But the settings of D a y and Night of the Picture Mode ...
User Manual
Page 80
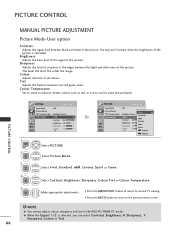
...; Press the BACK button to move to make picture bluish. NOTE G You cannot adjust colour, sharpness and tint in the picture. PICTURE CONTROL MANUAL PICTURE ADJUSTMENT Picture Mode-User option Contrast Adjusts the signal level between black and white in the RGB-PC/HDMI-PC mode. Sharpness Adjusts the level of the...
...; Press the BACK button to move to make picture bluish. NOTE G You cannot adjust colour, sharpness and tint in the picture. PICTURE CONTROL MANUAL PICTURE ADJUSTMENT Picture Mode-User option Contrast Adjusts the signal level between black and white in the RGB-PC/HDMI-PC mode. Sharpness Adjusts the level of the...


