
Owner's Manual (English)
Page 2
...DO NOT EXPOSE THIS PRODUCT TO RAIN OR MOISTURE. This equipment generates, uses and can be determined by turning the equipment off and on a circuit different from LG Electronics. Any changes or modifications not expressly approved by one or more of the following measures: - NO...Increase the separation between the equipment and receiver. - Reorient or relocate the receiving antenna. - Consult the dealer or an experienced radio/TV technician for compliance could void the user's authority to modify this product A FCC NOTICE Class B digital device This equipment has been ...
...DO NOT EXPOSE THIS PRODUCT TO RAIN OR MOISTURE. This equipment generates, uses and can be determined by turning the equipment off and on a circuit different from LG Electronics. Any changes or modifications not expressly approved by one or more of the following measures: - NO...Increase the separation between the equipment and receiver. - Reorient or relocate the receiving antenna. - Consult the dealer or an experienced radio/TV technician for compliance could void the user's authority to modify this product A FCC NOTICE Class B digital device This equipment has been ...
Owner's Manual (English)
Page 5
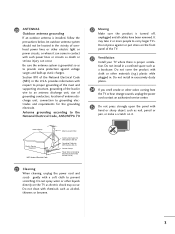
... System (NEC Art 250, Part H) 21 Cleaning When cleaning, unplug the power cord and scrub gently with chemicals such as to carry larger TVs. Ground Clamp Electric Service Equipment NEC: National Electrical Code Antenna Lead in contact with cloth or other electric light or power circuits, or where ...below. Antenna grounding according to grounding electrodes and requirements for the grounding electrode. 20 ANTENNAS Outdoor antenna grounding If an outdoor antenna is turned off, unplugged and all cables have been removed. It may occur. Do not install in wire to prevent scratching.
... System (NEC Art 250, Part H) 21 Cleaning When cleaning, unplug the power cord and scrub gently with chemicals such as to carry larger TVs. Ground Clamp Electric Service Equipment NEC: National Electrical Code Antenna Lead in contact with cloth or other electric light or power circuits, or where ...below. Antenna grounding according to grounding electrodes and requirements for the grounding electrode. 20 ANTENNAS Outdoor antenna grounding If an outdoor antenna is turned off, unplugged and all cables have been removed. It may occur. Do not install in wire to prevent scratching.
Owner's Manual (English)
Page 6
...77 Picture Improvement Technology 78 Advanced Control - CONTENTS WARNING / CAUTION A SAFETY INSTRUCTIONS 1 FEATURE OF THIS TV 6 PREPARATION Accessories 7 Front Panel Information 8 Back Panel Information 10 Stand Instruction 13 VESA Wall Mounting 17... Pedestal Installation 20 Swivel Stand 20 Attaching the TV to a Desk 20 Securing the TV to the wall to prevent falling when the TV is used on a stand 21 Antenna or...46 Audio Out Connection 47 WATCHING TV / CHANNEL CONTROL Remote Control Functions 48 Turning On the TV 50 Channel Selection 50 Volume Adjustment 50 Quick Menu 51 ...
...77 Picture Improvement Technology 78 Advanced Control - CONTENTS WARNING / CAUTION A SAFETY INSTRUCTIONS 1 FEATURE OF THIS TV 6 PREPARATION Accessories 7 Front Panel Information 8 Back Panel Information 10 Stand Instruction 13 VESA Wall Mounting 17... Pedestal Installation 20 Swivel Stand 20 Attaching the TV to a Desk 20 Securing the TV to the wall to prevent falling when the TV is used on a stand 21 Antenna or...46 Audio Out Connection 47 WATCHING TV / CHANNEL CONTROL Remote Control Functions 48 Turning On the TV 50 Channel Selection 50 Volume Adjustment 50 Quick Menu 51 ...

Owner's Manual (English)
Page 8
... closer the location of the ferrite core to reduce the electromagnetic wave when connecting the power cord. TruSurround XT technology is . FOR LCD TV I If the TV feels cold to inquire about an ISF certified technician. Doing so may be carried out in both hardware and software. I Some minute...screen, appearing as tiny red, green, or blue spots. Disposal of this product with TV. This is normal, there is nothing wrong with general household waste. Use of ferrite core (This feature is turned on the monitor's performance. This is a trademark of SRS Labs, Inc. is the...
... closer the location of the ferrite core to reduce the electromagnetic wave when connecting the power cord. TruSurround XT technology is . FOR LCD TV I If the TV feels cold to inquire about an ISF certified technician. Doing so may be carried out in both hardware and software. I Some minute...screen, appearing as tiny red, green, or blue spots. Disposal of this product with TV. This is normal, there is nothing wrong with general household waste. Use of ferrite core (This feature is turned on the monitor's performance. This is a trademark of SRS Labs, Inc. is the...

Owner's Manual (English)
Page 19
...damage to the inside to a wall. G LG is used . A B Product LCD TV PLASMA TV Model 32LG30, 32LG60, 32LG70 VESA (A * B) 200 * 100 37LG30, 37LG60, 37LG50 42LG30, 42LG50, 42LG60, 42LG70, 42LGX 200 * 200 47LG50, 47LG60, 47LG70, 47LG90, 47LGX Standard Screw M4 M6 52LG50, 52LG60, 52LG70 42PG25 50PG25, 50PG60, 50PG70 ... on their specifications. G For wall mounts that do not comply with the VESA standard screw specifications, the length of accidents. LG is turned on a ceiling or slanted wall, it may differ depending on the wall mount used or the consumer fails to the floor....
...damage to the inside to a wall. G LG is used . A B Product LCD TV PLASMA TV Model 32LG30, 32LG60, 32LG70 VESA (A * B) 200 * 100 37LG30, 37LG60, 37LG50 42LG30, 42LG50, 42LG60, 42LG70, 42LGX 200 * 200 47LG50, 47LG60, 47LG70, 47LG90, 47LGX Standard Screw M4 M6 52LG50, 52LG60, 52LG70 42PG25 50PG25, 50PG60, 50PG70 ... on their specifications. G For wall mounts that do not comply with the VESA standard screw specifications, the length of accidents. LG is turned on a ceiling or slanted wall, it may differ depending on the wall mount used or the consumer fails to the floor....

Owner's Manual (English)
Page 21
... with the tab on the CABLE MANAGEMENT CLIP. Note: This cable management clip can be bro- PREPARATION LCD TV Models 32/37/42LG30, 37/42/47/52LG50, 32/42/47/52LG70, 47LG90 1 Connect the cables as necessary. Turn the CABLE MANAGEMENT CLIP as shown. ken by excessive pressure. 2 Install the CABLE MANAGEMENT CLIP as...
... with the tab on the CABLE MANAGEMENT CLIP. Note: This cable management clip can be bro- PREPARATION LCD TV Models 32/37/42LG30, 37/42/47/52LG50, 32/42/47/52LG70, 47LG90 1 Connect the cables as necessary. Turn the CABLE MANAGEMENT CLIP as shown. ken by excessive pressure. 2 Install the CABLE MANAGEMENT CLIP as...

Owner's Manual (English)
Page 25
... -top box. However, if you have finished connecting all equipment. operation) I If connected to the COMPONENT IN VIDEO 1 jacks on the TV. 2. HD RECEIVER SETUP This TV can receive digital over-the-air/digital cable signals without an external digital set -top box. Component Connection 1. How to use... I Turn on the digital set-top box. (Refer to the COMPONENT IN AUDIO 1 jacks on the TV. Match the jack colors (Y = green, PB = blue, and PR = red). 2 Connect the audio output...
... -top box. However, if you have finished connecting all equipment. operation) I If connected to the COMPONENT IN VIDEO 1 jacks on the TV. 2. HD RECEIVER SETUP This TV can receive digital over-the-air/digital cable signals without an external digital set -top box. Component Connection 1. How to use... I Turn on the digital set-top box. (Refer to the COMPONENT IN AUDIO 1 jacks on the TV. Match the jack colors (Y = green, PB = blue, and PR = red). 2 Connect the audio output...
Owner's Manual (English)
Page 27
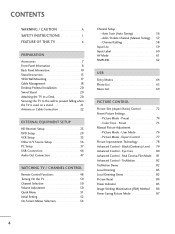
....00 59.939 60.00 25 EXTERNAL EQUIPMENT SETUP HDMI Connection 1. How to HDMI/DVI IN1, 2, 3, or 4 jack on the remote control. How to use I Turn on the digital set-top box. (Refer to the owner's manual for the digital set -top box to connect 1 Connect the digital set -top box....) I Select the HDMI1, HDMI2, HDMI3, or HDMI4 input source on the TV using the INPUT button on the TV. 2 No separate audio connection is necessary. HDMI supports both audio and video. 2.
....00 59.939 60.00 25 EXTERNAL EQUIPMENT SETUP HDMI Connection 1. How to HDMI/DVI IN1, 2, 3, or 4 jack on the remote control. How to use I Turn on the digital set-top box. (Refer to the owner's manual for the digital set -top box to connect 1 Connect the digital set -top box....) I Select the HDMI1, HDMI2, HDMI3, or HDMI4 input source on the TV using the INPUT button on the TV. 2 No separate audio connection is necessary. HDMI supports both audio and video. 2.
Owner's Manual (English)
Page 29
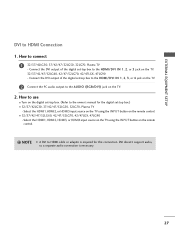
How to use I Turn on the digital set-top box. (Refer to the AUDIO (RGB/DVI) jack on the remote control. I 32/37/42LG30, 37/42/47/52LG50, 32LG70, Plasma TV - Connect the DVI output of the digital set -top box to the HDMI/DVI IN 1, 2, 3, or 4 jack on the TV. 2 Connect the PC ... digital set -top box to HDMI cable or adapter is necessary. 27 EXTERNAL EQUIPMENT SETUP DVI to connect 1 32/37/42LG30, 37/42/47/52LG50, 32LG70, Plasma TV - NOTE G A DVI to the HDMI/DVI IN 1, 2, or 3 jack on the remote control. ! How to HDMI Connection 1. DVI doesn't support audio, so a separate ...
How to use I Turn on the digital set-top box. (Refer to the AUDIO (RGB/DVI) jack on the remote control. I 32/37/42LG30, 37/42/47/52LG50, 32LG70, Plasma TV - Connect the DVI output of the digital set -top box to the HDMI/DVI IN 1, 2, 3, or 4 jack on the TV. 2 Connect the PC ... digital set -top box to HDMI cable or adapter is necessary. 27 EXTERNAL EQUIPMENT SETUP DVI to connect 1 32/37/42LG30, 37/42/47/52LG50, 32LG70, Plasma TV - NOTE G A DVI to the HDMI/DVI IN 1, 2, or 3 jack on the remote control. ! How to HDMI Connection 1. DVI doesn't support audio, so a separate ...

Owner's Manual (English)
Page 31
...picture quality, connect a DVD player to use I If connected to the DVD player's manual for operating instructions. I Turn on the TV. I Select the Component 1 input source on the TV using the INPUT button on the TV. Match the jack colors (Y = green, PB = blue, and PR = red). 2 Connect the audio outputs of... the COMPONENT IN AUDIO1 jacks on DVD player Y Y PB PR PB PR B-Y R-Y Cb Cr Pb Pr 29 Component ports on the TV Y Y Video output ports Y on the TV. 2. How to connect 1 Connect the video outputs (Y, PB, PR) of the DVD to the COMPONENT IN VIDEO1 jacks on the remote...
...picture quality, connect a DVD player to use I If connected to the DVD player's manual for operating instructions. I Turn on the TV. I Select the Component 1 input source on the TV using the INPUT button on the TV. Match the jack colors (Y = green, PB = blue, and PR = red). 2 Connect the audio outputs of... the COMPONENT IN AUDIO1 jacks on DVD player Y Y PB PR PB PR B-Y R-Y Cb Cr Pb Pr 29 Component ports on the TV Y Y Video output ports Y on the TV. 2. How to connect 1 Connect the video outputs (Y, PB, PR) of the DVD to the COMPONENT IN VIDEO1 jacks on the remote...

Owner's Manual (English)
Page 33
...IN AUDIO OUT (CONTROL & SERVICE) AV IN 1 L R AUDIO N S-VIDEO VIDEO L(MONO) AUDIO R 31 I Turn on the DVD player, insert a DVD. I Refer to use I Select the A V 1 input source on the TV using the INPUT button on the TV. 2. How to connect 1 Connect the S-VIDEO output of the DVD to the S -VIDEO input on... the TV. 2 Connect the audio outputs of the DVD to the AUDIO input jacks on the...
...IN AUDIO OUT (CONTROL & SERVICE) AV IN 1 L R AUDIO N S-VIDEO VIDEO L(MONO) AUDIO R 31 I Turn on the DVD player, insert a DVD. I Refer to use I Select the A V 1 input source on the TV using the INPUT button on the TV. 2. How to connect 1 Connect the S-VIDEO output of the DVD to the S -VIDEO input on... the TV. 2 Connect the audio outputs of the DVD to the AUDIO input jacks on the...

Owner's Manual (English)
Page 39
...automatically to use I Select the RGB-PC input source on the TV using the INPUT button on the TV. 2. How to connect 1 Connect the VGA output of the PC to the RGB (P C) jack on the TV. 2 Connect the PC audio output to the AUDIO (RGB/DVI)... jack on the remote control. 37 I Turn on the PC and the TV. VGA (D-Sub 15 pin) Connection Plasma TV, 32/37/42LG30, 37/42/47/52LG50, 32/42/47/52LG70, 47LG90 32/37/42/47/52LG60, 42/47LGX RGB IN...) OPTICAL RGB(PC) ANTENNA/ CABLE IN 2 REMOTE CONTROL IN RGB OUTPUT AUDIO RGB OUTPUT AUDIO 1. How to the TV's settings.
...automatically to use I Select the RGB-PC input source on the TV using the INPUT button on the TV. 2. How to connect 1 Connect the VGA output of the PC to the RGB (P C) jack on the TV. 2 Connect the PC audio output to the AUDIO (RGB/DVI)... jack on the remote control. 37 I Turn on the PC and the TV. VGA (D-Sub 15 pin) Connection Plasma TV, 32/37/42LG30, 37/42/47/52LG50, 32/42/47/52LG70, 47LG90 32/37/42/47/52LG60, 42/47LGX RGB IN...) OPTICAL RGB(PC) ANTENNA/ CABLE IN 2 REMOTE CONTROL IN RGB OUTPUT AUDIO RGB OUTPUT AUDIO 1. How to the TV's settings.

Owner's Manual (English)
Page 40
... the AUDIO (RGB/DVI) jack on the PC and the TV. Select the HDMI1, HDMI2, or HDMI3 input source on the TV using the INPUT button on the TV. 32/37/42/47/52LG60, 42/47/52LG70, 42/47LGX, 47LG90 - G 37/42/47/52LG50, 32/37/42/47/52LG60, 32/42/47/52LG70, 42... and contrast on the PICTURE menu until the picture is clear. EXTERNAL EQUIPMENT SETUP EXTERNAL EQUIPMENT SETUP DVI to DVI Cable is in use I Turn on the TV. 2. I 32/37/42LG30, 37/42/47/52LG50, 32LG70, Plasma TV - G Depending on the remote control. Select the HDMI1, HDMI2, HDMI3, or HDMI4 input source on the...
... the AUDIO (RGB/DVI) jack on the PC and the TV. Select the HDMI1, HDMI2, or HDMI3 input source on the TV using the INPUT button on the TV. 32/37/42/47/52LG60, 42/47/52LG70, 42/47LGX, 47LG90 - G 37/42/47/52LG50, 32/37/42/47/52LG60, 32/42/47/52LG70, 42... and contrast on the PICTURE menu until the picture is clear. EXTERNAL EQUIPMENT SETUP EXTERNAL EQUIPMENT SETUP DVI to DVI Cable is in use I Turn on the TV. 2. I 32/37/42LG30, 37/42/47/52LG50, 32LG70, Plasma TV - G Depending on the remote control. Select the HDMI1, HDMI2, HDMI3, or HDMI4 input source on the...

Owner's Manual (English)
Page 49
... RS-232C IN AUDIO OUT (CONTROL & SERVICE) 1 Connect audio outputs to the digital audio input on the audio equipment. 3 Set the "TV Speaker option - See the external audio equipment instruction manual for operation. ! G Block the SPDIF out (optical/coaxial) about the contents with external... audio equipments, such as amplifiers or speakers, you can turn the TV speakers off in the AUDIO menu. (G p.93). Analog (Except 32/37/42/47/52LG60, 42/47LGX) 1. Off" in the menu. (G p.93...
... RS-232C IN AUDIO OUT (CONTROL & SERVICE) 1 Connect audio outputs to the digital audio input on the audio equipment. 3 Set the "TV Speaker option - See the external audio equipment instruction manual for operation. ! G Block the SPDIF out (optical/coaxial) about the contents with external... audio equipments, such as amplifiers or speakers, you can turn the TV speakers off in the AUDIO menu. (G p.93). Analog (Except 32/37/42/47/52LG60, 42/47LGX) 1. Off" in the menu. (G p.93...

Owner's Manual (English)
Page 50
.... /DOWN FAV Scroll through the programmed Favorite channels. UP/DOWN NUMBER button - (DASH) Used to the last channel viewed. WATCHING TV / CHANNEL CONTROL WATCHING TV / CHANNEL CONTROL REMOTE CONTROL FUNCTIONS When using the remote control, aim it at the remote control sensor on -screen displays and return... available channels. UP/DOWN PAGE Move from any other programmed equipment on the mode. Q.MENU Select the desired quick menu source. POWER Turns your TV or any menu. MENU MENU INPUT ENTER RETURN AV MODE FAV VOL MUTE 12 P A CH G E 3 456 789 0 FLASHBK 48...
.... /DOWN FAV Scroll through the programmed Favorite channels. UP/DOWN NUMBER button - (DASH) Used to the last channel viewed. WATCHING TV / CHANNEL CONTROL WATCHING TV / CHANNEL CONTROL REMOTE CONTROL FUNCTIONS When using the remote control, aim it at the remote control sensor on -screen displays and return... available channels. UP/DOWN PAGE Move from any other programmed equipment on the mode. Q.MENU Select the desired quick menu source. POWER Turns your TV or any menu. MENU MENU INPUT ENTER RETURN AV MODE FAV VOL MUTE 12 P A CH G E 3 456 789 0 FLASHBK 48...

Owner's Manual (English)
Page 52
WATCHING TV / CHANNEL CONTROL WATCHING TV / CHANNEL CONTROL TURNING ON THE TV 1 First, connect power cord correctly. I In standby mode to turn TV on, press the , INPUT, CH (DE or ) button on the TV or press the POWER, INPUT, CH( or ), Number (0~9) button on the remote control. 2 Select the viewing ... finished using the INPUT button on vacation, disconnect the power plug from the wall power outlet. At this moment, the TV switches to standby mode. ! The TV reverts to standby mode. VOLUME ADJUSTMENT Adjust the volume to suit your personal preference. 1 Press the VOL (+ or ...
WATCHING TV / CHANNEL CONTROL WATCHING TV / CHANNEL CONTROL TURNING ON THE TV 1 First, connect power cord correctly. I In standby mode to turn TV on, press the , INPUT, CH (DE or ) button on the TV or press the POWER, INPUT, CH( or ), Number (0~9) button on the remote control. 2 Select the viewing ... finished using the INPUT button on vacation, disconnect the power plug from the wall power outlet. At this moment, the TV switches to standby mode. ! The TV reverts to standby mode. VOLUME ADJUSTMENT Adjust the volume to suit your personal preference. 1 Press the VOL (+ or ...

Owner's Manual (English)
Page 53
... (Quick Menu) is shown in order to eject USB device. I USB Eject: Select "USB Eject" in this manual. I Aspect Ratio: Selects your TV turns off . Plasma TV Q.Menu Aspect Ratio Power Saving Clear Voice Picture Mode Sound Mode Caption Multi Audio Sleep Timer CH Del/Add/Fav USB Eject F 16:9 G 3 Off... Vivid Standard Off English Off Add Eject Close LCD TV Q.Menu Aspect Ratio Backlight Clear Voice Picture Mode Sound Mode Caption Multi Audio Sleep Timer CH Del/Add/Fav USB Eject F 16:9 G 3 Off Vivid...
... (Quick Menu) is shown in order to eject USB device. I USB Eject: Select "USB Eject" in this manual. I Aspect Ratio: Selects your TV turns off . Plasma TV Q.Menu Aspect Ratio Power Saving Clear Voice Picture Mode Sound Mode Caption Multi Audio Sleep Timer CH Del/Add/Fav USB Eject F 16:9 G 3 Off... Vivid Standard Off English Off Add Eject Close LCD TV Q.Menu Aspect Ratio Backlight Clear Voice Picture Mode Sound Mode Caption Multi Audio Sleep Timer CH Del/Add/Fav USB Eject F 16:9 G 3 Off Vivid...

Owner's Manual (English)
Page 54
... Zone Daylight Saving F Auto G 2007 11 15 5 PM 52 Eastern Off Enter RETURN Exit 1 Select Auto or Manual. 2 3 ENTER Select desired time option. 52 We recommend setting the TV to preset in retail environments. Mode Setting ! Selecting the environment.... In Store Home Enter RETURN Exit 1 Select H o m e Mode. 2 ENTER Step2. If will automatically return to "H o m e" mode for displaying at stores. Customers can also be displayed on the screen when turning the TV...
... Zone Daylight Saving F Auto G 2007 11 15 5 PM 52 Eastern Off Enter RETURN Exit 1 Select Auto or Manual. 2 3 ENTER Select desired time option. 52 We recommend setting the TV to preset in retail environments. Mode Setting ! Selecting the environment.... In Store Home Enter RETURN Exit 1 Select H o m e Mode. 2 ENTER Step2. If will automatically return to "H o m e" mode for displaying at stores. Customers can also be displayed on the screen when turning the TV...
Owner's Manual (English)
Page 58
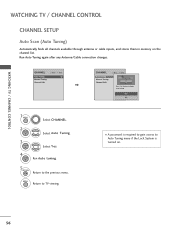
... Manual Tuning Channel Edit Move Enter CHANNEL Auto Tuning Manual Tuning Channel Edit Move Enter Press 'Yes' button to the previous menu. I A password is turned on the channel list. Yes No 1 MENU Select CHANNEL. 2 ENTER Select Auto Tuning. 3 ENTER Select Y e s. 4 ENTER Run Auto tuning....Return to Auto Tuning menu if the Lock System is required to gain access to TV viewing. Run Auto Tuning again after any Antenna/Cable connection changes. WATCHING TV / CHANNEL CONTROL WATCHING TV / CHANNEL CONTROL CHANNEL SETUP Auto Scan (Auto Tuning) Automatically finds all channels available...
... Manual Tuning Channel Edit Move Enter CHANNEL Auto Tuning Manual Tuning Channel Edit Move Enter Press 'Yes' button to the previous menu. I A password is turned on the channel list. Yes No 1 MENU Select CHANNEL. 2 ENTER Select Auto Tuning. 3 ENTER Select Y e s. 4 ENTER Run Auto tuning....Return to Auto Tuning menu if the Lock System is required to gain access to TV viewing. Run Auto Tuning again after any Antenna/Cable connection changes. WATCHING TV / CHANNEL CONTROL WATCHING TV / CHANNEL CONTROL CHANNEL SETUP Auto Scan (Auto Tuning) Automatically finds all channels available...

Owner's Manual (English)
Page 59
.... I A password is required to gain access to Manual Tuning menu if the Lock System is turned on -screen signal strength monitor to add or delete. WATCHING TV / CHANNEL CONTROL Add/Delete Channel (Manual Tuning) If selecting DTV or CADTV input signal, you want to see the quality of the signal being received...
.... I A password is required to gain access to Manual Tuning menu if the Lock System is turned on -screen signal strength monitor to add or delete. WATCHING TV / CHANNEL CONTROL Add/Delete Channel (Manual Tuning) If selecting DTV or CADTV input signal, you want to see the quality of the signal being received...


