
Owner's Manual (English)
Page 1
... Retain it for Plasma TV) LCD TV PLASMA TV OWNER'S MANUAL LCD TV MODELS 32LG30 37LG30 42LG30 42LGX 47LGX 32LG60 37LG60 42LG60 47LG60 52LG60 37LG50 42LG50 47LG50 52LG50 32LG70 42LG70 47LG70 52LG70 PLASMA TV MODELS 42PG25 50PG25 50PG60 ...60PG60 50PG70 60PG70 47LG90 32LG20 Please read this manual carefully before operating your dealer when you require service. P/NO : SAC30708020 (0810-REV09) www.lgusa.com / www.lg...
... Retain it for Plasma TV) LCD TV PLASMA TV OWNER'S MANUAL LCD TV MODELS 32LG30 37LG30 42LG30 42LGX 47LGX 32LG60 37LG60 42LG60 47LG60 52LG60 37LG50 42LG50 47LG50 52LG50 32LG70 42LG70 47LG70 52LG70 PLASMA TV MODELS 42PG25 50PG25 50PG60 ...60PG60 50PG70 60PG70 47LG90 32LG20 Please read this manual carefully before operating your dealer when you require service. P/NO : SAC30708020 (0810-REV09) www.lgusa.com / www.lg...

Owner's Manual (English)
Page 2
... system installer's attention to radio communications. Connect the equipment to persons. Consult the dealer or an experienced radio/TV technician for a Class B digital device, pursuant to rain or moisture. NOTE TO CABLE/TV INSTALLER This reminder is encouraged to try to correct the interference by turning the equipment off and on a circuit...
... system installer's attention to radio communications. Connect the equipment to persons. Consult the dealer or an experienced radio/TV technician for a Class B digital device, pursuant to rain or moisture. NOTE TO CABLE/TV INSTALLER This reminder is encouraged to try to correct the interference by turning the equipment off and on a circuit...

Owner's Manual (English)
Page 4
...and if its appearance indicates damage or deterioration, unplug it to telephone wires, lightening rods, or gas pipes. on the wall, make the TV with an exact replacement part by connecting it , discontinue use a damaged or loose power cord. Overloaded wall outlets, loose or damaged wall... the power cord plugged in electric shock or fire. Protect the power cord from direct sunlight. 2 Pay particular attention to unplug the TV. 15 WARNING - Short-circuit Breaker Power Supply 18 DISCONNECTING DEVICE FROM MAINS Mains plug is , a single outlet circuit which powers only...
...and if its appearance indicates damage or deterioration, unplug it to telephone wires, lightening rods, or gas pipes. on the wall, make the TV with an exact replacement part by connecting it , discontinue use a damaged or loose power cord. Overloaded wall outlets, loose or damaged wall... the power cord plugged in electric shock or fire. Protect the power cord from direct sunlight. 2 Pay particular attention to unplug the TV. 15 WARNING - Short-circuit Breaker Power Supply 18 DISCONNECTING DEVICE FROM MAINS Mains plug is , a single outlet circuit which powers only...

Owner's Manual (English)
Page 5
... discharge unit, size of grounding conductors, location of antenna discharge unit, connection to carry larger TVs. It may occur. Do not cover the product with cloth or other odors coming from the TV or hear strange sounds, unplug the power cord contact an authorized service center. 25 Do not...plastic while plugged in the vicinity of overhead power lines or other liquids directly on the TV as nail, pencil or pen, or make a scratch on the front panel of the TV. 23 Ventilation Install your TV where there is turned off, unplugged and all cables have been removed. Ground Clamp ...
... discharge unit, size of grounding conductors, location of antenna discharge unit, connection to carry larger TVs. It may occur. Do not cover the product with cloth or other odors coming from the TV or hear strange sounds, unplug the power cord contact an authorized service center. 25 Do not...plastic while plugged in the vicinity of overhead power lines or other liquids directly on the TV as nail, pencil or pen, or make a scratch on the front panel of the TV. 23 Ventilation Install your TV where there is turned off, unplugged and all cables have been removed. Ground Clamp ...
Owner's Manual (English)
Page 6
... Sticking Minimization (ISM) Method 86 Power Saving Picture Mode 87 4 CONTENTS WARNING / CAUTION A SAFETY INSTRUCTIONS 1 FEATURE OF THIS TV 6 PREPARATION Accessories 7 Front Panel Information 8 Back Panel Information 10 Stand Instruction 13 VESA Wall Mounting 17 Cable Management 18 Desktop ... 37 USB Connection 46 Audio Out Connection 47 WATCHING TV / CHANNEL CONTROL Remote Control Functions 48 Turning On the TV 50 Channel Selection 50 Volume Adjustment 50 Quick Menu / Favorite Channel Setup 51 Initial Setting 52 On-Screen Menus Selection 54 Channel Setup - Picture ...
... Sticking Minimization (ISM) Method 86 Power Saving Picture Mode 87 4 CONTENTS WARNING / CAUTION A SAFETY INSTRUCTIONS 1 FEATURE OF THIS TV 6 PREPARATION Accessories 7 Front Panel Information 8 Back Panel Information 10 Stand Instruction 13 VESA Wall Mounting 17 Cable Management 18 Desktop ... 37 USB Connection 46 Audio Out Connection 47 WATCHING TV / CHANNEL CONTROL Remote Control Functions 48 Turning On the TV 50 Channel Selection 50 Volume Adjustment 50 Quick Menu / Favorite Channel Setup 51 Initial Setting 52 On-Screen Menus Selection 54 Channel Setup - Picture ...

Owner's Manual (English)
Page 7
... Clock Setting - Analog Broadcasting System Captions 98 - Digital Broadcasting System Captions 99 - User Mode 90 Clear Voice 91 Balance 92 TV Speakers On/Off Setup 93 Audio Reset 94 Stereo/SAP Broadcast Setup 95 Audio Language 96 On-Screen Menus Language Selection 97 Caption ...Timer Setting 104 Auto Shut-off Setting 105 PARENTAL CONTROL / RATINGS Set Password & Lock System 106 Channel Blocking 109 Movie & TV Rating 110 Downloadable Rating 115 External Input Blocking 116 Key lock 117 APPENDIX Troubleshooting 118 Maintenance 120 Product Specifications 121 Programming the ...
... Clock Setting - Analog Broadcasting System Captions 98 - Digital Broadcasting System Captions 99 - User Mode 90 Clear Voice 91 Balance 92 TV Speakers On/Off Setup 93 Audio Reset 94 Stereo/SAP Broadcast Setup 95 Audio Language 96 On-Screen Menus Language Selection 97 Caption ...Timer Setting 104 Auto Shut-off Setting 105 PARENTAL CONTROL / RATINGS Set Password & Lock System 106 Channel Blocking 109 Movie & TV Rating 110 Downloadable Rating 115 External Input Blocking 116 Key lock 117 APPENDIX Troubleshooting 118 Maintenance 120 Product Specifications 121 Programming the ...
Owner's Manual (English)
Page 8
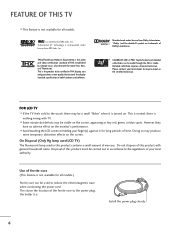
... have no adverse effect on the screen, appearing as tiny red, green, or blue spots. The closer the location of time. FOR LCD TV I Avoid touching the LCD screen or holding your local authority. Install the power plug closely. 6 CALIBRATE LIKE A PRO: Sophisticated and detailed calibrations can be a... certified in THX display area and guarantees screen quality that exceeds the display standard specification in this product with TV. On Disposal (Only Hg lamp used LCD TV) The fluorescent lamp used to inquire about an ISF certified technician. Do not dispose of this product contains ...
... have no adverse effect on the screen, appearing as tiny red, green, or blue spots. The closer the location of time. FOR LCD TV I Avoid touching the LCD screen or holding your local authority. Install the power plug closely. 6 CALIBRATE LIKE A PRO: Sophisticated and detailed calibrations can be a... certified in THX display area and guarantees screen quality that exceeds the display standard specification in this product with TV. On Disposal (Only Hg lamp used LCD TV) The fluorescent lamp used to inquire about an ISF certified technician. Do not dispose of this product contains ...
Owner's Manual (English)
Page 9
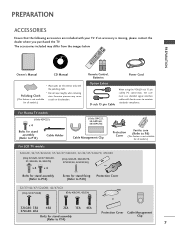
... Clip Protection Cover Ferrite core (Refer to P.6) (This feature is not available for all models.) For LCD TV models 32LG20, 32/37/42LG30, 37/42/47/52LG50, 32/42/47/52LG70, 47LG90 (Only 32LG20, 32/37/42LG30, 37/42LG50, 32/42LG70) (Only 32LG20, 32LG30/70, ...must use shielded signal interface cables with ferrite cores to P.14) 7 If an accessory is not available scratch or discoloration. RETURN TV Q. PREPARATION PREPARATION ACCESSORIES Ensure that the following accessories are included with the polishing cloth. for stand assembly Clip (Refer to maintain ...
... Clip Protection Cover Ferrite core (Refer to P.6) (This feature is not available for all models.) For LCD TV models 32LG20, 32/37/42LG30, 37/42/47/52LG50, 32/42/47/52LG70, 47LG90 (Only 32LG20, 32/37/42LG30, 37/42LG50, 32/42LG70) (Only 32LG20, 32LG30/70, ...must use shielded signal interface cables with ferrite cores to P.14) 7 If an accessory is not available scratch or discoloration. RETURN TV Q. PREPARATION PREPARATION ACCESSORIES Ensure that the following accessories are included with the polishing cloth. for stand assembly Clip (Refer to maintain ...
Owner's Manual (English)
Page 10
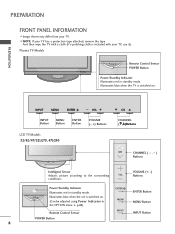
...INPUT MENU INPUT MENU ENTER VOL MENU ENTER INPUT Button ENTER VOL MENU Button VOL CH ENTER VOLUME Button (-, +) Buttons CH LCD TV Models 32/42/47/52LG70, 47LG90 CH CHANNEL (E,D)Buttons CH CHANNEL ( , ) Buttons Intelligent Sensor Adjusts picture according to the surrounding VOL conditions VOLUME ... using Power Indicator in the OPTION menu. I Image shown may differ from your TV. PREPARATION PREPARATION FRONT PANEL INFORMATION I NOTE: If your TV has a protection tape attached, remove the tape. And then wipe the TV with a cloth (If a polishing cloth is included with your...
...INPUT MENU INPUT MENU ENTER VOL MENU ENTER INPUT Button ENTER VOL MENU Button VOL CH ENTER VOLUME Button (-, +) Buttons CH LCD TV Models 32/42/47/52LG70, 47LG90 CH CHANNEL (E,D)Buttons CH CHANNEL ( , ) Buttons Intelligent Sensor Adjusts picture according to the surrounding VOL conditions VOLUME ... using Power Indicator in the OPTION menu. I Image shown may differ from your TV. PREPARATION PREPARATION FRONT PANEL INFORMATION I NOTE: If your TV has a protection tape attached, remove the tape. And then wipe the TV with a cloth (If a polishing cloth is included with your...

Owner's Manual (English)
Page 11
... the set is switched on . (Can be adjusted using Power Indicator in the OPTION menu. G p.85) ENTER MENU INPUT ENTER Button MENU Button INPUT Button 9 LCD TV Models 32LG20, 32/37/42LG30, 37/42/47/52LG50 PREPARATION CH Intelligent Sensor (Except 32LG20, 32/37/42LG30) Adjusts picture according to the surrounding conditions...
... the set is switched on . (Can be adjusted using Power Indicator in the OPTION menu. G p.85) ENTER MENU INPUT ENTER Button MENU Button INPUT Button 9 LCD TV Models 32LG20, 32/37/42LG30, 37/42/47/52LG50 PREPARATION CH Intelligent Sensor (Except 32LG20, 32/37/42LG30) Adjusts picture according to the surrounding conditions...
Owner's Manual (English)
Page 12
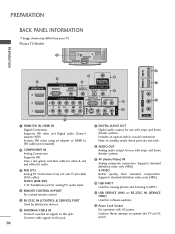
... to DVI cable (not included). 2 COMPONENT IN Analog Connection. Supports HD video and Digital audio. Doesn't support 480i. S-VIDEO Better quality than standard composition. Plasma TV Models 12 PREPARATION VIDEO L/MONO AUDIO R HDMI IN 4 USB IN 10 1 HDMI/DVI IN 3 2 1 3 5 6 4 ANTENNA/ CABLE IN RGB IN RGB(PC) ... and blue cable for video & red and white for use with AC power. Accepts DVI video using an adapter or HDMI to operate the TV on DC power. 10 Supports HD. Connect cable signals to this jack. Supports standard definition video only (480i). 10 USB INPUT Used for ...
... to DVI cable (not included). 2 COMPONENT IN Analog Connection. Supports HD video and Digital audio. Doesn't support 480i. S-VIDEO Better quality than standard composition. Plasma TV Models 12 PREPARATION VIDEO L/MONO AUDIO R HDMI IN 4 USB IN 10 1 HDMI/DVI IN 3 2 1 3 5 6 4 ANTENNA/ CABLE IN RGB IN RGB(PC) ... and blue cable for video & red and white for use with AC power. Accepts DVI video using an adapter or HDMI to operate the TV on DC power. 10 Supports HD. Connect cable signals to this jack. Supports standard definition video only (480i). 10 USB INPUT Used for ...

Owner's Manual (English)
Page 15
... When assembling the desk type stand, make sure the bolt is fully tightened (If not tightened fully, the TV can tilt forward after the product installation). Plasma TV models INSTALLATION (Only 42PG25) 1 Carefully place the TV screen side down on a cushioned surface to protect the screen from damage. 2 Assemble the...70 3 Fix the 4 bolts securely using the holes in the back of the TV. 3 Detach the stand from your TV. Do not over the hole for the stand. Press the PROTECTION COVER into the TV until you hear it click. 13 PREPARATION STAND INSTRUCTION I Image shown may differ ...
... When assembling the desk type stand, make sure the bolt is fully tightened (If not tightened fully, the TV can tilt forward after the product installation). Plasma TV models INSTALLATION (Only 42PG25) 1 Carefully place the TV screen side down on a cushioned surface to protect the screen from damage. 2 Assemble the...70 3 Fix the 4 bolts securely using the holes in the back of the TV. 3 Detach the stand from your TV. Do not over the hole for the stand. Press the PROTECTION COVER into the TV until you hear it click. 13 PREPARATION STAND INSTRUCTION I Image shown may differ ...

Owner's Manual (English)
Page 16
... G When assembling the desk type stand, make sure the bolt is fully tightened (If not tightened fully, the TV can tilt forward after the product installation). PREPARATION PREPARATION 32/37/42/47/52LG60, 42/47LGX I Image shown may differ from damage. 2 Assemble the parts ...of the STAND BODY with COVER BASE of the TV. 32LG60 37LG60 42LG60, 42LGX STAND BODY STAND BODY STAND BODY COVER BASE COVER BASE COVER BASE 3 Assemble the...
... G When assembling the desk type stand, make sure the bolt is fully tightened (If not tightened fully, the TV can tilt forward after the product installation). PREPARATION PREPARATION 32/37/42/47/52LG60, 42/47LGX I Image shown may differ from damage. 2 Assemble the parts ...of the STAND BODY with COVER BASE of the TV. 32LG60 37LG60 42LG60, 42LGX STAND BODY STAND BODY STAND BODY COVER BASE COVER BASE COVER BASE 3 Assemble the...

Owner's Manual (English)
Page 17
PROTECTION COVER After removing the stand, install the included p r otection cover over the hole for the stand. 2 Loose the bolts from TV. 3 Detach the stand from the protection cover, adhere it to protect the screen from damage. After removing the protection paper from TV. PREPARATION DETACHMENT 1 Carefully place the TV screen side down on a cushioned surface to the TV as shown. 15
PROTECTION COVER After removing the stand, install the included p r otection cover over the hole for the stand. 2 Loose the bolts from TV. 3 Detach the stand from the protection cover, adhere it to protect the screen from damage. After removing the protection paper from TV. PREPARATION DETACHMENT 1 Carefully place the TV screen side down on a cushioned surface to the TV as shown. 15

Owner's Manual (English)
Page 18
... the hole for the stand. PREPARATION PREPARATION 32LG20, 32/37/42LG30, 37/42/47/52LG50, 32/42/47/52LG70, 47LG90 I Image shown may differ from TV. Press the PROTECTION COVER into the TV until you hear it click. ! INSTALLATION (Only 32LG20, 32/37/42LG30, 37/42LG50, 32/42LG70) 1 ...Carefully place the TV screen side down on a cush- COVER BASE 3 Assemble the TV as shown. 3 Detach the stand from damage. PROTECTION COVER After removing the stand, install the included protection cover over tighten. ...
... the hole for the stand. PREPARATION PREPARATION 32LG20, 32/37/42LG30, 37/42/47/52LG50, 32/42/47/52LG70, 47LG90 I Image shown may differ from TV. Press the PROTECTION COVER into the TV until you hear it click. ! INSTALLATION (Only 32LG20, 32/37/42LG30, 37/42LG50, 32/42LG70) 1 ...Carefully place the TV screen side down on a cush- COVER BASE 3 Assemble the TV as shown. 3 Detach the stand from damage. PROTECTION COVER After removing the stand, install the included protection cover over tighten. ...
Owner's Manual (English)
Page 19
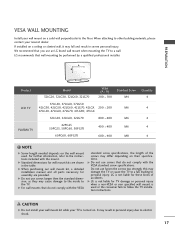
...standard screw specifications. G Standard dimensions for these kinds of the screws may differ depending on their specifications. LG is used . When attaching to the floor. A B Product LCD TV PLASMA TV Model 32LG20, 32LG30, 32LG60, 32LG70 VESA (A * B) 200 * 100 37LG30, 37LG60, 37LG50 42LG30..., 42LG50, 42LG60, 42LG70, 42LGX 200 * 200 47LG50, 47LG60, 47LG70, 47LG90, 47LGX Standard Screw M4 M6 52LG50, 52LG60, 52LG70 42PG25 50PG25, 50PG60, 50PG70 ...
...standard screw specifications. G Standard dimensions for these kinds of the screws may differ depending on their specifications. LG is used . When attaching to the floor. A B Product LCD TV PLASMA TV Model 32LG20, 32LG30, 32LG60, 32LG70 VESA (A * B) 200 * 100 37LG30, 37LG60, 37LG50 42LG30..., 42LG50, 42LG60, 42LG70, 42LGX 200 * 200 47LG50, 47LG60, 47LG70, 47LG90, 47LGX Standard Screw M4 M6 52LG50, 52LG60, 52LG70 42PG25 50PG25, 50PG60, 50PG70 ...

Owner's Manual (English)
Page 20
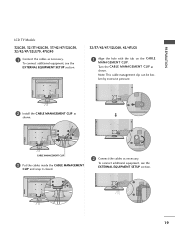
... as shown and bundle the cables. NOTE G Do not hold the CABLE MANAGEMENT CLIP when moving the TV. - If your TV. G Separate CABLE MANAGEMENT CLIP from your TV has the CABLE HOLDER, install it upward. Plasma TV Models 1 Connect the cables as shown. PREPARATION CABLE MANAGEMENT I Image shown may be broken. 18 PREPARATION 2 Install... How to remove the CABLE MANAGEMENT CLIP 42PG25 G First, press the cable management. To connect additional equipment, see the EXTERNAL EQUIPMENT SETUP section. If the TV is dropped, you may be injured or the product may differ from...
... as shown and bundle the cables. NOTE G Do not hold the CABLE MANAGEMENT CLIP when moving the TV. - If your TV. G Separate CABLE MANAGEMENT CLIP from your TV has the CABLE HOLDER, install it upward. Plasma TV Models 1 Connect the cables as shown. PREPARATION CABLE MANAGEMENT I Image shown may be broken. 18 PREPARATION 2 Install... How to remove the CABLE MANAGEMENT CLIP 42PG25 G First, press the cable management. To connect additional equipment, see the EXTERNAL EQUIPMENT SETUP section. If the TV is dropped, you may be injured or the product may differ from...
Owner's Manual (English)
Page 21
... clip can be bro- CABLE MANAGEMENT CLIP 3 Put the cables inside the CABLE MANAGEMENT CLIP and snap it closed. 2 Connect the cables as necessary. PREPARATION LCD TV Models 32LG20, 32/37/42LG30, 37/42/47/52LG50, 32/42/47/52LG70, 47LG90 1 Connect the cables as necessary.
... clip can be bro- CABLE MANAGEMENT CLIP 3 Put the cables inside the CABLE MANAGEMENT CLIP and snap it closed. 2 Connect the cables as necessary. PREPARATION LCD TV Models 32LG20, 32/37/42LG30, 37/42/47/52LG50, 32/42/47/52LG70, 47LG90 1 Connect the cables as necessary.

Owner's Manual (English)
Page 22
...left or right direction by following the clearance recommendations. Stand 1-Screw (provided as parts of the product) Desk WARNING G To prevent TV from falling over, the TV should be pulled in a forward/backward direction, potentially causing injury or damaging the product. G Do not mount near or above ...4 inches on all four sides from your viewing position. ATTACHING THE TV TO A DESK (Only 32LG20, 32LG30/70, 37LG30/50, 42LG30/50) The TV must be attached to a desk so it cannot be securely attached to suit your TV. Tipping, shaking, or rocking the machine may differ from the wall...
...left or right direction by following the clearance recommendations. Stand 1-Screw (provided as parts of the product) Desk WARNING G To prevent TV from falling over, the TV should be pulled in a forward/backward direction, potentially causing injury or damaging the product. G Do not mount near or above ...4 inches on all four sides from your viewing position. ATTACHING THE TV TO A DESK (Only 32LG20, 32LG30/70, 37LG30/50, 42LG30/50) The TV must be attached to a desk so it cannot be securely attached to suit your TV. Tipping, shaking, or rocking the machine may differ from the wall...

Owner's Manual (English)
Page 23
... one on the wall to tie the product. We recommend that is safer to a wall so it cannot be pulled in the picture. * If your TV. Secure the wall brackets with the bolts (sold separately) to the holes in the upper holes. NOTE G Use a platform or cabinet strong enough and large... enough to support the size and weight of the bracket that you set up the TV close to the wall. Ensure the eye-bolts or brackets are the same. 21 I Use a sturdy rope (sold separately) to a wall so it becomes horizontal...
... one on the wall to tie the product. We recommend that is safer to a wall so it cannot be pulled in the picture. * If your TV. Secure the wall brackets with the bolts (sold separately) to the holes in the upper holes. NOTE G Use a platform or cabinet strong enough and large... enough to support the size and weight of the bracket that you set up the TV close to the wall. Ensure the eye-bolts or brackets are the same. 21 I Use a sturdy rope (sold separately) to a wall so it becomes horizontal...


