

Owner's Manual (English)
Page 6
...Auto Volume 68 Preset Sound Settings( Sound Mode 69 Sound Setting Adjustment - User Mode 70 Balance 72 Stereo / SAP Broadcast Setup 73 TV Speakers On/ Off Setup 74 Audio Language 75 On-Screen Menus Language Selection 76 Caption Mode - Picture Mode - User Mode 59 -... ( Manual Tuning) . . 43 - Cinema 3:2 Pulldown Mode 62 Advanced - Preset 58 Manual Picture Adjustment - Analog Broadcasting System Captions . . . . 77 - User Mode 60 XD - Picture Improvement Technology 61 Advanced - Caption Option 80 CONTENTS WARNING / CAUTION 1 SAFETY INSTRUCTIONS 2 FEATURES OF THIS...
...Auto Volume 68 Preset Sound Settings( Sound Mode 69 Sound Setting Adjustment - User Mode 70 Balance 72 Stereo / SAP Broadcast Setup 73 TV Speakers On/ Off Setup 74 Audio Language 75 On-Screen Menus Language Selection 76 Caption Mode - Picture Mode - User Mode 59 -... ( Manual Tuning) . . 43 - Cinema 3:2 Pulldown Mode 62 Advanced - Preset 58 Manual Picture Adjustment - Analog Broadcasting System Captions . . . . 77 - User Mode 60 XD - Picture Improvement Technology 61 Advanced - Caption Option 80 CONTENTS WARNING / CAUTION 1 SAFETY INSTRUCTIONS 2 FEATURES OF THIS...

Owner's Manual (English)
Page 9
...pin Cable 32LB9D* only 1-Screw for stand fixing Refer to p. 12 4-Bolts for the product. Owner's Manual LCD TV PLASMA TV Owner's Manual http://www.lgusa.com www.lg.ca Copyright© 2007 LGE, All Rights Reserved. or Cable Management Twist Holder Arrange the wires with the polishing cloth ...for the product exterior if there is not available for all models. 60 inches only 50 inches only Additional Cover 3 - Rubber Refer to p. 13 For PLASMA TV ...
...pin Cable 32LB9D* only 1-Screw for stand fixing Refer to p. 12 4-Bolts for the product. Owner's Manual LCD TV PLASMA TV Owner's Manual http://www.lgusa.com www.lg.ca Copyright© 2007 LGE, All Rights Reserved. or Cable Management Twist Holder Arrange the wires with the polishing cloth ...for the product exterior if there is not available for all models. 60 inches only 50 inches only Additional Cover 3 - Rubber Refer to p. 13 For PLASMA TV ...

Owner's Manual (English)
Page 10
Power Standby Indicator • illuminates red in standby mode. • illuminates white when the set is included with a cloth (If a polishing cloth is switched on. Touch Pad ENTER INPUT Button POWER Button ENTER Button VOLUME MENU Button (F,G) Buttons CHANNEL (E,D) Buttons 8 And then wipe the product with your TV. PREPARATION FRONT PANEL CONTROLS I If your product has a protection tape attached, remove the tape. I Here shown may be somewhat different from your product, use it). 50/60 inches PREPARATION Remote Control Sensor Program Display . .
Power Standby Indicator • illuminates red in standby mode. • illuminates white when the set is included with a cloth (If a polishing cloth is switched on. Touch Pad ENTER INPUT Button POWER Button ENTER Button VOLUME MENU Button (F,G) Buttons CHANNEL (E,D) Buttons 8 And then wipe the product with your TV. PREPARATION FRONT PANEL CONTROLS I If your product has a protection tape attached, remove the tape. I Here shown may be somewhat different from your product, use it). 50/60 inches PREPARATION Remote Control Sensor Program Display . .

Owner's Manual (English)
Page 12
.... 10 AUDIO/VIDEO Input Connect audio/video output from an S-VIDEO device. PREPARATION PREPARATION BACK PANEL INFORMATION I Here shown may be somewhat different from your TV. 50/60 inches VIDEVOIDLE/OMOL/NMOONAOUDAIUODIOR R UUSSBB AAVVININ2 2 SS-V-VIDIEDOEO USB port S-VIDEO Input Connect S-Video out from an external device to these jacks. 47LC7DF VIDEO...
.... 10 AUDIO/VIDEO Input Connect audio/video output from an S-VIDEO device. PREPARATION PREPARATION BACK PANEL INFORMATION I Here shown may be somewhat different from your TV. 50/60 inches VIDEVOIDLE/OMOL/NMOONAOUDAIUODIOR R UUSSBB AAVVININ2 2 SS-V-VIDIEDOEO USB port S-VIDEO Input Connect S-Video out from an external device to these jacks. 47LC7DF VIDEO...

Owner's Manual (English)
Page 13
PREPARATION 50/60 inches RGB /DVI 47LC7DF RGB /DVI VIDEO L/MONO AUDIO R USB IN S-VIDEO ANTENNA/ CABLE IN AV IN 2 ANTENNA/ CABLE IN 32LB9D* RGB /DVI ANTENNA/ CABLE ... PORT Connect your wired remote control. S-VIDEO Connect S-Video out from a PC to this jack. COMPONENT IN Connect a component video/audio device to operate the TV on a PC. DIGITAL AUDIO OUT Connect digital audio to various types of equipment. Note: In standby mode, these jacks. RGB(PC) AUDIO (RGB/DVI) Connect...
PREPARATION 50/60 inches RGB /DVI 47LC7DF RGB /DVI VIDEO L/MONO AUDIO R USB IN S-VIDEO ANTENNA/ CABLE IN AV IN 2 ANTENNA/ CABLE IN 32LB9D* RGB /DVI ANTENNA/ CABLE ... PORT Connect your wired remote control. S-VIDEO Connect S-Video out from a PC to this jack. COMPONENT IN Connect a component video/audio device to operate the TV on a PC. DIGITAL AUDIO OUT Connect digital audio to various types of equipment. Note: In standby mode, these jacks. RGB(PC) AUDIO (RGB/DVI) Connect...

Owner's Manual (English)
Page 14
...hang from your TV. 50 inches 60 inches 47LC7DF 32LB9D* PREPARATION I Use a sturdy rope (not provided as shown in the picture. *Insert the eye-bolts and tighten them securely in a forward/backward direction, potentially causing injury or damaging the product. ATTACHING THE TV TO A DESK (Only 32LB9D*) The TV must purchase ...pulled in the upper holes. Ensure the eye-bolts or brackets are tightened securely. Caution: Please make sure that you set up the TV close to tie the rope so it cannot be pulled in the product. We recommend that children don't climb on the wall to ...
...hang from your TV. 50 inches 60 inches 47LC7DF 32LB9D* PREPARATION I Use a sturdy rope (not provided as shown in the picture. *Insert the eye-bolts and tighten them securely in a forward/backward direction, potentially causing injury or damaging the product. ATTACHING THE TV TO A DESK (Only 32LB9D*) The TV must purchase ...pulled in the upper holes. Ensure the eye-bolts or brackets are tightened securely. Caution: Please make sure that you set up the TV close to tie the rope so it cannot be pulled in the product. We recommend that children don't climb on the wall to ...

Owner's Manual (English)
Page 16
PREPARATION PREPARATION BACK COVER FOR WIRE ARRANGEMENT I Here shown may be somewhat different from your TV. 50/60 inches 1 Hold the CABLE MANAGEMENT with both hands and pull it as shown. 45° CABLE MANAGEMENT 2 Connect the cables as shown. 14 To connect an additional equipment, see the External equipment Connections section. 3 Install the CABLE MANAGEMENT as necessary.
PREPARATION PREPARATION BACK COVER FOR WIRE ARRANGEMENT I Here shown may be somewhat different from your TV. 50/60 inches 1 Hold the CABLE MANAGEMENT with both hands and pull it as shown. 45° CABLE MANAGEMENT 2 Connect the cables as shown. 14 To connect an additional equipment, see the External equipment Connections section. 3 Install the CABLE MANAGEMENT as necessary.

Owner's Manual (English)
Page 19
PREPARATION DESKTOP PEDESTAL INSTALLATION For proper ventilation, allow a clearance of 4inches on all four sides from the wall. 50/60 inches 4 inches 47LC7DF 4 inches 4 inches 4 inches 4 inches 4 inches 4 inches 32LB9D* 4 inches 4 inches 4 inches 4 inches 4 inches VIDEO L/MONO AUDIO R... VESA WALL MOUNTING This product accepts a VESA-compliant mounting interface pad. (optional) There 4 threaded holes are available for attaching the bracket. 50/60 inches 47LC7DF 32LB9D* 600mm AV IN 2 600mm USB S-VIDEO 400mm 400mm 200mm 100mm AV IN 2 VIDEO L/MONO AUDIO R USB IN NOTE G...
PREPARATION DESKTOP PEDESTAL INSTALLATION For proper ventilation, allow a clearance of 4inches on all four sides from the wall. 50/60 inches 4 inches 47LC7DF 4 inches 4 inches 4 inches 4 inches 4 inches 4 inches 32LB9D* 4 inches 4 inches 4 inches 4 inches 4 inches VIDEO L/MONO AUDIO R... VESA WALL MOUNTING This product accepts a VESA-compliant mounting interface pad. (optional) There 4 threaded holes are available for attaching the bracket. 50/60 inches 47LC7DF 32LB9D* 600mm AV IN 2 600mm USB S-VIDEO 400mm 400mm 200mm 100mm AV IN 2 VIDEO L/MONO AUDIO R USB IN NOTE G...

Owner's Manual (English)
Page 20
... as wall-type. PREPARATION PREPARATION NOT USING THE DESK-TYPE STAND (Only 50/60 inches models) I It is applied to when installing only the 50/60 inches models as wall-type. NOTE G Before adjusting the angle, you can adjust the the TV set the hole. 18 ADDITIONAL COVER SWIVEL STAND (Only 50.../60 inches models) After installing the TV, you must close (to the right) the shaft bolt to...
... as wall-type. PREPARATION PREPARATION NOT USING THE DESK-TYPE STAND (Only 50/60 inches models) I It is applied to when installing only the 50/60 inches models as wall-type. NOTE G Before adjusting the angle, you can adjust the the TV set the hole. 18 ADDITIONAL COVER SWIVEL STAND (Only 50.../60 inches models) After installing the TV, you must close (to the right) the shaft bolt to...

Owner's Manual (English)
Page 33
... 1280x768 48.363 56.476 60.023 47.776 60.289 60.00 70.06 75.02 59.870 74.893 1360x768 47.712 60.015 1280x1024 63.981 79.976 60.020 75.025 1600x1200 1920x1080 75.00 67.50 60.00 60.00 Supported Display Specifications (HDMI... 59.94 1920x1080 33.75 33.72 67.50 67.432 27.00 26.97 33.75 33.71 60.00 59.94 60.00 59.939 24.00 23.94 30.00 29.97 Supported Display Specifications (Y, CB /PB, CR /PR)...KHz) Frequency(Hz) 720x480 15.73 15.73 31.47 31.47 60.00 59.94 59.94 60.00 1280x720 45.00 44.96 60.00 59.94 * RGB-PC mode only: 1280x768(H-60.289, V-74.893) 1920x1080 33.75 37.72 67.50 67....
... 1280x768 48.363 56.476 60.023 47.776 60.289 60.00 70.06 75.02 59.870 74.893 1360x768 47.712 60.015 1280x1024 63.981 79.976 60.020 75.025 1600x1200 1920x1080 75.00 67.50 60.00 60.00 Supported Display Specifications (HDMI... 59.94 1920x1080 33.75 33.72 67.50 67.432 27.00 26.97 33.75 33.71 60.00 59.94 60.00 59.939 24.00 23.94 30.00 29.97 Supported Display Specifications (Y, CB /PB, CR /PR)...KHz) Frequency(Hz) 720x480 15.73 15.73 31.47 31.47 60.00 59.94 59.94 60.00 1280x720 45.00 44.96 60.00 59.94 * RGB-PC mode only: 1280x768(H-60.289, V-74.893) 1920x1080 33.75 37.72 67.50 67....
Owner's Manual (English)
Page 62
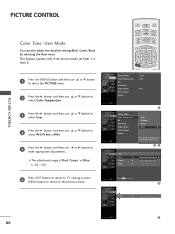
TV INPUT STB MEDIA HOST BRIGHT - User Red 0 G Green 0 Blue 0 Press MENU to the detailed setting screen. E Red 0 E 60 MENU BRIGHT + TIMER RATIO SIMPLINK Picture Mode : User1 Color Temperature : Cool XD Advanced Aspect Ratio : 16:9 Picture Reset Screen BACK ...2 Press the G button and then use F or G button to BACK select Color PICTURE SOUND SAP TeCC mperature. PICTURE CONTROL PICTURE CONTROL TV INPUT TV INPUT STB MEDIA HOST STB MEDIA HOST Color Tone -User Mode You can also adjust the detailed settings(Red, Green, Blue) by selecting the...
TV INPUT STB MEDIA HOST BRIGHT - User Red 0 G Green 0 Blue 0 Press MENU to the detailed setting screen. E Red 0 E 60 MENU BRIGHT + TIMER RATIO SIMPLINK Picture Mode : User1 Color Temperature : Cool XD Advanced Aspect Ratio : 16:9 Picture Reset Screen BACK ...2 Press the G button and then use F or G button to BACK select Color PICTURE SOUND SAP TeCC mperature. PICTURE CONTROL PICTURE CONTROL TV INPUT TV INPUT STB MEDIA HOST STB MEDIA HOST Color Tone -User Mode You can also adjust the detailed settings(Red, Green, Blue) by selecting the...

Owner's Manual (English)
Page 86
...of minutes. MEDIA HOST Note that thSTBis setting MEDIAHOST is displayed on the screen, followed by the following Sleep Time options : 10, 20, 30, 60, 90, 120, 180, and 240 minutes. MENU BRIGHT + 1 Press the TIMER button repeatedly to select Off. SOUND SAP CC PICTURE SOUND SAP...ENTER butBtACoK n. I You can also set up the Sleep Time in the TIME menu. TIME SETTING SLEEP TIME SETTING TV INPUT TV INPUT TV INPUT TV INPUT TV INP The Sleep Time turns the TV off , press the TIMER button once. BRIGHT - TIMER RATIO SIMPLINK 2 When the number of minutes you want ...
...of minutes. MEDIA HOST Note that thSTBis setting MEDIAHOST is displayed on the screen, followed by the following Sleep Time options : 10, 20, 30, 60, 90, 120, 180, and 240 minutes. MENU BRIGHT + 1 Press the TIMER button repeatedly to select Off. SOUND SAP CC PICTURE SOUND SAP...ENTER butBtACoK n. I You can also set up the Sleep Time in the TIME menu. TIME SETTING SLEEP TIME SETTING TV INPUT TV INPUT TV INPUT TV INPUT TV INP The Sleep Time turns the TV off , press the TIMER button once. BRIGHT - TIMER RATIO SIMPLINK 2 When the number of minutes you want ...

Owner's Manual (English)
Page 98
...32LB9D-UA) 32LB9DB ( 32LB9DB-UB) 47LC7DF ( 47LC7DF-UB) Width x Height x Depth (inches/mm) Weight (pounds / kg) Width x Height x Depth (inches/mm) Weight (pounds / kg) 60PY3D 60PY3DF ( 60PY3DF-UA) 50PY3D 50PY3DF ( 50PY3DF-UA) Width x Height x Depth (inches/mm) Weight (pounds / kg) Width x Height x Depth (inches/mm) Weight (pounds / kg) Power ...ATSC, 64 & 256 QAM VHF 2-13, UHF 14-69, CATV 1-135, DTV 2-69, CADTV 1-135 75 Ω 0 ~ 40°C Less than 80% -20 ~ 60°C Less than 85% I The specifications shown above may be changed without prior notice for quality improvement. APPENDIX 96
...32LB9D-UA) 32LB9DB ( 32LB9DB-UB) 47LC7DF ( 47LC7DF-UB) Width x Height x Depth (inches/mm) Weight (pounds / kg) Width x Height x Depth (inches/mm) Weight (pounds / kg) 60PY3D 60PY3DF ( 60PY3DF-UA) 50PY3D 50PY3DF ( 50PY3DF-UA) Width x Height x Depth (inches/mm) Weight (pounds / kg) Width x Height x Depth (inches/mm) Weight (pounds / kg) Power ...ATSC, 64 & 256 QAM VHF 2-13, UHF 14-69, CATV 1-135, DTV 2-69, CADTV 1-135 75 Ω 0 ~ 40°C Less than 80% -20 ~ 60°C Less than 85% I The specifications shown above may be changed without prior notice for quality improvement. APPENDIX 96

Owner's Manual (English)
Page 109
... Max : 64(*transmit by Hexadecimal code) Refer to 'Real data mapping 1' as shown below . Input select(Command: x b) To select input source for the TV. Screen Mute (Command2:d) To select screen mute on (Volume off) Data 1 : Volume mute off ) Acknowledgement [d][ ][Set ID][ ][OK/NG][Data][x] 06. ...10 : Analog (Antenna) Data 11 : Analog (Cable) Data 20 : AV1 Data 21 : AV2 Data 40 : Component 1 Data 41 : Component 2 Data 60 : RGB-PC Data 90 : HDMI1 Data 91 : HDMI2 Data 92 : HDMI3 Acknowledgement [b][ ][Set ID][ ][OK/NG][Data][x] 04. Input Select (Command2:b)...
... Max : 64(*transmit by Hexadecimal code) Refer to 'Real data mapping 1' as shown below . Input select(Command: x b) To select input source for the TV. Screen Mute (Command2:d) To select screen mute on (Volume off) Data 1 : Volume mute off ) Acknowledgement [d][ ][Set ID][ ][OK/NG][Data][x] 06. ...10 : Analog (Antenna) Data 11 : Analog (Cable) Data 20 : AV1 Data 21 : AV2 Data 40 : Component 1 Data 41 : Component 2 Data 60 : RGB-PC Data 90 : HDMI1 Data 91 : HDMI2 Data 92 : HDMI3 Acknowledgement [b][ ][Set ID][ ][OK/NG][Data][x] 04. Input Select (Command2:b)...


