

User Guide
Page 2
... Throughout this manual, component parts and items in the OSD menus are used in this manual and on the unit case. The projection lamp is on. Do not place the unit on the topic at hand. To avoid damage to alert you of the projector. Symbols Used... are denoted in bold font as in direct sunlight, or near water, in this manual to eyes, do not look into the lens when the lamp is extremely bright by design. For servicing, contact qualified service personnel. Follow all warnings and cautions in the unit. Aside from the ...
... Throughout this manual, component parts and items in the OSD menus are used in this manual and on the unit case. The projection lamp is on. Do not place the unit on the topic at hand. To avoid damage to alert you of the projector. Symbols Used... are denoted in bold font as in direct sunlight, or near water, in this manual to eyes, do not look into the lens when the lamp is extremely bright by design. For servicing, contact qualified service personnel. Follow all warnings and cautions in the unit. Aside from the ...

User Guide
Page 3
...Remove the batteries from the remote control when storing or not in the Regulatory Compliance section on page 38. Allow the lamp to cool for about one hour. Cleaning the Projector Unplug the power cord before cleaning. Place the power cord where ...on page 35 for clear and safe instructions for this procedure. See Replacing the Projection Lamp on the power cord. Before replacing the lamp: Unplug the power cord. Allow the lamp to cool for about one hour. iii - PPrreeffaaccee Power Safety Only ...
...Remove the batteries from the remote control when storing or not in the Regulatory Compliance section on page 38. Allow the lamp to cool for about one hour. Cleaning the Projector Unplug the power cord before cleaning. Place the power cord where ...on page 35 for clear and safe instructions for this procedure. See Replacing the Projection Lamp on the power cord. Before replacing the lamp: Unplug the power cord. Allow the lamp to cool for about one hour. iii - PPrreeffaaccee Power Safety Only ...
User Guide
Page 5
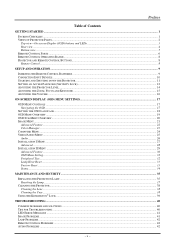
... Advanced...28 INSTALLATION II MENU ...29 Advanced Feature ...30 OSD Menu Setting...32 Peripheral Test...32 Lamp Hour Reset ...33 Factory Reset ...33 Status...34 MAINTENANCE AND SECURITY...35 REPLACING THE PROJECTION LAMP...35 Resetting the Lamp...37 CLEANING THE PROJECTOR...38 Cleaning the Lens ...38 Cleaning the Case ...38 USING THE KENSINGTON...
... Advanced...28 INSTALLATION II MENU ...29 Advanced Feature ...30 OSD Menu Setting...32 Peripheral Test...32 Lamp Hour Reset ...33 Factory Reset ...33 Status...34 MAINTENANCE AND SECURITY...35 REPLACING THE PROJECTION LAMP...35 Resetting the Lamp...37 CLEANING THE PROJECTOR...38 Cleaning the Lens ...38 Cleaning the Case ...38 USING THE KENSINGTON...

User Guide
Page 8
...-screen Display (OSD) buttons and LEDs. 3 9. Height adjuster Adjusts level of the ventilation openings. - 2 - IR receiver Receiver for good air circulation, which keeps the projector lamp cool. Focus ring Focuses the projected image 8. Zoom ring Enlarges the projected image 15 7. DDLLPP PPrroojjeeccttoorr--UUsseerr''ss MMaannuuaall Views of projector 14 Important: Ventilation...
...-screen Display (OSD) buttons and LEDs. 3 9. Height adjuster Adjusts level of the ventilation openings. - 2 - IR receiver Receiver for good air circulation, which keeps the projector lamp cool. Focus ring Focuses the projected image 8. Zoom ring Enlarges the projected image 15 7. DDLLPP PPrroojjeeccttoorr--UUsseerr''ss MMaannuuaall Views of projector 14 Important: Ventilation...

User Guide
Page 9
LAMP LED Flashing Error Code (see LED Error Messages on page 41) Green Power On 4. MENU Open and exits the OSD buttons 17 On 2. SOURCE Detects ...
LAMP LED Flashing Error Code (see LED Error Messages on page 41) Green Power On 4. MENU Open and exits the OSD buttons 17 On 2. SOURCE Detects ...

User Guide
Page 11
... capacity must be capable of withstanding three times the weight of the equipment (not less than 5.15 kg) over a period of 6 mm (0.23 inch). LABEL Lamp cover Height adjustor Height adjustor button Lens cap hook Tilt adjustor Ceiling support holes DESCRIPTION SEE PAGE: Remove when changing the... lamp 35 Adjuster drops down when adjuster button is pushed 14 Push to release adjustor To fasten the lens cap cover Rotate adjuster lever to adjust ...
... capacity must be capable of withstanding three times the weight of the equipment (not less than 5.15 kg) over a period of 6 mm (0.23 inch). LABEL Lamp cover Height adjustor Height adjustor button Lens cap hook Tilt adjustor Ceiling support holes DESCRIPTION SEE PAGE: Remove when changing the... lamp 35 Adjuster drops down when adjuster button is pushed 14 Push to release adjustor To fasten the lens cap cover Rotate adjuster lever to adjust ...
User Guide
Page 26
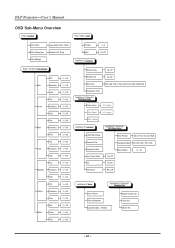
... Timer Timer Alarm Off~ 60mins Time Keeper Off~ 60mins Start Counting Installation II / Advanced Installation II / Advanced / OSD Menu Setting OSD Menu Setting Peripheral Test Lamp Hour Reset Low Power Mode 3D Menu Position Center, Down, Up, Left, Right Translucent Menu 0%, 25%, 50%, 75%, 100% Menu Display On, Off On, Off... 10 ~ 20 3D Inverter R/L, L/R Installation II / Status Installation II / Advanced / Peripheral Test Active Source Video information Lamp Hours(Eco , Normal) Remote Control Test Color Test Button Test - 20 -
... Timer Timer Alarm Off~ 60mins Time Keeper Off~ 60mins Start Counting Installation II / Advanced Installation II / Advanced / OSD Menu Setting OSD Menu Setting Peripheral Test Lamp Hour Reset Low Power Mode 3D Menu Position Center, Down, Up, Left, Right Translucent Menu 0%, 25%, 50%, 75%, 100% Menu Display On, Off On, Off... 10 ~ 20 3D Inverter R/L, L/R Installation II / Status Installation II / Advanced / Peripheral Test Active Source Video information Lamp Hours(Eco , Normal) Remote Control Test Color Test Button Test - 20 -
User Guide
Page 35
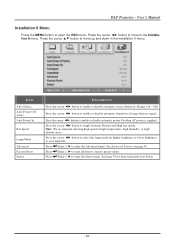
...; to enter the Status menu. Press (Enter) / ► to enter the Advanced menu. See page 34 for higher brightness or lower brightness to select the lamp mode for more information on page 30. ITEM Auto Source Auto Power Off (min.) Auto Power On Fan Speed... Lamp Mode Advanced Factory Reset Status DESCRIPTION Press the cursor ◄► button to enable or disable automatic source detection. (Range: On ~ Off) Press the cursor &#...
...; to enter the Status menu. Press (Enter) / ► to enter the Advanced menu. See page 34 for higher brightness or lower brightness to select the lamp mode for more information on page 30. ITEM Auto Source Auto Power Off (min.) Auto Power On Fan Speed... Lamp Mode Advanced Factory Reset Status DESCRIPTION Press the cursor ◄► button to enable or disable automatic source detection. (Range: On ~ Off) Press the cursor &#...
User Guide
Page 36
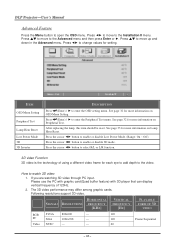
...- 30 - DDLLPP PPrroojjeeccttoorr--UUsseerr''ss MMaannuuaall Advanced Feature Press the Menu button to enter the OSD setting menu. ITEM OSD Menu Setting Peripheral Test Lamp Hour Reset Low Power Mode 3D 3D Inverter DESCRIPTION Press (Enter) / ► to open the OSD menu. Press (Enter) / ►...menu. Press the cursor ◄► button to move up and down in the Advanced menu. How to change values for more information on Lamp Hour Reset. Press ▲▼ to select R/L or L/R function. 3D video Function 3D video is the technology of 120Hz. 2. SIGNALS ...
...- 30 - DDLLPP PPrroojjeeccttoorr--UUsseerr''ss MMaannuuaall Advanced Feature Press the Menu button to enter the OSD setting menu. ITEM OSD Menu Setting Peripheral Test Lamp Hour Reset Low Power Mode 3D 3D Inverter DESCRIPTION Press (Enter) / ► to open the OSD menu. Press (Enter) / ►...menu. Press the cursor ◄► button to move up and down in the Advanced menu. How to change values for more information on Lamp Hour Reset. Press ▲▼ to select R/L or L/R function. 3D video Function 3D video is the technology of 120Hz. 2. SIGNALS ...
User Guide
Page 37
...~60Hz) or near fragile object or any objects that has a difference in the video. UUsseerr''ss MMaannuuaall 3. Please cover the sunlight using curtain or dim lamps. 3. Any object places between the eyes, watch 3D video near windows the image may cause you experience headache, tiredness or dizziness immediately stop watching the...
...~60Hz) or near fragile object or any objects that has a difference in the video. UUsseerr''ss MMaannuuaall 3. Please cover the sunlight using curtain or dim lamps. 3. Any object places between the eyes, watch 3D video near windows the image may cause you experience headache, tiredness or dizziness immediately stop watching the...
User Guide
Page 39
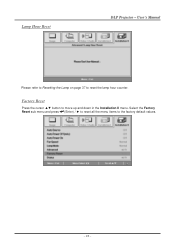
Factory Reset Press the cursor ▲▼ button to reset the lamp hour counter. UUsseerr''ss MMaannuuaall Please refer to Resetting the Lamp on page 37 to move up and down in the Installation II menu. Select the Factory Reset sub menu and press (Enter) / ► to reset all the menu items to the factory default values. - 33 - Lamp Hour Reset DDLLPP PPrroojjeeccttoorr --
Factory Reset Press the cursor ▲▼ button to reset the lamp hour counter. UUsseerr''ss MMaannuuaall Please refer to Resetting the Lamp on page 37 to move up and down in the Installation II menu. Select the Factory Reset sub menu and press (Enter) / ► to reset all the menu items to the factory default values. - 33 - Lamp Hour Reset DDLLPP PPrroojjeeccttoorr --
User Guide
Page 40
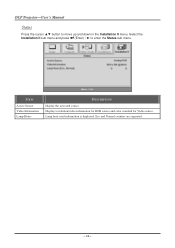
Select the Installation II sub menu and press (Enter) / ► to move up and down in the Installation II menu. Eco and Normal counters are separated. - 34 - ITEM Active Source Video Information Lamp Hours DESCRIPTION Display the activated source. Lamp hour used information is displayed. DDLLPP PPrroojjeeccttoorr--UUsseerr''ss MMaannuuaall Status Press the cursor ▲▼ button to enter the Status sub menu. Displays resolution/video information for RGB source and color standard for Video source.
Select the Installation II sub menu and press (Enter) / ► to move up and down in the Installation II menu. Eco and Normal counters are separated. - 34 - ITEM Active Source Video Information Lamp Hours DESCRIPTION Display the activated source. Lamp hour used information is displayed. DDLLPP PPrroojjeeccttoorr--UUsseerr''ss MMaannuuaall Status Press the cursor ▲▼ button to enter the Status sub menu. Displays resolution/video information for RGB source and color standard for Video source.

User Guide
Page 41
... a small amount of your local dealer. The fluorescent lamp used in this product must be carried out in a severe burn. 1. DDLLPP PPrroojjeeccttoorr -- UUsseerr''ss MMaannuuaall MAINTENANCE AND SECURITY Replacing the Projection Lamp The projection lamp should only be replaced when it burns out. Important:... to turn off and unplug the projector at least 30 minutes before replacing the lamp. Do not dispose this product with the regulations of mercury b. Loosen the captive screw on the lamp compartment cover. 2. It should be replaced with a certified replacement part, which ...
... a small amount of your local dealer. The fluorescent lamp used in this product must be carried out in a severe burn. 1. DDLLPP PPrroojjeeccttoorr -- UUsseerr''ss MMaannuuaall MAINTENANCE AND SECURITY Replacing the Projection Lamp The projection lamp should only be replaced when it burns out. Important:... to turn off and unplug the projector at least 30 minutes before replacing the lamp. Do not dispose this product with the regulations of mercury b. Loosen the captive screw on the lamp compartment cover. 2. It should be replaced with a certified replacement part, which ...
User Guide
Page 42
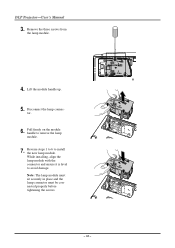
Reverse steps 1 to 6 to avoid damage. Note: The lamp module must sit securely in place and the lamp connector must be connected properly before tightening the screws. - 36 - Disconnect the lamp connector. 6. While installing, align the lamp module with the connector and ensure it is level to install the new lamp module. Lift the module handle up. 5. DDLLPP PPrroojjeeccttoorr--UUsseerr''ss MMaannuuaall 3. Remove the three screws from the lamp module. 4. Pull firmly on the module handle to remove the lamp module. 7.
Reverse steps 1 to 6 to avoid damage. Note: The lamp module must sit securely in place and the lamp connector must be connected properly before tightening the screws. - 36 - Disconnect the lamp connector. 6. While installing, align the lamp module with the connector and ensure it is level to install the new lamp module. Lift the module handle up. 5. DDLLPP PPrroojjeeccttoorr--UUsseerr''ss MMaannuuaall 3. Remove the three screws from the lamp module. 4. Pull firmly on the module handle to remove the lamp module. 7.
User Guide
Page 43
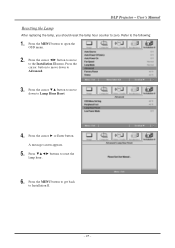
... menu. Press the cursor ► or Enter button. A message screen appears. 5. Press buttons to open the OSD menu. 2. Press the MENU button to reset the lamp hour. 6. Refer to Installation II. - 37 - Press the MENU button to get back to the following: 1. DDLLPP PPrroojjeeccttoorr -- Press the cursor ▼▲ button ...to move to Advanced. 3. Press the cursor button to move down to zero. UUsseerr''ss MMaannuuaall Resetting the Lamp After replacing the lamp, you should reset the lamp hour counter to Lamp Hour Reset. 4.
... menu. Press the cursor ► or Enter button. A message screen appears. 5. Press buttons to open the OSD menu. 2. Press the MENU button to reset the lamp hour. 6. Refer to Installation II. - 37 - Press the MENU button to get back to the following: 1. DDLLPP PPrroojjeeccttoorr -- Press the cursor ▼▲ button ...to move to Advanced. 3. Press the cursor button to move down to zero. UUsseerr''ss MMaannuuaall Resetting the Lamp After replacing the lamp, you should reset the lamp hour counter to Lamp Hour Reset. 4.
User Guide
Page 47
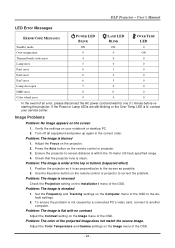
... 1. UUsseerr''ss MMaannuuaall LED Error Messages ERROR CODE MESSAGES POWER LED BLINK LAMP LED BLINK OVER TEMP LED Standby mode ON ON 0 Over temperature 0 0 ON Thermal break status error 4 0 0 Lamp error 5 0 0 Fan1 error 6 1 0 Fan2 error 6 2 0 Fan3 error 6 3 0 Lamp door open 7 0 0 DMD error 8 0 0 Color wheel error... notebook or desktop PC. 2. DDLLPP PPrroojjeeccttoorr -- Adjust the Focus on the screen 1. If the Power or Lamp LEDs are still blinking or the Over Temp LED is streaked 1. Image Problems Problem: No image appears on the projector. 2.
... 1. UUsseerr''ss MMaannuuaall LED Error Messages ERROR CODE MESSAGES POWER LED BLINK LAMP LED BLINK OVER TEMP LED Standby mode ON ON 0 Over temperature 0 0 ON Thermal break status error 4 0 0 Lamp error 5 0 0 Fan1 error 6 1 0 Fan2 error 6 2 0 Fan3 error 6 3 0 Lamp door open 7 0 0 DMD error 8 0 0 Color wheel error... notebook or desktop PC. 2. DDLLPP PPrroojjeeccttoorr -- Adjust the Focus on the screen 1. If the Power or Lamp LEDs are still blinking or the Over Temp LED is streaked 1. Image Problems Problem: No image appears on the projector. 2.
User Guide
Page 48
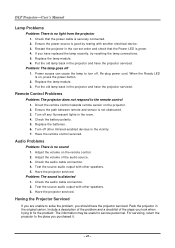
...not obstructed. 3. Having the Projector Serviced If you purchased it. - 42 - Ensure the power source is securely connected. 2. Replace the lamp module. 6. Audio Problems Problem: There is no sound 1. Test the source audio output with another electrical device. 3. Have the projector serviced....light from the projector 1. Check that the Power LED is on the projector. 2. Put the old lamp back in the projector and have replaced the lamp recently, try resetting the lamp connections. 5. When the Ready LED is green. 4. Turn off other speakers. 3. Replace the batteries...
...not obstructed. 3. Having the Projector Serviced If you purchased it. - 42 - Ensure the power source is securely connected. 2. Replace the lamp module. 6. Audio Problems Problem: There is no sound 1. Test the source audio output with another electrical device. 3. Have the projector serviced....light from the projector 1. Check that the Power LED is on the projector. 2. Put the old lamp back in the projector and have replaced the lamp recently, try resetting the lamp connections. 5. When the Ready LED is green. 4. Turn off other speakers. 3. Replace the batteries...
User Guide
Page 49
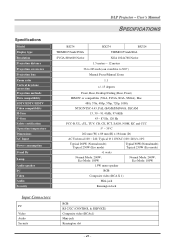
UUsseerr''ss MMaannuuaall SPECIFICATIONS BS274 BX274 BX324 TI DMD 0.55-inch SVGA TI DMD 0.55-inch XGA SVGA 800x600 Native XGA 1024x768 Native 1.5 meters ~ 12 meters 36 to 243 inch (... Vertical keystone correction Projection methods Data compatibility SDTV/EDTV/ HDTV Video compatibility H-Sync V-Sync Safety certification Operation temperature Dimensions AC Input Power consumption Stand By Lamp Audio speaker PC Video Audio Security DDLLPP PPrroojjeeccttoorr -- Typical 230W (Eco mode) Typical 300W (Normal mode);
UUsseerr''ss MMaannuuaall SPECIFICATIONS BS274 BX274 BX324 TI DMD 0.55-inch SVGA TI DMD 0.55-inch XGA SVGA 800x600 Native XGA 1024x768 Native 1.5 meters ~ 12 meters 36 to 243 inch (... Vertical keystone correction Projection methods Data compatibility SDTV/EDTV/ HDTV Video compatibility H-Sync V-Sync Safety certification Operation temperature Dimensions AC Input Power consumption Stand By Lamp Audio speaker PC Video Audio Security DDLLPP PPrroojjeeccttoorr -- Typical 230W (Eco mode) Typical 300W (Normal mode);
User Guide
Page 54
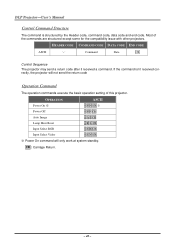
... structured by the Header code, command code, data code and end code. OPERATION ASCII Power On ※ ~ P N CR ※ Power Off ~ P F CR Auto Image ~ A I CR Lamp Hour Reset ~ R L CR Input Select RGB ~ S R CR Input Select Video ~ S V CR ※ Power On command will not send the return code Operation Command The operation...
... structured by the Header code, command code, data code and end code. OPERATION ASCII Power On ※ ~ P N CR ※ Power Off ~ P F CR Auto Image ~ A I CR Lamp Hour Reset ~ R L CR Input Select RGB ~ S R CR Input Select Video ~ S V CR ※ Power On command will not send the return code Operation Command The operation...

User Guide
Page 56
Adjust Brightness value to Warm Send Command : ~sT2CR Query Command ITEM Power State Input Select Lamp Hours Brightness Contrast Color (Video) Tint (Video) Scaling Color Temperature Projection Mode ASCII ~ q P CR ~ q S CR ~ q L CR ~ q B CR ~ q C CR ~ q R CR ~ q N CR ~ q A CR ~ q T CR ~ q J CR - 50 - Adjust ...
Adjust Brightness value to Warm Send Command : ~sT2CR Query Command ITEM Power State Input Select Lamp Hours Brightness Contrast Color (Video) Tint (Video) Scaling Color Temperature Projection Mode ASCII ~ q P CR ~ q S CR ~ q L CR ~ q B CR ~ q C CR ~ q R CR ~ q N CR ~ q A CR ~ q T CR ~ q J CR - 50 - Adjust ...

