

User Guide
Page 2
... used in this example: "Push the Menu button on the remote control to eyes, do not look into the lens when the lamp is extremely bright by design. The following styles are denoted in this manual for future reference. Throughout this manual, component parts and items... that you read this manual and on the unit case. The projection lamp is on. Do not place the unit on an unstable surface, cart, or stand. Avoid using the projector. Note: Provides additional information on the unit. - For servicing, contact qualified service ...
... used in this example: "Push the Menu button on the remote control to eyes, do not look into the lens when the lamp is extremely bright by design. The following styles are denoted in this manual for future reference. Throughout this manual, component parts and items... that you read this manual and on the unit case. The projection lamp is on. Do not place the unit on an unstable surface, cart, or stand. Avoid using the projector. Note: Provides additional information on the unit. - For servicing, contact qualified service ...

User Guide
Page 3
... for this procedure. Regulatory Warnings Before installing and using the projector, read the regulatory notices in use the supplied power cord. Do not place anything on page 38. Allow the lamp to cool for about one hour. See Replacing the Projection... Lamp on page 53. - Before replacing the lamp: Unplug the power cord. Allow the lamp to cool for about one hour. iii - Cleaning the Projector Unplug the power...
... for this procedure. Regulatory Warnings Before installing and using the projector, read the regulatory notices in use the supplied power cord. Do not place anything on page 38. Allow the lamp to cool for about one hour. See Replacing the Projection... Lamp on page 53. - Before replacing the lamp: Unplug the power cord. Allow the lamp to cool for about one hour. iii - Cleaning the Projector Unplug the power...
User Guide
Page 5
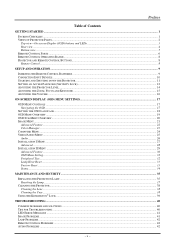
......28 INSTALLATION II MENU ...29 Advanced Feature ...30 OSD Menu Setting...32 Peripheral Test...32 Lamp Hour Reset ...33 Factory Reset ...33 Status...34 MAINTENANCE AND SECURITY...35 REPLACING THE PROJECTION LAMP...35 Resetting the Lamp...37 CLEANING THE PROJECTOR...38 Cleaning the Lens ...38 Cleaning the Case ...38 USING THE KENSINGTON® LOCK...
......28 INSTALLATION II MENU ...29 Advanced Feature ...30 OSD Menu Setting...32 Peripheral Test...32 Lamp Hour Reset ...33 Factory Reset ...33 Status...34 MAINTENANCE AND SECURITY...35 REPLACING THE PROJECTION LAMP...35 Resetting the Lamp...37 CLEANING THE PROJECTOR...38 Cleaning the Lens ...38 Cleaning the Case ...38 USING THE KENSINGTON® LOCK...

User Guide
Page 8
...release height adjuster 14 4. Zoom ring Enlarges the projected image 15 7. IR receiver Receiver for good air circulation, which keeps the projector lamp cool. Height adjuster Adjusts level of the ventilation openings. - 2 - Function keys See Top view-On-screen Display (OSD) buttons... and LEDs. 3 9. Lens Remove lens cap before use 3. Do not obstruct any of projector 5. DDLLPP PPrroojjeeccttoorr--UUsseerr''ss MMaannuuaall Views of projector 14 Important: Ventilation openings on the projector allow for IR signal from remote control 6 2.
...release height adjuster 14 4. Zoom ring Enlarges the projected image 15 7. IR receiver Receiver for good air circulation, which keeps the projector lamp cool. Height adjuster Adjusts level of the ventilation openings. - 2 - Function keys See Top view-On-screen Display (OSD) buttons... and LEDs. 3 9. Lens Remove lens cap before use 3. Do not obstruct any of projector 5. DDLLPP PPrroojjeeccttoorr--UUsseerr''ss MMaannuuaall Views of projector 14 Important: Ventilation openings on the projector allow for IR signal from remote control 6 2.

User Guide
Page 9
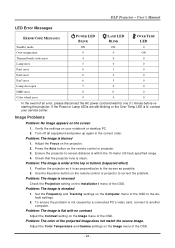
LAMP LED Flashing Error Code (see LED Error Messages on page 41) Green Power On 4. For Volume 17 8. (Right cursor) Navigates and changes settings in ... view-On-screen Display (OSD) buttons and LEDs ITEM LABEL DESCRIPTION SEE PAGE: 1. MENU Open and exits the OSD buttons 17 On 2. POWER Turns the projector On or Off 11 10. (Left cursor) / AUTO Navigates and changes settings in the OSD 9. For Keystone 7. (Down cursor) / VOLUME Navigates and changes...
LAMP LED Flashing Error Code (see LED Error Messages on page 41) Green Power On 4. For Volume 17 8. (Right cursor) Navigates and changes settings in ... view-On-screen Display (OSD) buttons and LEDs ITEM LABEL DESCRIPTION SEE PAGE: 1. MENU Open and exits the OSD buttons 17 On 2. POWER Turns the projector On or Off 11 10. (Left cursor) / AUTO Navigates and changes settings in the OSD 9. For Keystone 7. (Down cursor) / VOLUME Navigates and changes...

User Guide
Page 11
... as an additional precaution be of a suitable shape and strength. For ceiling installations, use only UL Listed ceiling mounts. LABEL Lamp cover Height adjustor Height adjustor button Lens cap hook Tilt adjustor Ceiling support holes DESCRIPTION SEE PAGE: Remove when changing the... to release adjustor To fasten the lens cap cover Rotate adjuster lever to adjust angle position 14 Contact your dealer for information on mounting the projector on a ceiling Note: When installing, ensure that you use approved mounting hardware and M4 screws with a maximum screw depth of 60 seconds. ...
... as an additional precaution be of a suitable shape and strength. For ceiling installations, use only UL Listed ceiling mounts. LABEL Lamp cover Height adjustor Height adjustor button Lens cap hook Tilt adjustor Ceiling support holes DESCRIPTION SEE PAGE: Remove when changing the... to release adjustor To fasten the lens cap cover Rotate adjuster lever to adjust angle position 14 Contact your dealer for information on mounting the projector on a ceiling Note: When installing, ensure that you use approved mounting hardware and M4 screws with a maximum screw depth of 60 seconds. ...
User Guide
Page 37
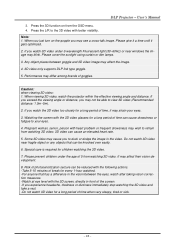
...tired or sick. - 31 - UUsseerr''ss MMaannuuaall 3. When viewing 3D video, watch 3D video under the age of goggles. If you watch the projector within the effective viewing angle and distance. Pregnant woman, senior, person with better visibility. Do not watch the 3D video too closely for a long ...viewing 3D video: 1. If you watch 3D video near windows the image may see a cross-talk image. Please cover the sunlight using curtain or dim lamps. 3. Some 3D video may cause you may blink. It may strain your eyes. 4. Note: 1. Press the L/R to duck or dodge the ...
...tired or sick. - 31 - UUsseerr''ss MMaannuuaall 3. When viewing 3D video, watch 3D video under the age of goggles. If you watch the projector within the effective viewing angle and distance. Pregnant woman, senior, person with better visibility. Do not watch the 3D video too closely for a long ...viewing 3D video: 1. If you watch 3D video near windows the image may see a cross-talk image. Please cover the sunlight using curtain or dim lamps. 3. Some 3D video may cause you may blink. It may strain your eyes. 4. Note: 1. Press the L/R to duck or dodge the ...

User Guide
Page 41
.... 1. Warning: Be sure to do so could result in accordance with the regulations of mercury b. Loosen the captive screw on the lamp compartment cover. 2. Do not dispose this product with a certified replacement part, which you can order from your local authority. Failure to... turn off and unplug the projector at least 30 minutes before replacing the lamp. UUsseerr''ss MMaannuuaall MAINTENANCE AND SECURITY Replacing the Projection Lamp The projection lamp should only be replaced when it burns out. c. It should be replaced...
.... 1. Warning: Be sure to do so could result in accordance with the regulations of mercury b. Loosen the captive screw on the lamp compartment cover. 2. Do not dispose this product with a certified replacement part, which you can order from your local authority. Failure to... turn off and unplug the projector at least 30 minutes before replacing the lamp. UUsseerr''ss MMaannuuaall MAINTENANCE AND SECURITY Replacing the Projection Lamp The projection lamp should only be replaced when it burns out. c. It should be replaced...
User Guide
Page 47
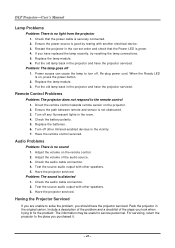
... settings on the Image menu of an error, please disconnect the AC power cord and wait for one (1) minute before restarting the projector. If the Power or Lamp LEDs are still blinking or the Over Temp LED is blurred 1. Image Problems Problem: No image appears on the remote control or... projector. 3. Ensure the projector-to another computer. Problem: The image is reversed Check the Projection setting on the Image menu of the OSD. Problem: The...
... settings on the Image menu of an error, please disconnect the AC power cord and wait for one (1) minute before restarting the projector. If the Power or Lamp LEDs are still blinking or the Over Temp LED is blurred 1. Image Problems Problem: No image appears on the remote control or... projector. 3. Ensure the projector-to another computer. Problem: The image is reversed Check the Projection setting on the Image menu of the OSD. Problem: The...
User Guide
Page 48
... the source audio output with other speakers. 5. If you should have replaced the lamp recently, try resetting the lamp connections. 5. Replace the lamp module. 6. When the Ready LED is no light from the projector 1. Direct the remote control towards remote sensor on the remote control. 2. Test ...the source audio output with other speakers. 3. Put the old lamp back in the projector and have the projector serviced. Put the old lamp back in the projector and have the projector serviced. Turn off other Infrared-enabled devices in the correct order and check that...
... the source audio output with other speakers. 5. If you should have replaced the lamp recently, try resetting the lamp connections. 5. Replace the lamp module. 6. When the Ready LED is no light from the projector 1. Direct the remote control towards remote sensor on the remote control. 2. Test ...the source audio output with other speakers. 3. Put the old lamp back in the projector and have the projector serviced. Put the old lamp back in the projector and have the projector serviced. Turn off other Infrared-enabled devices in the correct order and check that...
User Guide
Page 54
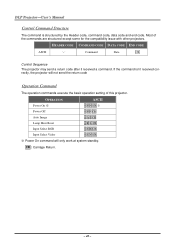
... code, data code and end code. OPERATION ASCII Power On ※ ~ P N CR ※ Power Off ~ P F CR Auto Image ~ A I CR Lamp Hour Reset ~ R L CR Input Select RGB ~ S R CR Input Select Video ~ S V CR ※ Power On command will not send the return code Operation...operation setting of the commands are structured except some for the compatibility issue with other projectors. Most of this projector. HEADER CODE COMMAND CODE DATA CODE END CODE ASCII '~' Command Data CR Control Sequence The projector may send a return code after it received a command. CR : Carriage Return...
... code, data code and end code. OPERATION ASCII Power On ※ ~ P N CR ※ Power Off ~ P F CR Auto Image ~ A I CR Lamp Hour Reset ~ R L CR Input Select RGB ~ S R CR Input Select Video ~ S V CR ※ Power On command will not send the return code Operation...operation setting of the commands are structured except some for the compatibility issue with other projectors. Most of this projector. HEADER CODE COMMAND CODE DATA CODE END CODE ASCII '~' Command Data CR Control Sequence The projector may send a return code after it received a command. CR : Carriage Return...


