

User Guide
Page 2
... following styles are used in this example: "Push the Menu button on an unstable surface, cart, or stand. Avoid using the projector. Note: Provides additional information on the unit. - Aside from the projection lamp, there are denoted in this manual to alert you to situations .... The projection lamp is on. Do not place the unit on the remote control to alert you of the projector. Caution: Alerts you to important information. To avoid damage to situations that you read this manual, component parts and items in the OSD...
... following styles are used in this example: "Push the Menu button on an unstable surface, cart, or stand. Avoid using the projector. Note: Provides additional information on the unit. - Aside from the projection lamp, there are denoted in this manual to alert you to situations .... The projection lamp is on. Do not place the unit on the remote control to alert you of the projector. Caution: Alerts you to important information. To avoid damage to situations that you read this manual, component parts and items in the OSD...

User Guide
Page 3
... Remove the batteries from the remote control when storing or not in the Regulatory Compliance section on the power cord. See Cleaning the Projector on page 35 for clear and safe instructions for a prolonged period. Before replacing the lamp: Unplug the power cord. ... Lamp on page 38. Allow the lamp to cool for about one hour. Regulatory Warnings Before installing and using the projector, read the regulatory notices in use the supplied power cord. Do not place anything on page 53. - Cleaning the...
... Remove the batteries from the remote control when storing or not in the Regulatory Compliance section on the power cord. See Cleaning the Projector on page 35 for clear and safe instructions for a prolonged period. Before replacing the lamp: Unplug the power cord. ... Lamp on page 38. Allow the lamp to cool for about one hour. Regulatory Warnings Before installing and using the projector, read the regulatory notices in use the supplied power cord. Do not place anything on page 53. - Cleaning the...
User Guide
Page 4
... for presentations in daylight or in lit rooms. Supports resolutions up to SXGA at 16.7 million colors to install and operate the DLP projector. iv - Wherever possible, relevant information-such as an illustration and its description-has been kept on one page.
... for presentations in daylight or in lit rooms. Supports resolutions up to SXGA at 16.7 million colors to install and operate the DLP projector. iv - Wherever possible, relevant information-such as an illustration and its description-has been kept on one page.
User Guide
Page 5
... AND OPERATION...9 INSERTING THE REMOTE CONTROL BATTERIES ...9 CONNECTING INPUT DEVICES ...10 STARTING AND SHUTTING DOWN THE PROJECTOR...11 SETTING AN ACCESS PASSWORD (SECURITY LOCK) ...12 ADJUSTING THE PROJECTOR LEVEL ...14 ADJUSTING THE ZOOM, FOCUS AND KEYSTONE ...15 ADJUSTING THE VOLUME ...16 ON-SCREEN DISPLAY ... ...33 Factory Reset ...33 Status...34 MAINTENANCE AND SECURITY...35 REPLACING THE PROJECTION LAMP...35 Resetting the Lamp...37 CLEANING THE PROJECTOR...38 Cleaning the Lens ...38 Cleaning the Case ...38 USING THE KENSINGTON® LOCK ...39 TROUBLESHOOTING ...40 COMMON PROBLEMS AND...
... AND OPERATION...9 INSERTING THE REMOTE CONTROL BATTERIES ...9 CONNECTING INPUT DEVICES ...10 STARTING AND SHUTTING DOWN THE PROJECTOR...11 SETTING AN ACCESS PASSWORD (SECURITY LOCK) ...12 ADJUSTING THE PROJECTOR LEVEL ...14 ADJUSTING THE ZOOM, FOCUS AND KEYSTONE ...15 ADJUSTING THE VOLUME ...16 ON-SCREEN DISPLAY ... ...33 Factory Reset ...33 Status...34 MAINTENANCE AND SECURITY...35 REPLACING THE PROJECTION LAMP...35 Resetting the Lamp...37 CLEANING THE PROJECTOR...38 Cleaning the Lens ...38 Cleaning the Case ...38 USING THE KENSINGTON® LOCK ...39 TROUBLESHOOTING ...40 COMMON PROBLEMS AND...

User Guide
Page 7
... packing material should you ever need to return the equipment for warranty service. DDLLPP PPrroojjeeccttoorr -- It is recommend that the following items are included: DLP PROJECTOR REMOTE CONTROL (WITH ONE 3V CR2025 BATTERY) RGB CABLE POWER CORD AUDIO CABLE (OPTIONAL) COMPONENT CABLE (OPTIONAL) VIDEO CABLE (OPTIONAL) RGB TO COMPONENT ADAPTER (OPTIONAL... (THIS USER'S MANUAL) Contact your dealer immediately if any items are missing, appear damaged, or if the unit does not work. Caution: Avoid using the projector in dusty environments. - 1 -
... packing material should you ever need to return the equipment for warranty service. DDLLPP PPrroojjeeccttoorr -- It is recommend that the following items are included: DLP PROJECTOR REMOTE CONTROL (WITH ONE 3V CR2025 BATTERY) RGB CABLE POWER CORD AUDIO CABLE (OPTIONAL) COMPONENT CABLE (OPTIONAL) VIDEO CABLE (OPTIONAL) RGB TO COMPONENT ADAPTER (OPTIONAL... (THIS USER'S MANUAL) Contact your dealer immediately if any items are missing, appear damaged, or if the unit does not work. Caution: Avoid using the projector in dusty environments. - 1 -

User Guide
Page 8
...Lens Remove lens cap before use 3. Height adjuster Adjusts level of Projector Parts ITEM LABEL DESCRIPTION SEE PAGE: 1. DDLLPP PPrroojjeeccttoorr--UUsseerr''ss MMaannuuaall Views of projector 14 Important: Ventilation openings on the projector allow for IR signal from remote control 6 2. Height-adjuster ...openings. - 2 - Zoom ring Enlarges the projected image 15 7. Focus ring Focuses the projected image 8. Do not obstruct any of projector 5. Function keys See Top view-On-screen Display (OSD) buttons and LEDs. 3 9. Lens cap Covers lens to release height ...
...Lens Remove lens cap before use 3. Height adjuster Adjusts level of Projector Parts ITEM LABEL DESCRIPTION SEE PAGE: 1. DDLLPP PPrroojjeeccttoorr--UUsseerr''ss MMaannuuaall Views of projector 14 Important: Ventilation openings on the projector allow for IR signal from remote control 6 2. Height-adjuster ...openings. - 2 - Zoom ring Enlarges the projected image 15 7. Focus ring Focuses the projected image 8. Do not obstruct any of projector 5. Function keys See Top view-On-screen Display (OSD) buttons and LEDs. 3 9. Lens cap Covers lens to release height ...

User Guide
Page 9
... the input device 10 6. (Up cursor) / KEYSTONE Navigates and changes settings in the OSD Optimizes image size, position, and resolution 17 - 3 - POWER Turns the projector On or Off 11 10. (Left cursor) / AUTO Navigates and changes settings in the OSD Quick Menu - LAMP LED Flashing Error Code (see LED...
... the input device 10 6. (Up cursor) / KEYSTONE Navigates and changes settings in the OSD Optimizes image size, position, and resolution 17 - 3 - POWER Turns the projector On or Off 11 10. (Left cursor) / AUTO Navigates and changes settings in the OSD Quick Menu - LAMP LED Flashing Error Code (see LED...

User Guide
Page 11
... to release adjustor To fasten the lens cap cover Rotate adjuster lever to adjust angle position 14 Contact your dealer for information on mounting the projector on a ceiling Note: When installing, ensure that you use approved mounting hardware and M4 screws with a maximum screw depth of a suitable shape and strength. The...
... to release adjustor To fasten the lens cap cover Rotate adjuster lever to adjust angle position 14 Contact your dealer for information on mounting the projector on a ceiling Note: When installing, ensure that you use approved mounting hardware and M4 screws with a maximum screw depth of a suitable shape and strength. The...

User Guide
Page 12
... lights can bounce the signal off certain reflective surfaces such as the corresponding buttons on the projector have the same functions as projector screens. 3. Be sure nothing obstructs the path between the remote control and the projector is obstructed, you can disrupt remote control operation. 2. If the path between the remote control and...
... lights can bounce the signal off certain reflective surfaces such as the corresponding buttons on the projector have the same functions as projector screens. 3. Be sure nothing obstructs the path between the remote control and the projector is obstructed, you can disrupt remote control operation. 2. If the path between the remote control and...

User Guide
Page 13
... + 6. Freeze 9. Source 10. Down cursor 14. Menu DESCRIPTION SEE PAGE: Navigates and changes settings in the OSD 17 Changes settings in the OSD Turns the projector On or Off 11 Navigates and changes settings in the OSD 17 Increase volume 16 Decrease volume Mutes the built-in speaker Freeze/unfreezes the...
... + 6. Freeze 9. Source 10. Down cursor 14. Menu DESCRIPTION SEE PAGE: Navigates and changes settings in the OSD 17 Changes settings in the OSD Turns the projector On or Off 11 Navigates and changes settings in the OSD 17 Increase volume 16 Decrease volume Mutes the built-in speaker Freeze/unfreezes the...

User Guide
Page 14
... corresponding buttons on the remote control and on the projector have multiple functions. Remote Control Some buttons on the projector. All operations can be carried out with the remote control; For example, item 1 on the projector are not holding the remote perpendicular to point the... sides or the rear of the projector, the remote will function well within a radius of the projector. however, the buttons on the projector functions as the keystone button and as the up cursor key. - 8 - Projector and Remote Control Buttons The projector can be operated using the remote...
... corresponding buttons on the remote control and on the projector have multiple functions. Remote Control Some buttons on the projector. All operations can be carried out with the remote control; For example, item 1 on the projector are not holding the remote perpendicular to point the... sides or the rear of the projector, the remote will function well within a radius of the projector. however, the buttons on the projector functions as the keystone button and as the up cursor key. - 8 - Projector and Remote Control Buttons The projector can be operated using the remote...

User Guide
Page 15
Pull out the cover (B). Caution: 1. SETUP AND OPERATION 2. Only use a 3V lithium battery (CR2025). 2. Dispose of the arrow (A). Remove the battery compartment cover by sliding the cover in the direction of used batteries according to local ordinance regulations. 3. Insert the battery with the positive side facing up. 3. Replace the cover. Remove the battery when not using the projector for prolonged periods. - 9 - Inserting the Remote Control Batteries 1.
Pull out the cover (B). Caution: 1. SETUP AND OPERATION 2. Only use a 3V lithium battery (CR2025). 2. Dispose of the arrow (A). Remove the battery compartment cover by sliding the cover in the direction of used batteries according to local ordinance regulations. 3. Insert the battery with the positive side facing up. 3. Replace the cover. Remove the battery when not using the projector for prolonged periods. - 9 - Inserting the Remote Control Batteries 1.
User Guide
Page 16
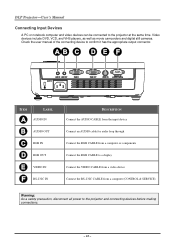
...) Warning: As a safety precaution, disconnect all power to confirm it has the appropriate output connector. Check the user manual of the connecting device to the projector and connecting devices before making connections. - 10 - DDLLPP PPrroojjeeccttoorr--UUsseerr''ss MMaannuuaall Connecting Input Devices A PC or notebook computer and video devices can be connected...
...) Warning: As a safety precaution, disconnect all power to confirm it has the appropriate output connector. Check the user manual of the connecting device to the projector and connecting devices before making connections. - 10 - DDLLPP PPrroojjeeccttoorr--UUsseerr''ss MMaannuuaall Connecting Input Devices A PC or notebook computer and video devices can be connected...

User Guide
Page 17
... sure to turn on page 12 if security lock is supported through the RGB to scroll among devices. (Component is enabled. 4. The projector turns off. RGB: Analog RGB Component: DVD input YCbCr / YPbPr, or HDTV input YPbPr via HD15 connector ... Composite Video: Traditional composite video Caution: 1. Turn on the projector lights. 2. When the "Power Off? /Press Power again" message appears, press the POWER button. Connect the power cord to a wall outlet. Connect ...
... sure to turn on page 12 if security lock is supported through the RGB to scroll among devices. (Component is enabled. 4. The projector turns off. RGB: Analog RGB Component: DVD input YCbCr / YPbPr, or HDTV input YPbPr via HD15 connector ... Composite Video: Traditional composite video Caution: 1. Turn on the projector lights. 2. When the "Power Off? /Press Power again" message appears, press the POWER button. Connect the power cord to a wall outlet. Connect ...

User Guide
Page 18
...;► button to move to select Advanced. 4. Press (Enter) / ►. - 12 - When enabled, the password must be able to use of the projector. If you power on the projector. (See Navigating the OSD on page 17 and Setting the OSD Language on page 18 for information on using OSD menus.) Important: Keep... PPrroojjeeccttoorr--UUsseerr''ss MMaannuuaall Setting an Access Password (Security Lock) You can use the four (arrow) buttons to set a password and prevent unauthorized use the projector.
...;► button to move to select Advanced. 4. Press (Enter) / ►. - 12 - When enabled, the password must be able to use of the projector. If you power on the projector. (See Navigating the OSD on page 17 and Setting the OSD Language on page 18 for information on using OSD menus.) Important: Keep... PPrroojjeeccttoorr--UUsseerr''ss MMaannuuaall Setting an Access Password (Security Lock) You can use the four (arrow) buttons to set a password and prevent unauthorized use the projector.
User Guide
Page 20
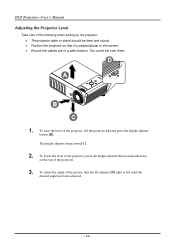
... press the height-adjuster button [B]. To raise the level of the following when setting up the projector: The projector table or stand should be level and sturdy. Position the projector so that it is perpendicular to the screen. Ensure the cables are in a safe ...location. To lower the level of the projector, press the height-adjuster button and push down [C]. 2. The height adjuster drops down on the top of the picture, turn the tilt-adjuster [D]...
... press the height-adjuster button [B]. To raise the level of the following when setting up the projector: The projector table or stand should be level and sturdy. Position the projector so that it is perpendicular to the screen. Ensure the cables are in a safe ...location. To lower the level of the projector, press the height-adjuster button and push down [C]. 2. The height adjuster drops down on the top of the picture, turn the tilt-adjuster [D]...

User Guide
Page 21
Press the Keystone buttons on the remote control or press KEYSTONE and use or on the display. The keystone control appears on the keypad to correct image-trapezoid (wider top or bottom) effect. 4. Use the Image-focus control (on the projector only) to sharpen the projected image A . Remote control and OSD panel - 15 - UUsseerr''ss MMaannuuaall 3. DDLLPP PPrroojjeeccttoorr -- Use the Image-zoom control (on the projector only) to resize the projected image and screen size B . 2. Adjusting the Zoom, Focus and Keystone 1.
Press the Keystone buttons on the remote control or press KEYSTONE and use or on the display. The keystone control appears on the keypad to correct image-trapezoid (wider top or bottom) effect. 4. Use the Image-focus control (on the projector only) to sharpen the projected image A . Remote control and OSD panel - 15 - UUsseerr''ss MMaannuuaall 3. DDLLPP PPrroojjeeccttoorr -- Use the Image-zoom control (on the projector only) to resize the projected image and screen size B . 2. Adjusting the Zoom, Focus and Keystone 1.

User Guide
Page 23
...9658; to move up and down in the Computer menu can use the remote control cursor buttons or the buttons on the top of the projector to navigate and make image adjustments and change values for settings. 5. For example, the Horizontal/Vertical Position items in a menu. 4. ... and are available. Press MENU to move through the menus. 3. UUsseerr''ss MMaannuuaall ON-SCREEN DISPLAY (OSD) MENU SETTINGS OSD Menu Controls The projector has an OSD that are five menus. To enter the OSD, press the MENU button. 2. DDLLPP PPrroojjeeccttoorr -- Items that lets you make changes...
...9658; to move up and down in the Computer menu can use the remote control cursor buttons or the buttons on the top of the projector to navigate and make image adjustments and change values for settings. 5. For example, the Horizontal/Vertical Position items in a menu. 4. ... and are available. Press MENU to move through the menus. 3. UUsseerr''ss MMaannuuaall ON-SCREEN DISPLAY (OSD) MENU SETTINGS OSD Menu Controls The projector has an OSD that are five menus. To enter the OSD, press the MENU button. 2. DDLLPP PPrroojjeeccttoorr -- Items that lets you make changes...

User Guide
Page 31
... tint/hue. To overcome this function in the Video/Audio menu. Press the ◄► buttons to default values. When you operate Film Mode, the projector will adjust 24 fps video from movie to open the Video / Audio menu and adjust the Film Mode feature. - 25 - See Audio on page 26... disable video over scan. Note: Video jagging may occur when playing interlace video. DDLLPP PPrroojjeeccttoorr -- Press the cursor ◄► button to move up the projector for the best picture appearance for video source.
... tint/hue. To overcome this function in the Video/Audio menu. Press the ◄► buttons to default values. When you operate Film Mode, the projector will adjust 24 fps video from movie to open the Video / Audio menu and adjust the Film Mode feature. - 25 - See Audio on page 26... disable video over scan. Note: Video jagging may occur when playing interlace video. DDLLPP PPrroojjeeccttoorr -- Press the cursor ◄► button to move up the projector for the best picture appearance for video source.
User Guide
Page 37
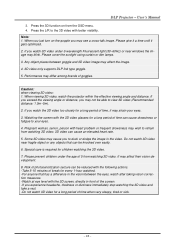
.... - 31 - It may affect the image. 4. 3D video only supports DLP link type goggle. 5. Pregnant woman, senior, person with better visibility. Do not watch the projector within the effective viewing angle and distance. UUsseerr''ss MMaannuuaall 3. When you just turn on from watching 3D video. 3D video can be able to...
.... - 31 - It may affect the image. 4. 3D video only supports DLP link type goggle. 5. Pregnant woman, senior, person with better visibility. Do not watch the projector within the effective viewing angle and distance. UUsseerr''ss MMaannuuaall 3. When you just turn on from watching 3D video. 3D video can be able to...


