
User Guide
Page 2
..., your purchase and welcome to Do if You Smell Gas 4 Grounding Instructions 5 Safety Instructions for Installation 5, 6 Safety Instructions for Connecting Electricity ....... 7 PARTS AND FEATURES Special Features 8 Key Parts and Components 9 INSTALLATION INSTRUCTIONS Choose the Proper Location 10 Clearances 10 Installation With Optional Pedestal Base or Stacking Kit 11 Leveling the Dryer 12 Reversing the Door Swing 12 Changing the...
..., your purchase and welcome to Do if You Smell Gas 4 Grounding Instructions 5 Safety Instructions for Installation 5, 6 Safety Instructions for Connecting Electricity ....... 7 PARTS AND FEATURES Special Features 8 Key Parts and Components 9 INSTALLATION INSTRUCTIONS Choose the Proper Location 10 Clearances 10 Installation With Optional Pedestal Base or Stacking Kit 11 Leveling the Dryer 12 Reversing the Door Swing 12 Changing the...

User Guide
Page 3
... others . Your Safety and the safety of life. Always read and obey all instructions before or after each load. • The dryer must be properly installed as they give off vapors that can happen if the instructions are not followed. This is removed from the accumulation of lint, dust, and ...dirt. • The interior of the dryer and exhaust vent should be cleaned periodically by qualified service personnel. • Do not install or store the dryer where it will follow...
... others . Your Safety and the safety of life. Always read and obey all instructions before or after each load. • The dryer must be properly installed as they give off vapors that can happen if the instructions are not followed. This is removed from the accumulation of lint, dust, and ...dirt. • The interior of the dryer and exhaust vent should be cleaned periodically by qualified service personnel. • Do not install or store the dryer where it will follow...

User Guide
Page 4
... soot, caused primarily by a qualified installer, service agency, or the gas supplier. Clear the room, building, or area of these substances can cause minor exposure to four of all occupants. 4. Follow the gas supplier's instructions carefully. 5. WHAT TO DO IF YOU SMELL GAS: 1. Properly adjusted dryers will minimize incomplete combustion. Do not touch any...
... soot, caused primarily by a qualified installer, service agency, or the gas supplier. Clear the room, building, or area of these substances can cause minor exposure to four of all occupants. 4. Follow the gas supplier's instructions carefully. 5. WHAT TO DO IF YOU SMELL GAS: 1. Properly adjusted dryers will minimize incomplete combustion. Do not touch any...

User Guide
Page 5
...INSTRUCTIONS This appliance must be properly installed as to conform with a cord having an equipment-grounding conductor and a grounding plug. The plug must be equipped with all packaging from children. If it will reduce the risk of electric shock by providing a path of suffocation. 5 Failure to do so can result if the dryer... modify the plug provided with a qualified electrician or service person if you are in the installation instructions. Electrical shock can cause serious injury, fire, electrical shock or death. • To reduce the risk of life. ...
...INSTRUCTIONS This appliance must be properly installed as to conform with a cord having an equipment-grounding conductor and a grounding plug. The plug must be equipped with all packaging from children. If it will reduce the risk of electric shock by providing a path of suffocation. 5 Failure to do so can result if the dryer... modify the plug provided with a qualified electrician or service person if you are in the installation instructions. Electrical shock can cause serious injury, fire, electrical shock or death. • To reduce the risk of life. ...

User Guide
Page 6
...INSTRUCTIONS FOR INSTALLATION Exhaust/Ducting: • Gas dryers MUST be exhausted to clean any area of the home can create a health and fire hazard. • Use only rigid metal or flexible metal 4-in fire or death. • Rigid or semi rigid metal ducting is recommended for exhausting to follow these instructions...must be exhausted to follow the Installation Instructions. If the dryer is not provided with duct tape. Punctured ductwork can result in use between the dryer and wall connection only. The use or during installation. • Ductwork is not ...
...INSTRUCTIONS FOR INSTALLATION Exhaust/Ducting: • Gas dryers MUST be exhausted to clean any area of the home can create a health and fire hazard. • Use only rigid metal or flexible metal 4-in fire or death. • Rigid or semi rigid metal ducting is recommended for exhausting to follow these instructions...must be exhausted to follow the Installation Instructions. If the dryer is not provided with duct tape. Punctured ductwork can result in use between the dryer and wall connection only. The use or during installation. • Ductwork is not ...

User Guide
Page 7
... from fire and electrical shock. These power cord can melt, creating electrical shock and/or fire hazard. • When installing or moving the dryer, be careful not to the installation instructions in this manual for specific electrical requirements for your model. Have the wall outlet and circuit checked by pulling on...
... from fire and electrical shock. These power cord can melt, creating electrical shock and/or fire hazard. • When installing or moving the dryer, be careful not to the installation instructions in this manual for specific electrical requirements for your model. Have the wall outlet and circuit checked by pulling on...

User Guide
Page 10
... open the door. Additional Instructions for closet installations: • The closet door must allow for minimum vent opening requirements. It is important that may increase the required clearances. • Allow at least 24 in. (61 cm) in . (2.5 cm) on the following pages. Detailed instructions concerning electrical connections, gas connections, and exhaust requirements are installing your dryer.
... open the door. Additional Instructions for closet installations: • The closet door must allow for minimum vent opening requirements. It is important that may increase the required clearances. • Allow at least 24 in. (61 cm) in . (2.5 cm) on the following pages. Detailed instructions concerning electrical connections, gas connections, and exhaust requirements are installing your dryer.

User Guide
Page 11
...: If you are installing your dryer using an optional pedestal base or stacking kit, please refer to Optional Accessories in this manual or to the instructions for Installation With Stacking Kit 30" (76.1 cm) 4" (10 cm) 771/2" (190.5 cm) 1" (2.54 cm) 27" (68.6 cm) 1" (2.54 cm) OPTIONAL ACCESSORIES For these and other LG products, contact...
...: If you are installing your dryer using an optional pedestal base or stacking kit, please refer to Optional Accessories in this manual or to the instructions for Installation With Stacking Kit 30" (76.1 cm) 4" (10 cm) 771/2" (190.5 cm) 1" (2.54 cm) 27" (68.6 cm) 1" (2.54 cm) OPTIONAL ACCESSORIES For these and other LG products, contact...

User Guide
Page 12
... is level from the latch side of the dryer. 2 Use an adjustable wrench to level the dryer. INSTALLATION INSTRUCTIONS LEVELING THE DRYER To ensure that the dryer provides optimal drying performance, it . Leveling Feet 1 Position the dryer in firm contact with the floor. Raise or... lower the leveling feet until dryer is reversed, and reattach the door...
... is level from the latch side of the dryer. 2 Use an adjustable wrench to level the dryer. INSTALLATION INSTRUCTIONS LEVELING THE DRYER To ensure that the dryer provides optimal drying performance, it . Leveling Feet 1 Position the dryer in firm contact with the floor. Raise or... lower the leveling feet until dryer is reversed, and reattach the door...

User Guide
Page 13
INSTALLATION INSTRUCTIONS CHANGING THE DRYER VENT LOCATION Your new dryer is not available on gas models). This kit contains the necessary duct components to the base of the dryer as shown. Be sure that the male end of the dryer. Be sure that the male end of the dryer with included screw. 13 ...faces down through hole in . (3.8 cm) to the back of the duct protrudes 1½ in the bottom of the elbow faces AWAY from your LG retailer. Attach the cover plate to connect the remaining ductwork. Cover Plate Elbow 11/2" (3.8 cm) 3 Preassemble a 4-in. (10 cm) elbow to...
INSTALLATION INSTRUCTIONS CHANGING THE DRYER VENT LOCATION Your new dryer is not available on gas models). This kit contains the necessary duct components to the base of the dryer as shown. Be sure that the male end of the dryer. Be sure that the male end of the dryer with included screw. 13 ...faces down through hole in . (3.8 cm) to the back of the duct protrudes 1½ in the bottom of the elbow faces AWAY from your LG retailer. Attach the cover plate to connect the remaining ductwork. Cover Plate Elbow 11/2" (3.8 cm) 3 Preassemble a 4-in. (10 cm) elbow to...

User Guide
Page 14
...Failure to follow these instructions can result in fire or death. • Gas dryers MUST exhaust to the outdoors. Failure to follow these instructions can result in fire or death. • Venting must be kept as short as an attic, wall, ceiling, crawl space, chimney, gas vent, or concealed space... result in fire or death. • To reduce the risk of fire, DO NOT exhaust the dryer with the dryer. INSTALLATION INSTRUCTIONS VENTING THE DRYER wWARNING: To reduce the risk of fire, electric shock, or injury to persons when using this ducting will affect drying ...
...Failure to follow these instructions can result in fire or death. • Gas dryers MUST exhaust to the outdoors. Failure to follow these instructions can result in fire or death. • Venting must be kept as short as an attic, wall, ceiling, crawl space, chimney, gas vent, or concealed space... result in fire or death. • To reduce the risk of fire, DO NOT exhaust the dryer with the dryer. INSTALLATION INSTRUCTIONS VENTING THE DRYER wWARNING: To reduce the risk of fire, electric shock, or injury to persons when using this ducting will affect drying ...

User Guide
Page 15
Length of 90° Elbows Max. Flexible Metal Duct 0 Recommended 1 2 3 4" 4" (10.2 cm) (10.2 cm) 4 Use Only for Short 0 Run Installations 1 2 3 21/2" (6.35 cm) 4 65 ft. (19.8 m) 55 ft. (16.8 m) 47 ft. (13.7 m) 36 ft. (11.0 m) 28 ft. (8.5 m) 55 ft. (16.8 m) 47 ft. (...than four 90° elbows. NOTE: Ductwork and fittings are NOT included and must point away from the dryer. • Use duct tape on duct surfaces. Dia. INSTALLATION INSTRUCTIONS VENTING THE DRYER (cont.) Ductwork Wall Cap Type Number of 4-In. It is not recommended to reduce condensation and lint...
Length of 90° Elbows Max. Flexible Metal Duct 0 Recommended 1 2 3 4" 4" (10.2 cm) (10.2 cm) 4 Use Only for Short 0 Run Installations 1 2 3 21/2" (6.35 cm) 4 65 ft. (19.8 m) 55 ft. (16.8 m) 47 ft. (13.7 m) 36 ft. (11.0 m) 28 ft. (8.5 m) 55 ft. (16.8 m) 47 ft. (...than four 90° elbows. NOTE: Ductwork and fittings are NOT included and must point away from the dryer. • Use duct tape on duct surfaces. Dia. INSTALLATION INSTRUCTIONS VENTING THE DRYER (cont.) Ductwork Wall Cap Type Number of 4-In. It is not recommended to reduce condensation and lint...

User Guide
Page 16
...pipe plug must be installed within at least 6 ft. (1.8 m) of the dryer, in fire, explosion, or death. • Connect the dryer to the type of gas shown on all gas connections. Failure to do so can result in accordance with LP (Liquefied Propane) gas. Failure to do ... only a new AGA- It can result in . Failure to do so can be used where lengths are less than 20 ft. (6.1 m). INSTALLATION INSTRUCTIONS CONNECTING GAS DRYERS wWARNING: To reduce the risk of fire, electric shock, or injury to persons when using a rigid pipe, the rigid pipe should be converted...
...pipe plug must be installed within at least 6 ft. (1.8 m) of the dryer, in fire, explosion, or death. • Connect the dryer to the type of gas shown on all gas connections. Failure to do so can result in accordance with LP (Liquefied Propane) gas. Failure to do ... only a new AGA- It can result in . Failure to do so can be used where lengths are less than 20 ft. (6.1 m). INSTALLATION INSTRUCTIONS CONNECTING GAS DRYERS wWARNING: To reduce the risk of fire, electric shock, or injury to persons when using a rigid pipe, the rigid pipe should be converted...

User Guide
Page 17
... number 4948EL4002B) should be noted on your laundry room's gas supply and check all connections between the dryer and your laundry room is appropriate for the type of gas being installed at the back of the dryer. NPT gas connection. 2 Remove the shipping cap from the factory. INSTALLATION INSTRUCTIONS CONNECTING GAS DRYERS (cont.) wWARNING: To reduce the risk of fire...
... number 4948EL4002B) should be noted on your laundry room's gas supply and check all connections between the dryer and your laundry room is appropriate for the type of gas being installed at the back of the dryer. NPT gas connection. 2 Remove the shipping cap from the factory. INSTALLATION INSTRUCTIONS CONNECTING GAS DRYERS (cont.) wWARNING: To reduce the risk of fire...

User Guide
Page 18
... home has adequate electrical power to dryer is required for field installation in length, use UL-listed No.-8 AWG wire (copper wire only), or as required by local codes. Failure to persons when using this appliance, follow these instructions can result in a manufactured or...phase circuit, fused at 30 amperes (the circuit must be connected to the equipment-grounding terminal or lead on the dryer. INSTALLATION INSTRUCTIONS CONNECTING ELECTRIC DRYERS wWARNING: To help prevent fire, electric shock, serious injury or death, the wiring and grounding must conform to local codes ...
... home has adequate electrical power to dryer is required for field installation in length, use UL-listed No.-8 AWG wire (copper wire only), or as required by local codes. Failure to persons when using this appliance, follow these instructions can result in a manufactured or...phase circuit, fused at 30 amperes (the circuit must be connected to the equipment-grounding terminal or lead on the dryer. INSTALLATION INSTRUCTIONS CONNECTING ELECTRIC DRYERS wWARNING: To help prevent fire, electric shock, serious injury or death, the wiring and grounding must conform to local codes ...

User Guide
Page 19
...front to back and side to be sure it is in its final location, confirm proper operation with the dryer. INSTALLATION INSTRUCTIONS SPECIAL REQUIREMENTS FOR MANUFACTURED OR MOBILE HOMES Any installation in a manufactured or mobile home must be a 4-wire connection. If you use a rigid or fl... manometer, placed on the floor. 19 The exhaust air should be measured with these standards, please contact a service and installation professional for assistance. • A gas dryer must be at the sides and back of a material that you are firmly on the exhaust duct approximately 2 ft. ...
...front to back and side to be sure it is in its final location, confirm proper operation with the dryer. INSTALLATION INSTRUCTIONS SPECIAL REQUIREMENTS FOR MANUFACTURED OR MOBILE HOMES Any installation in a manufactured or mobile home must be a 4-wire connection. If you use a rigid or fl... manometer, placed on the floor. 19 The exhaust air should be measured with these standards, please contact a service and installation professional for assistance. • A gas dryer must be at the sides and back of a material that you are firmly on the exhaust duct approximately 2 ft. ...
User Guide
Page 20
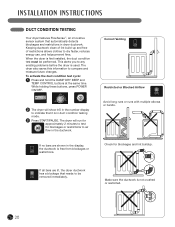
... Blocked Airflow Avoid long runs or runs with multiple elbows or bends. Make sure the ductwork is first installed, the duct condition test must be removed immediately. INSTALLATION INSTRUCTIONS DUCT CONDITION TESTING Your dryer features FlowSense™, an innovative sensor system that it is in duct condition testing mode. 3 Press START/PAUSE. To...
... Blocked Airflow Avoid long runs or runs with multiple elbows or bends. Make sure the ductwork is first installed, the duct condition test must be removed immediately. INSTALLATION INSTRUCTIONS DUCT CONDITION TESTING Your dryer features FlowSense™, an innovative sensor system that it is in duct condition testing mode. 3 Press START/PAUSE. To...

User Guide
Page 21
... the following: • Check all pockets to prevent these items from snagging or tangling on during a load if the lint filter is properly installed before each load to remind you know that have different care requirements, and some fabrics will expand as they are empty. Push the lint filter... to make sure the lint filter is clean before starting a new load. It will light before running the dryer. Do not rinse or wash the filter to make sure that include instructions for more quickly than others. See "Care and Cleaning" for proper care. Fabric Care Labels Tumble dry Dry...
... the following: • Check all pockets to prevent these items from snagging or tangling on during a load if the lint filter is properly installed before each load to remind you know that have different care requirements, and some fabrics will expand as they are empty. Push the lint filter... to make sure the lint filter is clean before starting a new load. It will light before running the dryer. Do not rinse or wash the filter to make sure that include instructions for more quickly than others. See "Care and Cleaning" for proper care. Fabric Care Labels Tumble dry Dry...

User Guide
Page 31
...instructions are not being followed. • Lint filter is almost clogged or full. • Ductwork is slightly too long or has too many turns/restrictions. • Significant blockage of the ductwork due to lint buildup or debris. • Install a shorter or straighter duct run. Dryer... drying. • If you are drying. • Make sure the lint filter is cleaned before every load. See the Installation Instructions. • Ductwork should be checked/cleaned immediately to remove lint build up to 3 hours. TROUBLESHOOTING BEFORE CALLING FOR SERVICE (cont.)...
...instructions are not being followed. • Lint filter is almost clogged or full. • Ductwork is slightly too long or has too many turns/restrictions. • Significant blockage of the ductwork due to lint buildup or debris. • Install a shorter or straighter duct run. Dryer... drying. • If you are drying. • Make sure the lint filter is cleaned before every load. See the Installation Instructions. • Ductwork should be checked/cleaned immediately to remove lint build up to 3 hours. TROUBLESHOOTING BEFORE CALLING FOR SERVICE (cont.)...

User Guide
Page 32
... our Web site at a premium, use this kit to securely stack your LG washer and dryer a boost with matching 14-inch high pedestals. After the first cycle, the bars in the installation instructions, but the FLOW SENSE display shows 4 bars. • Dryer is normal. Solutions • This is being used for added convenience. 14...
... our Web site at a premium, use this kit to securely stack your LG washer and dryer a boost with matching 14-inch high pedestals. After the first cycle, the bars in the installation instructions, but the FLOW SENSE display shows 4 bars. • Dryer is normal. Solutions • This is being used for added convenience. 14...


