
Owners Manual
Page 5
...see pages 14 ~ 16. 6. See page 18. 7. Additional features set up See Contents above. Contents Contents Warning/Caution 2 Safety Instructions 3~4 Introduction Controls 7 Connection Options 8 Remote Control Key Functions 9 Installation Installation Instruction 10~11 External Equipment Connections 12~16 Antenna Connection 12 VCR Setup / Cable TV Setup 13 External A/V Source Setup... Method 30 Low power 30 Split Zoom 30 Lock Menu Options Parental Lock Setup 32 PIP (Picture-in remote control. Turn video source equipment on . Turn TV on . 2. Select viewing source for TV.
...see pages 14 ~ 16. 6. See page 18. 7. Additional features set up See Contents above. Contents Contents Warning/Caution 2 Safety Instructions 3~4 Introduction Controls 7 Connection Options 8 Remote Control Key Functions 9 Installation Installation Instruction 10~11 External Equipment Connections 12~16 Antenna Connection 12 VCR Setup / Cable TV Setup 13 External A/V Source Setup... Method 30 Low power 30 Split Zoom 30 Lock Menu Options Parental Lock Setup 32 PIP (Picture-in remote control. Turn video source equipment on . Turn TV on . 2. Select viewing source for TV.
Owners Manual
Page 7
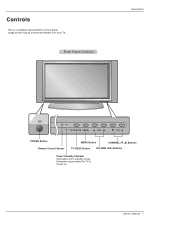
Image shown may be somewhat different from your TV. Front Panel Controls Introduction TV/VIDEO MENU VOL CH POWER Button Remote Control Sensor MENU Button CHANNEL (E, D) Buttons TV/VIDEO Button VOLUME (F,G) Buttons Power Standby Indicator Illuminates red in standby mode, Illuminates green when the TV is a simplified representation of front panel. Owner's Manual 7 This is turned on. Controls -
Image shown may be somewhat different from your TV. Front Panel Controls Introduction TV/VIDEO MENU VOL CH POWER Button Remote Control Sensor MENU Button CHANNEL (E, D) Buttons TV/VIDEO Button VOLUME (F,G) Buttons Power Standby Indicator Illuminates red in standby mode, Illuminates green when the TV is a simplified representation of front panel. Owner's Manual 7 This is turned on. Controls -
Owners Manual
Page 8
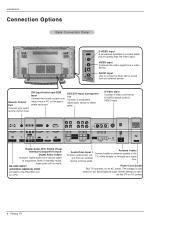
VIDEO Input Connects the video signal from a PC to the appropriate input port. Remote Control Port nector from a video device. S-Video Input Connect S-Video out from an external box. Note: In standby mode, these jacks. device to hear stereo sound ...from various types of equipment. ate the TV on the Specifications page. TV, either directly or through your wired remote control here. DVI Input/Audio Input/RGB Input Connect the monitor output con- The voltage is indicated on DC power. 8 Plasma TV DIGITAL AUDIO (OPTICAL) RS...
VIDEO Input Connects the video signal from a PC to the appropriate input port. Remote Control Port nector from a video device. S-Video Input Connect S-Video out from an external box. Note: In standby mode, these jacks. device to hear stereo sound ...from various types of equipment. ate the TV on the Specifications page. TV, either directly or through your wired remote control here. DVI Input/Audio Input/RGB Input Connect the monitor output con- The voltage is indicated on DC power. 8 Plasma TV DIGITAL AUDIO (OPTICAL) RS...

Owners Manual
Page 9
... to next higher/lower PIP channel. RATIO Changes the aspect ratio. PIPCH-/PIPCH+ Changes to the last channel viewed. LIGHT Illuminates the remote control buttons. ple program channels such as 2-1,22,etc. THUMBSTICK (Up/Down/Left/Right/OK) Allows you select the amount of time before...PLAY PAUSE STOP RECORD REW FF SKIP PIP PIPCH- PIPCH+ PIPINPUT FREEZE ZOOM SIGNAL SWAP ADJUST MODE Selects the remote operating mode: TV, VCR, DVD, CABLE, HDSTB or AUDIO. Installation Remote Control Key Functions - COMP/RGB/DVI Selects: Component 1-2, RGB-DTV (or RGB-PC), DVI-DTV (or ...
... to next higher/lower PIP channel. RATIO Changes the aspect ratio. PIPCH-/PIPCH+ Changes to the last channel viewed. LIGHT Illuminates the remote control buttons. ple program channels such as 2-1,22,etc. THUMBSTICK (Up/Down/Left/Right/OK) Allows you select the amount of time before...PLAY PAUSE STOP RECORD REW FF SKIP PIP PIPCH- PIPCH+ PIPINPUT FREEZE ZOOM SIGNAL SWAP ADJUST MODE Selects the remote operating mode: TV, VCR, DVD, CABLE, HDSTB or AUDIO. Installation Remote Control Key Functions - COMP/RGB/DVI Selects: Component 1-2, RGB-DTV (or RGB-PC), DVI-DTV (or ...

Owners Manual
Page 10
PIPCH+ PIPINPUT FREEZE ZOOM SIGNAL SWAP ADJUST Remote Control 2-Wall brackets 2-eye-bolts D-sub 15 pin Cable Attaching the TV assembly to a wall for additional support. • If the set will be sure the ...
PIPCH+ PIPINPUT FREEZE ZOOM SIGNAL SWAP ADJUST Remote Control 2-Wall brackets 2-eye-bolts D-sub 15 pin Cable Attaching the TV assembly to a wall for additional support. • If the set will be sure the ...

Owners Manual
Page 13
... manual.) ANT OUT 3. Use the ISM Method (on cable box. 3. Connection Option 2 1. compared to avoid having a fixed image remain on the remote control. (If connected to A/V INPUT 1, select Video 1 input source) ANT IN S-VIDEO OUT OUTPUT (R) AUDIO (L) SWITCH 3 4 IN VIDEO VCR Do...(MONO) R L AUDIO VIDEO S-VIDEO Antenna Analog/DTV AC INPUT 1. Installation NOTE: All cables shown are not included with the cable box remote control. Connect the audio and video cables from the VCR's output jacks to A/V INPUT 1, select Video 1 (R) AUDIO (L) VIDEO TV VCR OUTPUT ...
... manual.) ANT OUT 3. Use the ISM Method (on cable box. 3. Connection Option 2 1. compared to avoid having a fixed image remain on the remote control. (If connected to A/V INPUT 1, select Video 1 input source) ANT IN S-VIDEO OUT OUTPUT (R) AUDIO (L) SWITCH 3 4 IN VIDEO VCR Do...(MONO) R L AUDIO VIDEO S-VIDEO Antenna Analog/DTV AC INPUT 1. Installation NOTE: All cables shown are not included with the cable box remote control. Connect the audio and video cables from the VCR's output jacks to A/V INPUT 1, select Video 1 (R) AUDIO (L) VIDEO TV VCR OUTPUT ...

Owners Manual
Page 14
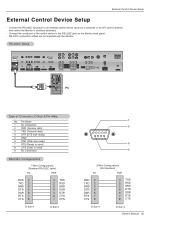
...). When connecting the TV to connect Connect the audio and video cables from the external equip- DIGITAL AUDIO (OPTICAL) RS-232C INPUT (CONTROL/SERVICE) REMOTE DVI COMPONENT1 CONTROL INPUT INPUT OUTPUT COMPONENT 2 DVD /DTV INPUT COMPONENT 1 R L AUDIO INPUT VIDEO INPUT A/V INPUT 1 (MONO) R L VIDEO ...the TV and connect the DVD audio outputs to the AUDIO INPUT jacks on the remote control. (If connected to SVIDEO, select the Video 1 or Video 2 external input source.) 3. Turn on the remote control to select Component 1 or Component 2. (If connected to A/V INPUT 1, select Video...
...). When connecting the TV to connect Connect the audio and video cables from the external equip- DIGITAL AUDIO (OPTICAL) RS-232C INPUT (CONTROL/SERVICE) REMOTE DVI COMPONENT1 CONTROL INPUT INPUT OUTPUT COMPONENT 2 DVD /DTV INPUT COMPONENT 1 R L AUDIO INPUT VIDEO INPUT A/V INPUT 1 (MONO) R L VIDEO ...the TV and connect the DVD audio outputs to the AUDIO INPUT jacks on the remote control. (If connected to SVIDEO, select the Video 1 or Video 2 external input source.) 3. Turn on the remote control to select Component 1 or Component 2. (If connected to A/V INPUT 1, select Video...

Owners Manual
Page 15
...jack for the digital set -top box connector. Connect the other digital external device, refer to the digital audio optical input on the remote control to external audio equipment (stereo system) via the Digital Audio Output Optical port. Installation HDSTB Setup - How to use 1. How to.... Connect one end of the optical cable to the figure as shown below. - DIGITAL AUDIO (OPTICAL) RS-232C INPUT (CONTROL/SERVICE) REMOTE DVI COMPONENT1 DVI INPUT CONTROL INPUT INPUT OUTPUT (PC/DTV INPUT) AUDIO INPUT RGB INPUT (PC/DTV INPUT) COMPONEN COMPONEN R L AUDIO INPUT Owner's ...
...jack for the digital set -top box connector. Connect the other digital external device, refer to the digital audio optical input on the remote control to external audio equipment (stereo system) via the Digital Audio Output Optical port. Installation HDSTB Setup - How to use 1. How to.... Connect one end of the optical cable to the figure as shown below. - DIGITAL AUDIO (OPTICAL) RS-232C INPUT (CONTROL/SERVICE) REMOTE DVI COMPONENT1 DVI INPUT CONTROL INPUT INPUT OUTPUT (PC/DTV INPUT) AUDIO INPUT RGB INPUT (PC/DTV INPUT) COMPONEN COMPONEN R L AUDIO INPUT Owner's ...

Owners Manual
Page 16
.... 2. This TV provides Plug and Play capability, meaning that the PC adjusts automatically to use a DVI-I cable. • Avoid keeping a fixed image on the TV's remote control. 3. The TV sends configuration information (EDID) to another resolution, change the PC graphic card or consult the manufacturer of the PC graphic card can not...
.... 2. This TV provides Plug and Play capability, meaning that the PC adjusts automatically to use a DVI-I cable. • Avoid keeping a fixed image on the TV's remote control. 3. The TV sends configuration information (EDID) to another resolution, change the PC graphic card or consult the manufacturer of the PC graphic card can not...

Owners Manual
Page 18
.... Press the TV/VIDEO , CH (D / E) button on the TV or press the POWER, TV/VIDEO, COMP/RGB/DVI, CH (+, -), Number (0 ~ 9) button on the remote control and then the TV will be shown on the screen in the selected language. 4. On-screen Menus Language Selection - Press the MENU button and then... TV • Press the button on the TV and then press the POWER, TV/VIDEO, COMP/RGB/DVI, CH (+, -), Number (0 ~ 9) button on the remote control to turn the TV on . First select your language. 1. From this manual, the OSD (On Screen Display) may be different from your desired language. Press...
.... Press the TV/VIDEO , CH (D / E) button on the TV or press the POWER, TV/VIDEO, COMP/RGB/DVI, CH (+, -), Number (0 ~ 9) button on the remote control and then the TV will be shown on the screen in the selected language. 4. On-screen Menus Language Selection - Press the MENU button and then... TV • Press the button on the TV and then press the POWER, TV/VIDEO, COMP/RGB/DVI, CH (+, -), Number (0 ~ 9) button on the remote control to turn the TV on . First select your language. 1. From this manual, the OSD (On Screen Display) may be different from your desired language. Press...
Owners Manual
Page 19
... to add or delete the channel from EZ Scan. - Run EZ Scan again after any Antenna/Cable connection changes. 1. Use the SURF button on the remote control when a channel is currently added or deleted by toggling each channel on the channel list. - Press the MENU button and then use D / E button to select...
... to add or delete the channel from EZ Scan. - Run EZ Scan again after any Antenna/Cable connection changes. 1. Use the SURF button on the remote control when a channel is currently added or deleted by toggling each channel on the channel list. - Press the MENU button and then use D / E button to select...
Owners Manual
Page 23
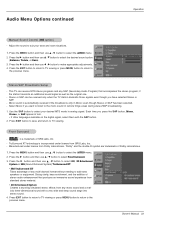
...add extra speakers or equipment. Press the MENU button and then use D / E button to the previous menu. Audio Menu Options continued Operation Manual Sound Control (Off option) - Adjust the sound to select the AUDIO menu. 2. Press the G button and then use D / E button to suit your desired... MTS mode in remote fringe areas during stereo/SAP broadcasting. 1. Stereo or SAP can receive MTS stereo programs and any multi-channel format without needing to select your ...
...add extra speakers or equipment. Press the MENU button and then use D / E button to the previous menu. Audio Menu Options continued Operation Manual Sound Control (Off option) - Adjust the sound to select the AUDIO menu. 2. Press the G button and then use D / E button to suit your desired... MTS mode in remote fringe areas during stereo/SAP broadcasting. 1. Stereo or SAP can receive MTS stereo programs and any multi-channel format without needing to select your ...

Owners Manual
Page 32
... ratings limit set up previ- sub menu, your children to watch or that you and your family do not want to movies shown on the remote control. 32 Plasma TV You can view those programs. • TV Rating-General: Based on the ratings, blocks certain TV programs that the movie ratings limit...
... ratings limit set up previ- sub menu, your children to watch or that you and your family do not want to movies shown on the remote control. 32 Plasma TV You can view those programs. • TV Rating-General: Based on the ratings, blocks certain TV programs that the movie ratings limit...
Owners Manual
Page 35
... 7 CTS 8 3 TXD 2 RXD 5 GND 4 DTR 6 DSR 7 RTS 8 CTS D-Sub 9 D-Sub 9 Owner's Manual 35 RS-232C Setup DIGITAL AUDIO (OPTICAL) RS-232C INPUT (CONTROL/SERVICE) REMOTE DVI COMPONENT1 DVI INPUT CONTROL INPUT INPUT OUTPUT (PC/DTV INPUT) AUDIO INPUT RGB INPUT (PC/DTV INPUT) COMPONENT 2 COMPONENT 1 DVD /DTV INPUT R L AUDIO INPUT VIDEO INPUT A/V INPUT...
... 7 CTS 8 3 TXD 2 RXD 5 GND 4 DTR 6 DSR 7 RTS 8 CTS D-Sub 9 D-Sub 9 Owner's Manual 35 RS-232C Setup DIGITAL AUDIO (OPTICAL) RS-232C INPUT (CONTROL/SERVICE) REMOTE DVI COMPONENT1 DVI INPUT CONTROL INPUT INPUT OUTPUT (PC/DTV INPUT) AUDIO INPUT RGB INPUT (PC/DTV INPUT) COMPONENT 2 COMPONENT 1 DVD /DTV INPUT R L AUDIO INPUT VIDEO INPUT A/V INPUT...

Owners Manual
Page 37
...ID][ ][OK][Data][x] 06. Transmission [k][d][ ][Set ID][ ][Data][Cr] Data 0 : Screen mute off (Picture on) 1 : Screen mute on remote control or in the Option menu. You can also adjust the screen format using the MUTE button on (Volume off ) Acknowledgement [d][ ][Set ID][ ][OK...][ ][Data][Cr] Data Min : 0 ~ Max : 64 • Refer to 'Real data mapping' as shown below. Volume Mute (Command2:e) G To control volume mute on remote control. Volume Control (Command2:f) G To adjust volume. Transmission [k][g][ ][Set ID][ ][Data][Cr] Data Min : 0 ~ Max : 64 • Refer to 'Real data mapping...
...ID][ ][OK][Data][x] 06. Transmission [k][d][ ][Set ID][ ][Data][Cr] Data 0 : Screen mute off (Picture on) 1 : Screen mute on remote control or in the Option menu. You can also adjust the screen format using the MUTE button on (Volume off ) Acknowledgement [d][ ][Set ID][ ][OK...][ ][Data][Cr] Data Min : 0 ~ Max : 64 • Refer to 'Real data mapping' as shown below. Volume Mute (Command2:e) G To control volume mute on remote control. Volume Control (Command2:f) G To adjust volume. Transmission [k][g][ ][Set ID][ ][Data][Cr] Data Min : 0 ~ Max : 64 • Refer to 'Real data mapping...

Owners Manual
Page 38
...Max: 64 • Refer to 'Real data mapping'. Acknowledgement [k][ ][Set ID][ ][OK][Data][x] 12. Remote Control Lock Mode (Command2:m) G To lock the remote control and the front panel controls on Acknowledgement [m][ ][Set ID][ ][OK][Data][x] 38 Plasma TV 14. PIP / Twin Picture (Command2:n) ...on Acknowledgement [l][ ][Set ID][ ][OK][Data][x] 13. Transmission [k][n][ ][Set ID][ ][Data][Cr] Data 0: PIP off 1: OSD on the remote control. Transmission [k][r][ ][Set ID][ ][Data][Cr] Data Min: 0 ~ Max: 64 • Refer to 'Real data mapping'. Acknowledgement [r][ ][Set...
...Max: 64 • Refer to 'Real data mapping'. Acknowledgement [k][ ][Set ID][ ][OK][Data][x] 12. Remote Control Lock Mode (Command2:m) G To lock the remote control and the front panel controls on Acknowledgement [m][ ][Set ID][ ][OK][Data][x] 38 Plasma TV 14. PIP / Twin Picture (Command2:n) ...on Acknowledgement [l][ ][Set ID][ ][OK][Data][x] 13. Transmission [k][n][ ][Set ID][ ][Data][Cr] Data 0: PIP off 1: OSD on the remote control. Transmission [k][r][ ][Set ID][ ][Data][Cr] Data Min: 0 ~ Max: 64 • Refer to 'Real data mapping'. Acknowledgement [r][ ][Set...
Owners Manual
Page 40
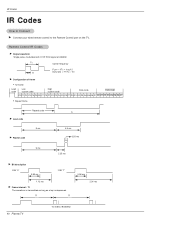
IR Codes IR Codes How to Connect G Connect your wired remote control to the Remote Control port on the TV. Tf Tf 0.56 ms 2.24 ms 40 Plasma TV Tf=108ms @455KHz Remote Control IR Codes G Output waveform Single pulse, modulated with 37.917KHz signal at 455KHz TC Carrier frequency FCAR = 1/TC = fOSC/12 T1 Duty ratio...
IR Codes IR Codes How to Connect G Connect your wired remote control to the Remote Control port on the TV. Tf Tf 0.56 ms 2.24 ms 40 Plasma TV Tf=108ms @455KHz Remote Control IR Codes G Output waveform Single pulse, modulated with 37.917KHz signal at 455KHz TC Carrier frequency FCAR = 1/TC = fOSC/12 T1 Duty ratio...

Owners Manual
Page 42
... the MENU and MUTE buttons simultaneously, the remote control is ready to operate most remote-controllable devices of other manufacturers. Programming a code into a remote mode 1. Programming code numbers for the code. 4. Note that the remote control may not control all models of other brands. Enter a ...to see if the component responds properly. Again, if the code is a multi-brand or universal remote control. Programming the Remote Programming the Remote G The remote control is correct, the device will turn on the component such as a VCR and press the corresponding MODE...
... the MENU and MUTE buttons simultaneously, the remote control is ready to operate most remote-controllable devices of other manufacturers. Programming a code into a remote mode 1. Programming code numbers for the code. 4. Note that the remote control may not control all models of other brands. Enter a ...to see if the component responds properly. Again, if the code is a multi-brand or universal remote control. Programming the Remote Programming the Remote G The remote control is correct, the device will turn on the component such as a VCR and press the corresponding MODE...
Owners Manual
Page 45
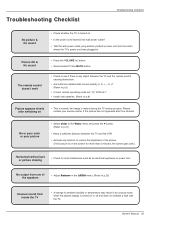
...to p.21) • Keep a sufficient distance between the TV and the VCR. • Activate any object between the TV and the remote control causing obstruction. • Are batteries installed with the TV. No or poor color or poor picture • Select Color in the Video ...the TV • A change in ambient humidity or temperature may result in the AUDIO menu. (Refer to +, - Picture OK & No sound The remote control doesn't work • Press the VOLUME (+) button. • Sound muted? Owner's Manual 45 Troubleshooting Checklist Troubleshooting Checklist No picture & No sound ...
...to p.21) • Keep a sufficient distance between the TV and the VCR. • Activate any object between the TV and the remote control causing obstruction. • Are batteries installed with the TV. No or poor color or poor picture • Select Color in the Video ...the TV • A change in ambient humidity or temperature may result in the AUDIO menu. (Refer to +, - Picture OK & No sound The remote control doesn't work • Press the VOLUME (+) button. • Sound muted? Owner's Manual 45 Troubleshooting Checklist Troubleshooting Checklist No picture & No sound ...

Owners Manual
Page 48
...call . Other service requirements will be charged if you must obtain an LGE Return Authorization before returning any product to the LG®Brand Service Center. G product where the original factory serial numbers have problems in obtaining satisfactory warranty service, write or... equipment, or other components in a video system G set-up or adjustment on consumer controls, or damage caused by improper adjustments G damage caused by other product G replacement of batteries on the remote control. THIS LIMITED WARRANTY DOES NOT APPLY TO: G damage caused in shipping or transit G...
...call . Other service requirements will be charged if you must obtain an LGE Return Authorization before returning any product to the LG®Brand Service Center. G product where the original factory serial numbers have problems in obtaining satisfactory warranty service, write or... equipment, or other components in a video system G set-up or adjustment on consumer controls, or damage caused by improper adjustments G damage caused by other product G replacement of batteries on the remote control. THIS LIMITED WARRANTY DOES NOT APPLY TO: G damage caused in shipping or transit G...


