

Owners Manual
Page 1
PLASMA TV OWNER'S MANUAL MODEL: DU-42PX12XD Please read this manual carefully and completely before operating your dealer if you require service. Record model number and serial number of the TV in the spaces provided below. Model Number : Serial Number : LG Electronics U.S.A., Inc. See the label attached on the back cover and relate this manual for future reference. Retain this information to your TV.
PLASMA TV OWNER'S MANUAL MODEL: DU-42PX12XD Please read this manual carefully and completely before operating your dealer if you require service. Record model number and serial number of the TV in the spaces provided below. Model Number : Serial Number : LG Electronics U.S.A., Inc. See the label attached on the back cover and relate this manual for future reference. Retain this information to your TV.
Owners Manual
Page 3
... safety instructions shall be used. Read these instructions. 3. Install in an instruction for installation for replacement of the obsolete outlet. 10. PORTABLE CART WARNING Owner's Manual 3 Follow all warnings. 4. Do not block any heat sources such as follows. Do not install near water. 6. Safety Instructions Safety Instructions IMPORTANT SAFETY INSTRUCTIONS Important...
... safety instructions shall be used. Read these instructions. 3. Install in an instruction for installation for replacement of the obsolete outlet. 10. PORTABLE CART WARNING Owner's Manual 3 Follow all warnings. 4. Do not block any heat sources such as follows. Do not install near water. 6. Safety Instructions Safety Instructions IMPORTANT SAFETY INSTRUCTIONS Important...
Owners Manual
Page 4
... Shock, Do Not Expose This Appliance To Rain Or Moisture. 17. CAUTION concerning the Power Cord : Most appliances recommend they be certain. Unplug this owner's manual to rain or moisture, does not operate normally, or has been dropped. 15. Refer all servicing to plugs, wall outlets, and the point where the...
... Shock, Do Not Expose This Appliance To Rain Or Moisture. 17. CAUTION concerning the Power Cord : Most appliances recommend they be certain. Unplug this owner's manual to rain or moisture, does not operate normally, or has been dropped. 15. Refer all servicing to plugs, wall outlets, and the point where the...
Owners Manual
Page 5
... Stereo/SAP Broadcasts Setup 23 Front Surround 23 TV Speakers On/Off Setup 24 BBE 24 Time Menu Options Auto Clock Setup 25 Manual Clock Setup 25 On/Off Timer Setup 25 Sleep Timer / Auto Off 26 Option Menu Features Aspect Ratio 27 Caption / Caption .... Connect all accessories. 5. Turn video source equipment on . See page 9. 4. See page 18. 7. See pages 21 ~ 24. 8. After reading this manual, keep it handy for available connection and operational setup options.) 1. See page 20. 3 Install batteries in -Picture)/Twin Picture Watching PIP/Twin Picture 33 Selecting...
... Stereo/SAP Broadcasts Setup 23 Front Surround 23 TV Speakers On/Off Setup 24 BBE 24 Time Menu Options Auto Clock Setup 25 Manual Clock Setup 25 On/Off Timer Setup 25 Sleep Timer / Auto Off 26 Option Menu Features Aspect Ratio 27 Caption / Caption .... Connect all accessories. 5. Turn video source equipment on . See page 9. 4. See page 18. 7. See pages 21 ~ 24. 8. After reading this manual, keep it handy for available connection and operational setup options.) 1. See page 20. 3 Install batteries in -Picture)/Twin Picture Watching PIP/Twin Picture 33 Selecting...
Owners Manual
Page 7
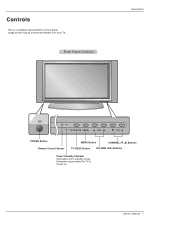
Front Panel Controls Introduction TV/VIDEO MENU VOL CH POWER Button Remote Control Sensor MENU Button CHANNEL (E, D) Buttons TV/VIDEO Button VOLUME (F,G) Buttons Power Standby Indicator Illuminates red in standby mode, Illuminates green when the TV is a simplified representation of front panel. Owner's Manual 7 Image shown may be somewhat different from your TV. This is turned on. Controls -
Front Panel Controls Introduction TV/VIDEO MENU VOL CH POWER Button Remote Control Sensor MENU Button CHANNEL (E, D) Buttons TV/VIDEO Button VOLUME (F,G) Buttons Power Standby Indicator Illuminates red in standby mode, Illuminates green when the TV is a simplified representation of front panel. Owner's Manual 7 Image shown may be somewhat different from your TV. This is turned on. Controls -

Owners Manual
Page 9
... TV. PIP Switches between PIP and Twin picture modes. SWAP Exchanges the PIP/main images. Don't mix old or used batteries with new ones. Owner's Manual 9
... TV. PIP Switches between PIP and Twin picture modes. SWAP Exchanges the PIP/main images. Don't mix old or used batteries with new ones. Owner's Manual 9

Owners Manual
Page 10
... a wall for additional support. • If the set will be sure the eye-bolts and the brackets are included with the product), as shown. Owner's Manual 1.5V 1.5V Batteries Power Cord 75Ω Round Cable LIGHT MODE POWER TV/VIDEO COMP/RGB/DVI TIMER FLASHBK MUTE VOL SURF CH INFO SAP...
... a wall for additional support. • If the set will be sure the eye-bolts and the brackets are included with the product), as shown. Owner's Manual 1.5V 1.5V Batteries Power Cord 75Ω Round Cable LIGHT MODE POWER TV/VIDEO COMP/RGB/DVI TIMER FLASHBK MUTE VOL SURF CH INFO SAP...
Owners Manual
Page 11
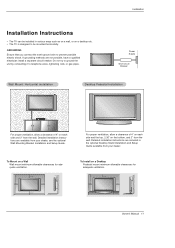
... your dealer. For proper ventilation, allow a clearance of 4" on a Desktop Pedestal mount minimum allowable clearances for adequate ventilation. 4 inches 4 inches 4 inches 2 inches 2.36 inches Owner's Manual 11 Installation Installation Instructions • The TV can be mounted horizontally. Power Supply Short-circuit Breaker Wall Mount: Horizontal installation Desktop Pedestal Installation For proper...
... your dealer. For proper ventilation, allow a clearance of 4" on a Desktop Pedestal mount minimum allowable clearances for adequate ventilation. 4 inches 4 inches 4 inches 2 inches 2.36 inches Owner's Manual 11 Installation Installation Instructions • The TV can be mounted horizontally. Power Supply Short-circuit Breaker Wall Mount: Horizontal installation Desktop Pedestal Installation For proper...

Owners Manual
Page 13
...1, select Video 1 input source) ANT IN S-VIDEO OUT OUTPUT (R) AUDIO (L) SWITCH 3 4 IN VIDEO VCR Do not connect to the VCR owner's 2 manual.) ANT OUT 3. Cable TV Setup - Select channels at the same time. Select the input source by using the TV/VIDEO button on the remote control...cannot display TV programming unless a TV tuner device or cable TV converter box is used; Select 3 or 4 with the TV VCR Setup - Owner's Manual 13 the fixed images on the sides of time. Connection Option 1 1. Tune the TV channel to connecting the Video input. 2. If the 4:3 picture...
...1, select Video 1 input source) ANT IN S-VIDEO OUT OUTPUT (R) AUDIO (L) SWITCH 3 4 IN VIDEO VCR Do not connect to the VCR owner's 2 manual.) ANT OUT 3. Cable TV Setup - Select channels at the same time. Select the input source by using the TV/VIDEO button on the remote control...cannot display TV programming unless a TV tuner device or cable TV converter box is used; Select 3 or 4 with the TV VCR Setup - Owner's Manual 13 the fixed images on the sides of time. Connection Option 1 1. Tune the TV channel to connecting the Video input. 2. If the 4:3 picture...

Owners Manual
Page 14
... DVD video outputs (Y, PB, PR) to the COMPONENT (Y, PB, PR) INPUT jacks on the TV, as shown in the figure. Refer to the DVD player's manual for Component 2 input source. • Digital Audio operation has priority if Digital Audio and AUDIO L/R are connected at the same time. 14 Plasma TV or...
... DVD video outputs (Y, PB, PR) to the COMPONENT (Y, PB, PR) INPUT jacks on the TV, as shown in the figure. Refer to the DVD player's manual for Component 2 input source. • Digital Audio operation has priority if Digital Audio and AUDIO L/R are connected at the same time. 14 Plasma TV or...

Owners Manual
Page 15
...COMPONENT1 DVI INPUT CONTROL INPUT INPUT OUTPUT (PC/DTV INPUT) AUDIO INPUT RGB INPUT (PC/DTV INPUT) COMPONEN COMPONEN R L AUDIO INPUT Owner's Manual 15 Installation HDSTB Setup - However, if you do receive Digital signals from a digital set -top box.) 2. Then, make the corresponding audio... connections. Turn on your vision. Connect the other digital external device, refer to the owner's manual for DTV (480p,720p,1080i) mode. See the external audio equipment instruction manual for video connections, depending on the digital set -top box.
...COMPONENT1 DVI INPUT CONTROL INPUT INPUT OUTPUT (PC/DTV INPUT) AUDIO INPUT RGB INPUT (PC/DTV INPUT) COMPONEN COMPONEN R L AUDIO INPUT Owner's Manual 15 Installation HDSTB Setup - However, if you do receive Digital signals from a digital set -top box.) 2. Then, make the corresponding audio... connections. Turn on your vision. Connect the other digital external device, refer to the owner's manual for DTV (480p,720p,1080i) mode. See the external audio equipment instruction manual for video connections, depending on the digital set -top box.
Owners Manual
Page 17
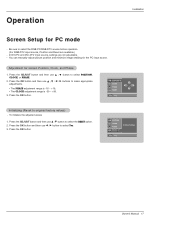
... CLOCK adjustment range is -30 ~ +30. 3. Press the ADJUST button and then use D / E / F / G buttons to original factory values) - You can manually adjust picture position and minimize image shaking for screen Position, Clock, and Phase 1. Press the OK button and then use D / E button to select the RGB...RGB-DTV input source, Position and Reset are not adjustable. - Press the OK button POSITION CLOCK PHASE RESET G Initialize Settings Adjust Close Owner's Manual 17 Be sure to select POSITION, CLOCK, or PHASE. 2. Press the ADJUST button and then use F / G button to select the RESET ...
... CLOCK adjustment range is -30 ~ +30. 3. Press the ADJUST button and then use D / E / F / G buttons to original factory values) - You can manually adjust picture position and minimize image shaking for screen Position, Clock, and Phase 1. Press the OK button and then use D / E button to select the RGB...RGB-DTV input source, Position and Reset are not adjustable. - Press the OK button POSITION CLOCK PHASE RESET G Initialize Settings Adjust Close Owner's Manual 17 Be sure to select POSITION, CLOCK, or PHASE. 2. Press the ADJUST button and then use F / G button to select the RESET ...

Owners Manual
Page 18
... on the TV or press the POWER, TV/VIDEO, COMP/RGB/DVI, CH (+, -), Number (0 ~ 9) button on . Turning on the TV just after installation 1. From this manual, the OSD (On Screen Display) may be different from your TV's because it is just example to be shown in the selected language. Press the...
... on the TV or press the POWER, TV/VIDEO, COMP/RGB/DVI, CH (+, -), Number (0 ~ 9) button on . Turning on the TV just after installation 1. From this manual, the OSD (On Screen Display) may be different from your TV's because it is just example to be shown in the selected language. Press the...
Owners Manual
Page 19
... D / E button to complete the channel search cycle for 1-125 channel. 1. Press the G button and then use the OK button to begin the channel search. Owner's Manual 19 Press the OK button to add or delete it. Create two different types of channel lists in memory on the remote control when a channel...
... D / E button to complete the channel search cycle for 1-125 channel. 1. Press the G button and then use the OK button to begin the channel search. Owner's Manual 19 Press the OK button to add or delete it. Create two different types of channel lists in memory on the remote control when a channel...

Owners Manual
Page 21
...3. Choose one of three automatic color adjustments. Press the G button and then use D / E button to the previous menu. Owner's Manual 21 Press the G button and then use D / E button to select either Warm, Medium, or Cool. 4. When adjusting Video menu ...options (contrast, brightness, color, sharpness, tint, and color temperature) manually, EZ Picture automatically changes to make appropriate adjustments. 4. Color Temperature Control - Press the G button and then use F / G button to Off....
...3. Choose one of three automatic color adjustments. Press the G button and then use D / E button to the previous menu. Owner's Manual 21 Press the G button and then use D / E button to select either Warm, Medium, or Cool. 4. When adjusting Video menu ...options (contrast, brightness, color, sharpness, tint, and color temperature) manually, EZ Picture automatically changes to make appropriate adjustments. 4. Color Temperature Control - Press the G button and then use F / G button to Off....
Owners Manual
Page 22
... to select EZ SoundRite. 3. Press the G button and then use D / E button to select the AUDIO menu. 2. When adjusting sound options (treble, bass, and front surround) manually, EZ Sound automatically switches Off. - casting station. 1. Press the MENU button and then use D / E button to select: English, Spanish, or French. 4. EZ Sound -
... to select EZ SoundRite. 3. Press the G button and then use D / E button to select the AUDIO menu. 2. When adjusting sound options (treble, bass, and front surround) manually, EZ Sound automatically switches Off. - casting station. 1. Press the MENU button and then use D / E button to select: English, Spanish, or French. 4. EZ Sound -
Owners Manual
Page 23
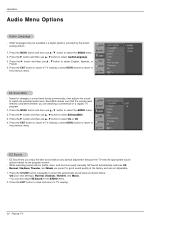
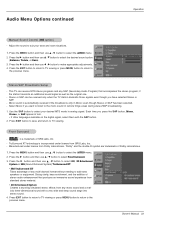
... transmits an additional sound signal as well as the original one. - TruSurround XT technology is incorporated under license from SRS Labs, Inc. - Owner's Manual 23 Press the G button and then use D / E button to add extra speakers or equipment. Select Mono if you have selected Stereo or SAP... Labs, Inc. - Press the G button and then use D / E button to the mono sound in Mono; Audio Menu Options continued Operation Manual Sound Control (Off option) - Press EXIT button to return to TV viewing or press MENU button to return to select your taste and room situations...
... transmits an additional sound signal as well as the original one. - TruSurround XT technology is incorporated under license from SRS Labs, Inc. - Owner's Manual 23 Press the G button and then use D / E button to add extra speakers or equipment. Select Mono if you have selected Stereo or SAP... Labs, Inc. - Press the G button and then use D / E button to the mono sound in Mono; Audio Menu Options continued Operation Manual Sound Control (Off option) - Press EXIT button to return to TV viewing or press MENU button to return to select your taste and room situations...
Owners Manual
Page 25
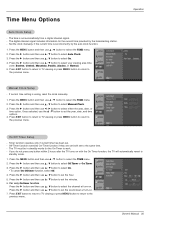
...the On-Timer to select the TIME menu. 2. Press the G button and then use D / E button to select either the year, date, or time option. Manual Clock Setup - Press the G button and then use D / E button to select Off Timer or On Timer. 3. Operation On/Off Timer Setup - If you ...D / E button to set the minutes. 6. Timer function operates only if current time has been set incorrectly by the broadcasting station. - Set the clock manually, if the current time is set . - Press EXIT button to return to TV viewing or press MENU button to return to standby mode. 1.
...the On-Timer to select the TIME menu. 2. Press the G button and then use D / E button to select either the year, date, or time option. Manual Clock Setup - Press the G button and then use D / E button to select Off Timer or On Timer. 3. Operation On/Off Timer Setup - If you ...D / E button to set the minutes. 6. Timer function operates only if current time has been set incorrectly by the broadcasting station. - Set the clock manually, if the current time is set . - Press EXIT button to return to TV viewing or press MENU button to return to standby mode. 1.
Owners Manual
Page 27
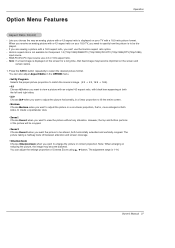
... specify how the picture is displayed on the screen and remain visible. 1. Note: When enlarging or reducing the picture, the image may become distorted. Owner's Manual 27 Lets you want to be displayed. - Note: If a fixed image is to view the picture without any alteration. You can adjust the enlarge proportion...
... specify how the picture is displayed on the screen and remain visible. 1. Note: When enlarging or reducing the picture, the image may become distorted. Owner's Manual 27 Lets you want to be displayed. - Note: If a fixed image is to view the picture without any alteration. You can adjust the enlarge proportion...
Owners Manual
Page 29
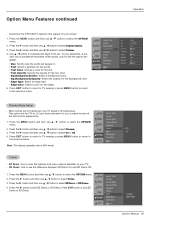
... signal is provided at the best motion appearance. 1. This option lets the TV do 3:2 pull-down operation for the edges. 5. Cinema Mode Setup - Operation Owner's Manual 29 Press the G button and then use D / E button to scan the features and menu options available on your TV. - Press the MENU button and then...
... signal is provided at the best motion appearance. 1. This option lets the TV do 3:2 pull-down operation for the edges. 5. Cinema Mode Setup - Operation Owner's Manual 29 Press the G button and then use D / E button to scan the features and menu options available on your TV. - Press the MENU button and then...


