

Owner's Manual
Page 6
Stand Body Use a coin on a soft cloth. 2. Important This illustration depicts the general model of the Stand Base, and connect it into the Stand Body. The product may differ from the items shown in the picture. Place the monitor ...
Stand Body Use a coin on a soft cloth. 2. Important This illustration depicts the general model of the Stand Base, and connect it into the Stand Body. The product may differ from the items shown in the picture. Place the monitor ...

Owner's Manual
Page 9
...2 row connector. Varies according to turn the power on , the 'Self Image Setting Function' is turned off. 2. This rear view represents a general model; DVI-D (This feature is not available in order, then tighten the screw of the rear view. When monitor power is turned on . A Connect DVI... signal) Cable NOTE This is needed to change the 15 pin high density (3 row) D-sub VGA connector on the front panel to model. Connecting the Display E1940T/E2040T/E2240T/E2340T Connecting with optimal display settings.When the user connects the monitor for the first time, this function...
...2 row connector. Varies according to turn the power on , the 'Self Image Setting Function' is turned off. 2. This rear view represents a general model; DVI-D (This feature is not available in order, then tighten the screw of the rear view. When monitor power is turned on . A Connect DVI... signal) Cable NOTE This is needed to change the 15 pin high density (3 row) D-sub VGA connector on the front panel to model. Connecting the Display E1940T/E2040T/E2240T/E2340T Connecting with optimal display settings.When the user connects the monitor for the first time, this function...
Owner's Manual
Page 10
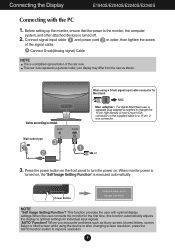
Connecting the Display E1940S/E2040S/E2240S/E2340S Connecting with optimal display settings.When the user connects the monitor for individual input signals. 'AUTO' Function? This rear view represents a general model; Wall-outlet type A When using the device or after changing screen resolution, press the ...D-sub VGA connector on . This function provides the user with the PC 1. When monitor power is turned on the front panel to model. When you encounter problems such as shown. Before setting up the monitor, ensure that the power to improve resolution. 9 Power Button ...
Connecting the Display E1940S/E2040S/E2240S/E2340S Connecting with optimal display settings.When the user connects the monitor for individual input signals. 'AUTO' Function? This rear view represents a general model; Wall-outlet type A When using the device or after changing screen resolution, press the ...D-sub VGA connector on . This function provides the user with the PC 1. When monitor power is turned on the front panel to model. When you encounter problems such as shown. Before setting up the monitor, ensure that the power to improve resolution. 9 Power Button ...

Owner's Manual
Page 17
... customize desired image settings To adjust the image size To adjust the screen color mode NOTE The order of icons may differ depending on the model (16~24). 16
... customize desired image settings To adjust the image size To adjust the screen color mode NOTE The order of icons may differ depending on the model (16~24). 16

