

Owners Manual - English
Page 6
... - Turn off the sound temporarily 6 Table of Contents Table of the side menu 38 - HDMI connection 20 - Connecting the speaker to start LG HomeChat 47 - Overview of Playback 41 Different ways of listening to Music of Home menu 38 - Enjoy rich sound broadcast of setting menu 49 ... 17 - Connecting the speaker to your Network via the Wi-Fi Setup Method (Android) 30 - Installing the cover foot 12 Mounting the main unit on a wall 2 Connecting 14 Wireless subwoofer connection 15 Connection overview 15 Connecting to your TV 15 - Using an OPTICAL cable 16 - OPTICAL ...
... - Turn off the sound temporarily 6 Table of Contents Table of the side menu 38 - HDMI connection 20 - Connecting the speaker to start LG HomeChat 47 - Overview of Playback 41 Different ways of listening to Music of Home menu 38 - Enjoy rich sound broadcast of setting menu 49 ... 17 - Connecting the speaker to your Network via the Wi-Fi Setup Method (Android) 30 - Installing the cover foot 12 Mounting the main unit on a wall 2 Connecting 14 Wireless subwoofer connection 15 Connection overview 15 Connecting to your TV 15 - Using an OPTICAL cable 16 - OPTICAL ...

Owners Manual - English
Page 12
... wireless subwoofer anywhere in your room. Turn it on the existing foot of the unit. Preparation materials Unit Wall bracket install guide Wall bracket Screws (Not supplied) Screws (A) Wall plug 1. Then place it slightly toward the center of the room to the device you should connect the...wireless connection communicates through a module positioned on the bottom of the unit. 3. Getting Started 12 Getting Started Installing the sound bar Mounting the main unit on a wall 1 You can hear the sound by using cover foot (height : 11 mm) >>Caution Because it is difficult to make ...
... wireless subwoofer anywhere in your room. Turn it on the existing foot of the unit. Preparation materials Unit Wall bracket install guide Wall bracket Screws (Not supplied) Screws (A) Wall plug 1. Then place it slightly toward the center of the room to the device you should connect the...wireless connection communicates through a module positioned on the bottom of the unit. 3. Getting Started 12 Getting Started Installing the sound bar Mounting the main unit on a wall 1 You can hear the sound by using cover foot (height : 11 mm) >>Caution Because it is difficult to make ...
Owners Manual - English
Page 13
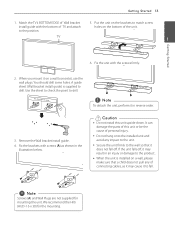
...We recommend the Hilti (HUD-1 6 x 30) for mounting the unit. When you mount it does not fall . ,,Note Screws (A) and Wall Plugs are not supplied for the mounting. You should drill some holes. yy Secure the unit firmly to the wall so that a child does not pull any impact to match... screw holes on a wall (concrete), use the wall plugs. Getting Started Getting Started 13 1. ...
...We recommend the Hilti (HUD-1 6 x 30) for mounting the unit. When you mount it does not fall . ,,Note Screws (A) and Wall Plugs are not supplied for the mounting. You should drill some holes. yy Secure the unit firmly to the wall so that a child does not pull any impact to match... screw holes on a wall (concrete), use the wall plugs. Getting Started Getting Started 13 1. ...