

Owners Manual
Page 1
FRANÇAIS ESPAÑOL IMPORTANT • Please read this owner's manual carefully and thoroughly before installing and operating your room air conditioner. • Please retain this air-conditioning unit must be submitted for future reference after reading it thoroughly. ENGLISH website http://www.lgservice.com LG LG Cassette-Type Air Conditioner OWNER'S MANUAL Prior to installation, this owner's manual for approval by the utility service which provides electricity (EN 61000-2, EN 61000-3 Norm).
FRANÇAIS ESPAÑOL IMPORTANT • Please read this owner's manual carefully and thoroughly before installing and operating your room air conditioner. • Please retain this air-conditioning unit must be submitted for future reference after reading it thoroughly. ENGLISH website http://www.lgservice.com LG LG Cassette-Type Air Conditioner OWNER'S MANUAL Prior to installation, this owner's manual for approval by the utility service which provides electricity (EN 61000-2, EN 61000-3 Norm).
Owners Manual
Page 2
... at all. PRECAUTION • Contact the authorized service technician for repair or maintenance of this unit. • Contact the installer for installation of this page in the chart of your receipt to be replaced, replacement work shall be performed by authorized personnel only using... only genuine replacement parts. • Installation work must be performed in accordance with the National Electric Code by qualified and authorized personnel only. 2 Cassette- READ THIS MANUAL Inside you will find many helpful hints on the side of purchase...
... at all. PRECAUTION • Contact the authorized service technician for repair or maintenance of this unit. • Contact the installer for installation of this page in the chart of your receipt to be replaced, replacement work shall be performed by authorized personnel only using... only genuine replacement parts. • Installation work must be performed in accordance with the National Electric Code by qualified and authorized personnel only. 2 Cassette- READ THIS MANUAL Inside you will find many helpful hints on the side of purchase...
Owners Manual
Page 3
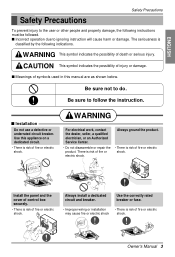
Use this manual are as shown below. WARNING This symbol indicates the possibility of injury or damage. Be sure to ignoring instruction will cause harm or damage. Install the panel and the cover of control box securely. • There is risk of fire or electric shock. Always... or serious injury. Owner's Manual 3 ENGLISH Safety Precautions Safety Precautions To prevent injury to do. The seriousness is risk of fire or electric shock. Be sure not to the user or other people and property damage, the following indications. s Installation Do not use a defective ...
Use this manual are as shown below. WARNING This symbol indicates the possibility of injury or damage. Be sure to ignoring instruction will cause harm or damage. Install the panel and the cover of control box securely. • There is risk of fire or electric shock. Always... or serious injury. Owner's Manual 3 ENGLISH Safety Precautions Safety Precautions To prevent injury to do. The seriousness is risk of fire or electric shock. Be sure not to the user or other people and property damage, the following indications. s Installation Do not use a defective ...
Owners Manual
Page 9
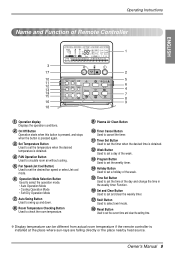
.... 9 Plasma Air Clean Button 10 Timer Cancel Button Used to cancel the timer. 11 Timer Set Button Used to set On Off Set no. Owner's Manual 9 Operating Instructions ENGLISH Name and Function of the day and change the time in the weekly timer Function. 16 Set and Clear Button Used to... Defrost Humidify 1 LO SLo Filter Out door 2ndF Time ZONE 1234 Timer Operation unit No Func Program set the timer when the desired time is installed at the place where sun-rays are falling directly or the place nearby heat source.
.... 9 Plasma Air Clean Button 10 Timer Cancel Button Used to cancel the timer. 11 Timer Set Button Used to set On Off Set no. Owner's Manual 9 Operating Instructions ENGLISH Name and Function of the day and change the time in the weekly timer Function. 16 Set and Clear Button Used to... Defrost Humidify 1 LO SLo Filter Out door 2ndF Time ZONE 1234 Timer Operation unit No Func Program set the timer when the desired time is installed at the place where sun-rays are falling directly or the place nearby heat source.
Owners Manual
Page 23
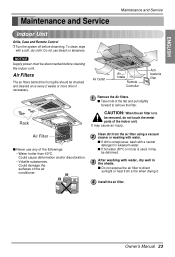
... not expose the air filter to be checked and cleaned once every 2 weeks or more ) is conspicuous, wash with water. Owner's Manual 23 ENGLISH Maintenance and Service Maintenance and Service Indoor Unit Grille, Case and Remote Control ❐ Turn the system off before cleaning the ... cleanining, To clean, wipe with water, dry well in lukewarm water. s If dirt is used, it . B enzene SINNER CSLCBOAURRGINEGR 4 Install the air filter. Could damage the surfaces of the followings: • Water hotter than 40°C. Air Filter s Never use bleach or abrasives.
... not expose the air filter to be checked and cleaned once every 2 weeks or more ) is conspicuous, wash with water. Owner's Manual 23 ENGLISH Maintenance and Service Maintenance and Service Indoor Unit Grille, Case and Remote Control ❐ Turn the system off before cleaning the ... cleanining, To clean, wipe with water, dry well in lukewarm water. s If dirt is used, it . B enzene SINNER CSLCBOAURRGINEGR 4 Install the air filter. Could damage the surfaces of the followings: • Water hotter than 40°C. Air Filter s Never use bleach or abrasives.
Owners Manual
Page 25
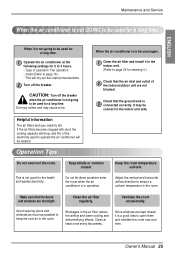
... a long time. Clean the air filter regularly. Ventilate the room occasionally. When the air conditioner is to be used again. 1 Clean the air filter and install it in the indoor unit. (Refer to page 24 for a long time. 1 Operate the air conditioner at least once every two weeks. Owner...'s Manual 25 Keep the room temperature uniform. Check that the air inlet and outlet of the indoor/outdoor unit are shut tight. Operation Tips Do not ...
... a long time. Clean the air filter regularly. Ventilate the room occasionally. When the air conditioner is to be used again. 1 Clean the air filter and install it in the indoor unit. (Refer to page 24 for a long time. 1 Operate the air conditioner at least once every two weeks. Owner...'s Manual 25 Keep the room temperature uniform. Check that the air inlet and outlet of the indoor/outdoor unit are shut tight. Operation Tips Do not ...

Service Manual
Page 4
... Conditioner Be sure not to follow the instruction. I Incorrect operation due to ignoring instruction will cause harm or damage. Use this manual are as shown below. I Installation Do not use a defective or under- Always ground the product. I Meanings of symbols used in this appliance on a dedicated ...Presautions Safety Precautions To prevent injury to the user or other people and property damage, the following indications. Be sure to do. Install the panel and the cover of control box securely. • There is risk of fire or electric shock. The seriousness is ...
... Conditioner Be sure not to follow the instruction. I Incorrect operation due to ignoring instruction will cause harm or damage. Use this manual are as shown below. I Installation Do not use a defective or under- Always ground the product. I Meanings of symbols used in this appliance on a dedicated ...Presautions Safety Precautions To prevent injury to the user or other people and property damage, the following indications. Be sure to do. Install the panel and the cover of control box securely. • There is risk of fire or electric shock. The seriousness is ...
Service Manual
Page 5
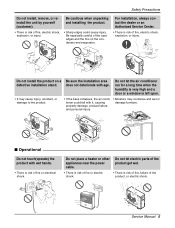
... conditioner run for a long time when the humidity is very high and a door or a window is risk of fire or electrical shock. Service Manual 5 Be cautious when unpacking and installing the product. • Sharp edges could fall with age. Do not place a heater or other appliances near the power cable. For... wet. • There is risk of fire or electric shock. • There is risk of the product, or electric shock. Safety Presautions Do not install, remove, or reinstall the unit by yourself (customer). • There is risk of the case edges and the fins on a Be sure the...
... conditioner run for a long time when the humidity is very high and a door or a window is risk of fire or electrical shock. Service Manual 5 Be cautious when unpacking and installing the product. • Sharp edges could fall with age. Do not place a heater or other appliances near the power cable. For... wet. • There is risk of fire or electric shock. • There is risk of the product, or electric shock. Safety Presautions Do not install, remove, or reinstall the unit by yourself (customer). • There is risk of the case edges and the fins on a Be sure the...
Service Manual
Page 7
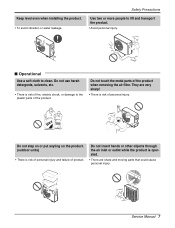
... are very sharp! • There is risk of product. They are sharp and moving parts that could cause personal injury. Keep level even when installing the product. • To avoid vibration or water leakage. Safety Presautions Use two or more people to lift and transport the product. • Avoid... personal injury. 90˚ I Operational Use a soft cloth to the plastic parts of the product when removing the air filter. Service Manual 7 Wax Thinner Do not step on or put anyting on the product. (outdoor units) • There is risk of fire, electric shock, or damage...
... are very sharp! • There is risk of product. They are sharp and moving parts that could cause personal injury. Keep level even when installing the product. • To avoid vibration or water leakage. Safety Presautions Use two or more people to lift and transport the product. • Avoid... personal injury. 90˚ I Operational Use a soft cloth to the plastic parts of the product when removing the air filter. Service Manual 7 Wax Thinner Do not step on or put anyting on the product. (outdoor units) • There is risk of fire, electric shock, or damage...
Service Manual
Page 9
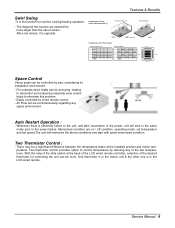
...Open Close O7p1en Close Open Time Vane 1 Vane 2 Vane 4 Vane 3 Space Control Vanes angle can be controlled by pair, considering its installation environment. - Auto Restart Operation : - Memorized condition are opened the more larger than the other one minute, it is electricity failure to the...at the back of the LCD wired remote controller, selection of the two temperatures. It is in the LCD wired remote. Service Manual 9 There may be annoying, leading to discomfort and reduced productivity vane control helps to control temperature by wired remote control. - ...
...Open Close O7p1en Close Open Time Vane 1 Vane 2 Vane 4 Vane 3 Space Control Vanes angle can be controlled by pair, considering its installation environment. - Auto Restart Operation : - Memorized condition are opened the more larger than the other one minute, it is electricity failure to the...at the back of the LCD wired remote controller, selection of the two temperatures. It is in the LCD wired remote. Service Manual 9 There may be annoying, leading to discomfort and reduced productivity vane control helps to control temperature by wired remote control. - ...

Service Manual
Page 11
Accessory: Installed at field, ordered and purchased separately by the corresponding model name, supplied with main unit. Service Manual 11 control Electric heater (Operation) High ceiling operation Hot start Self diagnosis Soft dry operation... Option Option X X - List of Functions List of Functions • Ceiling Cassette Category Function AT-C243HLF0 AT-C343HLF0 Air flow Air purifying Installation Reliability Convenience Individual Control CAC Network Function Special Function Kit Others Air supply outlet Airflow direction control (left & right) Airflow direction control (up...
Accessory: Installed at field, ordered and purchased separately by the corresponding model name, supplied with main unit. Service Manual 11 control Electric heater (Operation) High ceiling operation Hot start Self diagnosis Soft dry operation... Option Option X X - List of Functions List of Functions • Ceiling Cassette Category Function AT-C243HLF0 AT-C343HLF0 Air flow Air purifying Installation Reliability Convenience Individual Control CAC Network Function Special Function Kit Others Air supply outlet Airflow direction control (left & right) Airflow direction control (up...

Service Manual
Page 23
... connection 3. Indoor Wall Outdoor 5~7mm (0.20~0.28inch) Service Manual 23 Hanging Bolt - 2. W 3/8 or M10 Spring Washer - Indoor Unit Installation 150mm(5.91inch) Hanging bolt (W3/8 or M10) Nut (W3/8 or M10) Spring washer (M10) Keep the length of the bolt from the ... • Anchor the outdoor unit with a bolt and nut(ø10mm(0.39inch)) tightly and horizontally on a concrete or rigid mount. • When installing on the wall slightly tilted to 40mm(1.57inch) Flat washer for M10 (accessory) Ceiling board Ceiling Air Conditioner body Ceiling board Flat washer for M10...
... connection 3. Indoor Wall Outdoor 5~7mm (0.20~0.28inch) Service Manual 23 Hanging Bolt - 2. W 3/8 or M10 Spring Washer - Indoor Unit Installation 150mm(5.91inch) Hanging bolt (W3/8 or M10) Nut (W3/8 or M10) Spring washer (M10) Keep the length of the bolt from the ... • Anchor the outdoor unit with a bolt and nut(ø10mm(0.39inch)) tightly and horizontally on a concrete or rigid mount. • When installing on the wall slightly tilted to 40mm(1.57inch) Flat washer for M10 (accessory) Ceiling board Ceiling Air Conditioner body Ceiling board Flat washer for M10...
Service Manual
Page 25
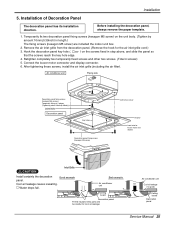
... screw) are included the indoor unit box. 2. After tightening these screws, install the air inlet grille (including the air filter). Installation of Decoration Panel The decoration panel has its installation direction. Before installing the decoration panel, always remove the paper template. 1. Retighten completely two temporarily...part) and be careful for cool air leakage Air conditioner unit Air Cool air leakage (no good) Ceiling board Decoration panel Service Manual 25 Water drops fall. Hook the decoration panel key hole ( ) on the unit body. (Tighten by amount 10mm(0.39inch) ...
... screw) are included the indoor unit box. 2. After tightening these screws, install the air inlet grille (including the air filter). Installation of Decoration Panel The decoration panel has its installation direction. Before installing the decoration panel, always remove the paper template. 1. Retighten completely two temporarily...part) and be careful for cool air leakage Air conditioner unit Air Cool air leakage (no good) Ceiling board Decoration panel Service Manual 25 Water drops fall. Hook the decoration panel key hole ( ) on the unit body. (Tighten by amount 10mm(0.39inch) ...
Service Manual
Page 29
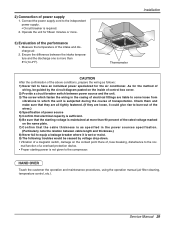
...power is subjected during the course of transportation. HAND OVER Teach the customer the operation and maintenance procedures, using the operation manual (air filter cleaning, temperature control, etc.). Ensure the difference between power source and the unit. 3) The screw which the...function of control box cover. 2) Provide a circuit breaker switch between the intake temperature and the discharge one is required. 2. Installation Thermometer CAUTION After the confirmation of the above conditions, prepare the wiring as specified in the power sources specification. (Particularly note ...
...power is subjected during the course of transportation. HAND OVER Teach the customer the operation and maintenance procedures, using the operation manual (air filter cleaning, temperature control, etc.). Ensure the difference between power source and the unit. 3) The screw which the...function of control box cover. 2) Provide a circuit breaker switch between the intake temperature and the discharge one is required. 2. Installation Thermometer CAUTION After the confirmation of the above conditions, prepare the wiring as specified in the power sources specification. (Particularly note ...
Service Manual
Page 31
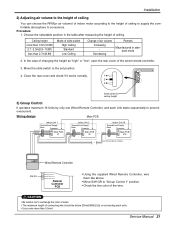
...Control 1 Group Control 2 Remote Controller PCB • Using the supplied Wired Remote Controller, wire them like above. • Move S/W GR to consumers. Installation 2) Adjusting air volume to the height of ceiling You can choose the RPM(or air volume) of indoor motor according to the height of ceiling...only one Wired Remote Controller, and each units. • Use a wire more than 3.3m(10.8ft) 2.7~3.3m(8.9~10.8ft) less than 0.5mm2 Service Manual 31 Wiring design Main PCB Indoor Unit 1 Terminal(Local Supply) Block Connector RED(12V) YL(SIGNAL) BR(GND) RED(12V) YL(SIGNAL) BR(GND...
...Control 1 Group Control 2 Remote Controller PCB • Using the supplied Wired Remote Controller, wire them like above. • Move S/W GR to consumers. Installation 2) Adjusting air volume to the height of ceiling You can choose the RPM(or air volume) of indoor motor according to the height of ceiling...only one Wired Remote Controller, and each units. • Use a wire more than 3.3m(10.8ft) 2.7~3.3m(8.9~10.8ft) less than 0.5mm2 Service Manual 31 Wiring design Main PCB Indoor Unit 1 Terminal(Local Supply) Block Connector RED(12V) YL(SIGNAL) BR(GND) RED(12V) YL(SIGNAL) BR(GND...
Service Manual
Page 41
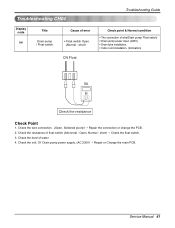
... : Open, Normal : short) ¡ Check the float switch. 3. Check the wire connection. (Open, Soldered poorly) ¡ Repair the connection or change the PCB. 2. Service Manual 41 Check the resistance of water 4. Of Drain pump power supply. (AC 230V) ¡ Repair or Change the main PCB. Check the volt. Troubleshooting CH04... Guide Check point & Normal condition • The connection of wire(Drain pump/ Float switch) • Drain pump power input. (220V) • Drain tube installation. • Indoor unit installation. (Inclination) 0Ω Ω Check the resistance Check Point 1.
... : Open, Normal : short) ¡ Check the float switch. 3. Check the wire connection. (Open, Soldered poorly) ¡ Repair the connection or change the PCB. 2. Service Manual 41 Check the resistance of water 4. Of Drain pump power supply. (AC 230V) ¡ Repair or Change the main PCB. Check the volt. Troubleshooting CH04... Guide Check point & Normal condition • The connection of wire(Drain pump/ Float switch) • Drain pump power input. (220V) • Drain tube installation. • Indoor unit installation. (Inclination) 0Ω Ω Check the resistance Check Point 1.
Service Manual
Page 43
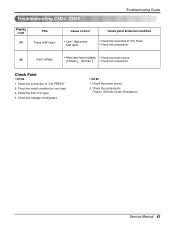
Check the connection of refrigerant. • CH 25 1. Check the leakage of "CN_PRESS" 2. Check the components (Trans1, B/Diode, Diode, Resistance) Service Manual 43 Troubleshooting CH24, CH25 Display code Title 24 Press S/W Open Cause of error • Low / High press S/W open . 4. Check the power source. 2. ...8226; Check the components. 25 Input voltage • Abnormal Input voltage • Check the power source. (140Vac , 300Vac . • Check the components. Check the install condition for over load. 3. Check Point • CH 24 1. Check the SVC V/V open .
Check the connection of refrigerant. • CH 25 1. Check the leakage of "CN_PRESS" 2. Check the components (Trans1, B/Diode, Diode, Resistance) Service Manual 43 Troubleshooting CH24, CH25 Display code Title 24 Press S/W Open Cause of error • Low / High press S/W open . 4. Check the power source. 2. ...8226; Check the components. 25 Input voltage • Abnormal Input voltage • Check the power source. (140Vac , 300Vac . • Check the components. Check the install condition for over load. 3. Check Point • CH 24 1. Check the SVC V/V open .
Service Manual
Page 47
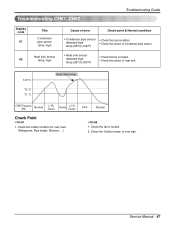
Troubleshooting CH61, CH62 Troubleshooting Guide Display code 61 Title Condenser pipe sensor temp. Check the install condition for over load. (Refrigerant, Pipe length, Blocked, ...) OFF Normal • CH 62 1. Service Manual 47 high • Heat sink sensor detected high temp.(85°C)(185°F) • Check the fan is locked. • Check the...
Troubleshooting CH61, CH62 Troubleshooting Guide Display code 61 Title Condenser pipe sensor temp. Check the install condition for over load. (Refrigerant, Pipe length, Blocked, ...) OFF Normal • CH 62 1. Service Manual 47 high • Heat sink sensor detected high temp.(85°C)(185°F) • Check the fan is locked. • Check the...


