

Owners Manual
Page 1
ENGLISH LFXS28596* / LMXS28596* / LMRS28596* / LFXS26596* / LFXC22596* MFL70761702 Rev.06_072020 www.lg.com Copyright © 2019-2020 LG Electronics Inc. All Rights Reserved. OWNER'S MANUAL FRENCH DOOR REFRIGERATOR Read this owner's manual thoroughly before operating the appliance and keep it handy for reference at all times.
ENGLISH LFXS28596* / LMXS28596* / LMRS28596* / LFXS26596* / LFXC22596* MFL70761702 Rev.06_072020 www.lg.com Copyright © 2019-2020 LG Electronics Inc. All Rights Reserved. OWNER'S MANUAL FRENCH DOOR REFRIGERATOR Read this owner's manual thoroughly before operating the appliance and keep it handy for reference at all times.

Owners Manual
Page 2
... 32 Ice Compartment 33 Automatic Icemaker 35 Storing Food 37 Humidity Controlled Crispers 38 Glide'N'Serve 38 Refrigerator Shelves 39 InstaView 40 Door-in-Door 41 Door Bins 41 Durabase 42 SMART FUNCTIONS 42 LG ThinQ Application 44 Smart Grid Function 45 Smart Diagnosis™ Feature 47 MAINTENANCE 47 Cleaning 47 Air...
... 32 Ice Compartment 33 Automatic Icemaker 35 Storing Food 37 Humidity Controlled Crispers 38 Glide'N'Serve 38 Refrigerator Shelves 39 InstaView 40 Door-in-Door 41 Door Bins 41 Durabase 42 SMART FUNCTIONS 42 LG ThinQ Application 44 Smart Grid Function 45 Smart Diagnosis™ Feature 47 MAINTENANCE 47 Cleaning 47 Air...

Owners Manual
Page 3
... it to replace a standard 2-prong wall outlet with this product, follow instructions. CAUTION You may deteriorate. • Do not place the refrigerator in this product to a dedicated grounded electrical outlet rated for use with a standard 3-prong wall outlet. • Do not use an ...is , tell you how to potential hazards that can be dangerous for easy access to a power source. • When moving the refrigerator, be killed or seriously injured if you and others are not followed. All safety messages will follow instructions. ENGLISH IMPORTANT SAFETY INSTRUCTIONS ...
... it to replace a standard 2-prong wall outlet with this product, follow instructions. CAUTION You may deteriorate. • Do not place the refrigerator in this product to a dedicated grounded electrical outlet rated for use with a standard 3-prong wall outlet. • Do not use an ...is , tell you how to potential hazards that can be dangerous for easy access to a power source. • When moving the refrigerator, be killed or seriously injured if you and others are not followed. All safety messages will follow instructions. ENGLISH IMPORTANT SAFETY INSTRUCTIONS ...

Owners Manual
Page 4
... fuses, use time delay fuse. • Keep ventilation openings, in the appliance enclosure or in the built-in structure, clear of the refrigerator. • Disconnect the power cord immediately and contact an authorized service center if there is of pinch point areas; Do not plug appliance... flammable propellant in this appliance. Doing so may result in a serious health hazard. • Do not use . Doing so could damage the refrigerator and seriously injure themselves. • Do not allow children to ensure that has thawed completely. Doing so may cause frostbite. • Do not ...
... fuses, use time delay fuse. • Keep ventilation openings, in the appliance enclosure or in the built-in structure, clear of the refrigerator. • Disconnect the power cord immediately and contact an authorized service center if there is of pinch point areas; Do not plug appliance... flammable propellant in this appliance. Doing so may result in a serious health hazard. • Do not use . Doing so could damage the refrigerator and seriously injure themselves. • Do not allow children to ensure that has thawed completely. Doing so may cause frostbite. • Do not ...

Owners Manual
Page 5
... appliance by a person responsible for their safety. • Unplug the power plug before cleaning or repairing the refrigerator. • The refrigerator and freezer compartment lights are interior LED lighting, and service should be fined or imprisoned in accordance with reduced ... connection of the equipment-grounding conductor can result in the freezer compartment. Check with the appliance; Disposal • Junked or abandoned refrigerators are removed for proper grounding. • Never unplug the appliance by a qualified servicer. Insulation foam contains flammable blowing gas. &#...
... appliance by a person responsible for their safety. • Unplug the power plug before cleaning or repairing the refrigerator. • The refrigerator and freezer compartment lights are interior LED lighting, and service should be fined or imprisoned in accordance with reduced ... connection of the equipment-grounding conductor can result in the freezer compartment. Check with the appliance; Disposal • Junked or abandoned refrigerators are removed for proper grounding. • Never unplug the appliance by a qualified servicer. Insulation foam contains flammable blowing gas. &#...

Owners Manual
Page 6
... Never start up an appliance showing any glass surface. If in which the appliance is intended to be sited depends on the refrigerator's dispenser. When transporting and installing the appliance, care should be 10.8 square feet (1 square meter) in which the appliance ... Do not hang on to sudden temperature changes. Clean with warm water when they are damaged. SAVE THESE INSTRUCTIONS The amount of refrigerant in your particular appliance is combustible. 6 IMPORTANT SAFETY INSTRUCTIONS Risk of Fire and Flammable Materials This appliance contains a small amount of...
... Never start up an appliance showing any glass surface. If in which the appliance is intended to be sited depends on the refrigerator's dispenser. When transporting and installing the appliance, care should be 10.8 square feet (1 square meter) in which the appliance ... Do not hang on to sudden temperature changes. Clean with warm water when they are damaged. SAVE THESE INSTRUCTIONS The amount of refrigerant in your particular appliance is combustible. 6 IMPORTANT SAFETY INSTRUCTIONS Risk of Fire and Flammable Materials This appliance contains a small amount of...

Owners Manual
Page 7
... e Door Button† Opens the Door-in -Door Allows for product improvement purposes. c EZ Handle Easily opens the freezer door. d Handle Opens and closes the refrigerator door. b Filtered Water and Ice Dispenser Dispenses purified water and ice. ENGLISH PRODUCT OVERVIEW PRODUCT OVERVIEW 7 Product Features The images in this guide may be... access to commonly used food items. g LED Light Lights up when the freezer door is only available on some models. a Control Panel Sets the refrigerator temperature and freezer temperature, the water filter condition and the dispenser mode.
... e Door Button† Opens the Door-in -Door Allows for product improvement purposes. c EZ Handle Easily opens the freezer door. d Handle Opens and closes the refrigerator door. b Filtered Water and Ice Dispenser Dispenses purified water and ice. ENGLISH PRODUCT OVERVIEW PRODUCT OVERVIEW 7 Product Features The images in this guide may be... access to commonly used food items. g LED Light Lights up when the freezer door is only available on some models. a Control Panel Sets the refrigerator temperature and freezer temperature, the water filter condition and the dispenser mode.

Owners Manual
Page 8
b Water filter Purifies water. c Air Filter Reduces odors inside of the refrigerator. 8 PRODUCT OVERVIEW Interior InstaView Door-in-Door: LFXS28596* / LFXS26596*/ LFXC22596* InstaView Door-in-Door: LMXS28596* / LMRS28596* a LED Interior Lighting Lights up the inside the refrigerator compartment. The filter should be replaced every 6 months.
b Water filter Purifies water. c Air Filter Reduces odors inside of the refrigerator. 8 PRODUCT OVERVIEW Interior InstaView Door-in-Door: LFXS28596* / LFXS26596*/ LFXC22596* InstaView Door-in-Door: LMXS28596* / LMRS28596* a LED Interior Lighting Lights up the inside the refrigerator compartment. The filter should be replaced every 6 months.

Owners Manual
Page 9
... the risk of the ice dropping. f Humidity Controlled Crisper Helps vegetables and fruit to meet individual storage needs. j Adjustable Refrigerator Shelf The refrigerator shelves are closed. l Glide'N'Serve Stores food items at an angle of the shelf. The pad attached to the bottom of...and stored. m Automatic Icemaker (Freezer)† Dispenses ice automatically. NOTE • Pad† - h Auto-Closing Hinge† The refrigerator doors and freezer drawers close automatically when pushed slightly. (The door only closes automatically when it is folded in before closing the left-hand ...
... the risk of the ice dropping. f Humidity Controlled Crisper Helps vegetables and fruit to meet individual storage needs. j Adjustable Refrigerator Shelf The refrigerator shelves are closed. l Glide'N'Serve Stores food items at an angle of the shelf. The pad attached to the bottom of...and stored. m Automatic Icemaker (Freezer)† Dispenses ice automatically. NOTE • Pad† - h Auto-Closing Hinge† The refrigerator doors and freezer drawers close automatically when pushed slightly. (The door only closes automatically when it is folded in before closing the left-hand ...

Owners Manual
Page 10
...* LFXC22596* Description Standard-depth, InstaView Door-in-Door French door refrigerator, bottom freezer, Sabbath Mode Standard-depth, InstaView Door-in-Door French door refrigerator, bottom freezer Standard-depth, InstaView Door-in-Door French door refrigerator, bottom freezer, Sabbath Mode Standard-depth, InstaView Door-in-Door... manual may vary due to constant product improvements. 10 PRODUCT OVERVIEW Product Specifications The appearance and specifications listed in -Door French door refrigerator, bottom freezer, Sabbath Mode Net weight 322 lb (146 kg) 337 lb (153 kg) 340 lb (154 kg) 309 ...
...* LFXC22596* Description Standard-depth, InstaView Door-in-Door French door refrigerator, bottom freezer, Sabbath Mode Standard-depth, InstaView Door-in-Door French door refrigerator, bottom freezer Standard-depth, InstaView Door-in-Door French door refrigerator, bottom freezer, Sabbath Mode Standard-depth, InstaView Door-in-Door... manual may vary due to constant product improvements. 10 PRODUCT OVERVIEW Product Specifications The appearance and specifications listed in -Door French door refrigerator, bottom freezer, Sabbath Mode Net weight 322 lb (146 kg) 337 lb (153 kg) 340 lb (154 kg) 309 ...
Owners Manual
Page 11
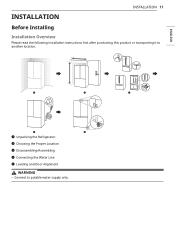
INSTALLATION INSTALLATION 11 Before Installing Installation Overview Please read the following installation instructions first after purchasing this product or transporting it to potable water supply only. ENGLISH a Unpacking the Refrigerator b Choosing the Proper Location c Disassembling/Assembling d Connecting the Water Line e Leveling and Door Alignment WARNING • Connect to another location.
INSTALLATION INSTALLATION 11 Before Installing Installation Overview Please read the following installation instructions first after purchasing this product or transporting it to potable water supply only. ENGLISH a Unpacking the Refrigerator b Choosing the Proper Location c Disassembling/Assembling d Connecting the Water Line e Leveling and Door Alignment WARNING • Connect to another location.

Owners Manual
Page 12
... so can result in back injury or other injury. • The refrigerator is located under the front of the refrigerator. • To remove any temporary labels from the refrigerator. Reinstall shelves according to move and install the refrigerator. Tape or glue residue can also be easily removed by rubbing a ... materials and vapors, such as needed. NOTE • Remove tape and any remaining tape or glue, rub the area briskly with your refrigerator before using. Do not remove any warning labels, the model and serial number label, or the Tech Sheet that is heavy. Always pull the...
... so can result in back injury or other injury. • The refrigerator is located under the front of the refrigerator. • To remove any temporary labels from the refrigerator. Reinstall shelves according to move and install the refrigerator. Tape or glue residue can also be easily removed by rubbing a ... materials and vapors, such as needed. NOTE • Remove tape and any remaining tape or glue, rub the area briskly with your refrigerator before using. Do not remove any warning labels, the model and serial number label, or the Tech Sheet that is heavy. Always pull the...
Owners Manual
Page 13
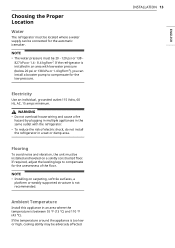
... where the temperature is too low or high, cooling ability may be 20 - 120 psi or 138 - 827 kPa or 1.4 - 8.4 kgf/cm2. If the refrigerator is installed in the same outlet with low water pressure (below 20 psi or 138 kPa or 1.4 kgf/cm2), you can be installed and leveled... structure is not recommended. WARNING • Do not overload house wiring and cause a fire hazard by plugging in multiple appliances in an area with the refrigerator. • To reduce the risk of the floor. NOTE • The water pressure must be adversely affected. If the temperature around the appliance is ...
... where the temperature is too low or high, cooling ability may be 20 - 120 psi or 138 - 827 kPa or 1.4 - 8.4 kgf/cm2. If the refrigerator is installed in the same outlet with low water pressure (below 20 psi or 138 kPa or 1.4 kgf/cm2), you can be installed and leveled... structure is not recommended. WARNING • Do not overload house wiring and cause a fire hazard by plugging in multiple appliances in an area with the refrigerator. • To reduce the risk of the floor. NOTE • The water pressure must be adversely affected. If the temperature around the appliance is ...

Owners Manual
Page 14
...consumption charges. See Removing/ Assembling the Doors and Drawers in this manual. • The installation location chosen for the refrigerator should allow space behind the unit for connections and airflow and space in front to open the doors and drawers. •... Dimensions and Clearances • Check the dimensions of the appliance and the installation path to ensure there is sufficient room to move the refrigerator through , remove the refrigerator doors. Dimension/Clearance LMXS28596* LFXS26596* LFXC22596* LMRS28596* A Depth without Handle 33 3/4" (857 mm) 32 3/8" (822 mm) 28...
...consumption charges. See Removing/ Assembling the Doors and Drawers in this manual. • The installation location chosen for the refrigerator should allow space behind the unit for connections and airflow and space in front to open the doors and drawers. •... Dimensions and Clearances • Check the dimensions of the appliance and the installation path to ensure there is sufficient room to move the refrigerator through , remove the refrigerator doors. Dimension/Clearance LMXS28596* LFXS26596* LFXC22596* LMRS28596* A Depth without Handle 33 3/4" (857 mm) 32 3/8" (822 mm) 28...
Owners Manual
Page 15
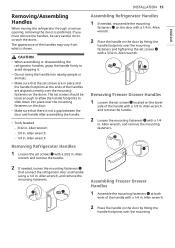
...the doors is not a gap between the door and handle after assembling the handle. • Tools Needed - 3/32 in. Allen wrench Removing Refrigerator Handles 1 Loosen the set screws b with a 1/4 in . Allen wrench and remove the handle. 2 If needed , reassemble the mounting ...fasteners a on the doors. INSTALLATION 15 Assembling Refrigerator Handles 1 If needed , loosen the mounting fasteners b that the set screws are aligned correctly over the mounting fasteners and tightening the set screws ...
...the doors is not a gap between the door and handle after assembling the handle. • Tools Needed - 3/32 in. Allen wrench Removing Refrigerator Handles 1 Loosen the set screws b with a 1/4 in . Allen wrench and remove the handle. 2 If needed , reassemble the mounting ...fasteners a on the doors. INSTALLATION 15 Assembling Refrigerator Handles 1 If needed , loosen the mounting fasteners b that the set screws are aligned correctly over the mounting fasteners and tightening the set screws ...

Owners Manual
Page 16
... shown. • Connections may vary by model. † This feature is only available on the model. 1 The water supply is too narrow for the refrigerator to the upper right part of the rear surface of wire harnesses may come off. Allen wrench 1/8 in . Allen wrench Removing the Left... Refrigerator Door NOTE • The number of the refrigerator. Hold the water supply connection and gently push the collet a to detach the water supply line as the handle may vary ...
... shown. • Connections may vary by model. † This feature is only available on the model. 1 The water supply is too narrow for the refrigerator to the upper right part of the rear surface of wire harnesses may come off. Allen wrench 1/8 in . Allen wrench Removing the Left... Refrigerator Door NOTE • The number of the refrigerator. Hold the water supply connection and gently push the collet a to detach the water supply line as the handle may vary ...

Owners Manual
Page 17
... is only present on a nonscratching surface. 3 Rotate the hinge lever e clockwise. INSTALLATION 17 ENGLISH 3 Remove the cover and pull out the tube h. Removing the Right Refrigerator Door NOTE • The number of the cover b, with a flat-head screwdriver. 2 Detach all wire harnesses i.
... is only present on a nonscratching surface. 3 Rotate the hinge lever e clockwise. INSTALLATION 17 ENGLISH 3 Remove the cover and pull out the tube h. Removing the Right Refrigerator Door NOTE • The number of the cover b, with a flat-head screwdriver. 2 Detach all wire harnesses i.

Owners Manual
Page 18
Removing the Freezer Drawer WARNING • Use two or more people to remove and install the refrigerator doors and freezer drawer. • Be careful of sharp hinges on both sides of the drawer and pull it up , on the freezer drawer. • ...
Removing the Freezer Drawer WARNING • Use two or more people to remove and install the refrigerator doors and freezer drawer. • Be careful of sharp hinges on both sides of the drawer and pull it up , on the freezer drawer. • ...

Owners Manual
Page 20
... 1 Make sure that the plastic sleeve is installed. 2 Fit the hinge a over the hinge lever latch b and slot it into place. Install the refrigerator door onto the middle hinge. 3 Connect all the wire harnesses and the ground screw. 2 Fit the hinge a over the hinge lever latch b and ...into place. Lower the door onto the middle hinge pin as shown in the bottom of the door. Assembling the Left Refrigerator Door CAUTION • Install the left refrigerator door after the right door is inserted in place. Rotate the lever c counterclockwise to secure the hinge. 20 INSTALLATION ...
... 1 Make sure that the plastic sleeve is installed. 2 Fit the hinge a over the hinge lever latch b and slot it into place. Install the refrigerator door onto the middle hinge. 3 Connect all the wire harnesses and the ground screw. 2 Fit the hinge a over the hinge lever latch b and ...into place. Lower the door onto the middle hinge pin as shown in the bottom of the door. Assembling the Left Refrigerator Door CAUTION • Install the left refrigerator door after the right door is inserted in place. Rotate the lever c counterclockwise to secure the hinge. 20 INSTALLATION ...

Owners Manual
Page 22
...or adjustable wrench. • Flat-blade and Phillips screwdrivers. • Two ¼ in. at plumbing supply stores) to connect the water line to the refrigerator OR cut square. Before purchasing, make sure Be sure there is sufficient extra tubing (about 8 feet [2.4 m] coiled into 3 turns of 5/32 in ....8226; If the water pressure remains low, call a qualified plumber to correct water hammer before the water line is not covered by the refrigerator warranty. Replace the filter if necessary. • Allow the storage tank on the back of the tubing are included in many water supply ...
...or adjustable wrench. • Flat-blade and Phillips screwdrivers. • Two ¼ in. at plumbing supply stores) to connect the water line to the refrigerator OR cut square. Before purchasing, make sure Be sure there is sufficient extra tubing (about 8 feet [2.4 m] coiled into 3 turns of 5/32 in ....8226; If the water pressure remains low, call a qualified plumber to correct water hammer before the water line is not covered by the refrigerator warranty. Replace the filter if necessary. • Allow the storage tank on the back of the tubing are included in many water supply ...


