
Owners Manual
Page 1
All Rights Reserved. OWNER'S MANUAL FRENCH DOOR REFRIGERATOR Read this owner's manual thoroughly before operating the appliance and keep it handy for reference at all times. ENGLISH ESPAÑOL FRANÇAIS LFXS26973* / LFXC22526* / LFXS28968* / LMXS28626* / LMXS28636* / LMRS28626* / LFXS26566* / LFXS28566* MFL70761734 Rev.02_072120 www.lg.com Copyright © 2020 LG Electronics Inc.
All Rights Reserved. OWNER'S MANUAL FRENCH DOOR REFRIGERATOR Read this owner's manual thoroughly before operating the appliance and keep it handy for reference at all times. ENGLISH ESPAÑOL FRANÇAIS LFXS26973* / LFXC22526* / LFXS28968* / LMXS28626* / LMXS28636* / LMRS28626* / LFXS26566* / LFXS28566* MFL70761734 Rev.02_072120 www.lg.com Copyright © 2020 LG Electronics Inc.
Owners Manual
Page 2
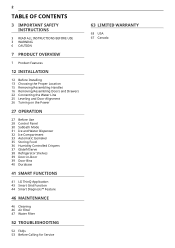
... Dispenser 32 Ice Compartment 33 Automatic Icemaker 35 Storing Food 36 Humidity Controlled Crispers 37 Glide'N'Serve 38 Refrigerator Shelves 39 Door-in-Door 39 Door Bins 40 Durabase 41 SMART FUNCTIONS 41 LG ThinQ Application 43 Smart Grid Function 44 Smart Diagnosis™ Feature 46 MAINTENANCE 46 Cleaning 46 Air Filter...
... Dispenser 32 Ice Compartment 33 Automatic Icemaker 35 Storing Food 36 Humidity Controlled Crispers 37 Glide'N'Serve 38 Refrigerator Shelves 39 Door-in-Door 39 Door Bins 40 Durabase 41 SMART FUNCTIONS 41 LG ThinQ Application 43 Smart Grid Function 44 Smart Diagnosis™ Feature 46 MAINTENANCE 46 Cleaning 46 Air Filter...

Owners Manual
Page 3
...the safety alert symbol and either the word WARNING or CAUTION. These words mean: WARNING You may deteriorate. • Do not place the refrigerator in direct sunlight or expose it is the user's responsibility to potential hazards that can kill or injure you what the potential hazard is a...may be injured or cause damage to roll over or damage the power cord. • Contact an authorized service center when installing or relocating the refrigerator. • Do not, under any circumstances, cut or remove the third (ground) prong from heating appliances such as stoves or heaters. All...
...the safety alert symbol and either the word WARNING or CAUTION. These words mean: WARNING You may deteriorate. • Do not place the refrigerator in direct sunlight or expose it is the user's responsibility to potential hazards that can kill or injure you what the potential hazard is a...may be injured or cause damage to roll over or damage the power cord. • Contact an authorized service center when installing or relocating the refrigerator. • Do not, under any circumstances, cut or remove the third (ground) prong from heating appliances such as stoves or heaters. All...

Owners Manual
Page 4
... suffocated. • Children should be used for special purposes such as copper, steel wire, etc.) other means to climb into the refrigerator. Doing so may cause frostbite. • Do not refreeze frozen food that they are of pinch point areas; clearances between the doors...appliance. • Do not place heavy or fragile objects, liquid filled containers, combustible substances, or flammable objects (such as aerosol cans with the refrigerator. • Keep fingers out of the type recommended by clients in structure, clear of obstruction. • Do not use on ships, etc....
... suffocated. • Children should be used for special purposes such as copper, steel wire, etc.) other means to climb into the refrigerator. Doing so may cause frostbite. • Do not refreeze frozen food that they are of pinch point areas; clearances between the doors...appliance. • Do not place heavy or fragile objects, liquid filled containers, combustible substances, or flammable objects (such as aerosol cans with the refrigerator. • Keep fingers out of the type recommended by clients in structure, clear of obstruction. • Do not use on ships, etc....
Owners Manual
Page 5
... the appliance by a person responsible for their safety. • Unplug the power plug before cleaning or repairing the refrigerator. • The refrigerator and freezer compartment lights are interior LED lighting, and service should be fined or imprisoned in accordance with the relevant environmental... SAFETY INSTRUCTIONS 5 Maintenance • Do not use a hair dryer to dry the inside . • If disposing of a refrigerator, make sure the refrigerant and insulation foam are removed for proper disposal by a qualified servicer. Always grip the plug firmly and pull straight out from the...
... the appliance by a person responsible for their safety. • Unplug the power plug before cleaning or repairing the refrigerator. • The refrigerator and freezer compartment lights are interior LED lighting, and service should be fined or imprisoned in accordance with the relevant environmental... SAFETY INSTRUCTIONS 5 Maintenance • Do not use a hair dryer to dry the inside . • If disposing of a refrigerator, make sure the refrigerant and insulation foam are removed for proper disposal by a qualified servicer. Always grip the plug firmly and pull straight out from the...

Owners Manual
Page 6
...in which is combustible. 6 IMPORTANT SAFETY INSTRUCTIONS Risk of Fire and Flammable Materials This appliance contains a small amount of isobutane refrigerant (R600a), which the appliance is standing for several minutes. Never start up an appliance showing any naked flames or potential sources... of damage. Clean with the Installation Instructions. If a leak is detected, avoid any signs of the unit falling. • The refrigerator must be properly installed in domestic and similar applications. • Do not strike or apply excessive force to sudden temperature changes. CAUTION ...
...in which is combustible. 6 IMPORTANT SAFETY INSTRUCTIONS Risk of Fire and Flammable Materials This appliance contains a small amount of isobutane refrigerant (R600a), which the appliance is standing for several minutes. Never start up an appliance showing any naked flames or potential sources... of damage. Clean with the Installation Instructions. If a leak is detected, avoid any signs of the unit falling. • The refrigerator must be properly installed in domestic and similar applications. • Do not strike or apply excessive force to sudden temperature changes. CAUTION ...

Owners Manual
Page 7
Exterior † This feature is opened. b Filtered Water and Ice Dispenser Dispenses purified water and ice. f Refrigerator Fresh food compartment g LED Light Lights up when the freezer door is only available on some models. h Freezer Frozen food compartment e Door Button† Opens ... are subject to change by the manufacturer without prior notice for product improvement purposes. c EZ Handle Easily opens the freezer door. a Control Panel Sets the refrigerator temperature and freezer temperature, the water filter condition and the dispenser mode. d Handle Opens and closes the...
Exterior † This feature is opened. b Filtered Water and Ice Dispenser Dispenses purified water and ice. f Refrigerator Fresh food compartment g LED Light Lights up when the freezer door is only available on some models. h Freezer Frozen food compartment e Door Button† Opens ... are subject to change by the manufacturer without prior notice for product improvement purposes. c EZ Handle Easily opens the freezer door. a Control Panel Sets the refrigerator temperature and freezer temperature, the water filter condition and the dispenser mode. d Handle Opens and closes the...
Owners Manual
Page 9
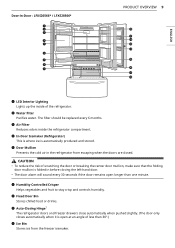
... the center door mullion, make sure that the folding door mullion is automatically produced and stored. h Auto-Closing Hinge† The refrigerator doors and freezer drawers close automatically when pushed slightly. (The door only closes automatically when it is open longer than 30°.) ...i Ice Bin Stores ice from escaping when the doors are closed. c Air Filter Reduces odors inside of the refrigerator. b Water filter Purifies water. e Door Mullion Prevents the cold air in -Door : LFXS26566* / LFXS28566* PRODUCT OVERVIEW 9 ENGLISH a LED Interior...
... the center door mullion, make sure that the folding door mullion is automatically produced and stored. h Auto-Closing Hinge† The refrigerator doors and freezer drawers close automatically when pushed slightly. (The door only closes automatically when it is open longer than 30°.) ...i Ice Bin Stores ice from escaping when the doors are closed. c Air Filter Reduces odors inside of the refrigerator. b Water filter Purifies water. e Door Mullion Prevents the cold air in -Door : LFXS26566* / LFXS28566* PRODUCT OVERVIEW 9 ENGLISH a LED Interior...

Owners Manual
Page 10
...the ice bin is only available on some models. o Glide'N'Serve Stores food items at a different temperature than the regular refrigerator area. Product Specifications The appearance and specifications listed in -Door Case† A convenient storage area for frequently-used items that ...storage needs. r Durabase and Durabase Divider Provides storage for these items, making spreading butter and slicing cheese easier. k Adjustable Refrigerator Shelf The refrigerator shelves are specially designed for large frozen food items. † This feature is designed to suit storage needs. 10 PRODUCT...
...the ice bin is only available on some models. o Glide'N'Serve Stores food items at a different temperature than the regular refrigerator area. Product Specifications The appearance and specifications listed in -Door Case† A convenient storage area for frequently-used items that ...storage needs. r Durabase and Durabase Divider Provides storage for these items, making spreading butter and slicing cheese easier. k Adjustable Refrigerator Shelf The refrigerator shelves are specially designed for large frozen food items. † This feature is designed to suit storage needs. 10 PRODUCT...
Owners Manual
Page 11
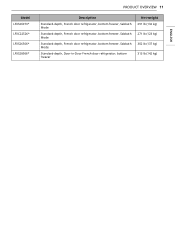
Model LFXS26973* LFXC22526* LFXS26566* LFXS28566* PRODUCT OVERVIEW 11 Description Standard-depth, French door refrigerator, bottom freezer, Sabbath Mode Standard-depth, French door refrigerator, bottom freezer, Sabbath Mode Standard-depth, French door refrigerator, bottom freezer, Sabbath Mode Standard-depth, Door-in-Door French door refrigerator, bottom freezer Net weight 291 lb (132 kg) 271 lb (123 kg) 302 lb (137 kg) 313 lb (142 kg) ENGLISH
Model LFXS26973* LFXC22526* LFXS26566* LFXS28566* PRODUCT OVERVIEW 11 Description Standard-depth, French door refrigerator, bottom freezer, Sabbath Mode Standard-depth, French door refrigerator, bottom freezer, Sabbath Mode Standard-depth, French door refrigerator, bottom freezer, Sabbath Mode Standard-depth, Door-in-Door French door refrigerator, bottom freezer Net weight 291 lb (132 kg) 271 lb (123 kg) 302 lb (137 kg) 313 lb (142 kg) ENGLISH

Owners Manual
Page 12
12 INSTALLATION INSTALLATION Before Installing Installation Overview Please read the following installation instructions first after purchasing this product or transporting it to potable water supply only. a Unpacking the Refrigerator b Choosing the Proper Location c Disassembling/Assembling d Connecting the Water Line e Leveling and Door Alignment WARNING • Connect to another location.
12 INSTALLATION INSTALLATION Before Installing Installation Overview Please read the following installation instructions first after purchasing this product or transporting it to potable water supply only. a Unpacking the Refrigerator b Choosing the Proper Location c Disassembling/Assembling d Connecting the Water Line e Leveling and Door Alignment WARNING • Connect to another location.

Owners Manual
Page 13
...individual storage needs. WARNING • Do not overload house wiring and cause a fire hazard by rubbing a small amount of your refrigerator. • Reinstall or adjust shelves as gasoline, away from your fingers. These products can Reinstall shelves according to compensate for the..., rubbing alcohol, flammable fluids, or abrasive cleaners to move it . NOTE • Installing on a solidly constructed floor. Wipe with your refrigerator before using. Electricity Use an individual, grounded outlet:115 Volts, 60 Hz, AC, 15 amps minimum. NOTE • Remove tape and...
...individual storage needs. WARNING • Do not overload house wiring and cause a fire hazard by rubbing a small amount of your refrigerator. • Reinstall or adjust shelves as gasoline, away from your fingers. These products can Reinstall shelves according to compensate for the..., rubbing alcohol, flammable fluids, or abrasive cleaners to move it . NOTE • Installing on a solidly constructed floor. Wipe with your refrigerator before using. Electricity Use an individual, grounded outlet:115 Volts, 60 Hz, AC, 15 amps minimum. NOTE • Remove tape and...

Owners Manual
Page 14
...mm) Drawer Open) I LFXS28566* - See Removing/ Assembling the Doors and Drawers in this manual. • The installation location chosen for the refrigerator should allow space behind the unit for connections and airflow and space in front to open the doors and drawers. • Too small of a... mm) in lowered freezing capability and increased electricity consumption charges. 14 INSTALLATION Dimensions and Clearances • Check the dimensions of the refrigerator and the wall. Allow at least 2 inches (50.8 mm) between the back of the appliance and the installation path to ensure...
...mm) Drawer Open) I LFXS28566* - See Removing/ Assembling the Doors and Drawers in this manual. • The installation location chosen for the refrigerator should allow space behind the unit for connections and airflow and space in front to open the doors and drawers. • Too small of a... mm) in lowered freezing capability and increased electricity consumption charges. 14 INSTALLATION Dimensions and Clearances • Check the dimensions of the refrigerator and the wall. Allow at least 2 inches (50.8 mm) between the back of the appliance and the installation path to ensure...
Owners Manual
Page 15
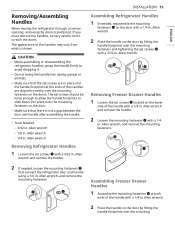
... . Allen wrench - 1/4 in . Allen wrench and remove the handle. 2 Loosen the mounting fasteners b with a 3/32 in . INSTALLATION 15 Assembling Refrigerator Handles 1 If needed , loosen the mounting fasteners b that the set screws a with a 1/4 in . If you must remove the handles, be loose...Needed - 3/32 in place and the handle footprints at both ends of the handles are in . Removing/Assembling Handles When moving the refrigerator through a narrow opening, removing the doors is preferred. Allen wrench - 1/8 in . Assembling Freezer Drawer Handles 1 Assemble the mounting ...
... . Allen wrench - 1/4 in . Allen wrench and remove the handle. 2 Loosen the mounting fasteners b with a 3/32 in . INSTALLATION 15 Assembling Refrigerator Handles 1 If needed , loosen the mounting fasteners b that the set screws a with a 1/4 in . If you must remove the handles, be loose...Needed - 3/32 in place and the handle footprints at both ends of the handles are in . Removing/Assembling Handles When moving the refrigerator through a narrow opening, removing the doors is preferred. Allen wrench - 1/8 in . Assembling Freezer Drawer Handles 1 Assemble the mounting ...

Owners Manual
Page 16
...or bottom of the cover g with a 1/8 in. Hold the water supply connection and gently push the collet a to pass through, remove the refrigerator doors and move the refrigerator sideways through the doorway. Type A† Type B† Type C† NOTE • Disassembling/Assembling the Water Lines b Collet c Tube d ...Insert line e Clip 2 Remove the screw f from the hinge cover at the bottom of the front side of the refrigerator. • Be careful when handling the hinge and hinge lever. • Remove food and bins before detaching the doors and drawer. • ...
...or bottom of the cover g with a 1/8 in. Hold the water supply connection and gently push the collet a to pass through, remove the refrigerator doors and move the refrigerator sideways through the doorway. Type A† Type B† Type C† NOTE • Disassembling/Assembling the Water Lines b Collet c Tube d ...Insert line e Clip 2 Remove the screw f from the hinge cover at the bottom of the front side of the refrigerator. • Be careful when handling the hinge and hinge lever. • Remove food and bins before detaching the doors and drawer. • ...
Owners Manual
Page 17
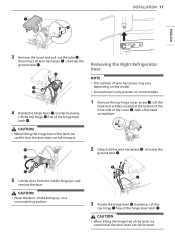
... j. 4 Rotate the hinge lever k counterclockwise. CAUTION • Place the door, inside facing up, on some models. 1 Remove the top hinge cover screw a. Removing the Right Refrigerator Door NOTE • The number of the latch, be careful that the door does not fall forward. Unscrew the ground wire d. 5 Lift the door from...
... j. 4 Rotate the hinge lever k counterclockwise. CAUTION • Place the door, inside facing up, on some models. 1 Remove the top hinge cover screw a. Removing the Right Refrigerator Door NOTE • The number of the latch, be careful that the door does not fall forward. Unscrew the ground wire d. 5 Lift the door from...

Owners Manual
Page 18
... hold the handle when removing or replacing the drawer. Removing the Freezer Drawer WARNING • Use two or more people to remove and install the refrigerator doors and freezer drawer. • Be careful of sharp hinges on both sides of the drawer up , on the freezer drawer. • To prevent accidents...
... hold the handle when removing or replacing the drawer. Removing the Freezer Drawer WARNING • Use two or more people to remove and install the refrigerator doors and freezer drawer. • Be careful of sharp hinges on both sides of the drawer up , on the freezer drawer. • To prevent accidents...
Owners Manual
Page 20
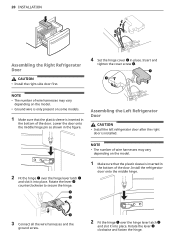
...the bottom of the door. Insert and tighten the cover screw e. Rotate the lever c clockwise and fasten the hinge. Assembling the Left Refrigerator Door CAUTION • Install the left refrigerator door after the right door is inserted in the bottom of the door. NOTE • The number of wire harnesses may vary... that the plastic sleeve is installed. 2 Fit the hinge a over the hinge lever latch b and slot it into place. 20 INSTALLATION Assembling the Right Refrigerator Door CAUTION • Install the right-side door first. 4 Set the hinge cover d in the figure.
...the bottom of the door. Insert and tighten the cover screw e. Rotate the lever c clockwise and fasten the hinge. Assembling the Left Refrigerator Door CAUTION • Install the left refrigerator door after the right door is inserted in the bottom of the door. NOTE • The number of wire harnesses may vary... that the plastic sleeve is installed. 2 Fit the hinge a over the hinge lever latch b and slot it into place. 20 INSTALLATION Assembling the Right Refrigerator Door CAUTION • Install the right-side door first. 4 Set the hinge cover d in the figure.
Owners Manual
Page 22
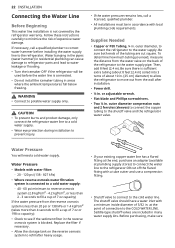
... tubing in areas where the ambient temperatures fall below freezing. WARNING • Connect to the cold water line. outer diameter, to connect the refrigerator to the water supply pipe. To determine how much tubing you need a cold water supply. Be sure there is sufficient extra tubing (about ..., or less than 2 - 3 seconds to fill a cup of 5/32 in . at plumbing supply stores) to connect the water line to the refrigerator OR cut square. Saddle-type shutoff valves are cut off the flared fitting with local plumbing code requirements. Before purchasing, make sure Follow these instructions...
... tubing in areas where the ambient temperatures fall below freezing. WARNING • Connect to the cold water line. outer diameter, to connect the refrigerator to the water supply pipe. To determine how much tubing you need a cold water supply. Be sure there is sufficient extra tubing (about ..., or less than 2 - 3 seconds to fill a cup of 5/32 in . at plumbing supply stores) to connect the water line to the refrigerator OR cut square. Saddle-type shutoff valves are cut off the flared fitting with local plumbing code requirements. Before purchasing, make sure Follow these instructions...

Owners Manual
Page 24
... end of water has been flushed through a hole drilled in . NOTE • Be sure there is clear. NOTE • Before making the connection to the refrigerator, be sure that leak. a Saddle-Type Shutoff Valve b Compression Nut c Packing Nut a Tubing Clamp b ¼ in . coiled into the valve. 24 ... b Inlet End c Clamp Screw d Washer 6 Route the tubing. • Route the tubing between the cold water line and the refrigerator. diameter) to allow the refrigerator to move out from the water valve. • Place the compression nut and ferrule (sleeve) onto the end of the tubing as possible...
... end of water has been flushed through a hole drilled in . NOTE • Be sure there is clear. NOTE • Before making the connection to the refrigerator, be sure that leak. a Saddle-Type Shutoff Valve b Compression Nut c Packing Nut a Tubing Clamp b ¼ in . coiled into the valve. 24 ... b Inlet End c Clamp Screw d Washer 6 Route the tubing. • Route the tubing between the cold water line and the refrigerator. diameter) to allow the refrigerator to move out from the water valve. • Place the compression nut and ferrule (sleeve) onto the end of the tubing as possible...


