

Owners Manual - English Spanish
Page 3
... the Preheat Alarm Light On/Off -- 2 TABLE OF CONTENTS TABLE OF CONTENTS 3 IMPORTANT SAFETY INSTRUCTIONS 9 PRODUCT OVERVIEW 9 Parts 9 Accessories 10 INSTALLATION 10 Installation Overview 10 Product Specifications 11 Before Installing the Range 12 Installing the Range 14 Connecting Electricity 18 Engaging the Anti-tip Device 18 Optional Rear Filler 19 Test Run 20 OPERATION...
... the Preheat Alarm Light On/Off -- 2 TABLE OF CONTENTS TABLE OF CONTENTS 3 IMPORTANT SAFETY INSTRUCTIONS 9 PRODUCT OVERVIEW 9 Parts 9 Accessories 10 INSTALLATION 10 Installation Overview 10 Product Specifications 11 Before Installing the Range 12 Installing the Range 14 Connecting Electricity 18 Engaging the Anti-tip Device 18 Optional Rear Filler 19 Test Run 20 OPERATION...
Owners Manual - English Spanish
Page 4
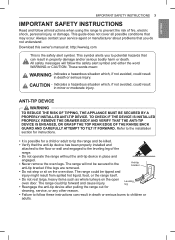
...SAFETY INSTRUCTIONS 3 IMPORTANT SAFETY INSTRUCTIONS Read and follow all possible conditions that you to potential hazards that the anti-tip device has been properly installed and attached to the floor or wall and engaged to the leveling leg of fire, electric shock, personal injury, or damage. Download this... owner's manual at: http://www.lg.com This is possible for cleaning, service, or any other reason. ••Failure to follow these instructions can result in death or ...
...SAFETY INSTRUCTIONS 3 IMPORTANT SAFETY INSTRUCTIONS Read and follow all possible conditions that you to potential hazards that the anti-tip device has been properly installed and attached to the floor or wall and engaged to the leveling leg of fire, electric shock, personal injury, or damage. Download this... owner's manual at: http://www.lg.com This is possible for cleaning, service, or any other reason. ••Failure to follow these instructions can result in death or ...
Owners Manual - English Spanish
Page 6
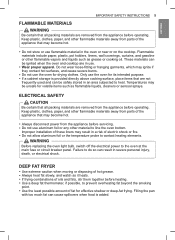
...;•Use extreme caution when moving or disposing of hot grease. ••Always heat fat slowly, and watch as grease or cooking oil. Improper installation of fat for its intended purpose. ••If a cabinet storage is added. These materials can be ignited when the oven and cooktop are in...
...;•Use extreme caution when moving or disposing of hot grease. ••Always heat fat slowly, and watch as grease or cooking oil. Improper installation of fat for its intended purpose. ••If a cabinet storage is added. These materials can be ignited when the oven and cooktop are in...
Owners Manual - English Spanish
Page 11
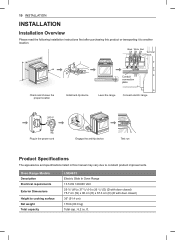
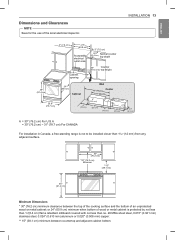
Black White Red Terminal block Check and choose the proper location Conduit connection plate Install anti-tip device Level the range Connect electric range 240 V Plug in the power cord Engage the anti-tip device Test run Product ...(W) x 37 7/8" (H) x 26 1/2" (D) (D with door closed) 75.7 cm (W) x 96 cm (H) x 67.3 cm (D) (D with door closed) 36" (91.4 cm) 176 lb (80.0 kg) Total cap.: 6.2 cu. 10 INSTALLATION INSTALLATION Installation Overview Please read the following installation instructions first after purchasing this manual may vary due to constant product improvements.
Black White Red Terminal block Check and choose the proper location Conduit connection plate Install anti-tip device Level the range Connect electric range 240 V Plug in the power cord Engage the anti-tip device Test run Product ...(W) x 37 7/8" (H) x 26 1/2" (D) (D with door closed) 75.7 cm (W) x 96 cm (H) x 67.3 cm (D) (D with door closed) 36" (91.4 cm) 176 lb (80.0 kg) Total cap.: 6.2 cu. 10 INSTALLATION INSTALLATION Installation Overview Please read the following installation instructions first after purchasing this manual may vary due to constant product improvements.
Owners Manual - English Spanish
Page 12
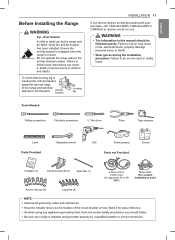
...range without the anti-tip bracket in fire, electrical shock, property damage, personal injury, or death. •• Wear gloves during the installation procedure. To check that leveling leg is moved. Warning •• The information in this manual should follow these instructions can result in CANADA... range is inserted into anti-tip bracket, grasp the top rear edge of the circuit breaker or fuse. Anti-tip bracket Leveling leg INSTALLATION 11 If you the location of the range and carefully attempt to receive one at no cost. Failure to follow . ••...
...range without the anti-tip bracket in fire, electrical shock, property damage, personal injury, or death. •• Wear gloves during the installation procedure. To check that leveling leg is moved. Warning •• The information in this manual should follow these instructions can result in CANADA... range is inserted into anti-tip bracket, grasp the top rear edge of the circuit breaker or fuse. Anti-tip bracket Leveling leg INSTALLATION 11 If you the location of the range and carefully attempt to receive one at no cost. Failure to follow . ••...

Owners Manual - English Spanish
Page 13
...; Do not use sharp instruments, rubbing alcohol, flammable fluids, or abrasive cleaners to remove tape or glue. Additional Installation Requirements The installation of this range is installed in a mobile home, it conforms to the standards listed above the range. Any method of securing the range is...This prevents overloading house wiring circuits which could cause a fire hazard from your range. Doing so can result in a mobile home installation. Remove packing material, tape and any warning-type labels, the model and serial number label, or the Tech Sheet that projects ...
...; Do not use sharp instruments, rubbing alcohol, flammable fluids, or abrasive cleaners to remove tape or glue. Additional Installation Requirements The installation of this range is installed in a mobile home, it conforms to the standards listed above the range. Any method of securing the range is...This prevents overloading house wiring circuits which could cause a fire hazard from your range. Doing so can result in a mobile home installation. Remove packing material, tape and any warning-type labels, the model and serial number label, or the Tech Sheet that projects ...
Owners Manual - English Spanish
Page 14
... cm) 4" (10 cm) 2.5" (6.3 cm) 5" (13 cm) 6" (15.2 cm) 9" (23 cm) 2.5" (6.3 cm) A = 30" (76.2 cm) For U.S.A = 30" (76.2 cm) ~ 31" (78.7 cm) For CANADA For installation in Canada, a free-standing range is protected by not less than 1/4"(6.4 cm) flame retardant millboard covered with not less than 15/32" (12 mm) from... the use of an unprotected wood or metal cabinet; or 24" (60.9 cm) minimum when bottom of wood or metal cabinet is not to be installed closer than no. 28 MSG sheet steel, 0.015" (0.381 mm) stainless steel, 0.024" (0.610 mm) aluminum or 0.020" (0.508 mm) copper. ** 15" (38...
... cm) 4" (10 cm) 2.5" (6.3 cm) 5" (13 cm) 6" (15.2 cm) 9" (23 cm) 2.5" (6.3 cm) A = 30" (76.2 cm) For U.S.A = 30" (76.2 cm) ~ 31" (78.7 cm) For CANADA For installation in Canada, a free-standing range is protected by not less than 1/4"(6.4 cm) flame retardant millboard covered with not less than 15/32" (12 mm) from... the use of an unprotected wood or metal cabinet; or 24" (60.9 cm) minimum when bottom of wood or metal cabinet is not to be installed closer than no. 28 MSG sheet steel, 0.015" (0.381 mm) stainless steel, 0.024" (0.610 mm) aluminum or 0.020" (0.508 mm) copper. ** 15" (38...

Owners Manual - English Spanish
Page 15
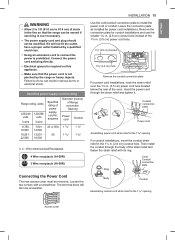
... wire conduit connections or 4 wire conduit connections. Use only a 3-conductor or a 4-conductor UL - Verify the anti-tip bracket has been installed. To check that leveling leg is moved. First check direction . If the level doesn't show level on the rack, adjust the leveling legs...This range requires a single-phase, 3 wire, A.C 120/208 V or 120/240 V 60 Hz electrical system. Then check direction . 14 INSTALLATION Installing the Anti-tip Device Warning Tip - Leveling the Range Level the range by a qualified technician in death or serious burns to Local and NEC ...
... wire conduit connections or 4 wire conduit connections. Use only a 3-conductor or a 4-conductor UL - Verify the anti-tip bracket has been installed. To check that leveling leg is moved. First check direction . If the level doesn't show level on the rack, adjust the leveling legs...This range requires a single-phase, 3 wire, A.C 120/208 V or 120/240 V 60 Hz electrical system. Then check direction . 14 INSTALLATION Installing the Anti-tip Device Warning Tip - Leveling the Range Level the range by a qualified technician in death or serious burns to Local and NEC ...
Owners Manual - English Spanish
Page 16
...Cord The rear access cover must be accessible. Conduit connection plate Power cord Assembling power cord strain relief at the 11/8" opening For conduit installations, insert the conduit strain relief in the 11/8 in. (2.8 cm) conduit hole. Connect the power cord and plug directly. •&#...the 13/8 in. (3.5 cm) power cord hole. 11/8" (2.8 cm) Conduit 13/8" (3.5 cm) Cord Remove the conduit connection plate For power cord installations, hook the strain relief over the 13/8 in. (3.5 cm) power cord hole located below the rear of Range connection Opening Power cord Conduit 8,750 -...
...Cord The rear access cover must be accessible. Conduit connection plate Power cord Assembling power cord strain relief at the 11/8" opening For conduit installations, insert the conduit strain relief in the 11/8 in. (2.8 cm) conduit hole. Connect the power cord and plug directly. •&#...the 13/8 in. (3.5 cm) power cord hole. 11/8" (2.8 cm) Conduit 13/8" (3.5 cm) Cord Remove the conduit connection plate For power cord installations, hook the strain relief over the 13/8 in. (3.5 cm) power cord hole located below the rear of Range connection Opening Power cord Conduit 8,750 -...
Owners Manual - English Spanish
Page 17
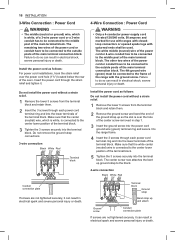
...lower position of the main terminal connection block. Insert the power cord through each power cord terminal ring and into the terminal block. Do not install the power cord without a strain relief. 1 Remove the lower 3 screws from the terminal block and retain them . 2 Remove the ground ...lugs with the ground screw. Do not remove the ground strap connections. 3-wire connection Black White Red Terminal block Install the power cord as follows: For power cord installations, hook the strain relief over the hole of the center screw removed in electrical shock, severe personal injury or...
...lower position of the main terminal connection block. Insert the power cord through each power cord terminal ring and into the terminal block. Do not install the power cord without a strain relief. 1 Remove the lower 3 screws from the terminal block and retain them . 2 Remove the ground ...lugs with the ground screw. Do not remove the ground strap connections. 3-wire connection Black White Red Terminal block Install the power cord as follows: For power cord installations, hook the strain relief over the hole of the center screw removed in electrical shock, severe personal injury or...
Owners Manual - English Spanish
Page 18
...Loosen the lower 3 screws from the terminal block. 2 Insert the bare wire (white/neutral) end through the center terminal block opening . Do not install the conduit without a strain relief. 2 Loosen the 2 lower left and right screws from the rear of the main terminal connection block. The center screw... Ground wire If screws are not tightened securely, it in the 11/8 in electrical spark and severe personal injury or death. For conduit installations, purchase a strain relief and insert it can result in place with the ground screw. Reinstall the bracket. Do not remove the ground ...
...Loosen the lower 3 screws from the terminal block. 2 Insert the bare wire (white/neutral) end through the center terminal block opening . Do not install the conduit without a strain relief. 2 Loosen the 2 lower left and right screws from the rear of the main terminal connection block. The center screw... Ground wire If screws are not tightened securely, it in the 11/8 in electrical spark and severe personal injury or death. For conduit installations, purchase a strain relief and insert it can result in place with the ground screw. Reinstall the bracket. Do not remove the ground ...
Owners Manual - English Spanish
Page 19
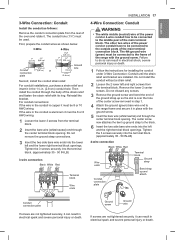
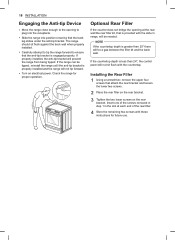
...range until the anti-tip bracket is provided with the slide in range, will not tip forward. •• Turn on the rear bracket. 18 INSTALLATION Engaging the Anti-tip Device •• Move the range close enough to the opening at each end of the rear filler. 4 Store the remaining... is greater than 24", the control panel will prevent the range from being tipped. The range should sit flush against the back wall when properly installed. •• Carefully attempt to tip the range forward to ensure that attach the rear bracket and loosen the lower two screws. 2 Place the rear...
...range until the anti-tip bracket is provided with the slide in range, will not tip forward. •• Turn on the rear bracket. 18 INSTALLATION Engaging the Anti-tip Device •• Move the range close enough to the opening at each end of the rear filler. 4 Store the remaining... is greater than 24", the control panel will prevent the range from being tipped. The range should sit flush against the back wall when properly installed. •• Carefully attempt to tip the range forward to ensure that attach the rear bracket and loosen the lower two screws. 2 Place the rear...
Owners Manual - English Spanish
Page 20
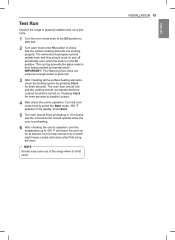
...it is preheating. 6 After checking the oven's operation, turn the temperature up to select the Bake mode. 350 °F appears in the Hi position. INSTALLATION 19 ENGLISH This cycling prevents the glass-ceramic from being cracked by pressing Clock for three seconds to glow red. 3 After checking all the surface... turned on for at least an hour to check that the surface heating elements are working properly. Test Run Check if the range is properly installed and run a test cycle. 1 Turn the oven mode knob to the Off position to start test. 2 Turn each knob to the Hi position ...
...it is preheating. 6 After checking the oven's operation, turn the temperature up to select the Bake mode. 350 °F appears in the Hi position. INSTALLATION 19 ENGLISH This cycling prevents the glass-ceramic from being cracked by pressing Clock for three seconds to glow red. 3 After checking all the surface... turned on for at least an hour to check that the surface heating elements are working properly. Test Run Check if the range is properly installed and run a test cycle. 1 Turn the oven mode knob to the Off position to start test. 2 Turn each knob to the Hi position ...
Owners Manual - English Spanish
Page 49
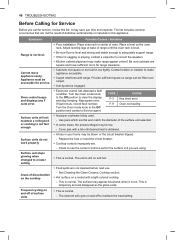
...your home may appear discolored when it is still on and hot. •• Food spillovers not cleaned before next use. - Contact builder or installer to make range appear unlevel. Cover pan with a light-colored cooktop. - This is not level. Reprogram oven. Use pans which are using. &#... tripped. - The list includes common occurrences that are built in center of surface units Possible Causes / Solutions •• Poor installation. The element will cycle on the oven rack. 48 TROUBLESHOOTING Before Calling for Service Before you call for service.
...your home may appear discolored when it is still on and hot. •• Food spillovers not cleaned before next use. - Contact builder or installer to make range appear unlevel. Cover pan with a light-colored cooktop. - This is not level. Reprogram oven. Use pans which are using. &#... tripped. - The list includes common occurrences that are built in center of surface units Possible Causes / Solutions •• Poor installation. The element will cycle on the oven rack. 48 TROUBLESHOOTING Before Calling for Service Before you call for service.
Owners Manual - English Spanish
Page 54
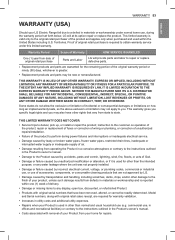
...when your Product is used for repairs. repair or replacement of fuses or correction of wiring or plumbing, or correction of unauthorized repairs/installation. •• Failure of incidental or consequential damages or limitations on operation of the original warranty period or ninety (90) days, ...state. THIS LIMITED WARRANTY DOES NOT COVER: •• Service trips to deliver, pick up, or install or repair the product; WARRANTY (USA) WARRANTY 53 ENGLISH Should your LG Electric Range fail due to a defect in materials or workmanship under this limited warranty. TO THE EXTENT...
...when your Product is used for repairs. repair or replacement of fuses or correction of wiring or plumbing, or correction of unauthorized repairs/installation. •• Failure of incidental or consequential damages or limitations on operation of the original warranty period or ninety (90) days, ...state. THIS LIMITED WARRANTY DOES NOT COVER: •• Service trips to deliver, pick up, or install or repair the product; WARRANTY (USA) WARRANTY 53 ENGLISH Should your LG Electric Range fail due to a defect in materials or workmanship under this limited warranty. TO THE EXTENT...
Owners Manual - English Spanish
Page 55
...have access to LG with published installation instructions, including LG's owner's and installation manuals. •• Damage resulting from misuse, abuse, improper installation, repair, or maintenance. The cost of the Product if it is installed in an inaccessible location or is not installed in accordance with... any questions or concerns at http://www.lg.com 54 WARRANTY •• The...
...have access to LG with published installation instructions, including LG's owner's and installation manuals. •• Damage resulting from misuse, abuse, improper installation, repair, or maintenance. The cost of the Product if it is installed in an inaccessible location or is not installed in accordance with... any questions or concerns at http://www.lg.com 54 WARRANTY •• The...
